mcsa mcse windows xp professional study guide 2nd phần 2 pdf
Bạn đang xem bản rút gọn của tài liệu. Xem và tải ngay bản đầy đủ của tài liệu tại đây (3.49 MB, 74 trang )
Choosing Automated Deployment Options
41
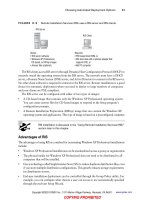
FIGURE 2.2
Remote Installation Services (RIS) uses a RIS server and RIS clients.
The RIS clients access RIS servers through Dynamic Host Configuration Protocol (DHCP) to
remotely install the operating system from the RIS server. The network must have a DHCP
server, a Domain Name System (DNS) server, and Active Directory to connect to the RIS server.
No other client software is required to connect to the RIS server. Remote installation is a good
choice for automatic deployment when you need to deploy to large numbers of computers
and your clients are PXE compliant.
The RIS server can be configured with either of two types of images:
A CD-based image that contains only the Windows XP Professional operating system.
You can create answer files for CD-based images to respond to the Setup program’s
configuration prompts.
A Remote Installation Preparation (RIPrep) image that can contain the Windows XP
operating system and applications. This type of image is based on a preconfigured computer.
RIS installation is discussed in the “Using Remote Installation Services (RIS)”
section later in this chapter.
Advantages of RIS
The advantages of using RIS as a method for automating Windows XP Professional installations
include:
Windows XP Professional installations can be standardized across a group or organization.
The physical media for Windows XP Professional does not need to be distributed to all
computers that will be installed.
Uses a technology called Single Instance Store (SIS) to reduce duplicate distribution files, even
if you store multiple distribution configurations. This greatly reduces storage requirements
for distribution servers.
End-user installation deployment can be controlled through the Group Policy utility. For
example, you can configure what choices a user can access or are automatically specified
through the end-user Setup Wizard.
RIS Server
RIS Client
Stores:
• RIS server software
• Windows XP Professional,
CD-based, or RIPrep images
• Answer files (optional)
Requires:
• PXE-based boot ROM, or
• RIS boot disk with a network adapter that
supports PXE, or
• Net PC computer
Simpo PDF Merge and Split Unregistered Version -
Copyright ©2003 SYBEX Inc., 1151 Marina Village Parkway, Alameda, CA 94501.
COPYING PROHIBITED
www.sybex.com
42
Chapter 2
Automating the Windows XP Installation
Disadvantages of RIS
The disadvantages of using RIS as a method for automating Windows XP Professional
installations include:
Can only be used if your network is running Windows 2000 Server or Windows Server
2003 with Active Directory installed.
The clients that use RIS must have a PXE-compliant network adapter or have a remote boot
disk that can be used with a PCI-compliant network adapter.
RIS images can be created only from the C: partition of a hard disk.
RIS can be used only for clean installations and can’t be used to upgrade a previous version
of Windows.
An Overview of the System Preparation Tool
and Disk Imaging
The System Preparation Tool (
Sysprep.exe
) is used to prepare a computer for disk imaging,
which can be done with a third-party image software or with disk-duplicator hardware.
Disk
imaging
(also sometimes called disk cloning or disk duplication) is the process of creating a
reference computer
for the automated deployment. The reference, or source, computer has
Windows XP Professional installed and is configured with the settings and applications that
should be installed on the target computers. An image is then created that can be transferred to
other computers, thus installing the operating system, settings, and applications that were defined
on the reference computer.
Using the System Preparation Tool and disk imaging is a good choice for automatic deployment
when you have the hardware that supports disk imaging and you have a large number of
computers with similar configuration requirements. For example, education centers that reinstall
the same software every week might use this technology.
To perform an unattended install, the System Preparation Tool prepares the reference computer
by stripping away the
security identifier (SID)
, which is used to uniquely identify each com-
puter on the network. The System Preparation Tool also detects any Plug and Play devices that
are installed and can adjust dynamically for any computers that have different hardware installed.
If you are using disk-duplicator hardware, you create a reference computer, then use the System
Preparation Tool to create the image. You would then remove the drive that has the disk image
and insert it into a special piece of hardware, called a disk duplicator, to copy the image. The
copied disks are inserted into the target computers. After you add the hard drive that contains
the disk image to the target computers, you can complete the installation from those computers.
Figure 2.3 illustrates the disk-imaging process. You can also copy disk images by using special
third-party software.
When the client computer starts an installation using a disk image, a Mini-Setup Wizard will
execute. You can customize what is displayed on the Windows Welcome screen and the options
that are displayed through the Mini-Setup Wizard process, which query for information such as
username or time zone selection. You can also create fully automated deployments with disk
imaging through the use of answer files.
Simpo PDF Merge and Split Unregistered Version -
Copyright ©2003 SYBEX Inc., 1151 Marina Village Parkway, Alameda, CA 94501.
COPYING PROHIBITED
www.sybex.com
Choosing Automated Deployment Options
43
FIGURE 2.3
Disk imaging with disk-duplicator hardware
You can also configure disk imaging so that the drive is not removed. The
reference computer is booted to an image boot disk. The image is labeled
and uploaded to a remote server. When the image is required, you boot the
computer with the image boot disk and download the selected image from
a menu.
The process for using the System Preparation Tool to create disk images is
covered in detail in the “Using the System Preparation Tool to Create Disk
Images” section later in this chapter.
Advantages of the System Preparation Tool
The advantages of using the System Preparation Tool as a method for automating Windows XP
Professional installations include:
For large numbers of computers with similar hardware, it greatly reduces deployment
time by copying the operating system, applications, and Desktop settings from a reference
computer to multiple cloned computers.
Using disk imaging facilitates the standardization of Desktops, administrative policies, and
restrictions throughout an organization.
Reference images can be copied across a network connection or through CDs that are
physically distributed to client computers.
By default, it does not perform full Plug and Play re-detection, which means that the Plug
and Play process that is run at the destination computer is greatly reduced (therefore, is
faster) compared to the standard Plug and Play detection process.
Disadvantages of the System Preparation Tool
The disadvantages of using the System Preparation Tool as a method for automating Windows
XP Professional installations include:
You must use either third-party imaging software or hardware disk-duplicator devices.
Duplicated
disk
Windows XP
Professional computer
Source
Windows XP
Professional computer
Target
Disk Duplicator
Simpo PDF Merge and Split Unregistered Version -
Copyright ©2003 SYBEX Inc., 1151 Marina Village Parkway, Alameda, CA 94501.
COPYING PROHIBITED
www.sybex.com
44
Chapter 2
Automating the Windows XP Installation
The Hardware Abstraction Layer (HAL) must be the same on the reference and target
computers.
Will not detect any hardware that is non–Plug and Play compliant.
If you use a CD to distribute the reference image, you will be limited to the capacity of the
CD (approximately 650MB).
Can only be used for clean installations and can’t be used to upgrade a previous version of
Windows.
Summary of Windows XP Professional Deployment Options
Table 2.1 summarizes the installation options for Windows XP Professional and notes the required
client hardware, server requirements, and whether the option supports clean install or upgrade.
TABLE 2.1
Summary of Windows XP Professional Installation Options
Attended
Installation
Unattended
Installation RIS
System
Preparation Tool
Required Client Hardware
PC that meets Win-
dows XP Professional
requirements
PC that meets Win-
dows XP Professional
requirements, access
to the network
PC that meets the
Windows XP Profes-
sional requirements
that is PXE-compliant
or uses a remote
boot disk with a PCI-
compliant network
adapter
Reference computer
with Windows XP
installed and config-
ured, PC that meets
the Windows XP
Professional require-
ments, third-party
disk imaging software
or hardware disk-
duplicator device
Required Server Hardware and Services
None None with CD; if
using network instal-
lation, distribution
server with \I386
folder
Windows 2000 Server
or Windows Server
2003 to act as a RIS
server with image
files, Active Directory,
DNS server, and DHCP
server
None
Clean Install or Upgrade Only
Clean install or
upgrade
Clean install or
upgrade
Clean install only Clean install only
Simpo PDF Merge and Split Unregistered Version -
Copyright ©2003 SYBEX Inc., 1151 Marina Village Parkway, Alameda, CA 94501.
COPYING PROHIBITED
www.sybex.com
Accessing the Windows XP Professional Deployment Tools
45
Table 2.2 summarizes the unattended installation tools and files that are used with automated
installations of Windows XP Professional, the associated installation method, and a description
of each tool.
Accessing the Windows XP Professional
Deployment Tools
The Windows XP Professional installation utilities and resources relating to automated
deployment are located in a variety of locations. Table 2.3 provides a quick reference for each
utility or resource and its location.
TABLE 2.2 Summary of Windows XP Professional Unattended Deployment Utilities
Tool or File Automated Installation Option Description
Winnt32.exe or
Winnt.exe
Unattended installation Program used to initiate the unattended
installation process
Unattend.txt Unattended installation Answer file used to customize
installation queries
Setupmgr.exe Unattended installation
RIS (Remote Installation Services)
Sysprep (Disk Duplication)
Setup Manager utility, used to create
and modify answer files and distribution
folders
Risetup.exe RIS Remote Installation Services Wizard,
used to create and configure a CD-
based Windows XP Professional image
to be used by the RIS server
Riprep.exe RIS Remote Installation Preparation Tool,
used to prepare a pre-installed and
configured Windows XP Professional
computer for disk imaging and then to
replicate the disk image to a RIS server
Rbfg.exe RIS Remote Boot File Generator utility,
used with RIS to create RIS boot disks
Sysprep.exe Sysprep (Disk Duplication) System Preparation Tool, prepares a
source reference computer that will
be used in conjunction with disk dupli-
cation through third-party software
or hardware disk-duplication devices
Simpo PDF Merge and Split Unregistered Version -
Copyright ©2003 SYBEX Inc., 1151 Marina Village Parkway, Alameda, CA 94501.
COPYING PROHIBITED
www.sybex.com
46
Chapter 2
Automating the Windows XP Installation
In Exercise 2.1, you will extract the Windows XP Deployment Tools.
TABLE 2.3 Location of Windows XP Professional Deployment Utilities and Resources
Utility Location
Winnt32.exe or Winnt.exe Windows XP Professional distribution CD, \I386 folder
Sysprep.exe Windows XP Professional distribution CD, \Support\Tools;
Sysprep.exe must be extracted from the Deploy.cab file
Setupmgr.exe Windows XP Professional distribution CD, \Support\Tools;
Setupmgr.exe must be extracted from the Deploy.cab file
RIS Server Included with Windows 2000 Server and Windows
Server 2003
Risetup.exe RIS Server
Riprep.exe RIS Server
Rbfg.exe \\RIS_Server\Reminst\Admin\I386\Rbfg.exe
EXERCISE 2.1
Extracting the Windows XP Deployment Tools
1. Log onto your Windows XP computer as Administrator.
2. Use Windows Explorer to create a folder named Deployment Tools on the root folder of
your C: drive.
3. Insert the Windows XP Professional CD. Using Windows Explorer, copy the \Support\
Tools\Deploy file (the .cab extension is hidden by default) to the C:\Deployment Tools
folder.
4. Double-click the Deploy.cab file to display its contents.
5. In Windows Explorer, select Edit Select All. Then select File Extract.
6. The Select a Destination dialog box appears. Select My Computer, Local Disk (C:), and then
Deployment Tools. Click the Extract button to extract the files to the specified folder.
7. Verify that the Deployment Tools were extracted to C:\Deployment Tools. There should
be 11 items (including the Deploy.cab file).
Simpo PDF Merge and Split Unregistered Version -
Copyright ©2003 SYBEX Inc., 1151 Marina Village Parkway, Alameda, CA 94501.
COPYING PROHIBITED
www.sybex.com
Deploying Unattended Installations
47
Deploying Unattended Installations
You can deploy Windows XP Professional installations or upgrades through the Window XP
Professional distribution CD or a distribution server that has a network share of the \I386
folder. Using a CD can be advantageous if the computer you are installing Windows XP on
is not connected to the network or is connected via a low-bandwidth network. It is also typically
faster to install Windows XP Professional from CD than to use a network connection. The
drawback to using a CD for unattended installation is that the answer file (winnt.sif) must
be located on a floppy disk.
Unattended installations rely on command-line switches used with the Winnt32 or Winnt
command-line utilities, along with answer files, to deploy Windows XP Professional. Answer
files are text files that contain the settings that are typically supplied by the installer during
attended installations of Windows XP Professional. Answer files can also contain instructions
for how programs and applications should be run.
You will learn more about answer files in the section “Using Setup Manager to
Create Answer Files” later in this chapter.
You run Winnt32 to install or upgrade to Windows XP Professional from computers that are
running Windows 98, Windows Me, Windows NT 4 Workstation, Windows 2000 Professional,
or Windows XP Home Edition. You would run Winnt from all other operating systems.
Typically, when you run Winnt32 or winnt in unattended mode, you use the following syntax.
Winnt32 /unattend:answerfile
The Winnt32 command-line utility has a wide range of switches that can be applied, many
of which are used with unattended installations. Each Winnt32 switch is described in Table 2.4.
TABLE 2.4 Winnt32 Command-Line Switches and Descriptions
Winnt32 Switch Description
/checkupgradeonly Does not install or upgrade to Windows XP Professional. Used
to check the current operating system for upgrade compatibility
with the hardware and software that is currently installed and
will be upgraded to Windows XP Professional.
/cmd:command line Allows you to specify that a command should be executed
before the GUI mode of setup is complete. This option is typically
used with cmdlines.txt to specify what applications should be
installed on the computer before the Setup phase of Windows
XP Professional is complete.
/cmdcons Used to support the Recovery Console for repair of failed
installations.
Simpo PDF Merge and Split Unregistered Version -
Copyright ©2003 SYBEX Inc., 1151 Marina Village Parkway, Alameda, CA 94501.
COPYING PROHIBITED
www.sybex.com
48
Chapter 2
Automating the Windows XP Installation
/copydir:folder name Used to create customized subfolders that can be used with
the Windows XP Professional installation. For example, if your
computer contains hardware that does not have drivers on the
Windows XP distribution CD, you can create a custom folder
called \Custom Drivers that contains the custom driver files.
/copysource:folder name Used to create a temporary subfolder for Windows XP Professional
files to be used during the installation process. Once the installa-
tion process is complete, the folders created with this process are
deleted. If you use the \copydir option, the folder is not deleted.
/debug:[level ]
[filename]
Used to create debugging files, which are used in troubleshooting.
Level specifies the amount of detail that will be included in the
log file, and file name specifies the filename that will be created.
/dudisable Used to prevent dynamic update from running during the
installation process.
/duprepare:pathname Used to prepare a network share that will be used to provide
dynamic update files to clients installing Windows XP Professional.
/dushare:pathname Specifies the installation share to be used with dynamic update
files that have been downloaded from the Windows Update
website. The dynamic updates are then accessed from a net-
work connection, rather than an Internet connection, during
the installation process.
/m:folder name Used with Setup to specify that replacement files should be
copied from the specified location. If the files are not present,
then Setup will use the default location.
/makelocalsource Copies the installation files to a local hard disk. Used if the CD
will not be available for the entire installation process.
/noreboot Normally, when the file copy phase of Winnt32 is complete,
the computer restarts. This option specifies that the computer
should not restart so that you can execute another command
prior to the restart.
/s:sourcepath By default, the installation process looks for the Windows XP
Professional installation files in the current folder. This option
allows you to specify the source location for the Windows XP
Professional installation files. You can use this option to specify
up to eight sources, which allows you to simultaneously copy
files from multiple servers.
TABLE 2.4 Winnt32 Command-Line Switches and Descriptions (continued)
Winnt32 Switch Description
Simpo PDF Merge and Split Unregistered Version -
Copyright ©2003 SYBEX Inc., 1151 Marina Village Parkway, Alameda, CA 94501.
COPYING PROHIBITED
www.sybex.com
Using Remote Installation Services (RIS)
49
Using Remote Installation Services (RIS)
You can remotely install Windows XP Professional through RIS. A variety of installation
options are available through the Windows XP Client Installation Wizard (CIW). For RIS
installation, you need a RIS server that stores the Windows XP Professional operating system
files in a shared image folder, and clients that can access the RIS server. Depending on the type
of image you will distribute, you may also want to configure answer files so that users need
not respond to any Windows XP Professional installation prompts. (Answer files are described
in the “Using Setup Manager to Create Answer Files” section of this chapter.)
Following are some of the advantages of using RIS for automated installation:
You can remotely install Windows XP Professional.
/syspart:drive letter Used to copy the Setup startup files to a hard disk and mark
the disk as active for installation into another computer. When
you start the computer that the disk has been moved to, Setup
will automatically start at the next phase. This option must be
used with the /tempdrive option, and both the /syspart and
the /tempdrive options must specify the same partition on the
secondary hard disk.
/tempdrive:drive letter Specifies the location that will be used to store the temporary
files for Windows XP Professional and the installation partition
for Windows XP Professional. This option must be used with the
/syspart option.
/udf:ID, UDB file Used by the Setup program to specify how a Uniqueness
Database file (UDB) will be used to modify an answer file. UDF
settings override any conflicting settings specified through an
answer file.
/unattend Used to upgrade a previous version of Windows using unat-
tended installation. This option automatically uses Windows
Update and preserves all user settings from the previous instal-
lation. When this option is specified, an upgrade requires no
user intervention.
/unattend:seconds
:answerfile
Specifies that you will be using an unattended installation for
Windows XP Professional. The seconds variable specifies the
number of seconds that Windows will wait between finishing
the file copy and restarting the computer. The answer file vari-
able points to the custom answer file you will use for installation.
TABLE 2.4 Winnt32 Command-Line Switches and Descriptions (continued)
Winnt32 Switch Description
Simpo PDF Merge and Split Unregistered Version -
Copyright ©2003 SYBEX Inc., 1151 Marina Village Parkway, Alameda, CA 94501.
COPYING PROHIBITED
www.sybex.com
50
Chapter 2
Automating the Windows XP Installation
The procedure simplifies management of the server image by allowing you to access
Windows XP distribution files and use Plug and Play hardware detection during the
installation process.
You can quickly recover the operating system in the event of a computer failure.
Windows XP security is retained when you restart the destination computer. Here are the
basic steps of the RIS process:
1. The RIS client initiates a special boot process through the PXE network adapter (and the
computer’s BIOS configured for a network boot), or through a special RIS boot disk. On
a PXE client, the client presses F12 to start the PXE boot process, and to indicate that they
want to perform a RIS installation.
2. The client computer sends out a DHCP discovery packet that requests an IP address for the
client and the IP address of a RIS server (running Windows 2000 Server or Windows
Server 2003). Within the discovery packet, the client also sends its Globally Unique Identifier
(GUID). The GUID is a unique 32-bit address that is used to identify the computer account
as an object within the Active Directory.
3. If the DHCP server and the RIS server are on the same computer, the information requested
in the discovery packet is returned. If the DHCP server and the RIS server are on separate
networks, the DHCP server will return the client information for IP configuration. Then the
client will send out another broadcast to contact the RIS server.
4. The client contacts the RIS server using the Boot Information Negotiation Layer (BINL)
protocol. The RIS server contacts Active Directory to see if the client is a “known client”
and whether it has already been authorized (also called pre-staged) through Active
Directory. The authorization process is discussed later in this section.
5. If the client is authorized to access the RIS server, BINL provides to the client the location
of the RIS server and the name of the bootstrap image (enough software to get the client
to the correct RIS server).
6. The RIS client accesses the bootstrap image via the Trivial File Transfer Protocol (TFTP),
and the Windows XP Client Installation Wizard (CIW) is started.
7. The RIS client is prompted for a username and password that can be used to log onto the
Windows 2000 or Windows 2003 domain that contains the RIS server.
8. Depending on the user or group credentials, the user sees a menu offering the operating
systems (images) that can be installed. The user sees only the options for the installs
determined by the parameters defined on the RIS server.
The following sections describe how to set up the RIS server and the RIS clients, and how to
install Windows XP Professional through RIS.
RIS Client Options
RIS offers several client installation options. This allows administrators to customize remote
installations based on organizational needs. When the client accesses the Windows XP Client
Installation Wizard (CIW), they see the installation options that have been defined by the
Simpo PDF Merge and Split Unregistered Version -
Copyright ©2003 SYBEX Inc., 1151 Marina Village Parkway, Alameda, CA 94501.
COPYING PROHIBITED
www.sybex.com
Using Remote Installation Services (RIS)
51
administrator. Remote installation options include the following:
Automatically setting up the computer When you automatically set up the computer, the user
sees a screen indicating which operating system will be installed but is not prompted for any
configuration settings. If only one operating system is offered, the user does not even have to
make any selections and the entire installation process is automatic.
Customizing the setup of the computer If you configure RIS to support customizing the setup of
the computer, then Administrators who install computers within the enterprise can override the RIS
settings to specify the name and location of the computer being installed within Active Directory.
Restarting a previous setup attempt The option to restart a previous setup attempt is used
when a remote installation fails prior to completion. The operating system installation will
restart when this option is selected from the CIW.
Performing maintenance or troubleshooting The maintenance and troubleshooting option
provides access to third-party troubleshooting and maintenance tools. Examples of tasks that
can be completed through this option include updating flash BIOS and using PC diagnostic tools.
Preparing the RIS Server
The RIS server is used to manage and distribute the Windows XP Professional operating system
to RIS client computers. As explained earlier in this chapter, RIS servers can distribute CD-based
images (created with the Risetup.exe utility) or images created from a reference Windows XP
computer, called RIPrep images (created with the Riprep.exe utility). A CD-based image
contains the operating system installation files taken directly from the Windows XP Professional
CD and can be customized for specific computers through the use of answer files. RIPrep
images are based on a pre-configured computer and can contain applications as well as the
operating system. RIPrep.exe is used to deploy these images to target computers.
The RIS server is configured to specify how client computers will be installed and config-
ured. The Administrator can configure the following options for client computers:
Define the operating system installation options that will be presented to the user. Based on
access permissions from Access Control Lists (ACLs), Administrators can define several
installation options, and then allow specific users to select an option based on their specific
permissions.
Define an automatic client-computer naming format, which bases the computer name on
a custom naming format. For example, the computer names might be a combination of
location and username.
Specify the default Active Directory location for client computers that are installed through
remote installation.
Pre-stage client computers through Active Directory so that only authorized computers can
access the RIS server. This option requires a specified computer name, a default Active
Directory location, and identification of RIS servers and the RIS clients they will service.
Authorize RIS servers so that unauthorized RIS servers can’t offer RIS services to clients.
Create and modify the RIS answer file.
Simpo PDF Merge and Split Unregistered Version -
Copyright ©2003 SYBEX Inc., 1151 Marina Village Parkway, Alameda, CA 94501.
COPYING PROHIBITED
www.sybex.com
52
Chapter 2
Automating the Windows XP Installation
The following steps for preparing the RIS server are discussed in the sections coming up:
1. Make sure that the server meets the requirements for running RIS.
2. Install RIS.
3. Configure and start RIS, using either a CD-based image or a RIPrep image.
4. Authorize the RIS server through DHCP Manager.
5. Grant users who will perform RIS installations the user right to create computer accounts.
6. Grant users who will perform the RIS installation the Log On as a Batch Job user right.
7. Configure the RIS server to respond to client computers (if this was not configured when
RIS was installed).
8. Configure RIS template files (if you wish to customize installation options for different
computers or groups).
There is a hands-on exercise to create a RIS server in MCSE: Windows 2000
Server Study Guide, 2nd edition, by Lisa Donald with James Chellis (Sybex, 2001)
Meeting the RIS Server Requirements
For RIS to work, the computer acting as the RIS server must be a Windows 2000 Server or Win-
dows Server 2003 domain controller or member server. The server on which you will install RIS
must meet the hardware requirements for RIS and be able to access the required network services.
Hardware Requirements
The RIS server must meet the following hardware requirements:
Pentium 133MHz or higher minimum processor and a minimum of 128MB of memory for
Windows 2000 Server or Windows Server 2003.
At least two disk partitions, one for the operating system and one for RIS images. The
partition that will hold the RIS images should be at least 2GB and formatted as NTFS.
A network adapter installed.
If you are deploying Windows XP Professional RIPrep images from Windows
2000 RIS servers, the Remote Installation Preparation Tool Update must be
installed. You can access this update on the Microsoft website.
Network Services
The following network services must be running on the RIS server or be accessible to the RIS
server from another network server:
TCP/IP, installed and configured.
A Dynamic Host Configuration Protocol (DHCP) server, which is used to assign DHCP
addresses to RIS clients. (Make sure that your DHCP scope has enough addresses to
accommodate all the RIS clients that will need IP addresses.)
Simpo PDF Merge and Split Unregistered Version -
Copyright ©2003 SYBEX Inc., 1151 Marina Village Parkway, Alameda, CA 94501.
COPYING PROHIBITED
www.sybex.com
Using Remote Installation Services (RIS)
53
A Domain Name System (DNS) server, which is used to locate the Active Directory controller.
Active Directory, which is used to locate RIS servers and RIS clients, as well as to authorize
RIS clients and manage RIS configuration settings and client installation options.
Installing the RIS Server
You add the RIS server components through the Add/Remove Programs icon in Control Panel.
To install the components on a RIS server running Windows 2000 Server, take the following steps:
1. Select Start Programs Administrative Tools Configure Your Server.
2. The Windows 2000 Configure Your Server dialog box appears. Click the Advanced option
in the panel on the left, and select Optional Components.
3. Click the Start the Windows Components Wizard option.
4. When the wizard starts, select the Remote Installation Services option and click the Next button.
5. The Insert Disk dialog box prompts you to insert the Windows 2000 Server CD so that the
proper files can be copied. Insert the CD and click the OK button.
6. After the process is complete, you’ll see the Completing the Windows Components Wizard
dialog box. Click the Finish button.
7. When you see the System Settings Change dialog box, click the Yes button to restart your
computer.
As part of the RIS installation, the following services are loaded on the server (these services
are required for the RIS server to function properly):
BINL The Boot Information Negotiation Layer (BINL) protocol is used to respond to client
requests for DHCP and the CIW.
SIS The Single Instance Store (SIS) manages duplicate copies of images by replacing duplicate
images with a link to the original files. The main purpose of this service is to reduce disk space
that is used.
SIS Groveler The SIS Groveler service scans the SIS volume for files that are identical. If identical
files are found, this service creates a link to the duplicate files instead of storing duplicate files.
TFTP The Trivial File Transfer Protocol (TFTP) is a UDP-based file transfer protocol that is
used to download the CIW from the RIS server to the RIS clients.
Configuring and Starting RIS with a CD-Based Image
After you have the RIS server components installed on the RIS server, you can use the Risetup
utility to configure the RIS installation. This utility performs the following actions:
Locates an NTFS partition that will be used to store the remote image(s)
Creates the directory structure that will be used for the remote images
Copies all the files that are required to install Windows XP Professional
Copies the Client Installation Wizard files and screens
Configures the Remote Installation Service
Simpo PDF Merge and Split Unregistered Version -
Copyright ©2003 SYBEX Inc., 1151 Marina Village Parkway, Alameda, CA 94501.
COPYING PROHIBITED
www.sybex.com
54
Chapter 2
Automating the Windows XP Installation
Starts the services that are required by RIS, which include BINL, TFTP, and the SIS Groveler
service
Creates a share named Reminist that provides the share for the root of the RIS directory
structure
Creates the appropriate IntelliMirror management Service Control Point (SCP) object that
is used within Active Directory to support RIS
Creates the SIS common store directory and the related files that are required to support SIS
on the RIS server
With RIS installed, you can configure the RIS server through the following steps:
1. Select Start Run, type Risetup in the Run dialog box, and click the OK button.
2. When the Remote Installation Services Setup Wizard starts, click the Next button to continue.
3. The Remote Installation Folder Location dialog box appears next. The remote installation
folder must be on an NTFS version 3.0 (or later) partition and must not reside on the same
partition as the system or boot partition. Specify the path of the remote installation folder
and click the Next button.
4. Next up is the Initial Settings dialog box. Here you configure client support during server
configuration. You can specify that the server should respond to client computers requesting
service, and that the server should not respond to unknown client computers. You can
select one or both options, or leave them both unchecked and configure client support later.
Make your selection(s) and click the Next button.
5. In the Installation Source Files Location dialog box that appears next, specify the location
of the Windows XP Professional distribution files and click the Next button.
6. In the Windows Installation Image Folder Name dialog box, specify the name of the folder
to be used for the Windows XP Professional distribution files and click the Next button.
7. The Friendly Description and Help Text dialog box appears next. Here you specify a
friendly name and help text to help users select the Windows installation image. Enter
a name and text, and click Next to continue.
8. The Review Settings dialog box appears next, where you confirm your installation choices.
If all of the settings are correct, click the Finish button.
9. The installation files will be copied, which can take several minutes. When the process is
complete, click the Done button.
Configuring and Starting RIS with a RIPrep Image
The Remote Installation Preparation Tool (Riprep.exe) is used to prepare a pre-installed and
configured Windows XP Professional computer for disk imaging and then to replicate the
disk image to a RIS server. In addition to containing the Windows XP operating system, the disk
image can include applications and customized configuration settings. In order to use a
RIPrep image, the reference computer must have Windows XP Professional and all of the
applications that will be imaged located on the C: drive prior to running the RIPrep utility.
The HAL for the imaged computer and the target computers must match. For example, you
could not apply an ACPI-based HAL on a non-ACPI-based computer. For other hardware
Simpo PDF Merge and Split Unregistered Version -
Copyright ©2003 SYBEX Inc., 1151 Marina Village Parkway, Alameda, CA 94501.
COPYING PROHIBITED
www.sybex.com
Using Remote Installation Services (RIS)
55
differences, the RIPrep wizard will use Plug and Play capabilities to detect any hardware differences
between the source and destination computers.
You would take the following steps to create a RIS image:
1. Install the Windows XP Professional operating system and any applications that will be
used for the RIPrep image on a reference computer.
2. From the reference computer, attach to the RIS server and run Riprep.exe. This will start
the Remote Installation Preparation Wizard.
3. You will be prompted to specify the name of the RIS Server, the folder location that will
store the RIPrep image, and a description for the RIPrep image.
4. The image preparation process will begin and the image will be copied to the RIS server.
Authorizing the RIS Server through DHCP Manager
For a RIS server to respond to client requests, the DHCP server must be authorized through the
Active Directory. By authorizing DHCP servers, you ensure that rogue DHCP servers do not
assign client IP addresses.
You’ll learn more about DHCP in Chapter 10, “Managing Network Connections.”
To authorize the DHCP server on Windows 2000 Server, take the following steps:
1. Select Start Programs Administrative Tools DHCP.
2. In the left pane of the DHCP window, right-click your DHCP server. From the pop-up
menu, select Authorize, as shown in Figure 2.4.
FIGURE 2.4 Authorizing a DHCP server
Simpo PDF Merge and Split Unregistered Version -
Copyright ©2003 SYBEX Inc., 1151 Marina Village Parkway, Alameda, CA 94501.
COPYING PROHIBITED
www.sybex.com
56
Chapter 2
Automating the Windows XP Installation
3.
Close the DHCP console.
To authorize a RIS server, use this same process.
Granting the User Right to Create Computer Accounts
To install an image using RIS, users must have the user right to create a computer account in
the Active Directory. You can specify that users can create accounts anywhere in the domain,
or that users can create computer accounts only in specific organizational units.
To grant the user right to create computer accounts, take the following steps on a Win-
dows 2000 Server:
1. Select Start Programs Administrative Tools Active Directory Users and
Computers.
2. The Active Directory Users and Computers window appears, as shown in Figure 2.5.
Right-click the domain or organizational unit where you want to allow users to create
computer accounts and select Delegate Control from the pop-up menu.
FIGURE 2.5 The Active Directory Users and Computers window
3. The Delegation of Control Wizard starts. Click the Next button to continue.
4. In the Users or Groups dialog box (Figure 2.6), click the Add button.
5. The Select Users, Computers, or Groups dialog box appears next, as shown in Figure 2.7.
Select the users or groups that will use RIS to install Windows XP Professional, click
the Add button, and click OK.
6. When you return to the Users or Groups dialog box, click the Next button to continue.
7. In the Tasks to Delegate dialog box, select the check box Join a Computer to the Domain
and then click the Next button.
Simpo PDF Merge and Split Unregistered Version -
Copyright ©2003 SYBEX Inc., 1151 Marina Village Parkway, Alameda, CA 94501.
COPYING PROHIBITED
www.sybex.com
Using Remote Installation Services (RIS)
57
FIGURE 2.6 The Users or Groups dialog box
FIGURE 2.7 The Select Users, Computers, or Groups dialog box
8. In the Completing the Delegation of Control dialog box, verify that all the configuration
options are correct and click the Finish button.
9. Close the Active Directory Users and Computers window.
Simpo PDF Merge and Split Unregistered Version -
Copyright ©2003 SYBEX Inc., 1151 Marina Village Parkway, Alameda, CA 94501.
COPYING PROHIBITED
www.sybex.com
58
Chapter 2
Automating the Windows XP Installation
Active Directory is covered in detail in MCSE: Windows 2000 Directory Ser-
vices Administration Study Guide, 2nd ed., by Anil Desai with James Chellis
(Sybex, 2001).
Granting the User Right to Log On as a Batch Job
The user account that will perform the remote installation must have the user right that
allows logging on as a batch job. By default, the Administrators group does not have this user
right. To assign the Log On as a Batch Job user right on a Windows 2000 Server, take the
following steps:
1. Log on as Administrator and add the Group Policy snap-in to the MMC administrator
console. (The MMC and snap-ins are covered in Chapter 4, “Configuring the Windows XP
Environment.” Adding the Group Policy snap-in and assigning user rights are covered in
Chapter 7, “Managing Security.”)
2. Select Local Computer Policy Computer Configuration Windows Settings Security
Settings Local Policies User Rights Assignment.
3. Double-click the Log On as a Batch Job user right.
4. The Local Security Policy Setting dialog box appears. Click the Add button.
5. The Select Users or Groups dialog box appears. Click the user or group to which you want
to assign this permission, click the Add button, and then click the OK button.
6. You will return to the Local Security Policy Setting dialog box. Click the OK
button.
Configuring the RIS Server to Respond to Client Requests
The RIS server must be configured to respond to client requests. You can configure the server
response as a part of the RIS server installation or do it later, after the RIS server is installed and
ready for client requests. Take the following steps to configure the RIS server on a Windows 2000
Server to respond to client requests:
1. Select Start Programs Administrative Tools Active Directory Users and
Computers.
2. The Active Directory Users and Computers window appears. Expand your domain and
select Computers or Domain Controllers to access the computer that acts as your RIS
server. Right-click the RIS server, and select Properties from the pop-up menu.
3. In the computer’s Properties dialog box, select the Remote Install tab to see the dialog box
shown in Figure 2.8.
4. Check the Respond to Client Computers Requesting Service check box. Click the OK
button.
5. Close the Active Directory Users and Computers window.
Simpo PDF Merge and Split Unregistered Version -
Copyright ©2003 SYBEX Inc., 1151 Marina Village Parkway, Alameda, CA 94501.
COPYING PROHIBITED
www.sybex.com
Using Remote Installation Services (RIS)
59
FIGURE 2.8 The Remote Install tab of the computer’s Properties dialog box
Using RIS Template Files
RIS template files are used to specify the installation parameters for your client computers. When
you use the Risetup utility, a standard template called Ristndrd.sif is automatically created,
which acts as the answer file. You can have as many template files as you need to perform custom
installations for different computers, or for groups that require custom configurations such as
Sales and Marketing. Template files must have a .sif filename extension. The Ristndrd.sif
template can also be configured with the description that will be displayed during the CIW
when the user is presented with a menu or operating system images to select from.
Preparing the RIS Client
The RIS client is the computer on which Windows XP Professional will be installed. RIS clients rely
on a technology called PXE (Pre-boot eXecution Environment), which allows the client computer
to remotely boot and connect to a RIS server.
To act as a RIS client, the computer must meet all the hardware requirements for Windows
XP Professional (see Chapter 1) and have a network adapter installed. In addition, the RIS
client must support one of the following configurations:
Use a PXE-based boot ROM (a boot ROM is a special chip that uses read-only memory)
with a BIOS that supports starting the computer with the PXE-based boot ROM (as
opposed to booting from the hard disk).
Simpo PDF Merge and Split Unregistered Version -
Copyright ©2003 SYBEX Inc., 1151 Marina Village Parkway, Alameda, CA 94501.
COPYING PROHIBITED
www.sybex.com
60
Chapter 2
Automating the Windows XP Installation
Follow the Net PC/PC 98 standard for PCs, which uses industry-standard components
for the computer. This includes processor, memory, hard disk, video, audio, and an inte-
grated network adapter and modem, in a locked case with limited expansion capabilities.
The primary advantages of Net PCs are that they are less expensive to purchase and to
manage.
Have a network adapter that supports PXE and that can be used with a RIS boot disk. The
only network adapters that can be used with RIS boot disks are the network adapters that
are displayed when running the RBFG.exe utility. If your network adapter is not on the list,
ensure that you have the most current RBFG.exe utility, since Microsoft makes updates
and adds drivers to this utility periodically. You can obtain updates through Windows
Update or Service Packs.
If the client computer does not have a network adapter that contains a PXE-based boot ROM,
then you can use a RIS boot disk to simulate the PXE startup process. The PXE-based boot
disk is used to provide network connectivity to the RIS server. In order to use a RIS boot disk,
the client computer must use a PCI-compliant network adapter.
If your client uses PCMCIA or ISA network adapters, there is no support to use
RIS boot disks.
To create a RIS boot disk, take the following steps:
1. On a Windows XP Professional computer that is connected to the same network as the RIS
server, select Start Run. In the Run dialog box, type the following command and click
the OK button:
\\RIS_Server\Reminst\Admin\I386\Rbfg.exe
2.
The Windows XP Remote File Generator dialog box appears. Insert a blank floppy disk
in your computer, select the appropriate destination drive, select the installed network card
from the Adapter List, and click the Create Disk button. The network adapter must be
on the list of those shown when running the RBFG.exe utility. When the disk is made, it will
support any and all of these network adapters.
3. You see a message verifying that the boot floppy was created and asking whether you want
to create another disk. You can click Yes and repeat the procedure to create another boot
disk, or click No. After you are finished creating RIS boot disks, click the Close button.
Installing Windows XP Professional through RIS
After the RIS server has been installed and configured, you can install Windows XP Professional
on a RIS client that uses either a PXE-compliant network card or a RIS boot disk with a network
card that supports PXE.
To install Windows XP Professional on the RIS client, take the following steps:
1. Start the computer. When prompted, press F12 for a network service boot.
2. The Client Installation Wizard starts. Press Enter to continue.
Simpo PDF Merge and Split Unregistered Version -
Copyright ©2003 SYBEX Inc., 1151 Marina Village Parkway, Alameda, CA 94501.
COPYING PROHIBITED
www.sybex.com
Using the System Preparation Tool to Create Disk Images
61
3. The Windows XP Logon dialog box appears. Specify the domain to which you will log on,
and enter a valid domain username and password.
4. A menu appears with the options Automatic Setup, Custom Setup, Restart a Previous Setup
Attempt, and Maintenance and Troubleshooting. Select Automatic Setup.
If you have only one RIS image, it will automatically be installed. If you have multiple RIS
images, the user will see a menu of RIS images. After you select a RIS image, the remote
installation process will start. What happens next depends on the image type and whether you
have configured answer files.
Using the System Preparation Tool
to Create Disk Images
You can use disk images to install Windows XP Professional on several computers that have
the same configuration. Also, if a computer is having technical difficulties, you can use a disk
image to quickly restore it to a baseline configuration.
To create a disk image, you install Windows XP Professional on the source computer with
the configuration that you want to copy. The source computer’s configuration should also
include any applications that should be installed.
Once you have your source computer configured, you use the System Preparation Tool
(Sysprep.exe) to prepare the disk image for disk duplication. After you’ve created the disk
image, you can copy the image to destination computers through third-party software or
through hardware disk duplication.
Preparing for Disk Duplication
To use a disk image, the source and target computers must meet the following requirements:
Both the source and destination computers must be able to use the same hard-drive
controller driver.
Both the source and destination computers must have the same HAL (Hardware Abstraction
Layer). For example, both use an ACPI HAL. If the source computer is ACPI-compatible
and the target computer is non-ACPI-compatible, Windows XP Professional will not load
properly.
The size of the installation partition must be as large as the smallest space the image
program will install the image to.
Plug and Play devices on the source and destination computers do not need to match, as
long as the drivers for the Plug and Play devices are available.
Using the System Preparation Tool
The System Preparation Tool (Sysprep.exe) is included on the Windows XP Professional
CD in the \Support\Tools folder, in the Deploy.cab file. When you run this utility on the
Simpo PDF Merge and Split Unregistered Version -
Copyright ©2003 SYBEX Inc., 1151 Marina Village Parkway, Alameda, CA 94501.
COPYING PROHIBITED
www.sybex.com
62
Chapter 2
Automating the Windows XP Installation
source computer, it strips out information from the master copy that must be unique for each
computer, such as the security ID (SID).
After you install the copied image on the target computer, a Mini-Setup Wizard runs. This
Wizard automatically creates a unique computer SID and then prompts the user for computer-
specific information, such as the product ID, regional settings, and network configuration. The
required information can also be supplied through an automated installation script.
Table 2.5 defines the command switches that you can use to customize the System Preparation
Tool’s (Sysprep.exe) operation.
TABLE 2.5 System Preparation Command-Line Switches
Switch Description
-quiet Runs the installation with no user interaction
-pnp Forces Setup to run Plug and Play detection of hardware
-reboot Restarts the target computer after the System Preparation Tool
completes
-noreboot Specifies that the computer should be shut down without a
reboot.
-clean Specifies that critical devices should be cleaned out.
-nosidgen Doesn’t create a SID on the destination computer (used with disk
cloning)
-activated Prevents Windows Product Activation from resetting
-factory Allows you to add additional drivers and applications to the
image after the computer has restarted
-reseal Reseals an image and prepares the computer for delivery
after modifications have been made to an image using the
factory mode
-bmsd Used to build a list of all available mass storage devices in
sysprep.inf.
-forceshutdown If you have used the -reseal switch, prepares the operating
system as specified, then immediately shuts down the computer
without any user intervention
-mini Specifies that you want to run the Mini-Setup Wizard on the next
restart of the computer
Simpo PDF Merge and Split Unregistered Version -
Copyright ©2003 SYBEX Inc., 1151 Marina Village Parkway, Alameda, CA 94501.
COPYING PROHIBITED
www.sybex.com
Using the System Preparation Tool to Create Disk Images
63
After you run the System Preparation Tool on a computer, you need to run the
Mini-Setup Wizard. Then run the Setup Manager to create an answer file that
will answer the Mini-Setup Wizard’s questions when the computer (the imaged
computer or the original computer that has had the System Preparation Tool
run on it) is restarted.
In the following sections you will learn how to create a disk image and how to copy and
install from a disk image.
Creating a Disk Image
To run the System Preparation Tool and create a disk image, take the following steps:
1. Install Windows XP Professional on a source computer. The computer should have a similar
hardware configuration to the destination computer(s). You should not join a domain,
and the Administrator password should be left blank. (See Chapter 1 for instructions on
installing Windows XP Professional.)
2. Log onto the source computer as Administrator and, if desired, install and configure any
applications, files (such as newer versions of Plug and Play drivers), or custom settings
(for example, a custom Desktop) that will be applied to the target computer(s).
3. Verify that your image meets the specified configuration criteria and that all applications
are properly installed and working. Extract the Deploy.cab file from the Windows XP
Professional CD. (See Exercise 2.1 for instructions on extracting this file.)
4. Select Start Run and click the Browse button in the Run dialog box. Select Local Drive (C:),
then Deployment Tools; double-click Sysprep and click the OK button.
5. The Windows System Preparation Tool dialog box appears, as shown in Figure 2.9. This
dialog box warns you that the execution of this program will modify some of the computer’s
security parameters. Click the OK button.
FIGURE 2.9 The Windows System Preparation Tool dialog box
6. You will be prompted to turn off your computer.
7. You may now boot up with third-party imaging software and create an image of the
computer to deploy to other computers.
Simpo PDF Merge and Split Unregistered Version -
Copyright ©2003 SYBEX Inc., 1151 Marina Village Parkway, Alameda, CA 94501.
COPYING PROHIBITED
www.sybex.com
64
Chapter 2
Automating the Windows XP Installation
In Exercise 2.2, you will use the System Preparation Tool to prepare the computer for disk
imaging. This exercise assumes that you have completed Exercise 2.1.
Copying and Installing from a Disk Image
After you’ve run the System Preparation Tool on the source computer, you can copy the image
and then install it on the target computer.
If you are using special hardware (a disk duplicator) to duplicate the disk image, shut down the
source computer and remove the disk. Copy the disk and install the copied disk into the target com-
puter. If you are using special software, copy the disk image per the software vendor’s instructions.
After the image is copied, turn on the destination computer. The Mini-Setup Wizard runs
and prompts you as follows (if you have not configured an answer file):
Accept the End User License Agreement.
Specify regional settings.
Enter a name and organization.
Specify your product key.
Specify the computer name and Administrator password.
Specify dialing information (if a modem is detected).
Specify date and time settings.
Specify which networking protocols and services should be installed.
Join a workgroup or a domain.
If you have created an answer file for use with disk images, as described in the
section “Using Setup Manager to Create Answer Files” later in this chapter,
the installation will run without requiring any user input.
EXERCISE 2.2
Using the System Preparation Tool
1. Log onto the source computer as Administrator and, if desired, install and configure any
applications that should also be installed on the target computer.
2. Select Start Run and click the Browse button. Select Local Drive (C:), Deployment Tools.
Double-click Sysprep and click the OK button.
3. In the Windows System Preparation Tool dialog box, click the OK button.
4. The System Preparation Tool dialog box will appear. Click the Reset button.
5. The Windows System Preparation Tool dialog box will ask you to confirm the current settings.
If you will not be using Disk Imaging, click the Cancel button and close the Windows
System Preparation Tools dialog box.
Simpo PDF Merge and Split Unregistered Version -
Copyright ©2003 SYBEX Inc., 1151 Marina Village Parkway, Alameda, CA 94501.
COPYING PROHIBITED
www.sybex.com
Using the System Preparation Tool to Create Disk Images
65
In Exercise 2.3, you will use the stripped image that was created in Exercise 2.2 to simulate
the process of continuing an installation from a disk image.
EXERCISE 2.3
Installing Windows XP Professional from a Disk Image
1. Turn on your computer. The Windows XP Setup Wizard will start. Click the Next button to con-
tinue (this will happen automatically if you don’t click the Next button after about 10 seconds).
2. In the License Agreement dialog box, click the I Accept This Agreement option and click the
Next button.
3. In the Regional Settings dialog box, click Next to accept the default settings and continue.
4. In the Personalize Your Software dialog box, enter your name and organization. Then click
the Next button.
5. In the Your Product Key dialog box, type the 25-character product key and click the Next
button.
6. In the Computer Name and Administrator Password dialog box, specify the computer
name and an Administrator password (if desired). Then click the Next button.
7. If you have a modem installed, the Modem Dialing Information dialog box appears. Specify
your dialing configuration and click the Next button.
8. In the Date and Time Settings dialog box, specify the date, time, and time zone. Then click
the Next button.
9. In the Network Settings dialog box, verify that Typical Settings is selected and click the
Next button.
10. In the Workgroup or Computer Domain dialog box, verify that the No, This Computer Is
Not on a Network, or Is on a Network without a Domain Controller option is selected and
click the Next button.
11. When the Completing the Windows XP Setup Wizard dialog box appears, click the Finish
button.
12. When the computer restarts, start Windows XP Professional.
13. When the Network Identification Wizard starts, click the Next button.
14. In the Users of This Computer dialog box, select the Users Must Enter a User Name and
Password to Use This Computer option and click the Next button.
15. When the Completing the Network Identification Wizard dialog box appears, click the
Finish button.
16. Log onto the computer as Administrator.
Simpo PDF Merge and Split Unregistered Version -
Copyright ©2003 SYBEX Inc., 1151 Marina Village Parkway, Alameda, CA 94501.
COPYING PROHIBITED
www.sybex.com