mcsa mcse windows xp professional study guide 2nd phần 6 ppt
Bạn đang xem bản rút gọn của tài liệu. Xem và tải ngay bản đầy đủ của tài liệu tại đây (3.79 MB, 74 trang )
342
Chapter 9
Accessing Files and Folders
Attaching to the Share
To use a file or folder offline, the file or folder must first be made available online. Someone
at the server must share the folder, and the user must have proper permissions to access the file
or folder. Then the user can attach to the shared file or folder. The procedure for sharing files
and folders is described in the “Managing Network Access” section later in this chapter.
Configuring Your Computer
You configure your computer to use offline files and folders through the Offline Files tab of
the Folder Options dialog box (see Figure 9.7). In this tab, verify that the Enable Offline Files
box is checked (this option is enabled by default). To configure automatic synchronization
between the offline and online files, make sure that the Synchronize All Offline Files before
Logging Off option is checked (this option is also enabled by default). To use this option, you
must disable the Fast User Switching option in Control Panel under User Accounts.
On the Offline Files tab, you can also configure several other options. These include the
reminder balloon options that are associated with offline files, the amount of disk space that can
be used by offline files, whether a shortcut is created for offline files on the Desktop, and
whether you want to encrypt the offline files local cache.
If you don’t configure offline files and folders to be synchronized automatically when you
log on to or log off from your computer, you will need to perform the synchronization manually.
To manually synchronize a file or folder, right-click the file or folder that has been configured
for offline use and select Synchronize from the pop-up menu, as shown in Figure 9.8.
FIGURE 9.8 Manually synchronizing an offline folder
Making Files or Folders Available
To make a file or folder available for offline access, take the following steps:
1. Access the shared file or folder that you wish to use offline. Right-click the file or folder and
select Make Available Offline from the pop-up menu (see Figure 9.8).
2. The Welcome to the Offline Files Wizard starts (this wizard will run only the first time you
create an offline file or folder). Click the Next button.
Simpo PDF Merge and Split Unregistered Version -
Copyright ©2003 SYBEX Inc., 1151 Marina Village Parkway, Alameda, CA 94501.
COPYING PROHIBITED
www.sybex.com
File and Folder Management Basics
343
3. As shown in Figure 9.9, a dialog box asks how to synchronize offline files. By default, the
option to Automatically Synchronize the Offline Files When I Log On and Log Off My
Computer is selected. If you would prefer to manually synchronize files, deselect this
option. Click the Next button to continue.
FIGURE 9.9 Configuring the synchronization of offline files and folders
4. The next dialog box, shown in Figure 9.10, allows you to configure reminders and to create
a shortcut to the Offline Files folder. Reminders periodically prompt you that you are
not connected to the network and are working offline. The Offline Files shortcut is an easy
way to access folders that have been configured for offline use. If you are online when
you access this folder, you are working online. You can select or deselect either of these
options. Then click the Finish button.
FIGURE 9.10 Configuring reminders and the Offline Files shortcut
5. If the folder you have selected contains subfolders, you will see the Confirm Offline
Subfolders dialog box, shown in Figure 9.11. This dialog box allows you to choose
Simpo PDF Merge and Split Unregistered Version -
Copyright ©2003 SYBEX Inc., 1151 Marina Village Parkway, Alameda, CA 94501.
COPYING PROHIBITED
www.sybex.com
344
Chapter 9
Accessing Files and Folders
whether the subfolders should also be made available offline. Make your selection and click
the OK button.
FIGURE 9.11 Configuring offline subfolder availability
The offline files will be copied (synchronized) to the local computer. You can tell that a
folder has been configured for offline access by the icon that appears under the folder, as
shown in Figure 9.12.
FIGURE 9.12 The icon for offline folders
Preventing a Folder from Being Accessed Offline
Once a computer has been configured to support offline files and folders, you can access
any share that has been configured with default properties. If you create a share and you do
not want the files to be accessible offline, you can configure the share properties for offline
access through the share’s cacheing properties. Shares are discussed in greater detail later in
this chapter.
Files are manually cached when a computer makes a request to a file or folder on the network
that has been made available for offline access. By default, the Manual Caching for Documents
setting is enabled. The default cache size for automatically cached files is 10 percent of the total
disk space of the hard disk. If files are marked as manually cached, they are automatically
marked as Always Available Offline In The Offline Files folder.
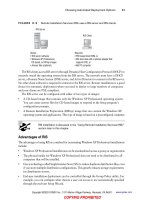
To configure the offline folder’s cacheing, access the share’s Properties dialog box, as shown in
Figure 9.13. Click the Caching button. In the Caching Settings dialog box (Figure 9.14), uncheck
the option Allow Caching of Files in This Shared Folder. With this option disabled, users can
access the data while they are on the network, but they can’t use the share offline.
By default, *.sim, *.mdb, *.ldb, *.mdw, *.mde, *.pst, and *.db? are not cached.
You can override this setting or specify which files will not be cached through
Group Policy.
Simpo PDF Merge and Split Unregistered Version -
Copyright ©2003 SYBEX Inc., 1151 Marina Village Parkway, Alameda, CA 94501.
COPYING PROHIBITED
www.sybex.com
File and Folder Management Basics
345
FIGURE 9.13 Sharing properties for a shared folder
FIGURE 9.14 Caching Settings for a shared folder
Configuring Your Computer’s Behavior after Losing the Network Connection
Through the Offline Files tab of the Folder Options dialog box, you can specify whether your
computer will begin working offline when a network connection is lost. To make this setting,
click the Advanced button in the bottom-right corner of the dialog box. This brings up the
Offline Files—Advanced Settings dialog box, as shown in Figure 9.15. Here, you can specify
Notify Me and Begin Working Offline (the default selection) or you can select Never Allow
My Computer to Go Offline. If you have created offline files and folders for multiple servers, you
can use the Exception List portion of the dialog box to specify different behavior for each server.
Simpo PDF Merge and Split Unregistered Version -
Copyright ©2003 SYBEX Inc., 1151 Marina Village Parkway, Alameda, CA 94501.
COPYING PROHIBITED
www.sybex.com
346
Chapter 9
Accessing Files and Folders
FIGURE 9.15 The Offline Files—Advanced Settings dialog box
To reconnect to a network share after using offline files, all of the following conditions must be met:
The network connection must not be a slow link.
No offline files from the network share can contain changes that require synchronization.
No offline files from the network share can be open on the user’s local computer.
If any of these conditions are not met, the user will continue to work offline even though
a network connection is available, and any changes that are made to local files will require
synchronization with the network share.
In Exercise 9.2, you will set up your computer to use and synchronize offline files and folders.
Your Windows XP Professional computer may be attached to a network that
has another computer with shared files or folders. Just as described in the
preceding sections, you can also attach to these shared files or folders that you
want to access offline, make them available for offline access, and configure
how the files will respond to network disconnection.
EXERCISE 9.2
Configuring Offline Files and Folders
1. Double-click the Explorer shortcut you created in Exercise 9.1.
2. In Windows Explorer, select Tools Folder Options and click the Offline Files tab.
3. In the Offline Files tab of the Folder Options dialog box, make sure that the following
options are selected:
Enable Offline Files
Simpo PDF Merge and Split Unregistered Version -
Copyright ©2003 SYBEX Inc., 1151 Marina Village Parkway, Alameda, CA 94501.
COPYING PROHIBITED
www.sybex.com
File and Folder Management Basics
347
The Offline Files Database
When you enable offline files, the local computer stores information that is related to offline
files in the Offline Files Database. By default, this database is stored in the \systemroot\CSC
folder on the client computer. CSC stands for Client Side Cache and is a term associated
with files that are cached with offline folders. When a user requests a file that is offline, the
database mimics the network resource. All file system permissions are maintained by the database.
The Offline Files folder is used to display all files stored within the database. Only members
of the Administrator group are able to directly access the CSC folder. Files should not be
directly deleted through the CSC folder.
The CSC folder can be moved through the Cachemov command-line utility. If
you move the CSC folder, you must ensure that the location that the cached
files will be moved to has adequate disk space and that the user who is using
offline files has appropriate permissions to the new location. This utility can be
found on the Windows 2000 Resource Kit.
Encrypting Offline Files
Windows XP Professional offers support for encrypting offline files. In order to support this
option, the Offline Files Database must be stored on an NTFS partition. If you refer back to the
Offline Files tab of the Folder Options dialog box shown in Figure 9.7, you will notice that
the option for Encrypt Offline Files to Secure Data is shaded out. This indicates that the CSC
folder is on a FAT or FAT32 partition. In order to set this option, you must be a member of the
Administrators group. This option can also be configured through the Group Policy MMC
snap-in for a set of users or groups. If this option is set through the Group Policy tool, then
it cannot be overridden by the Offline Files tab setting.
Troubleshooting Offline Files
If you are configuring offline files and folders, and you don’t see the Make Available Offline
option available as a folder property, check the following:
Are you connected to a network share on a computer that uses SMB? Offline files and
folders won’t work from a network computer that does not use SMB.
Synchronize All Offline Files before Logging Off
Display a Reminder Every 60 Minutes
Create an Offline Files Shortcut on the Desktop
4. Click the OK button to close the dialog box.
EXERCISE 9.2 (continued)
Simpo PDF Merge and Split Unregistered Version -
Copyright ©2003 SYBEX Inc., 1151 Marina Village Parkway, Alameda, CA 94501.
COPYING PROHIBITED
www.sybex.com
348
Chapter 9
Accessing Files and Folders
Have you configured your computer to use offline files and folders? Before you can
make a file or folder available offline, this feature must be enabled through the Offline
Files tab of the Folder Options dialog box (select Tools Folder Options in Windows
Explorer).
Has the folder that you want to access been shared, and do you have proper permissions
to access the folder? If you don’t see a folder that you want to configure for offline use,
it may not be shared or you may not have proper share (and NTFS) permissions to the
folder.
Are files using the extensions .mdb, .ldb, .mdw, .mde, or .db, which are not synchronized
by default?
If you are a member of the Active Directory, is group policy configured to specify that file
extensions you are using are not to be synchronized?
Do you have network errors that are preventing synchronization?
Is there sufficient disk space on the client computer to support synchronization?
Does the user have Read or Write permissions to the files they want to synchronize?
Searching for Files and Folders
Windows XP Professional offers more powerful search capabilities than Windows 2000
Professional. You can look for a file or folder based on the filename or folder name and also by
searching for text that is contained in the file. This is an extremely useful feature when you
know that you have saved a particular file on your computer but you can’t find it. You can
perform a search by selecting Start Search. Through the Search dialog box, shown in Figure 9.16,
you can specify the following options for your search:
Pictures, music, or video
Documents (word processing, spreadsheet, etc.)
All files and folders
Computers or people
Information in Help and Support Center
If you use the search option from the Start menu on a computer that is a part
of the Active Directory, you can also search for printers.
Depending on what you want to find—for example, a file or folder—you might specify the
filename or folder name and/or the text that you are looking for. Only one of these fields must
be filled in for a search. You must indicate the location that you want to look in; this can be as
broad as My Computer or as specific as a particular drive or folder.
Once you have designated your search criteria, click the Search button to start the search.
The results are displayed in the right side of the window, as shown in Figure 9.17.
Simpo PDF Merge and Split Unregistered Version -
Copyright ©2003 SYBEX Inc., 1151 Marina Village Parkway, Alameda, CA 94501.
COPYING PROHIBITED
www.sybex.com
File and Folder Management Basics
349
FIGURE 9.16 The Search dialog box
FIGURE 9.17 Search results
Simpo PDF Merge and Split Unregistered Version -
Copyright ©2003 SYBEX Inc., 1151 Marina Village Parkway, Alameda, CA 94501.
COPYING PROHIBITED
www.sybex.com
350
Chapter 9
Accessing Files and Folders
Managing Local Access
The two common types of file systems used by local partitions are FAT (which includes FAT16
and FAT32) and NTFS. (File systems are covered in detail in Chapter 8, “Managing Disks.”)
FAT partitions do not support local security; NTFS partitions do. This means that if the file
system on the partition that users access is configured as a FAT partition, you cannot specify
any security for the file system once a user has logged on locally. However, if the partition is
NTFS, you can specify the access each user has to specific folders on the partition, based on the
user’s logon name and group associations.
Access control consists of rights and permissions. A right (also referred to as a privilege)
is an authorization to perform a specific action. Permissions are authorizations to perform
specific operations on specific objects. The owner of an object or any user who has the necessary
rights to modify permissions can apply permissions to NTFS objects. If permissions are not
explicitly granted within NTFS, then they are implicitly denied. Permissions can also be explicitly
denied, which then overrides explicitly granted permissions.
The following sections describe design goals for access control, as well as how to apply NTFS
permissions and some techniques for optimizing local access.
Design Goals for Access Control
Before you start applying NTFS permissions to resources, you should develop design goals
for access control as a part of your overall security strategy. Basic security strategy suggests
that you provide each user and group with the minimum level of permissions needed for job
functionality. Some of the considerations when planning access control include:
Defining the resources that are included within your network—in this case, the files and
folders residing on the file system
Defining which resources will put your organization at risk; this includes defining the
resources and defining the risk of damage if the resource was compromised
Developing security strategies that address possible threats and minimize security risks
Defining groups that security can be applied to based on users within the group membership
who have common access requirements, and applying permissions to groups, as opposed
to users
Applying additional security settings through Group Policy, if your Windows XP Professional
clients are part of an Active Directory network
Using additional security features, such as EFS to provide additional levels of security or file
auditing to track access to critical files and folders
Applying NTFS Permissions
NTFS permissions control access to NTFS files and folders. This is based on the technology that
was originally developed for Windows NT. Ultimately, the person who owns the object has
Simpo PDF Merge and Split Unregistered Version -
Copyright ©2003 SYBEX Inc., 1151 Marina Village Parkway, Alameda, CA 94501.
COPYING PROHIBITED
www.sybex.com
Managing Local Access
351
complete control over the object. You configure access by allowing or denying NTFS permissions
to users and groups. Normally, NTFS permissions are cumulative, based on group memberships
if the user has been allowed access. However, if the user had been denied access through
user or group membership, those permissions override the allowed permissions. Windows XP
Professional offers five levels of NTFS permissions:
Full Control This permission allows the following rights:
Traverse folders and execute files (programs) in the folders. The ability to traverse folders
allows you to access files and folders in lower subdirectories, even if you do not have
permissions to access specific portions of the directory path.
List the contents of a folder and read the data in a folder’s files.
See a folder’s or file’s attributes.
Change a folder’s or file’s attributes.
Create new files and write data to the files.
Create new folders and append data to files.
Delete subfolders and files.
Delete files.
Compress files.
Change permissions for files and folders.
Take ownership of files and folders.
If you select the Full Control permission, all permissions will be checked by default, and can’t
be unchecked.
Modify This permission allows the following rights:
Traverse folders and execute files in the folders.
List the contents of a folder and read the data in a folder’s files.
See a file’s or folder’s attributes.
Change a file’s or folder’s attributes.
Create new files and write data to the files.
Create new folders and append data to files.
Delete files.
If you select the Modify permission, the Read & Execute, List Folder Contents, Read, and Write
permissions will be checked by default, and can’t be unchecked.
Read & Execute This permission allows the following rights:
Traverse folders and execute files in the folders.
List the contents of a folder and read the data in a folder’s files.
See a file’s or folder’s attributes.
Simpo PDF Merge and Split Unregistered Version -
Copyright ©2003 SYBEX Inc., 1151 Marina Village Parkway, Alameda, CA 94501.
COPYING PROHIBITED
www.sybex.com
352
Chapter 9
Accessing Files and Folders
If you select the Read & Execute permission, the List Folder Contents and Read permissions
will be checked by default, and can’t be unchecked.
List Folder Contents This permission allows the following rights:
Traverse folders.
List the contents of a folder.
See a file’s or folder’s attributes.
Read This permission allows the following rights:
List the contents of a folder and read the data in a folder’s files.
See a file’s or folder’s attributes.
View ownership.
Write This permission allows the following rights:
Overwrite a file.
View file ownership and permissions.
Change a file’s or folder’s attributes.
Create new files and write data to the files.
Create new folders and append data to files.
Any user with Full Control access can manage the security of a folder. By default, the
Everyone group has Full Control permission for the entire NTFS partition. However, to
access folders, a user must have physical access to the computer as well as a valid logon name
and password. By default, regular users can’t access folders over the network unless the folders
have been shared. Sharing folders is covered in the “Managing Network Access” section later
in this chapter.
You apply NTFS permissions through Windows Explorer. Right-click the file or folder
to which you want to control access, and select Properties from the pop-up menu. This
brings up the file’s or folder’s Properties dialog box. Figure 9.18 shows a folder Properties
dialog box.
The process for configuring NTFS permissions for files and folders is the
same. The examples in this chapter use a folder, since NTFS permissions are
most commonly applied at the folder level.
The tabs in the file or folder Properties dialog box depend on the options that have been
configured for your computer. For files and folders on NTFS partitions, the dialog box will
contain a Security tab, which is where you configure NTFS permissions. (The Security tab is not
present in the Properties dialog box for files or folders on FAT partitions, because FAT partitions
do not support local security.) The Security tab lists the users and groups that have been
assigned permissions to the file or folder. When you click a user or group in the top half of the
dialog box, you see the permissions that have been allowed or denied for that user or group in
the bottom half of the dialog box, as shown in Figure 9.19.
Simpo PDF Merge and Split Unregistered Version -
Copyright ©2003 SYBEX Inc., 1151 Marina Village Parkway, Alameda, CA 94501.
COPYING PROHIBITED
www.sybex.com
Managing Local Access
353
FIGURE 9.18 The Properties dialog box for a folder
FIGURE 9.19 The Security tab of the folder Properties dialog box
If the Security tab does not appear for your NTFS partition, and you are not
a part of a domain, then Simple File Sharing is probably enabled, which will
keep this option from appearing. To disable Simple File Sharing, select My
Computer
Tools Folder Options. In Advanced Settings, clear the box for
Use Simple File Sharing (Recommended).
Simpo PDF Merge and Split Unregistered Version -
Copyright ©2003 SYBEX Inc., 1151 Marina Village Parkway, Alameda, CA 94501.
COPYING PROHIBITED
www.sybex.com
354
Chapter 9
Accessing Files and Folders
In the following subsections you will learn how to implement NTFS permissions and how to
control permission inheritance.
Adding and Removing User and Group NTFS Permissions
To manage NTFS permissions, take the following steps:
1. In Windows Explorer, right-click the file or folder to which you want to control access, select
Properties from the pop-up menu, and click the Security tab of the Properties dialog box.
2. Click the Add button to open the Select Users or Groups dialog box, as shown in Figure 9.20.
You can select users from the computer’s local database or from the domain you are in
(or trusted domains) by typing in the user or group name in the Enter the object name
to select portion of the dialog box and click the Add button.
FIGURE 9.20 The Select Users or Groups dialog box
3. You return to the Security tab of the folder Properties dialog box. Highlight each user,
computer, or group in the top list box individually, and in the Permissions list specify the
NTFS permissions to be allowed or denied. When you are finished, click the OK button.
Through the Advanced button of the Security tab, you can configure more
granular NTFS permissions, such as Traverse Folder, Execute File, and Read
Attributes permissions.
To remove the NTFS permissions for a user, computer, or group, highlight that entity in the
Security tab and click the Remove button.
Be careful when you remove NTFS permissions. You won’t be asked to con-
firm their removal, as you are when deleting most other types of items in
Windows XP Professional.
Controlling Permission Inheritance
Normally, the directory structure is organized in a hierarchical manner. This means you are
likely to have subfolders in the folders to which you apply permissions. In Windows XP
Professional, by default, the parent folder’s permissions are applied to any files or subfolders in
that folder, as well as any subsequently created objects. These are called inherited permissions.
Simpo PDF Merge and Split Unregistered Version -
Copyright ©2003 SYBEX Inc., 1151 Marina Village Parkway, Alameda, CA 94501.
COPYING PROHIBITED
www.sybex.com
Managing Local Access
355
In Windows NT 4, by default, files in a folder do inherit permissions from the parent
folder, but subfolders do not inherit parent permissions. In Windows 2000 and
XP Professional, the default is for the permissions to be inherited by subfolders.
You can specify how permissions are inherited by subfolders and files through the Advanced
options from the Security tab of the folder Properties dialog box, by checking the Advanced button.
This calls up the Permissions tab of the Advanced Security Settings dialog box, as shown
in Figure 9.21. The options that can be selected include:
Inherit from parent the permission entries that apply to child objects. Include these with
entries explicitly defined here.
Replace permission entries on all child objects with entries shown here that apply to
child objects.
FIGURE 9.21 The Permissions tab of the Advanced Security Settings dialog box
If an Allow or a Deny check box in the Permissions list in the Security tab has a shaded
check mark, this indicates that the permission was inherited from an upper-level folder.
If the check mark is not shaded, it means the permission was applied at the selected folder.
This is known as an explicitly assigned permission. Knowing which permissions are inherited
and which are explicitly assigned is useful when you need to troubleshoot permissions.
If you are within a domain with Active Directory and you need to apply a file
permissions change to a large number of users, the most efficient way to
manage the change is to use security templates as a way of modifying the file
permissions. Then use a Group Policy Object to import and apply the security
template to the users within the domain who require the new file permission
settings. See Chapter 7 for more information.
Simpo PDF Merge and Split Unregistered Version -
Copyright ©2003 SYBEX Inc., 1151 Marina Village Parkway, Alameda, CA 94501.
COPYING PROHIBITED
www.sybex.com
356
Chapter 9
Accessing Files and Folders
Understanding Ownership and Security Descriptors
When an object is initially created on an NTFS partition, an associated security descriptor is
created. A security descriptor contains the following information:
The user or group that owns the object
The users and groups that are allowed or denied access to the object
The users and groups whose access to the object will be audited
After an object is created, the owner of the object has full permissions to change the information
in the security descriptor, even for members of the Administrators group. You can view the
owner of an object from the Security tab of the specified folder’s Properties (as shown in
Figure 9.19) and clicking the Advanced button (shown in Figure 9.20). Then click the Owner
tab to see who the owner of the object is, as shown in Figure 9.22. From this dialog box you can
change the owner of the object.
FIGURE 9.22 The Owner tab of the Advanced Security Settings dialog box
While the owner of an object can set the permissions of an object so that the Administrator
can’t access the object, the Administrator or any member of the Administrators group can take
ownership of an object, and thus manage the object’s permissions. When you take ownership of
an object, you can specify whether you want to replace the owner on subdirectories and objects
of the object.
From a command prompt, you can see who the owner of a directory is by
typing dir /q.
Simpo PDF Merge and Split Unregistered Version -
Copyright ©2003 SYBEX Inc., 1151 Marina Village Parkway, Alameda, CA 94501.
COPYING PROHIBITED
www.sybex.com
Managing Local Access
357
Determining Effective Permissions
To determine a user’s effective rights (the rights the user actually has to a file or folder), add all
of the permissions that have been allowed through the user’s assignments based on that user’s
username and group associations. After you determine what the user is allowed, you subtract
any permissions that have been denied the user through the username or group associations.
As an example, suppose that user Marilyn is a member of both the Accounting and Execs
groups. The following assignments have been made to the Accounting Group permissions:
The following assignments have been made to the Execs Group permissions:
Using the Take Ownership Option
You are the administrator of a large network. The manager of the Accounting department,
Michael, set up a series of files and folders with a high level of security. Michael was the owner
of these and all of the associated files and folders. When he set up NTFS security for his files
and folders, he removed access for everyone, including the Administrators group. Michael
recently left the company, and Kevin has been hired to take over the accounting manager’s job.
When Kevin tries to access Michael’s files, he can’t. When you log on as Administrator, you also
can’t access any of the files.
In this case, you should access the Owner tab of the parent folder for the files and folders and
change the owner to Kevin. You should ensure that you check the Replace Owner on Subcontainers
and Objects, and Kevin will now be able to have Full Control permissions to the resources.
Permission Allow Deny
Full Control
Modify X
Read & Execute X
List Folder Contents
Read
Write
Permission Allow Deny
Full Control
Modify
Read & Execute
List Folder Contents
Read X
Write
Simpo PDF Merge and Split Unregistered Version -
Copyright ©2003 SYBEX Inc., 1151 Marina Village Parkway, Alameda, CA 94501.
COPYING PROHIBITED
www.sybex.com
358
Chapter 9
Accessing Files and Folders
To determine Marilyn’s effective rights, you combine the permissions that have been
assigned. The result is that Marilyn’s effective rights are Modify, Read & Execute, and Read.
As another example, suppose that user Dan is a member of both the Sales and Temps groups.
The following assignments have been made to the Sales Group permissions:
The following assignments have been made to the Temps Group permissions:
To determine Dan’s effective rights, you start by seeing what Dan has been allowed: Modify,
Read & Execute, List Folder Contents, Read, and Write permissions. You then remove any-
thing that he is denied: Modify and Write permissions. In this case, Dan’s effective rights are
Read & Execute, List Folder Contents, and Read.
In Exercise 9.3, you will configure NTFS permissions based on the preceding examples. This
exercise assumes that you have completed Exercise 9.1.
Permission Allow Deny
Full Control
Modify X
Read & Execute X
List Folder Contents X
Read X
Write X
Permission Allow Deny
Full Control
Modify X
Read & Execute
List Folder Contents
Read
Write X
EXERCISE 9.3
Configuring NTFS Permissions
1. Using the Local Users and Groups utility, create two users: Marilyn and Dan. (See Chapter 6,
“Managing Users and Groups,” for details on creating user accounts.) Deselect the User
Must Change Password at Next Logon option.
2. Using the Local Users and Groups utility, create four groups: Accounting, Execs, Sales, and
Temps. (See Chapter 6 for details on creating groups.) Add Marilyn to the Accounting
and Execs groups. Add Dan to the Sales and Temps groups.
3. Double-click the Explorer shortcut created in Exercise 9.1. Expand the DATA folder (on drive D:)
that you created in Exercise 9.1.
Simpo PDF Merge and Split Unregistered Version -
Copyright ©2003 SYBEX Inc., 1151 Marina Village Parkway, Alameda, CA 94501.
COPYING PROHIBITED
www.sybex.com
Managing Local Access
359
Viewing Effective Permissions
If permissions have been applied at the user and group levels, and inheritance is involved, it can
sometimes be confusing to determine what effective permissions are. To help identify which
effective permissions will actually be applied, you can view them from the Effective Permissions
tab of Advanced Security Settings, or you can use the CACLS command-line utility.
4. Select Tools, then Folder Options.
5. Click the View tab and uncheck the Use Simple File Sharing (Recommended) option, then
click the Apply button. Click OK.
6. Right-click DATA, select Properties, and click the Security tab.
7. In the Security tab of the DATA Properties dialog box, highlight the Everyone group and
click the Remove button. You see a dialog box telling you that you cannot remove Everyone
because this group is inheriting permissions from a higher level. Click the OK button.
8. Configure NTFS permissions for the Accounting, Execs, Sales, and Temps groups by clicking
the Add button. In the Select Users and Groups dialog box, type in Accounting;Execs;Sales;
Temps (you can add multiple users and groups by separating each entry with a semicolon)
and click the Add button. Then click OK.
9. In the Security tab, highlight each group and check the Allow or Deny check boxes to add
permissions as follows:
For Accounting, allow Read & Execute (List Folder Contents and Read will automatically
be allowed) and Write.
For Execs, allow Read.
For Sales, allow Modify (Read & Execute, List Folder Contents, Read, and Write will
automatically be allowed).
For Temps, deny Write.
10. Click the OK button to close the DATA Properties dialog box. Because you set a Deny per-
mission, you will see a Security dialog box. Click the OK button to continue.
11. Log off as Administrator and log on as Marilyn. Access the D: \DATA\DOC1 file, make
changes, and then save the changes. Marilyn’s permissions should allow these actions.
12. Log off as Marilyn and log on as Dan. Access the D: \DATA\DOC1 file, make changes, and
then save the changes. Dan’s permissions should allow you to open the file but not to save
any changes.
13. Log off as Dan and log on as Administrator.
EXERCISE 9.3 (continued)
Simpo PDF Merge and Split Unregistered Version -
Copyright ©2003 SYBEX Inc., 1151 Marina Village Parkway, Alameda, CA 94501.
COPYING PROHIBITED
www.sybex.com
360
Chapter 9
Accessing Files and Folders
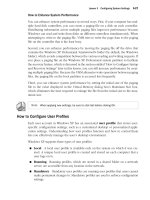
The Effective Permissions tab of Advanced Security Settings, shown in Figure 9.23, is a new
feature in Windows XP Professional.
FIGURE 9.23 The Effective Permissions tab of the Advanced Security Settings dialog box
To see what the effective permissions are for a user or group, you click the Select button,
then type in the user or group. Then click the OK button. If a box is checked and not shaded, then
explicit permissions have been applied at that level. If the box is shaded, then the permissions
to that object were inherited.
The CACLS command-line utility can also be used to display or modify user access rights. The
options associated with the CACLS command are as follows:
/g- grants permissions
/r- revokes permissions
/p- replaces permissions
/d- denies permissions
Determining NTFS Permissions for Copied or Moved Files
When you copy or move NTFS files, the permissions that have been set for those files might
change. The following guidelines can be used to predict what will happen:
If you move a file from one folder to another folder on the same volume, the file will retain
the original NTFS permissions.
If you move a file from one folder to another folder between different NTFS volumes, the
file is treated as a copy and will have the same permissions as the destination folder.
If you copy a file from one folder to another folder on the same volume or on a different
volume, the file will have the same permissions as the destination folder.
If you copy or move a file or folder to a FAT partition, it will not retain any NTFS permissions.
Simpo PDF Merge and Split Unregistered Version -
Copyright ©2003 SYBEX Inc., 1151 Marina Village Parkway, Alameda, CA 94501.
COPYING PROHIBITED
www.sybex.com
Managing Network Access
361
Managing Network Access
Sharing is the process of allowing network users to access a folder located on a Windows XP
Professional computer. A network share provides a single location to manage shared data
used by many users. Sharing also allows an administrator to install an application once, as
opposed to installing it locally at each computer, and to manage the application from a single
location.
The following sections describe how to create and manage shared folders, configure share
permissions, and provide access to shared resources.
Creating Shared Folders
To share a folder, you must be logged on as a member of the Administrators or Power Users
group (or Server Operators if you are a part of a domain). You enable and configure sharing
through the Sharing tab of the folder Properties dialog box, as shown in Figure 9.24.
FIGURE 9.24 The Sharing tab of the folder Properties dialog box
When you share a folder, you can configure the options listed in Table 9.2.
TABLE 9.2 Share Folder Options
Option Description
Do Not Share This Folder Makes the folder available only through local access
Share This Folder Makes the folder available through local access and network access
Simpo PDF Merge and Split Unregistered Version -
Copyright ©2003 SYBEX Inc., 1151 Marina Village Parkway, Alameda, CA 94501.
COPYING PROHIBITED
www.sybex.com
362
Chapter 9
Accessing Files and Folders
If you share a folder and then decide that you do not want to share it, just select the Do Not
Share This Folder radio button in the Sharing tab of the folder Properties dialog box.
In Windows Explorer, you can easily tell that a folder has been shared by the
hand icon under the folder.
In addition:
Only folders, not files, can be shared.
Share permissions can be applied only to folders and not files.
If a folder is shared over the network and a user is accessing it locally, then share permissions
will not apply to the local user.
If a shared folder is copied, the original folder will still be shared, but not the copy.
If a shared folder is moved, the folder will no longer be shared.
If the shared folder will be accessed by a mixed environment of clients including some that
do not support long filenames, you should use the 8.3 naming format for files.
Folders can be shared through the Net Share command-line utility.
In Exercise 9.4, you will create a shared folder.
Share Name A descriptive name by which users will access the folder
Comment Additional descriptive information about the share (optional)
User Limit The maximum number of connections to the share at any one time
(default is to allow up to 10 users access to a share on a Windows XP
Professional computer)
Permissions How users will access the folder over the network
Caching How folders are cached when the folder is offline
EXERCISE 9.4
Creating a Shared Folder
1. Double-click the Explorer shortcut you created in Exercise 9.1. Expand My Computer, then
expand Local Disk (D:).
2. Select File New Folder and name the new folder Share Me.
TABLE 9.2 Share Folder Options (continued)
Option Description
Simpo PDF Merge and Split Unregistered Version -
Copyright ©2003 SYBEX Inc., 1151 Marina Village Parkway, Alameda, CA 94501.
COPYING PROHIBITED
www.sybex.com
Managing Network Access
363
Configuring Share Permissions
You can control users’ access to shared folders by assigning share permissions. Share permissions
are less complex than NTFS permissions and can be applied only to folders (unlike NTFS
permissions, which can be applied to files and folders).
To assign share permissions, click the Permissions button in the Sharing tab of the folder
Properties dialog box. This brings up the Share Permissions dialog box, as shown in Figure 9.25.
FIGURE 9.25 The Share Permissions dialog box
You can assign three types of share permissions:
Full Control Allows full access to the shared folder.
3. Right-click the Share Me folder, select Properties, and click the Sharing tab.
4. In the Sharing tab of the Share Me Properties dialog box, click the Share This Folder radio
button.
5. Type Test Shared Folder in the Share Name text box.
6. Type This is a comment for a shared folder in the Comment text box.
7. Under User Limit, click the Allow radio button and specify 5 users.
8. Click the OK button to close the dialog box.
EXERCISE 9.4 (continued)
Simpo PDF Merge and Split Unregistered Version -
Copyright ©2003 SYBEX Inc., 1151 Marina Village Parkway, Alameda, CA 94501.
COPYING PROHIBITED
www.sybex.com
364
Chapter 9
Accessing Files and Folders
Change Allows users to change data within a file or to delete files.
Read Allows a user to view and execute files in the shared folder.
Full Control is the default permission on shared folders for the Everyone group.
Shared folders do not use the same concept of inheritance as NTFS folders.
If you share a folder, there is no way to block access to lower-level resources
through share permissions.
In Exercise 9.5, you will apply share permissions to a folder. This exercise assumes that you
have completed Exercises 9.3 and 9.4.
Using the Shared Documents Folder
One of the new features in Windows XP Professional is that if two or more user accounts
are created on the local computer, then the Shared Documents folder is created under the
My Documents folder. Files within this folder can be shared among multiple users of the local
computer. The folder is also automatically shared and made accessible to other users if the com-
puter is within a networked environment.
Managing Shares with the Shared Folders Utility
Shared Folders is a Computer Management utility for creating and managing shared folders on
the computer. The Shared Folders window displays all of the shares that have been created
on the computer, the user sessions that are open on each share, and the files that are currently
open, listed by user.
EXERCISE 9.5
Applying Share Permissions
1. Double-click the Explorer shortcut you created in Exercise 9.1. Expand My Computer, then
expand Local Disk (D:).
2. Right-click the Share Me folder, select Sharing and Security, and from the Sharing tab click
the Permissions button.
3. In the Share Permissions dialog box, highlight the Everyone group and click the Remove
button. Then click the Add button.
4. In the Select Users and Groups dialog box, type in users Dan; Marilyn, click the OK button,
and then click the OK button.
5. Click user Marilyn and check the Allow box for the Full Control permission.
6. Click user Dan and check the Allow box for the Read permission.
7. Click the OK button to close the dialog box.
Simpo PDF Merge and Split Unregistered Version -
Copyright ©2003 SYBEX Inc., 1151 Marina Village Parkway, Alameda, CA 94501.
COPYING PROHIBITED
www.sybex.com
Managing Network Access
365
To access Shared Folders, right-click My Computer from the Start menu and select Manage
from the pop-up menu. In Computer Management, expand System Tools and then expand
Shared Folders.
You can add the Shared Folders utility as an MMC snap-in. See Chapter 4,
“Configuring the Windows XP Environment,” for information about adding
snap-ins to the MMC.
Viewing Shares
When you select Shares in the Shared Folders utility, you see all of the shares that have been
configured on the computer. Figure 9.26 shows an example of a Shares listing.
FIGURE 9.26 The Shares listing in the Shared Folders utility
Along with the shares that you have specifically configured, you will also see the Windows XP
special shares, which are created by the system automatically to facilitate system administration.
Some of the administrative shares can’t be configured and access is limited to administrators. A share
that is followed by a dollar sign ($) indicates that the share is hidden from view when users access
utilities such as My Network Places and browse network resources. The following special shares may
appear on your Windows XP Professional computer, depending on how the computer is configured:
drive_letter$ Is the share for the root of the drive. By default, the root of every drive is shared.
For example, the C: drive is shared as C$.
On Windows XP Professional computers and Windows XP member servers,
only members of the Administrators and Backup Operators groups can access
the drive_letter$ share. On Windows XP domain controllers, members of the
Administrators, Backup Operators, and Server Operators groups can access
this share.
Simpo PDF Merge and Split Unregistered Version -
Copyright ©2003 SYBEX Inc., 1151 Marina Village Parkway, Alameda, CA 94501.
COPYING PROHIBITED
www.sybex.com
366
Chapter 9
Accessing Files and Folders
ADMIN$ Points to the Windows XP system root (for example, C:\Windows).
IPC$ Allows remote administration of a computer and is used to view a computer’s shared
resources. (IPC stands for interprocess communication.)
PRINT$ Is used for remote printer administration if a printer has been defined.
FAX$ Is used by fax clients to cache fax cover sheets and documents that are in the process
of being faxed if the fax service has been configured.
Creating New Shares
In Shared Folders, you can create new shares through the following steps:
1. Right-click the Shares folder and select New File Share from the pop-up menu.
2. The Create Shared Folder Wizard starts, as shown in Figure 9.27. Specify the folder that
will be shared (you can use the Browse button to select the folder) and provide a share name
and description. Click the Next button.
3. The Create Shared Folder Wizard dialog box for assigning share permissions appears next
(Figure 9.28). You can select from one of the predefined permissions assignments or you
can customize the share permissions. After you specify the permissions that will be
assigned, click the Finish button.
4. The Create Shared Folder dialog box appears, to verify that the folder has been shared
successfully. Click the Yes button to create another shared folder, or the No button if you
are finished creating shared folders.
Managing Remote Computers
Within your organization, you are responsible for managing hundreds of Windows XP computers.
All of them are installed into Windows XP domains. At present, when users have problems
accessing a local resource or want to create a share on their computer, an administrator is sent
to the local computer. You want to be able to support remote management from a central location,
but without adding remote management software to your network.
You can easily access remote computers’ local drives through the hidden shares. For example,
assume that user Peter has a computer called WS1. When this computer was added to the domain,
the Domain Admins group was automatically added to the Administrators group on WS1.
Currently no shares have been manually created on Peter’s computer, and he wants to create a share
on his C:\Test folder. Peter can’t share his own folder because he does not have enough rights.
As a member of the Administrators group, you can remotely access Peter’s C: drive through the
following command: NET USE x: \\WS1\C$. Once you’ve accessed the network drive, you can
access the Test folder and create the share remotely. This connection would also allow you to
manipulate NTFS permissions on remote computers.
Simpo PDF Merge and Split Unregistered Version -
Copyright ©2003 SYBEX Inc., 1151 Marina Village Parkway, Alameda, CA 94501.
COPYING PROHIBITED
www.sybex.com