mcsa mcse windows xp professional study guide 2nd phần 8 potx
Bạn đang xem bản rút gọn của tài liệu. Xem và tải ngay bản đầy đủ của tài liệu tại đây (3.92 MB, 74 trang )
492
Chapter 12
Dial-Up Networking and Internet Connectivity
The Include Windows Logon Domain option works in conjunction with the Prompt for
Name and Password, Certificate, Etc. option. This option specifies that Windows logon-
domain information should be requested prior to initiating a connection.
The Prompt for Phone Number option allows the telephone number to be viewed, selected,
or modified prior to initiating a connection.
FIGURE 12.19 The Options tab of the Connection Properties dialog box
The options for redialing let you specify the number of redial attempts if the connection is not
established, and the time between the redial attempts. You can also designate how long a con-
nection will remain idle before the computer hangs up. If you want the computer to redial the
connection number should the connection be dropped, check the Redial if Line Is Dropped
check box.
The X.25 button at the bottom of this dialog box can be used to configure an X.25 connection.
This requires you to know which X.25 provider you are using and the X.121 address of the
remote server you wish to connect to.
Configuring RAS Connection Security
Security settings are among the most important options to be configured for dial-up connections.
You can set typical or advanced (custom settings) security options in the Security tab of the
Connection Properties dialog box, as shown in Figure 12.20. This tab also has options for
interactive logon and scripting.
Simpo PDF Merge and Split Unregistered Version -
Copyright ©2003 SYBEX Inc., 1151 Marina Village Parkway, Alameda, CA 94501.
COPYING PROHIBITED
www.sybex.com
Creating a Connection to a Remote Access Server
493
FIGURE 12.20 The Security tab of the Connection Properties dialog box
Connections that are more secure require more overhead and are usually
slower. Less-secure connections require less overhead and are typically faster.
Typical Security Settings
You generally will configure typical security settings unless you need to use specific security
protocols. When you select the Typical radio button, you can then choose to validate the user’s
identity, to automatically use the Windows logon name and password (and domain, if specified),
and whether data encryption is required. For validating the user’s identity, you can select from
the following options:
Allow Unsecured Password Specifies that the password can be transmitted without any
encryption.
Require Secured Password Specifies that the password must be encrypted prior to transmission.
Use Smart Card Specifies that you must use a smart card.
The options for configuring Automatically Use My Windows Logon Name and Password
(and Domain if Any) and Require Data Encryption (Disconnect if None) are enabled based
on the validation method you select, and whether the options are supported by the selected
validation option.
Simpo PDF Merge and Split Unregistered Version -
Copyright ©2003 SYBEX Inc., 1151 Marina Village Parkway, Alameda, CA 94501.
COPYING PROHIBITED
www.sybex.com
494
Chapter 12
Dial-Up Networking and Internet Connectivity
Advanced Security Settings
If you need to configure specific security protocols, select the Advanced (Custom Settings) radio
button in the Security tab and then click the Settings button. This brings up the Advanced Security
Settings dialog box, as shown in Figure 12.21.
FIGURE 12.21 Connection Properties, Security tab, Advanced Settings dialog box
This dialog box allows you to configure the type of data encryption that will be employed.
You also specify whether logon security will use the Extensible Authentication Protocol (EAP),
which is used in conjunction with other security devices, including smart cards and certificates.
You can select from the following protocols for logon security:
Unencrypted Password (PAP)
Shiva Password Authentication Protocol (SPAP)
Challenge Handshake Authentication Protocol (CHAP)
Microsoft CHAP (MS-CHAP), if you select this option, additionally you can specify that
you want to support older MS-CHAP for Windows 95 servers
Microsoft CHAP Version 2 (MS-CHAPv2)
If you are using MS-CHAP-based protocols, you can also specify that you want to automat-
ically use your Windows logon name and password (and domain, if any).
The authentication security protocols were covered in the “Understanding
Remote Access Security” section earlier in this chapter.
Simpo PDF Merge and Split Unregistered Version -
Copyright ©2003 SYBEX Inc., 1151 Marina Village Parkway, Alameda, CA 94501.
COPYING PROHIBITED
www.sybex.com
Creating a Connection to a Remote Access Server
495
Interactive Logon and Scripting
The Interactive Logon and Scripting options on the Security tab are provided for users who use
terminal services for remote access. These options allow you to display a terminal window after
dialing, and run a script after dialing.
Scripting features are supported only for serial modems. These features are
not available for ISDN devices.
Configuring Networking Options for RAS Connections
The Networking tab, shown in Figure 12.22, contains networking options for the dial-up
connection. You can configure the wide area network (WAN) protocol you will use and the
network components that will be employed by the network connection.
FIGURE 12.22 The Networking tab of the Connection Properties dialog box
Your choices for the WAN protocol are the Point-to-Point Protocol (PPP) or Serial Line
Internet Protocol (SLIP). PPP offers more features and is the WAN protocol used by Win-
dows 9x, Windows NT (all versions), Windows 2000 (all versions), Windows XP, Windows
Server 2003, and most Internet servers. SLIP is an older protocol that is used with some
Unix servers. If you click the Settings button for PPP, you can configure options for Enable LCP
Extensions, Enable Software Compression, and Negotiate Multi-link for Single Link Connections.
You typically leave PPP settings at default values.
The network components used by the connection might include the protocols (such as Internet
Protocol (IP) and NWLink IPX/SPX/NetBIOS Compatible Transport Protocol) and the client
Simpo PDF Merge and Split Unregistered Version -
Copyright ©2003 SYBEX Inc., 1151 Marina Village Parkway, Alameda, CA 94501.
COPYING PROHIBITED
www.sybex.com
496
Chapter 12
Dial-Up Networking and Internet Connectivity
software (such as File and Printer Sharing for Microsoft Networks and Client for Microsoft
Networks). By clicking the Install button, you can install additional connections. The Properties
button allows you to configure the properties of whatever connection you have highlighted.
Configuring Advanced Options
The Advanced tab, shown in Figure 12.23, is used to configure an Internet Connection Firewall
and Internet Connection Sharing. The Internet Connection Firewall is used to limit access to
your computer through the Internet and is implemented as a security feature. Internet Connec-
tion Sharing is used to allow more than one Internet connection through a single computer.
Both of these topics are covered in greater detail in the “Using Internet Connection Sharing”
and “Using an Internet Connection Firewall” sections of the chapter.
FIGURE 12.23 The Advanced tab of the Connection Properties dialog box
Troubleshooting Remote Access Connections
If your remote access connection is not working properly, there are many possible causes. The
following list categorizes common problems and the options that can be used to troubleshoot,
identify, and resolve configuration errors:
If you suspect the problem is with your modem:
Verify that the modem you are using is on the Hardware Compatibility List (HCL) and that
you have the most current driver.
Simpo PDF Merge and Split Unregistered Version -
Copyright ©2003 SYBEX Inc., 1151 Marina Village Parkway, Alameda, CA 94501.
COPYING PROHIBITED
www.sybex.com
Creating a Connection to the Internet
497
If you are using an external modem, verify that it is turned on and connected to the proper
port, and that the modem cable is not defective. If you require a 9-to-25-pin serial connector,
do not use one that came with a mouse, as most are not manufactured to support modem
signals.
Use modem logging and modem diagnostics to test the modem.
If you suspect the problem is with your access line:
If you are using an unknown line type (for example, in a hotel), verify the line type you are
using. Analog modems only use analog phone lines, and digital modems only use digital
lines. The remote client and the server that is being accessed must also use a common access
method, analog or digital.
Verify that you dialed the correct number for the remote server. If you need to dial an external
line-access number (usually 9), verify that it is properly configured.
If the modem is having problems connecting, there may be excessive static on the phone
line that is preventing the modem from connecting at the configured speed. Attempt to
connect using lower speed and call the phone company to have the quality of the line
checked.
If you suspect the problem is with the RAS server:
Verify that you are using a valid user account and password. Make sure the user account
has been granted remote access permission on the RAS server.
Make sure the RAS server is properly configured and is running. If no remote clients can
connect, the problem is most likely the RAS server. If other remote clients can connect, the
RAS server is most likely properly configured.
If connections to the RAS server are being dropped:
Verify that the connection is not being dropped due to inactivity. Check with the RAS
server administrator to find out what the inactivity settings are.
If your phone line uses call waiting, an incoming call may be disrupting your connection;
verify that call waiting has been disabled.
Creating a Connection to the Internet
The most common option for remote access to the Internet is through a valid Internet service
provider (ISP). There are many ISPs to choose from, and they usually supply software to facil-
itate your Internet connection through their service. If you do not have software from your ISP,
you can set up an Internet connection the first time you access Internet Explorer or through New
Connection Wizard. Common options for accessing the Internet include analog modem and
phone line, ISDN adapter and ISDN phone line, cable modem, and DSL.
In Exercise 12.1, you will create a dial-up Internet connection for a new Internet
account.
Simpo PDF Merge and Split Unregistered Version -
Copyright ©2003 SYBEX Inc., 1151 Marina Village Parkway, Alameda, CA 94501.
COPYING PROHIBITED
www.sybex.com
498
Chapter 12
Dial-Up Networking and Internet Connectivity
EXERCISE 12.1
Creating a Dial-Up Connection to the Internet
1. Select Start Control Panel Network and Internet Connections Set Up or Change
Your Internet Connection.
2. Click the Setup button on the Connections tab.
3. In the Welcome to the New Connection Wizard dialog box, click the Next button.
4. The Network Connection Type dialog box will appear. Select Connect to the Internet and
click the Next button.
Simpo PDF Merge and Split Unregistered Version -
Copyright ©2003 SYBEX Inc., 1151 Marina Village Parkway, Alameda, CA 94501.
COPYING PROHIBITED
www.sybex.com
Using Virtual Private Network Connections
499
Using Virtual Private Network
Connections
A VPN is a private network that uses links across private or public networks (such as the Internet).
When data is sent over the remote link, it is encapsulated and encrypted and requires authenti-
cation services. You must use Point-to-Point Tunneling Protocol (PPTP) or Layer Two Tunneling
Protocol (L2TP) to support a VPN connection, both of which are automatically installed on
Windows XP Professional computers. To have a VPN, you must also have a Windows 2000
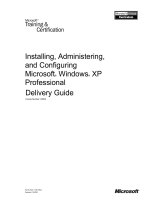
Server or a Windows Server 2003 computer that has been configured as a VPN server. Figure 12.24
illustrates a VPN.
5. In the Getting Ready dialog box, you can choose from the following options:
The Choose from a List of Internet Service Providers (ISPs) option guides you through
selecting an ISP and setting up a new account. You can use this option if you do not
already have an ISP.
The Set Up My Connection Manually option is used for dial-up connections where you
know the account name, password, and phone number for your ISP.
The Use the CD I Got from an ISP is probably the most common option and includes all
the software to connect to your ISP.
6. Select the option you will use to connect to your ISP and follow the remaining prompts.
EXERCISE 12.1 (continued)
Simpo PDF Merge and Split Unregistered Version -
Copyright ©2003 SYBEX Inc., 1151 Marina Village Parkway, Alameda, CA 94501.
COPYING PROHIBITED
www.sybex.com
500
Chapter 12
Dial-Up Networking and Internet Connectivity
FIGURE 12.24 Making a virtual private network (VPN) connection
The main advantage of using a VPN rather than a RAS connection is that with a RAS
connection, a long-distance call might be required to dial into the RAS server. With a
VPN connection, all you need is access to a network such as the Internet.
In Exercise 12.2, you will configure the client for a VPN connection. This exercise assumes
you already have a valid connection to the Internet.
EXERCISE 12.2
Configuring a VPN Client
1. Select Start Control Panel Network and Internet Connections.
2. In the Network Connection Type dialog box, click the Create a Connection to the Network
at My Workplace option and click the Next button.
3. In the Network Connection dialog box, select the Virtual Private Network connection option
and click the Next button.
4. The Connection Name dialog box will appear. Type in the name of the connection you will
use and the company name, and click the Next button.
5. In the Public Network dialog box, select the Do Not Dial the Initial Connection option and
click the Next button.
Internet
Tunnel
Windows 2000
VPN Server
Remote Computer
Simpo PDF Merge and Split Unregistered Version -
Copyright ©2003 SYBEX Inc., 1151 Marina Village Parkway, Alameda, CA 94501.
COPYING PROHIBITED
www.sybex.com
Using Internet Connection Sharing
501
Using Internet Connection Sharing
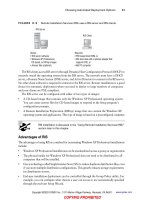
Internet Connection Sharing (ICS) allows you to connect a small network (typically a home
network) to the Internet through a single connection, as illustrated in Figure 12.25. The computer
that provides ICS services is usually the one with the fastest outgoing connection—for example,
using DSL.
The ICS host computer must have two connections. One of the connections is used to
connect the computer to the LAN. The second connection—for example, a modem, ISDN
adapter, DSL, or cable modem—is used to connect the computer to the Internet.
The ICS computer that accesses the Internet provides network address translation, IP
addressing, and DNS name resolution services for all the computers on the network. Through
Internet connection sharing, the other computers on the network can use Internet applications
such as Internet Explorer and Outlook Express, as well as access Internet resources.
6. In the VPN Server Selection dialog box, enter the hostname or the IP address of the computer
that you will connect to. Then click the Next button.
7. The Completing the New Connection Wizard will appear. Click the option Add a Shortcut
to This Connection to My Desktop and click the Finish button.
8. Click the shortcut that is created on the Desktop to connect to the VPN. Type in your username
and password and click the Connect button.
EXERCISE 12.2 (continued)
Simpo PDF Merge and Split Unregistered Version -
Copyright ©2003 SYBEX Inc., 1151 Marina Village Parkway, Alameda, CA 94501.
COPYING PROHIBITED
www.sybex.com
502
Chapter 12
Dial-Up Networking and Internet Connectivity
FIGURE 12.25 Internet Connection Sharing
There are three main steps for using ICS:
1. The ICS host computer is configured to access the Internet through whatever connection
method is appropriate (dial-up, cable modem, ISDN, etc.).
2. The ICS host computer has ICS enabled.
3. The client computers that will access the Internet through the ICS connection must be
configured to use dynamic IP addressing.
When you enable ICS on a host computer, the following configuration changes will occur:
When Internet connection sharing is enabled, the Internet host computer’s address becomes
192.168.0.1 with a subnet mask of 255.255.255.0. The host also becomes the DHCP
allocator, which acts as a “baby” DHCP server.
All of the network clients must get their IP addresses automatically through the DHCP
allocator, which gives out addresses randomly to the clients, in the range 192.168.0.2
through 192.168.0.254 with a subnet mask of 255.255.255.0.
The autodial feature is enabled on the ICS host computer.
DNS Proxy is enabled on the ICS host computer.
To configure Internet connection sharing, you must be a member of the Admin-
istrators group.
Using Internet Connection Sharing
You have Windows XP Professional on your home computer, which has Internet access. You
also have three other computers running Windows 98, Windows Me, and Windows 2000 Pro-
fessional. These computers, used as part of a home lab for testing and training preparation, are
connected through an Ethernet LAN using TCP/IP. They do not have Internet access, and you
want to change this so you can access the Internet from any of your computers.
This alteration is easily accomplished through Internet connection sharing. You will need to enable
the Internet Connection Sharing service on the Windows XP Professional computer, and configure
your client computers to use Internet connection sharing through their Internet browser software.
Internet
Internet
connection
Shares Internet
connection
Simpo PDF Merge and Split Unregistered Version -
Copyright ©2003 SYBEX Inc., 1151 Marina Village Parkway, Alameda, CA 94501.
COPYING PROHIBITED
www.sybex.com
Using Internet Connection Sharing
503
Configuring Internet Connection Sharing
on the Host Computer
The computer that will act as the host computer for Internet connection sharing must be
configured to support this option. Following are the options that can be configured:
Whether Internet connection sharing is enabled. If it is, watch out—local network access may
be momentarily disrupted because the IP address will automatically be reassigned to the com-
puters that use Internet connection sharing.
Whether on-demand dialing is enabled. When it is, if you do not have a permanent connection
on the computer that hosts Internet connection sharing, the host computer will automatically
dial out whenever a client tries to access the Internet. Enabling Internet Connection Sharing
automatically enables on-demand dialing.
Which applications and services can be used through the shared connection. For example,
you could specify that only FTP requests on port 21, Telnet requests on port 23, and HTTP
requests on port 80 can be passed through the shared Internet connection.
To configure Internet connection sharing on the host computer, take the following
steps:
1. Create an Internet connection or a VPN connection.
2. Verify that the host computer is configured as a DHCP client and that each client (Internet
Sharing) computer is also configured as a DHCP client. If the host has a static address, it
will be changed to 192.168.0.1 automatically.
3. Select Start Control Panel Network and Internet Connections, then select Network
Connections.
4. Right-click the connection you want to share, and select Properties from the pop-up menu.
5. The Properties dialog box for the selected connection appears. Click the Advanced tab
and under Internet Connection Sharing, check the option for Allow Other Network
Users to Connect through This Computer’s Internet Connection, which was shown in
Figure 12.23.
Enabling Internet Connection Sharing automatically enables on-demand dialing. When
on-demand dialing is enabled, if the Internet connection is not active and another computer
tries to access Internet resources, a connection will be automatically established.
6. Click the Settings button to access the Advanced Settings dialog box (Figure 12.26). This
dialog box allows you to specify which applications and services can be serviced through
the shared Internet connection. If you leave the blank default settings as is, then all appli-
cations and services are supported. However, you may want to limit access to one
application—for example, HTTP. If so, you could configure HTTP requests to only
be serviced by limited access to HTTP on port 80 (which is the default port that is used
by HTTP requests). When you are done, click the OK button twice to close both open
dialog boxes.
Simpo PDF Merge and Split Unregistered Version -
Copyright ©2003 SYBEX Inc., 1151 Marina Village Parkway, Alameda, CA 94501.
COPYING PROHIBITED
www.sybex.com
504
Chapter 12
Dial-Up Networking and Internet Connectivity
FIGURE 12.26 Advanced Settings, Advanced tab, Internet Connection Sharing Settings
dialog box
Configuring Internet Connection Sharing
on the Network Computers
To configure Internet connection sharing on the network computers, take the following
steps:
1. Right-click the Internet Explorer icon on the Desktop and select Properties from the
pop-up menu.
2. In the Internet Properties dialog box, click the Connections tab (Figure 12.27) and click the
Never Dial a Connection option.
3. Click the LAN Settings button, and in Automatic Configuration (Figure 12.28), clear the
Automatically Detect Settings and Use Automatic Configuration Script boxes. In Proxy
Server, clear the Use a Proxy Server check box.
Simpo PDF Merge and Split Unregistered Version -
Copyright ©2003 SYBEX Inc., 1151 Marina Village Parkway, Alameda, CA 94501.
COPYING PROHIBITED
www.sybex.com
Using Internet Connection Sharing
505
FIGURE 12.27 The Connections tab of the Internet Properties dialog box
FIGURE 12.28 The Local Area Network (LAN) Settings dialog box
Simpo PDF Merge and Split Unregistered Version -
Copyright ©2003 SYBEX Inc., 1151 Marina Village Parkway, Alameda, CA 94501.
COPYING PROHIBITED
www.sybex.com
506
Chapter 12
Dial-Up Networking and Internet Connectivity
Do not configure Internet connection sharing on corporate networks with domain
controllers, DNS servers, WINS servers, DHCP servers, routers, or other comput-
ers that use static IP addresses. When Internet connection sharing is configured,
it causes computers that use the shared Internet connection to lose their IP con-
figuration and generates a new IP configuration. Normal network connections
then have to be manually reset to access local network resources.
In Exercise 12.3, you will configure the VPN connection you created in Exercise 12.2 to
support Internet connection sharing.
Using an Internet Connection Firewall
If you have a computer that attaches to the Internet through a dial-up modem, cable modem,
or DSL connection, you can use Internet Connection Firewall (ICF) to protect your connection
from passive or active Internet security threats. Firewalls are security systems that act as a
boundary between your computer or network and the outside world. ICF works by acting as
a protective mechanism by restricting what access is allowed to your computer through the Internet.
You would use ICF only if your computer was directly connected to the Internet. If your
network already uses a firewall or a proxy server, then ICF is not needed. ICF should also not
be installed on computers that use VPN services. ICF can’t be enabled on private connections
for host computers of ICS.
ICF is a stateful firewall, which means that it monitors all communications by defining the
source and destination traffic of all messages that are sent to the computer. ICF works by using
a flow table, which defines protected networks. The only incoming traffic that is allowed is traffic
that can be validated through an entry in the flow table. If unauthorized traffic is detected, ICF
automatically discards the unauthorized packets. If you originate traffic from an ICF computer,
EXERCISE 12.3
Configuring Internet Connection Sharing
1. Select Start Control Panel and click Network and Internet Connections. Click Network
Connections, then right-click the Dial-Up connection you created in Exercise 12.2 and
select Properties.
2. In the Dial-Up Properties dialog box, select the Advanced tab. Under Internet Connection
Sharing, click the Allow Other Network Users to Connect through This Computer’s Internet
Connection option. If you have not saved your username and password for the computer,
you will see a dialog box warning you that Internet Connection Sharing will only dial the
connection when you are logged in. If you want to enable automatic dialing, you will need
to save your username and password in the Connect dialog box. Click the OK button.
3. In the Advanced tab, click the OK button to close the Dial-up Properties dialog box.
Simpo PDF Merge and Split Unregistered Version -
Copyright ©2003 SYBEX Inc., 1151 Marina Village Parkway, Alameda, CA 94501.
COPYING PROHIBITED
www.sybex.com
Using an Internet Connection Firewall
507
then that traffic is logged in a table, so that if you receive inbound traffic from a site you have
contacted, that traffic is allowed to pass through.
To configure and manage ICF, you take the following steps:
1. Select Start Control Panel and click Network and Internet Connections. Click Network Con-
nections and right-click the dial-up connection you want to enable ICF on. Select Properties.
2. Click the Advanced tab. Check the Protect My Computer and Network by Limiting or
Preventing Access to This Computer from the Internet option.
3. To configure ICF logging, click the Settings button. In the Advanced Settings dialog box,
click the Security Logging tab (Figure 12.29). This allows you to configure ICF logging
options such as whether dropped packets are logged and whether successful connections
are logged. You can also specify the log file that will be used and the maximum log file size.
FIGURE 12.29 The Security Logging tab of the Advanced Settings dialog box
In Exercise 12.4, you will configure Internet Connection Firewall.
EXERCISE 12.4
Configuring Internet Connection Firewall
1. Select Start Control Panel and click Network and Internet Connections. Click Network Con-
nections and right-click the dial-up connection you created in Exercise 12.2. Select Properties.
2. In the Dial-Up Properties dialog box, select the Advanced tab. Click the option Protect My
Computer and Network by Limiting or Preventing Access to This Computer from the Internet.
Simpo PDF Merge and Split Unregistered Version -
Copyright ©2003 SYBEX Inc., 1151 Marina Village Parkway, Alameda, CA 94501.
COPYING PROHIBITED
www.sybex.com
508
Chapter 12
Dial-Up Networking and Internet Connectivity
Configuring and Managing
Internet Explorer
Internet Explorer (IE) is a web browser used to search and view information on the World Wide
Web (WWW) via the Internet, or information that is stored on local intranets. You can access
resources by typing in the address of the web page you wish to access or by selecting an address
from your Favorites list. In this section you will learn about accessing resources through IE and
how to configure IE.
Accessing Resources through Internet Explorer
When you access a resource through IE, you use a Uniform Resource Locator (URL) address.
A URL address is typically composed of four parts—for example: .
The first part of the address is the protocol that is being used. Examples of protocols include
HTTP and FTP.
The second part of the address is the location of the site—for example, the World Wide
Web (www).
The third part of the address is who maintains the site—for example, Sybex.
The fourth part of the address identifies the kind of organization. Examples of defined
suffixes include .com, .gov, .org, and .edu.
Using HTTP
HTTP is the main protocol for making www requests. HTTP defines how messages are formatted
and transmitted and the actions that will be executed by web servers and browsers based on the
requests you make. The main standard that is used with HTTP is Hypertext Markup Language
(HTML), which defines how web pages are formatted and displayed.
If the web server you are trying to access is using Secure Sockets Layer (SSL)
services, then instead of using http:// requests, you use secure HTTP, and the
request would use https://.
Using FTP
FTP is mainly used to transfer files between computers on the Internet. Access to FTP servers
is based on permissions that have been set on the FTP server you are trying to access. Access
3. Click the Settings button. In the Advanced Settings dialog box, select the Security Logging
tab. Click the Log Dropped Packets option and the Log Successful Connections option.
Click the OK button.
EXERCISE 12.4 (continued)
Simpo PDF Merge and Split Unregistered Version -
Copyright ©2003 SYBEX Inc., 1151 Marina Village Parkway, Alameda, CA 94501.
COPYING PROHIBITED
www.sybex.com
Configuring and Managing Internet Explorer
509
can be granted to anonymous users or users can be required to have a valid username and
password.
Once you access a FTP site, you can:
Work with files and folders in the same manner that would be used on a local computer
View, download, upload, rename, and delete files and folders (based on your permissions)
When you use FTP for file transfer with IE, the syntax looks different than a typical HTTP
request. FTP requests are made through the address bar on IE. For example, if you were trying
to access Microsoft’s FTP site, you would type:
If the FTP site required user and password authentication services, you could use the File
menu and select the Login As option.
If you need to provide logon credentials as a part of the FTP request, then the syntax you
would use would be:
ftp://username:
Configuring Internet Explorer
Several options can be configured for Internet Explorer. You access Internet Properties by right-
clicking Internet Explorer from the Start menu and selecting Internet Properties. This brings up
the dialog box shown in Figure 12.30.
FIGURE 12.30 The Internet Properties dialog box
The options that can be configured are General, Security, Privacy, Content, Connections,
Programs, and Advanced.
Simpo PDF Merge and Split Unregistered Version -
Copyright ©2003 SYBEX Inc., 1151 Marina Village Parkway, Alameda, CA 94501.
COPYING PROHIBITED
www.sybex.com
510
Chapter 12
Dial-Up Networking and Internet Connectivity
Configuring General Options
General properties are used to configure home page, temporary Internet files, and history infor-
mation. Home Page is used to configure the default home page that is displayed when you launch
Internet Explorer. You can specify that you want to use the current home page for whatever is
currently loaded, use the default home page that was pre-configured, or leave the option blank.
The Temporary Internet Files options are used to manage cookies, files, and settings. Cookies
are special files that are created by websites and store information, such as preferences used
when you visited the website. By deleting files, you delete any temporary Internet files that have
been stored on your computer. This option is useful when you are low on disk space. Settings
is used to configure options such as how your computer checks for newer versions of stored files
and the location and amount of space that can be used by temporary Internet files.
History saves all of the links to pages you have visited. By default, a history of all of the links
you have accessed is kept for 20 days. You can customize how many days the history is stored
or manually clear the history.
You can also set other options from the General tab that affect how Internet Explorer is
customized, such as colors, fonts, languages, and accessibility options.
Configuring Security Options
The Security tab, as shown in Figure 12.31, allows you to configure the following options:
The Internet content zones that can be used by the computer
The local intranet zones that can be used by the computer
The trusted sites that are allowed for the computer
The restricted sites that are in effect for the computer
FIGURE 12.31 The Security tab of the Internet Properties dialog box
Simpo PDF Merge and Split Unregistered Version -
Copyright ©2003 SYBEX Inc., 1151 Marina Village Parkway, Alameda, CA 94501.
COPYING PROHIBITED
www.sybex.com
Configuring and Managing Internet Explorer
511
You set security zones by selecting the web content zone you want to configure, then
clicking the Sites button. Custom Settings allow you to configure options such as whether
you enable the downloading or use of signed or unsigned ActiveX controls. If you have con-
figured your computer for security options and have specified security restrictions, you will
receive an error message anytime you access a zone or site that is not configured for use with
your computer.
Configuring Privacy Options
The Privacy tab, as shown in Figure 12.32, is used to configure privacy settings that relate
to how third-party cookies are allowed to store information on your computer. You can
select from different levels of security that range from blocking all cookies to allowing all
cookies. When you click the Import button, you can import saved privacy settings from a
predefined file. The Advanced button allows you to customize privacy settings. At the bot-
tom of the screen, the Edit button for Web Sites allows you to customize privacy settings for
specific websites.
FIGURE 12.32 Internet Properties, Privacy tab dialog box
Configuring Content-Related Options
The Content tab, as shown in Figure 12.33, is used to configure the options for Content Advisor,
Certificates, and Personal Information.
Simpo PDF Merge and Split Unregistered Version -
Copyright ©2003 SYBEX Inc., 1151 Marina Village Parkway, Alameda, CA 94501.
COPYING PROHIBITED
www.sybex.com
512
Chapter 12
Dial-Up Networking and Internet Connectivity
FIGURE 12.33 The Content tab of the Internet Properties dialog box
Content Advisor
When you click the Enable button for Content Advisor, shown in Figure 12.34, you can set
ratings of what can be viewed on the computer. This allows you to set flags to limit what is
accessed based on language, nudity, sex, and violence on a sliding scale of acceptability. This
option assumes that the website has been rated appropriately through the website configuration.
The Approved Sites tab allows you to specifically define what sites are allowed or disallowed
regardless of their content rating. The General tab allows you to configure options to allow a
Supervisor to override content settings. The Advanced tab allows you to configure access for the
ratings bureau you want to use for content ratings.
Certificates
Certificates are used to identify who you are based on a certificate that has been issued to you
from a certification authority or certificate publisher. Through the Certificates section on the
Content tab, you can Clear SSL State, configure Certificates, and configure Publishers.
With Secure Sockets Layer (SSL), any certificates that are used are automatically saved in SSL
cache. The certificates are stored in SSL cache until the computer is restarted. If you need to use
a new certificate, the Clear SSL Start button can be used to manually clear the SSL cache, so the
new certificate can be used without restarting the computer.
The Certificates option is used to require a trusted website to provide you, the client, with a
valid certificate. This option is used to verify that the website that is being accessed can be
authenticated through certificate services.
Simpo PDF Merge and Split Unregistered Version -
Copyright ©2003 SYBEX Inc., 1151 Marina Village Parkway, Alameda, CA 94501.
COPYING PROHIBITED
www.sybex.com
Configuring and Managing Internet Explorer
513
FIGURE 12.34 The Content Advisor dialog box
The Publishers button is used to configure all of the trusted publishers for the computer.
You import a certificate from trusted publishers through the Import button in the Certificates
dialog box.
Personal Information
Personal information allows you to configure AutoComplete and use the Microsoft Profile
Assistant. With AutoComplete, the entries you make are stored, and when you type in a few
keystrokes of a new entry, AutoComplete will compare the new entry to the previous entries
and try and make a match for you. Profile Assistant is used to store personal information
about you.
Configuring Connections
The Connections tab, as shown in Figure 12.35, is used to configure what connection is used to
access the Internet. This can be any connection you have created or a connection that is using
Internet Connection Sharing. You can also configure proxy server settings and the LAN settings
that are used by the Internet connection.
Simpo PDF Merge and Split Unregistered Version -
Copyright ©2003 SYBEX Inc., 1151 Marina Village Parkway, Alameda, CA 94501.
COPYING PROHIBITED
www.sybex.com
514
Chapter 12
Dial-Up Networking and Internet Connectivity
FIGURE 12.35 The Connections tab of the Internet Properties dialog box
Dial-up settings include:
Never Dial a Connection
Dial Whenever a Network Connection Is Not Present
Always Dial My Default Connection
LAN settings are used to define automatic configuration settings and proxy server settings
(what the IP address for the proxy server is and the port that should be used). Proxy settings defined
for the LAN do not apply to dial-up or VPN connections.
Configuring Program Options
The Programs tab, as shown in Figure 12.36, is used to configure what programs are associated
with different Internet services. You can specify what programs are used for:
HTML editor
Newsgroups
Internet call
Calendar
Contact list
When you click the Reset Web Settings button, Internet Explorer will default back to all of
the default home and search page settings.
Simpo PDF Merge and Split Unregistered Version -
Copyright ©2003 SYBEX Inc., 1151 Marina Village Parkway, Alameda, CA 94501.
COPYING PROHIBITED
www.sybex.com
Configuring and Managing Internet Explorer
515
FIGURE 12.36 The Programs tab of the Internet Properties dialog box
Configuring Advanced Options
The Advanced tab, as shown in Figure 12.37, is used to configure Internet Explorer options for
accessibility, browsing, how links are underlined, HTTP settings, multimedia, printing, and
security settings.
FIGURE 12.37 The Advanced tab of the Internet Properties dialog box
Simpo PDF Merge and Split Unregistered Version -
Copyright ©2003 SYBEX Inc., 1151 Marina Village Parkway, Alameda, CA 94501.
COPYING PROHIBITED
www.sybex.com
516
Chapter 12
Dial-Up Networking and Internet Connectivity
Managing Internet Printers
Windows XP automatically supports Internet printing when Internet Information Services (IIS)
is installed on a Windows Server 2003 or a Windows XP Professional client. IIS is covered
in greater detail at the end of this chapter. Any printers that are shared on the Windows XP
Server are then automatically made accessible to Internet users through a protocol called Internet
Printing Protocol (IPP). Windows XP clients automatically include IPP print support, and the
users can browse and print to Internet printers through Internet Explorer 4.01 or higher.
This chapter covers the material related to Internet printing for the “Connect to
local and network print devices” objective. The other subobjectives for this
objective are covered in Chapter 11, “Managing Printing.”
To install a printer from the Internet or an intranet, use the printer’s URL as the name of the
printer. To support all browsers, an administrator must choose basic authentication. Internet
Explorer supports LAN Manager Challenge/Response and Kerberos version 5 authentication.
Adding an Internet Printer
To install an Internet printer on a Windows Server 2003 or Windows XP Professional client,
you must first install IIS. Then you can create a shared printer (see Chapter 11 for details on set-
ting up a shared printer). Once you have created a shared printer complete the following steps:
1. Select Start Printers and Faxes.
2. In the Printers folder, click the Add a Printer option.
3. The Welcome to the Add Printer Wizard starts. Click the Next button.
4. The Local or Network Printer dialog box appears, as shown in Figure 12.38. Select A
Network Printer, or a Printer Attached to Another Computer, and click the Next button.
FIGURE 12.38 The Local or Network Printer dialog box
Simpo PDF Merge and Split Unregistered Version -
Copyright ©2003 SYBEX Inc., 1151 Marina Village Parkway, Alameda, CA 94501.
COPYING PROHIBITED
www.sybex.com