Microsoft Office 2003 Super Bible phần 5 pps
Bạn đang xem bản rút gọn của tài liệu. Xem và tải ngay bản đầy đủ của tài liệu tại đây (1.43 MB, 64 trang )
233Chapter 9 ✦ Building Integrated Documents
Moving and resizing linked objects
You can move or resize a linked object just as you can move or resize an embedded object.
You can also edit it in its source application by double-clicking it, with one difference: When
you double-click an embedded object, the menus and toolbars of the originating program are
displayed in the destination document’s application. Double-clicking a linked object opens
the source document in the originating application: In the case of the previous example, it
would open the source document in Excel in a new window.
Editing and updating links
If you have a lot of linked objects in the same document, the easiest way to work with them is
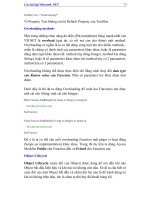
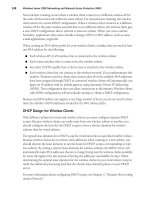
to choose Edit_Links. This opens a dialog box similar to the one shown in Figure 9-6. (Its
appearance varies slightly among the various Office applications.)
Figure 9-6: Edit your links using these controls.
The list box includes all the linked objects in the current document (in this case, only one).
Down the right side are additional controls:
✦ Update Now updates the linked object in the destination document to match the
source.
✦ Open Source opens the source file in its originating application.
✦ Change Source lets you browse your computer for a different source file. Obviously,
changing source files is likely to completely change the appearance of your current
document. You can also use Change Source to find a source file that has been
relocated, thus repairing the severed link.
✦ Break Link turns the linked object into a picture, severing its connection with the
source file.
You can also choose to either automatically update the linked object whenever you open the
destination document or whenever the source file changes, or you can choose to update the
linked object only when you click Update Now.
234 Part II ✦ Collaborating and Integrating with Office 2003
Using the Locked and Save picture options
Some applications include two additional options in this dialog box: Locked and Save Picture
in Document. If Locked is available, you can select it to deactivate the Update Now button
and prevent the linked object from being updated automatically. You might do this to freeze
the data in your document at a particular point in time.
Save picture in document is normally checked. If you uncheck it, you can save a graphic as a
linked object instead of inserting it into your document. This can save disk space.
Other Methods of Sharing Data
The four main Office applications (Word, Excel, PowerPoint, and Access) offer
additional ways to share data. You’ll look at collaborating on a network (including the
Internet) in a separate chapter, but there are several other ways in which Office
applications work together.
For a full explanation of how you can collaborate on a network with Office applications, see
Chapter 16 of this Super Bible eBook.
Sending a Word document to PowerPoint
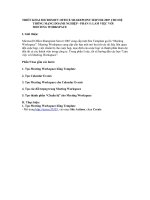
Word lets you send the currently active document to PowerPoint as the basis of a new
presentation. It automatically turns each paragraph of the document into a new PowerPoint
slide (see Figures 9-7 and 9-8), which you can then edit and format as you wish in
PowerPoint. To send a document to PowerPoint, choose File_Send To_Microsoft
PowerPoint.
You can reduce the amount of formatting you’ll have to do in PowerPoint by using styles.
PowerPoint will interpret each Heading 1 style as a title slide, each Heading 2 style as the
next level of text, and so on. For that reason, a Word outline actually makes a better
PowerPoint presentation than a Word document consisting of long paragraphs of text.
Cross-
Reference
235Chapter 9 ✦ Building Integrated Documents
Figure 9-7: This ordinary Word document can be sent to PowerPoint . . .
Figure 9-8: . . . where it becomes a presentation in which each paragraph forms a new
slide (although obviously some formatting work is needed!).
236 Part II ✦ Collaborating and Integrating with Office 2003
Analyzing Access data in Excel
Access is a great application for storing and retrieving, but when you want to analyze data,
Excel wins out. For that reason, Office makes it easy to analyze Access databases in Excel.
To do so, open the Access table you want to analyze, and then choose Tools_Office
Links_Analyze it with MS Excel. Excel opens the table and converts it into a spreadsheet,
where you can play with the data to your heart’s content.
Publishing Access reports with Word
Access has a disadvantage when it comes to designing reports for its data: Its tools can seem
awkward if you aren’t thoroughly familiar with it. But one advantage of Office’s integration
is that you can usually use data from any application in another application with which you’re
more comfortable. For that reason, Access also makes it easy to publish reports in Word.
Open the report you want to publish in Word in Access, and then choose Tools_Office
Links_Publish it with MS Word. Access opens Word and converts the report into a new
document in RTF format.
Merging Access data in Word
Access also lets you easily merge data from a database table with a Word document.
To do so:
1. In Access, open the table you want to merge, and then choose Tools_Office
Links_Merge it with Microsoft Word. This opens the wizard shown in Figure 9-9.
Figure 9-9: Use this wizard to merge Access data in Word.
2. Choose either to link your data to an existing Microsoft Word document — a form
letter, for instance — or to create a new document and then link the data to it. If you
choose to use an existing document, you’ll be asked to select it.
237Chapter 9 ✦ Building Integrated Documents
3. Access opens Word and either displays the existing document you chose or a blank
document that you can create and format. You can’t see it, but the Word document
and the Access document are linked.
4. From here on, the process of using the Access data is the same as creating any other
mail-merged document in Word.
Sending a PowerPoint presentation to Word
Just as you can turn a Word document into the basis of a PowerPoint presentation, you can
turn a presentation into a Word document which you can then edit and format. This can be a
great way to create a hard-copy version of it.
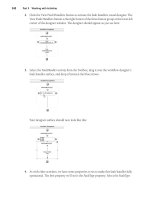
To do so, open the presentation you want to turn into a Word document, and choose
File_Send To_Microsoft Word. This opens the dialog box shown in Figure 9-10.
Figure 9-10: Turn your PowerPoint presentation into a Word document, laid out just the
way you like it.
Choose how you want to lay out the pages (you can position slides two to a page, with notes
or blank lines beside them; one to a page, with notes or blank lines below them; or send the
outline only, without any slide images), and whether you want to paste (embed) the
presentation into Word or paste it as a linked object.
Click OK. PowerPoint creates a new document in Word and pastes the presentation into it.
238 Part II ✦ Collaborating and Integrating with Office 2003
Sharing Data with XML
As has been pointed out several times already in this book, Office 2003 offers XML
(eXtensible Markup Language) as a native file format — meaning you can save your files as
XML files instead of as Office files.
XML is described in greater detail elsewhere, but it’s worth reiterating what is likely the
clearest definition of differences between HTML (the markup language used to create Web
pages) and XML: XML was designed to describe data, focusing on what data is, whereas
HTML was designed to display data, focusing on how data looks.
That makes XML an ideal format in which to exchange data between applications,
especially between Office and non-Office applications (provided they, too, support XML to
the extent Office does).
However, because Office applications do a fine job of interacting with each other with their
standard file formats, there’s no particular reason to use XML instead when sharing data
between them — unless you’re also planning to share that data with non-Office applications.
In which case you’ll find the techniques for inserting linked and embedded files work with
Office documents saved in XML format just as they do for Office documents saved in their
standard formats.
Summary
In this chapter, you learned ways to build documents using more than one Office application
at a time. Key points included the following:
✦ There’s more than one way to insert an object from one application into another.
You can copy it and select Paste Special, choose Insert_Object from the menu, or,
in some applications, use built-in tools.
✦ When you use Paste Special, you can choose to insert an object in a number of
formats, which vary depending on what kind of object you copied. Typical options
include inserting the object as text, as a picture, as a linked or embedded object, or
as HTML.
✦ Embedded objects can be edited using the program that created them by double-
clicking them.
✦ Linked objects can be edited in the same way. The difference is that linked objects
are created from a source file, and if that source file is changed in the originating
program, the display in the destination document also changes. This is useful for
keeping documents up-to-date when data is changing rapidly.
✦ You can edit all the linked objects in your document by choosing Edit_Links. You
can choose to update links automatically or manually.
239Chapter 9 ✦ Building Integrated Documents
✦ Other ways to share data in Office include sending Word documents to PowerPoint
presentations (and vice versa) and sending Access data to Excel for analysis or to
Word for publication or mail merging.
✦ You can integrate Office documents saved in XML format exactly the same way as
those saved in standard Office formats — useful if you need to keep your
documents in XML format for sharing with non-Office users.
✦✦✦
10
10
In This Chapter
Integrating Outlook
with Office
Creating a mail merge
Sending an e-mail
from an application
Importing and
exporting data
CHAPTER
Integrating
Outlook
with Other
Applications
C
omputers are wonderful and complex tools. Unlike a simple
tool such as a hammer, a computer is intended to handle
many very different tasks. This versatility is the result of the broad
range of software that is available for modern computers.
In all likelihood, your copy of Outlook came as a part of Microsoft
Office. But even if it did not, you probably have software that
provides word processing functions, other software that manages
database information, and software that handles calculations. You
probably have many other applications on your computer, too. All
these different pieces of software may seem totally independent of
each other, but as you learn in this chapter, you may want to use
some of them to complement each other. You might, for example,
want to use the contact information that you have in Outlook to
help you create perfectly addressed letters using your word
processor. You might also want to send a spreadsheet file that
you’re working on as an e-mail message. These are just a few of
the benefits you can gain from integrating Outlook with some of
the other applications on your computer.
Integrating Outlook with Office
As you would probably expect, Outlook works very well with the
other applications that are a part of Microsoft Office. If you want
to use your Outlook Contacts list to create a mail merge in
Microsoft, you’ll find a command right on the Outlook menu to
242 Part II ✦ Collaborating and Integrating with Office 2003
begin the process (Tools _ Mail Merge). In fact, if you want to share information between
applications, Outlook is ready both to provide information to other programs and to use
information that is provided by other programs.
Much of this two-way data sharing can be thought of as common to many different
programs. It’s often quite easy to share data between programs provided by different
software manufacturers. You don’t have to use Word, Excel, or Access to share information
with Outlook. Of course, because Microsoft would like you to use their products, they’ve
made it just a bit easier to share information between the programs of Microsoft Office than
with other programs.
One way to share information between programs is to use linking or embedding to place an
object from one program into a document in another program. Linking places a link in your
document so that changes in the original object are reflected in your document. Embedding
places a static copy of the object into your document. Linking offers the advantage of smaller
document size and always up-to-date content, but embedding offers the advantage of having
everything combined into a single package.
You might include a chart from an Excel worksheet in an e-mail message to show your team
members how expenses have really increased over the past year. Or you might use a
Microsoft Visio image to illustrate an important point about how your new building proposal
will fit in with the existing structures in the neighborhood.
Here’s a quick example of how you might place an Excel chart into an e-mail message:
1. Create the chart in an Excel worksheet.
2. Select the object that you want to use in your e-mail message. In this case, select the
chart of monthly expense.
3. Select Edit _ Copy to copy the object to the Office Clipboard.
4. Switch back to Outlook. If the taskbar is visible, you can click the Outlook icon on
the taskbar, or you can use Alt+Tab to switch between applications.
5. Click the Mail Button Bar icon and then click the New Mail Message button to
display a new Message form.
6. Choose Format _ Rich Text.
7. Enter the addresses and subject line.
8. Type your message.
9. Select Edit _ Paste Special to display the Paste Special dialog box. You could
simply choose Edit _ Paste, but this won’t enable you to choose the link option.
A link option sends only a link, not actual data.
10. Choose Paste to embed the object.
Note
243Chapter 10 ✦ Integrating Outlook with Other Applications
11. After you have selected how you want to paste the object, you may be able to select
the object type. Generally the types shown at the top of the list will remain the
closest to the object’s original appearance.
12. Click OK to paste the object as shown in Figure 10-1.
Figure 10-1: Inserted objects become a part of your document.
13. Click Send to send the e-mail message.
Don’t use plain text as the message format if you want to place objects into the message. You
can only paste text into a plain text message.
As you use Outlook and the other applications on your computer, it’s a good idea to think
about how you might share information between different applications. Don’t make the all
too common mistake of thinking that information can only be used in documents created in
the application where the data resides. As you see in other examples in this chapter, you can
almost always find a way to reuse data without going through the work of reentering it in a
new program.
Note
244 Part II ✦ Collaborating and Integrating with Office 2003
Creating a Mail Merge
A mail merge is the process of creating form letters, mailing labels, envelopes, or a catalog
from a set of related information. There are several ways to create a mail merge document.
You can either use your Outlook Contacts list to create these documents, or you can create
them from lists of information that you have in other applications.
Choosing the source for your data can affect what you can do with mail merge:
✦ If you have all the names and addresses in Contacts, Outlook will be the easiest
program to use because you won’t have to export the information to another
application.
✦ Outlook, however, doesn’t offer some advanced capabilities that you’ll find in other
Office programs. If you need to do things like automatically separating the mail
merge documents into individual zip codes to take advantage of special mailing
rates, you may want to use Excel or Access to do the mail merge.
✦ If you need to produce a very large set of mail merge documents, such as thousands
of form letters, you may want to use Access. This would be especially true if you
have a huge database and need to be able to select a subset of the records for a
particular need.
Getting names from contacts
If you already have the names that you want to use for your mail merge in your Outlook
Contacts folder, creating a mail merge directly from Outlook is a simple process. Before you
begin, however, you should put a little thought into what information the mail merge will use.
When you perform a mail merge, Outlook provides you with two options. You can create a
mail merge using only the selected records, or you can create one from all the contact records
that are shown in the current view. Unless you have applied a filter to the current view,
Outlook includes all your contact records in the view. Although you may want to create a
form letter to send to each of your contacts, it’s more likely that you’ll want to use a subset of
the contact records. Suppose, for example, that you have assigned categories to each of your
contacts. If you want to send a form letter to your relatives, you could create a view that
shows only those contacts in the family category. You can learn more about filtering your
contacts in Chapter 9 of Wiley’s Outlook 2003 Bible.
To create a mail merge using records in your Contacts list, follow these steps:
1. Open the Contacts folder.
2. If you want to use a subset of the records in the mail merge, do one of the following:
• Open a view that filters the records so that only the subset of records is shown.
• Select the records that you want to use. Hold down Ctrl as you select each record
to add it to the selection.
245Chapter 10 ✦ Integrating Outlook with Other Applications
3. Select Tools _ Mail Merge to display the Mail Merge Contacts dialog box, shown
in Figure 10-2.
Figure 10-2: Use the Mail Merge Contacts dialog box to produce a mail merge
from contact records.
4. Select which records to merge:
• Choose All contacts in current view if you have applied a filter to select a subset
of records or if you want to use all your contacts.
• Choose Only selected contacts if you selected the subset of records manually
before beginning the mail merge.
5. Select which fields to include:
• Choose All contact fields if you want the mail merge to include all of the contact
information.
• Choose Contact fields in current view if you want the mail merge to include only
those fields that are displayed in the current view.
6. Choose whether you want to create a new document or use an existing one. To use
an existing document, you can locate the document via the Browse button.
7. Select the Permanent file check box and specify a filename if you want to save the
mail merge data for future use. You might want to choose this option to provide a
permanent record of the contacts that you used for this mail merge. Normally,
246 Part II ✦ Collaborating and Integrating with Office 2003
though, you’ll want to perform a new mail merge each time you need the informa-
tion so that you don’t accidentally use outdated information.
8. Select the type of mail merge document from the drop-down Document type
list box:
• Form letters are documents that include merged information along with additional
text that you specify.
• Mailing labels are documents that contain multiple labels on each sheet. These are
generally printed on peel-off label stock in standard sizes.
• Envelopes are similar to mailing labels, except that the addresses are printed
directly on standard-size envelopes.
• Catalogs are similar to mailing labels, except that they are usually printed on plain
paper and are intended for uses such as membership lists.
9. Choose the destination from the drop-down Merge to list box, shown in Figure 10-3:
• New Document produces a document file that you can further edit as needed
before printing.
• Printer sends the merged document directly to the default system printer.
• E-mail creates e-mail messages and places them in your Outbox.
Figure 10-3: Choose the correct destination for the merged documents.
247Chapter 10 ✦ Integrating Outlook with Other Applications
10. If your current view includes any distribution lists, they will not be incorporated in
the mail merge. Click OK to confirm the message regarding this if it appears.
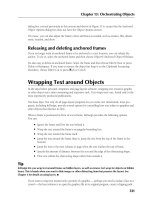
11. After Word opens, click the Insert Merge Field button to display the Insert Merge
Field dialog box as shown in Figure 10-4. Double-click to add fields to the docu-
ment. If you need to add spaces between fields, click Close, add a space, and reopen
the Insert Merge Field dialog box.
Figure 10-4: Add merge fields to your document.
12. Enter any additional text as necessary to complete your document.
13. Click the Merge to New Document button to display the Merge to New Document
dialog box, shown in Figure 10-5.
248 Part II ✦ Collaborating and Integrating with Office 2003
Figure 10-5: Select the number of records you want to use in your merge.
14. Click All, Current Record, or specify the range of contacts you want included in the
mail merge.
15. Click OK to complete your mail merge. Figure 10-6 shows an example of a com-
pleted form letter with the contact information substituted for the merge fields. If
you chose to merge to the printer, fax, or e-mail, the completed mail merge docu-
ments will be directed to the correct destination rather than to documents.
Figure 10-6: Your completed mail merge replaces the merge fields with the
information from your Contacts list.
249Chapter 10 ✦ Integrating Outlook with Other Applications
16. Print and save your mail merge documents as necessary.
Mail merge documents often contain nasty surprises such as missing or misplaced information.
It’s a good idea to practice using mail merge in advance to make certain that your mail merge
works as you expect. In addition, it’s always a good idea to take a quick look through the
merged documents before you print and mail them. You may find that you need to do some
additional tune-up of the master mail merge document before it is really ready to produce the
documents that you want.
Sending an E-mail from an Application
Outlook’s messaging capabilities make it easy for you to open Outlook and create a new
e-mail message. Although this is certainly not a difficult task, switching between applications
can be a distraction — especially if you’re deep into a project and discover something
important that you need to send out immediately. You’ve probably experienced this; you’re
working on a spreadsheet or a report and decide that you should send off a copy to someone
else. So you switch over to Outlook and click the New Mail Message button, address the
message, and begin to type your message. You then click the Insert File button and realize
that you can’t remember the correct filename. And even if you can remember the name of the
file that you want to send, you aren’t absolutely certain that you saved your latest revisions to
the file. You switch back to the original program, click the Save button, note the filename,
and switch back to your e-mail message. You complete the message and send it off, but
you’re frustrated by all the time that you’ve wasted.
Even if you’ve never thought about it before, you’re probably starting to realize that it might
be just a bit easier if you could send a document as an e-mail message without all that
switching back and forth. Not only would it be less distracting to your train of thought, but
you wouldn’t have to try to remember the name of the file that you want to send, nor just
exactly where you saved it.
You can send an e-mail message directly from any Office application as well as from many
other Windows programs. The process is similar in most applications, so the following
example shows you how to send an Excel worksheet from within Excel.
To send a document directly from an application, follow these steps:
1. Open the document that you want to send. In some programs, you must name the
document by saving it before you can send it as an e-mail message.
2. Select File _ Send To to display the Send To menu, shown in Figure 10-7. Different
applications may have different sets of options on the Send To menu, but most will
include a Mail Recipient option.
Note
250 Part II ✦ Collaborating and Integrating with Office 2003
Figure 10-7: You can send a document from within the application that created it.
3. Choose the option you prefer:
• Mail Recipient generally sends the document as a file attachment, but in Office
2003 applications, you can choose to send the document as an HTML page.
• Mail Recipient (for Review) specifies that you want to send this file out for others
to insert comments for review.
• Mail Recipient (as Attachment) specifies that you wish to send the document as a
file attachment to a text message.
• Routing Recipient sends the file to a specified group of people and returns it to
you when everyone has finished adding changes.
• Exchange Folder sends the file to an Exchange Server folder, where it will be
available to all authorized users of that folder.
251Chapter 10 ✦ Integrating Outlook with Other Applications
• Online Meeting Participant sends the file to someone who is participating with
you in an online meeting using NetMeeting.
• Fax Service enables you to send the document as a fax using a fax driver or fax
service (such as via the Internet).
4. If you selected Mail Recipient in an Office 2003 application, you’ll next see a
message similar to the one shown in Figure 10-8. Choose the format that best suits
your needs and then click OK.
Figure 10-8: Choose the proper document format.
5. Select the message recipients.
6. Enter any additional text and set any message options as necessary. Figure 10-9
shows the message ready to send.
252 Part II ✦ Collaborating and Integrating with Office 2003
Figure 10-9: Complete the message just as you would if you were sending it from
Outlook.
7. Click the Send button to send your message.
What happens after you click the Send button may depend on several factors. If Outlook is
running, the message should be sent to your Outbox. If Outlook is not running, the message
may be sent immediately using Outlook Express, or you may be prompted to select a
messaging profile — depending on the application that you used to create the e-mail message.
To prevent confusion, it’s usually best to make certain Outlook is running before you decide
to send an e-mail message.
Importing and Exporting Data
Your computer is probably worth a fraction of what the data it contains is worth to you. If you
think about all the time and effort that you’ve put into entering information into various
programs, documents, and databases, it’s easy to see how valuable that information may be.
As important as that data may be, it’s not useful if you can’t use the information the way you
need to.
Outlook handles many different types of data. You may have several sources of data that you
would like to use in Outlook, and you may have a number of places where your Outlook data
might also be useful. The key to making all of this data more useful is to import and export
the information so that you can use it where you need it.
Outlook can import more types of data than it can export. If you need to use data from another
program in Outlook, or use Outlook data in another program, you may encounter situations
where neither program seems to support the other’s format. If so, look for another format that
both programs support such as dBase, comma-separated values, or even tab-separated val-
ues. If you cannot find a common format, you may be able to use Word, Excel, or Access to
handle the format conversion.
Note
253Chapter 10 ✦ Integrating Outlook with Other Applications
Importing information into Outlook
There are several types of information that you may want to import into Outlook. Typically,
though, these fall into a few categories:
✦ Contact information such as e-mail addresses
✦ vCard electronic business cards
✦ iCalendar scheduling information
✦ Messages stored in Personal Folder files
✦ Internet mail account settings, such as from other e-mail programs (Eudora Pro for
example)
✦ Internet mail and addresses, such as from Eudora Pro
To import data into Outlook, follow these steps:
1. Select File _ Import and Export to display the Import and Export Wizard.If you
have the Microsoft Outlook Business Contact Manager installed, you will need to
select File _ Import and Export _ Outlook.
2. Select the type of information that you want to import. If you aren’t sure which
option to choose, select each option and read the description in the lower part of the
dialog box.
3. Click Next to continue.
4. Choose the type of file you wish to import. The choices will vary according to your
selection in step 2.
5. Click Next to continue.
6. Select the name of the file that you want to import.
7. Choose any options for the import. These will vary according to the type of file that
you are importing.
8. Click Next to continue.
9. If you are importing from a Personal Folder file, choose which folders you want to
import. If you are importing data from other types of sources, you probably won’t
have to make this selection.
10. If you want to set up custom field mappings, click the Map Custom Fields button to
display the Map Custom Fields dialog box. Drag values from the left list to the right
list to map the fields as necessary.
11. Click OK.
12. Click the Finish button to import the data.
Other types of data sources will involve different sequences of steps, but the import process
will be similar in all cases. You must choose the type of data, the source file, and how to
handle duplicates.
254 Part II ✦ Collaborating and Integrating with Office 2003
Exporting information from Outlook
Just as you can import data into Outlook from several different formats, you can also export
Outlook data into a number of formats. Sometimes, though, the way that Outlook exports
data may leave something to be desired. Fortunately, there are alternatives that may work
better in some cases.
To export data from Outlook, follow these steps:
1. Select File _ Import and Export to display the Import and Export Wizard. If you
have the Microsoft Outlook Business Contact Manager installed, you will need to
select File _ Import and Export _ Outlook
2. Select Export to a file option.
3. Click Next to continue.
4. Choose the type of file you want to create. Most of the format options are best suited
for exporting contact information.
5. Click Next to continue. If this is the first time that you have exported data to a
particular format, you may need to insert your Outlook CD-ROM so that the correct
export filter can be installed.
6. Select the folder that you want to export. If you choose a folder other than Contacts,
you may not be pleased with the results — especially if you hope to save messages.
See “Saving Outlook messages” later in this chapter for a better way to save your
message text.
7. Click Next to continue.
8. Specify a name for the exported data file.
9. Click Next to continue.
10. Verify the actions to be performed, and then click the Finish button to export the
data.
Be sure to open the exported data file to verify the contents before you delete the data within
Outlook. You may discover that the exported data is incomplete or unusable, and it is far better
to determine this while you can still recover the information in Outlook.
Saving Outlook messages
If you look at data that you’ve exported from Outlook, you may be somewhat less than
thrilled with the results. The reason for this is that data you export is generally saved in a
database type of format, and this may not be what you intended — especially if you were
trying to save a message for use in another program.
When you want to save a message, there’s another way to do so that will generally produce
better results than exporting the message. Follow these steps to save a message as a text file:
Note
255Chapter 10 ✦ Integrating Outlook with Other Applications
1. Select the message that you want to save.
2. Select File _ Save As to display the Save As dialog box, shown in Figure 10-10.
Figure 10-10: Save a message rather than exporting it if you want the message
text to appear in a file.
3. Choose the destination for the file.
4. Enter a filename for the message. By default, Outlook will use the message subject
as the filename.
5. Click Save to save the file.
When you save a message as a text file, Outlook includes the message header information at
the top of the text file. This makes it easy for you to see the information such as who sent the
message, the message date, the recipients, and the subject line. Following all of this, you’ll
see the message text.
Saving a message as text does not save any message attachments. Be sure to save any
important attachments separately.
Summary
Outlook is a capable program, but that doesn’t mean you have to use it in isolation. As you
learned in this chapter, Outlook works well with other programs. You saw that Outlook
integrates with the other programs in Microsoft Office. You also learned how to use
Outlook’s Contacts list to produce form letters using mail merge. You saw that sending e-mail
from within other applications is sometimes easier than switching back to Outlook, and you
learned how to share data between Outlook and other programs.
✦✦✦
Tip
11
11
In This Chapter
Adding comments to
documents
Marking documents
with revision marks
Comparing and
merging documents
Comparing
documents side by
side
Using Reading
Layout view
CHAPTER
Comments
and Reviewing
Functions
in Word
F
or many people — especially those employed in the
publishing business — Word’s reviewing tools have become
an essential part of our word-processing arsenal. You might
remember a few years ago when word-processed documents
were still being marked up by hand. FedEx made a lot of money
from the publishing business in those days, as editors would
make changes to printed copies of pages and ship them to
authors, who would make their changes and ship them back.
These days, FedEx isn’t doing quite so well off publishers, and
the publishing business has sped up. Everyone working on a file
can now make changes to an electronic version and e-mail it to
the next person. It’s much easier, much quicker, and far less
hassle. This chapter looks at the tools that Word provides to you
for comments and reviews, tools that enable people to add
information to your documents, yet still provide you with the
power to approve or disapprove the changes.
There are two ways for people to make comments or changes to
a document in a collaborative setting. You can place comments in
the document, or you can track changes with the reviewing tools.
✦ Comments are great for when you don’t want to change
the text itself, you simply want to add your own
thoughts to it.
✦ The track changes/reviewing feature is a more advanced
feature that enables two or more people to actually
modify the document, with Word tracking who made
each change.