microsoft press windows workflow foundation step by step phần 5 pps
Bạn đang xem bản rút gọn của tài liệu. Xem và tải ngay bản đầy đủ của tài liệu tại đây (552.54 KB, 37 trang )
142 Part II Working with Activities
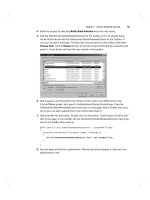
2. Click the View Fault Handlers button to activate the fault handlers visual designer. The
View Fault Handlers button is the right button of the three-button group at the lower-left
corner of the designer window. The designer should appear as you see here:
3. Select the FaultHandler activity from the Toolbox, drag it over the workflow designer’s
fault handler surface, and drop it between the blue arrows.
Your designer surface should now look like this:
4. As with other activities, we have some properties to set to make this fault handler fully
operational. The first property we’ll set is the FaultT ype property. Select the FaultType
Chapter 7 Basic Activity Operations 143
property in Visual Studio’s Properties pane, and click the browse button (the button
with the three dots) to activate the Browse And Select A .NET Type dialog box.
5. With the Browse And Select A .NET Type dialog box active, select the Type tab if it’s not
already selected and then expand the mscorlib tree node. From there, select System (for
the System assembly) and scroll down the resulting list in the right pane until you find
the list item Exception in the Type Name column. Select this by clicking the Exception
line in the right pane’s ListView control. This places the text “System.Exception” in the
Type Name edit control. Click OK to accept System.Exception as the exception type and
dismiss the dialog box. You should find the value System.Exception has been assigned to
the FaultT ype property.
Note
It’s no coincidence that the exception we’re asking this FaultHandler activity
to use is the same as the exception type thrown by the Throw activity we used earlier
in the chapter. They’re a matched set. If you don’t have a corresponding fault handler
for a Throw activity in your workflow, keep in mind that if the exception is thrown at
runtime, the WorkflowTerminated event is where you’ll soon find your workflow
executing. If this isn’t what you want, add the appropriate FaultHandler activity.
144 Part II Working with Activities
Note Although you see the Fault property in the preceding graphic, it’s actually
disabled and therefore cannot be set. Ignore it.
6. So far, we’ve added a FaultHandler activity and we’ve told it what type of exception it will
be handling, but we’ve not actually provided any code to deal with the exception if it’s
thrown. To do that, drag a Code activity from the Toolbox and drop it into the area below
where we dropped the FaultHandler activity itself. This area, identified by the name
faultHandlerActivity1, is like a miniature workflow visual designer. So it readily accepts
the Code activity, and as we’ve done with other instances of the Code activity, assign a
value to its ExecuteCode property. In this case, type in OnException and press Enter.
7. Visual Studio then adds the OnException event handler to Workflow1 and opens the code
editor for editing. To the OnException event handler, add this code:
Console.WriteLine(
"Exception handled within the workflow! The exception was: '{0}'",
WorkflowException != null ? WorkflowException.Message :
"Exception property not set, generic exception thrown");
Chapter 7 Basic Activity Operations 145
Note And again, it’s no coincidence we’re using the same WorkflowException
property we used with the Throw activity. If the WorkflowException property is null,
we’re directing Throw to simply throw a new instance of System.Exception. Otherwise,
WorkflowException contains the exception to throw.
8. Now compile and execute the code. You should see this output:
By using the FaultHandler, we’re able to process the exception (if we want to) and take any
required actions.
Note
By throwing and handling exceptions at this level, your workflow instance is still
essentially stopped. The advantage is that your workflow can work with the exception rather
than throwing it to the workflow runtime to deal with. If you want to continue processing
after specific exceptions are thrown (exceptions that you know you can recover from), don’t
use Throw and FaultHandler activities to deal with them. Instead, use try/catch inside activity
code so that the exception never leaks out to the runtime for disposition. If you can’t ade-
quately handle the exception internally (using try/catch), resort to Throw and FaultHandler.
Using the Suspend Activity
Another housekeeping activity you might find useful under certain conditions is the Suspend
activity. In fact, a common-use case is to handle a fault using FaultHandler and then suspend
the activity using Suspend to signal human intervention is required.
When you use the Suspend activity, you provide the activity with an error string through its
Error property. This property can be bound to a dependency property (such as the Throw
activity), a simple class property or field, or even a literal string (which we’ll do in the example
to follow). When Suspend executes, the workflow runtime raises the WorkflowSuspended event
and provides you with this error string in the event arguments.
Putting a workflow instance into a suspended state means the instance is not currently
executing, but neither is it unloaded. It’s essentially in a holding pattern, waiting for some
action on your part. It’s also not considered idle, so automatic persistence doesn’t come into
play here. Using the Suspend activity is relatively simple, as you’ll see.
146 Part II Working with Activities
Note In a suspended state, your workflow instance is merely existing. It’s a good idea to
hook the WorkflowSuspended event in your workflow-based applications so that you can take
action when workflow instances enter the suspended state. At least then you’re notified
they’ve been suspended, and you can take action to remove, resume, or restart them.
Modifying our workflow to use the Suspend activity
1.
With the ErrorThrower application again open in Visual Studio for editing, select the
Workflow1.cs file in the ErrorFlow project and click the designer button to activate the
workflow visual designer. (I again created a separate solution that targets this specific sec-
tion. If you’re following along, continue using ErrorThrower. But if you haven’t completed
the earlier steps in this chapter, you can jump straight to this point by opening the solu-
tion in \Workflow\Chapter7\ErrorSuspender, or you can follow along with a completed
version in \Workflow\Chapter7\ErrorSuspender Completed.) Because we’ll be adding
the
Suspend
activity to the
System.Exception
fault handler we just added, select the fault
handlers view by clicking the right-hand button at the bottom of the designer’s window.
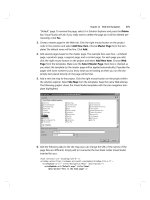
2. From the Toolbox, drag an instance of the Suspend activity onto the fault handler’s
design surface and place it after the Code activity, as shown here:
3. With the Suspend activity in place, select its Error property and type “This is an
example suspension error ” (including the quotation marks) in the associated
property edit control.
Chapter 7 Basic Activity Operations 147
Tip Typing a literal string, as we’ve done here, is perfectly acceptable. However, you
can also bind this to a string-based dependency property that is more easily altered as
your workflow executes. Clicking the browse button (the button with the three dots you
see in the graphic) activates the binding dialog box we saw in step 7 of the “Creating a
workflow using the Throw activity” procedure. Simply follow the same basic steps as
you did there.
4. Because we don’t have a WorkflowSuspended event handler in our main application, we
need to edit the Program.cs file from the main application and add it. In the Main
method, locate code to hook the existing event handlers and add the following:
workflowRuntime.WorkflowSuspended +=
new EventHandler<WorkflowSuspendedEventArgs>(workflowSuspended);
5. Because we’re using an event handler named workflowSuspended, we need to code that:
static void workflowSuspended(object sender, WorkflowSuspendedEventArgs e)
{
Console.WriteLine("Workflow instance suspended, error: '{0}'.",
e.Error);
waitHandle.Set();
}
6. Compile the application by clicking Build, Build Solution from Visual Studio’s main
menu and then press F5 or Ctrl+F5 to execute the application (after correcting any
compilation errors). The program output should be similar to this:
When you run this application, you should see the console output generated by the
WorkflowSuspended event handler in our main application. But you can do more than simply
write text to the console. You can take any other action appropriate for your process flow.
Although you could resume the workflow instance processing from here, it’s generally not rec-
ommended. For one thing, the entire activity that was processing will be skipped, leaving your
workflow instance to resume processing at a later stage in its flow, which probably isn’t a good
thing (what was skipped, and how do you account for it?). At the very least, however, you can
cleanly remove the workflow instance from processing and apply any necessary cleanup code.
As if exceptions and suspended workflow instances aren’t enough, you can, if you need to do
so, terminate your workflow instance. Let’s see how.
148 Part II Working with Activities
Using the Te r minate Activity
There are times when things get so bad that you have no recourse but to kill off a workflow
instance. Perhaps some data came back from an external process in a bad format or was oth-
erwise miscalculated. Or the database server simply disappeared and you can’t move forward
without it. Or well, hopefully, you see where this line of reasoning is going.
WF provides us with a ready-made way to terminate our workflow instances through the
Terminate activity. The Terminate activity is used in precisely the same way as the Suspend
activity, and in fact its properties are identical. The difference is that when Terminate executes,
all hope for your workflow instance continuing execution is lost.
When Terminate executes, the workflow runtime fires the WorkflowTerminated event, just
as if there were an unhandled exception. To tell the two situations apart is difficult when
processing the WorkflowTerminated event. All you can really do is examine the WorkflowTermi-
natedEventArgs and look at the Exception property. If the workflow instance was terminated
using the Terminate activity, the exception type will be System.Workflow.Component-
Model.WorkflowTerminatedException rather than some other (probably more common)
exception type.
Let’s see how we use Terminate activity in our workflow code.
Modifying our workflow to use the Terminate activity
1. We’re again going to work with the ErrorThrower application in Visual Studio. (If you
haven’t completed the earlier steps in this chapter, you can jump straight to this point by
opening the solution in \Workflow\Chapter7\ErrorTerminator, or you can follow along
with a completed version in \Workflow\Chapter7\ErrorTerminator Completed.) Once
again, select the Workflow1.cs file in the ErrorFlow project and click the designer button
to activate the workflow visual designer. We first need to remove the Suspend activity we
added in the preceding section. Simply select it with a single mouse click, and press the
Delete key.
2. From the Toolbox, drag an instance of the Terminate activity onto the fault handler’s
design surface and place it after the Code activity after first deleting the Suspend activity
you placed there previously.
Chapter 7 Basic Activity Operations 149
3. With the Terminate activity in place, select its Error property and type “This is an
example termination error ” (again with quotes) in the associated property edit
control.
Note
The tip I provided in the preceding section holds true here as well. You can use
a literal string, as we’re doing here, or you can bind the string to an activity field,
property, or dependency property.
4. Compile the application by choosing Build Solution from Visual Studio’s Build menu.
After correcting any compilation errors, press F5 or Ctrl+F5 to run it. If all goes as
expected, you’ll see something like the following:
Terminate, like Suspend, is a fairly simple activity, but a powerful one. You won’t often need it,
but when things go so badly for your workflow that you can’t continue, Terminate is the best
tool in the Toolbox.
If you want to continue to the next chapter, keep Visual Studio 2005 running and turn to
Chapter 8. If you suspended a workflow instance somewhere along the way in this chapter,
resume it! (Just kidding )
If you want to stop, exit Visual Studio 2005 now, save your spot in the book, and close it.
Terminate seems like a good alternative at this point
150 Part II Working with Activities
Chapter 7 Quick Reference
To Do This
Use the Sequence activity SequenceActivity is a composite activity, and as such it acts as
a drop site for other activities. Simply drag and drop an
instance of the Sequence activity onto the workflow visual
designer. Then drag and drop other activities onto Sequence-
Activity as necessary to complete your workflow. Those activ-
ities will be executed in the order they appear in the designer,
from top to bottom.
Use the Code activity With the visual workflow designer visible and active, drag an
instance of the Code activity onto the surface and drop it
into the workflow process as appropriate. Then provide an
ExecuteCode method name in the Properties window.
Populate that method with the code you want to execute.
Use the Throw activity With the visual workflow designer visible and active, drag an
instance of the Throw activity onto the surface and drop it into
the workflow process as appropriate. Then assign the Fault
and FaultT ype properties to provide the Throw activity with
the exception to throw as well as the type of exception it
should expect.
Use the FaultHandler activity With the visual workflow designer visible and active, and with
the Fault Handlers view showing, drag an instance of the
FaultHandler activity onto the surface and drop it into the
workflow process as appropriate. Then assign the FaultType
property to assign the type of exception it will handle.
Use the Suspend activity With the visual workflow designer visible and active, drag an
instance of the Suspend activity onto the surface and drop it
into the workflow process as appropriate. Then assign the
Error property to assign the error string value it will report to
the workflow runtime via the WorkflowSuspended event.
Use the Term in at e activity With the visual workflow designer visible and active, drag an
instance of the Ter mi na te activity onto the surface and drop it
into the workflow process as appropriate. Then assign the
Error property to assign the error string value it will report to
the workflow runtime via the WorkflowTerminated event.
151
Chapter 8
Calling External Methods and
Workflows
After completing this chapter, you will be able to:
■ Build and call local data services that are external to your workflow
■ Understand how interfaces are used to communicate between the host process and
your workflow
■ Use external methods designed to transfer data between you workflow and host
application
■ Invoke additional workflows from within an executing workflow
As I was writing the preceding chapters, I kept thinking to myself, “I can’t wait to get to the
part where we return real data to the host application!” Why? Because as interesting as work-
flow is, there is only so much you can do to demonstrate activities and workflows without
returning something realistic to the executing application. Theoretically, there might be an
infinite number of interesting workflow examples and demonstrations I could write that only
processed initialization data (such as the postal code example you saw in Chapter 1, “Intro-
ducing Microsoft Windows Workflow Foundation”). But things become far more interesting,
and to be honest, far more realistic when we kick off a workflow that seeks and processes data
from external sources and returns that data in some processed form to our application.
So why not just crack open an object and start sending data into an executing workflow, or
from an executing workflow to the host application? Actually, you can do this with existing
technology outside Windows Workflow Foundation (WF) using some form of marshaled
communications, such as .NET Remoting or an XML Web service. Marshaling, sometimes also
called serialization, is a process whereby data is converted from its original form into a form
suitable for transmission between different processes and even between different computers.
Why mention marshaling? Because your workflow is executing on a different thread than your
host process, and passing data between threads without proper marshaling is a recipe for
disaster for reasons beyond the scope of this chapter. In fact, your workflow could be in a
persisted state at the time you tried to send it data. It’s not on a different thread it’s not even
executing.
But wouldn’t a .NET Remoting connection or an XML Web service be considered excessive
if we just want to pass data between our workflow and the host process that’s controlling it?
Absolutely! And this is the premise of this chapter—how we can establish local communica-
tions. We’ll be setting up the systems necessary to satisfy the thread data-marshaling
152 Part II Working with Activities
requirements without calling into play (heavier-duty) technologies that are meant more for
computer-to-computer or process-to-process data transfers.
Building an ExternalDataService Service
When a workflow communicates with its host application, and specifically when it sends and
receives data, the workflow does so using queues and messages. How this is accomplished is
internal to WF, and this is not necessarily a bad thing. Although it might be nice to know the
specific mechanics that are used, the bottom line is we have applications to write and software
to deliver. So the more WF does for us, the more we can focus on our application-specific
tasks. But it’s important to understand the big picture so that the sections to follow make
more sense.
Workflow Intraprocess Communication
To simplify the communications task, WF uses an abstraction layer to buffer the workflow from
the host. An abstraction layer is like a black box. You feed input to the box, it performs some
magical task, and information flows out the other side. Of course, there isn’t anything magical
about it, but it’s still a useful way to describe it. We don’t know how it does the job—it simply
does the job.
In this case, the black box is known as the local communication service. Like any service in WF
terms, it’s another pluggable service. The difference is you write part of the service in this case
rather than using a prebuilt WF service. Why? Because the data you pass between your host
application and your workflow is specific to your application. Moreover, you can create vari-
ous data-transfer methods, allowing your host application to send data to and receive data
from the workflow using a variety of methods you design.
Note
Something you’ll need to watch for here is the sharing of collections or objects.
Since the host application and workflow runtime execute within the same AppDomain, refer-
ence-type objects and collections are passed by reference rather than by value. This means
that both the host application and the workflow instance could access and use the same
objects at the same time, opening the possibility for multithreading bugs and concurrent
data access issues. If your workflow and application design call for objects to be transferred
and the possibility exists that both workflow and host application would use the objects con-
currently, you should consider passing a copy of the object or collection, perhaps by imple-
menting ICloneable, or consider serializing the object or collection yourself and transferring
the serialized version.
I like to think of this local service we write as more of a connector. You write the service, plug
it into the workflow, and open connections to send your data. The data might be strings,
DataSet objects, or even custom objects you design—anything that is serializable. Although I
won’t show it in this chapter, the communication can be bidirectional. (Here, I’ll merely pass
data from the workflow back to the executing application.) Using a tool, we’ll generate
Chapter 8 Calling External Methods and Workflows 153
activities designed to send and receive data from the workflow’s perspective. From the host
application’s perspective, receiving data amounts to an event, while sending data is simply a
method call on the service object.
Note
We’ll return to the concept of bidirectional data transfer after looking at a few more
activities in later chapters. The workflow activity to receive data from the host application is
based on the HandleExternalEvent activity, which we’ll look at in Chapter 10, “Event Activities.”
We also need to dig deeper into the concept of correlation, which we’ll do in Chapter 17,
“Host Communication.” For now, we’ll simply return complex data to the host once the work-
flow instance has completed its task.
Although we need to do more than just this, ultimately we need to add the ExternalDataService
to our workflow runtime. ExternalDataService is a pluggable service that facilitates transferring
serializable data between workflow instances and the host application. The service code we’ll
write in the upcoming sections will do that and more. To see what’s in store for us, let’s look
at the overall development process.
Designing and Implementing Workflow Intraprocess
Communication
We begin by deciding what data will be transferred. Will it be a DataSet? An intrinsic object,
such as an integer or string? Or will it be a custom object we design ourselves? Whatever it is,
we’ll then design an interface that the ExternalDataService can bind to. This interface will con-
tain methods we design, and they can be designed to send and receive data from both the
workflow instance’s and the host’s perspective. The data we’re transferring will be passed
back and forth using the methods in this interface.
We’ll then need to write some code—our part of the external data service—which represents
the connection or bridging code the host and workflow will use to interact with the WF-pro-
vided ExternalDataService. If we were dealing with an XML Web service, Visual Studio could
automatically create proxy code for us. But there is no such tool for workflow, so we need to
devise this bridging code ourselves. The “bridge” we’ll use here actually consists of two
classes: a connector class and a service class. You can name them anything you like, and my
name assignments are not necessarily what WF might call them (I don’t believe WF has a
name for them!), but I prefer to think of them in this fashion. The connector class manages the
data conduit itself (maintains state), while the service class is used directly by the host and
workflow to exchange data.
With the interface we created in hand, we’ll execute a tool, wca.exe, which is typically located
in your Program Files\Microsoft SDKs\Windows\v6.0\Bin directory. The tool is called the
Workflow Communications Activity generator utility and given an interface it will generate two
activities you can use to bind the interface to your workflow instance: one for sending data,
the invoker; and one for receiving data, the sink. Once they are created and massaged a bit, you
154 Part II Working with Activities
can actually drag and drop them from the Visual Studio Toolbox onto the workflow visual
designer and work with them the same as any other workflow activity. While we don’t have a
tool to build the connection bridging code I mentioned previously, this tool definitely helps
on the workflow side.
Tip
From a project perspective, I tend to collect the host application code in one project or
a group of related projects (dependent assemblies), the interface and connection bridging
code in a second project, and the workflow code in a third project. This allows me to easily
reference the interface and bridge classes from both the host application and the workflow,
while neatly segregating functionality between assemblies.
We then have the pieces we need to wire up the communications between our workflow and
our host application. The entire process, while executing, is facilitated by ExternalDataService,
but it’ll use code we create. Let’s take a quick look at this chapter’s primary sample application
(as it’s far more complex than any we’ve seen so far) and then begin creating the workflow
external data communication code we’ll require.
The Motor Vehicle Data-Checking Application
The sample application for this chapter is a Windows Forms application that provides a user
interface for gathering motor vehicle data for specified drivers (very loosely based on an appli-
cation I actually wrote). The application itself is significant enough that I won’t record each
and every detail of its creation. Instead, you should use the sample code provided for this
chapter as a starting point. I will, however, show how to tie in the workflow components. And
if you were wondering, the application will use fictitious drivers and data, so all you with
excessive numbers of traffic violations can maintain your anonymity!
The main user interface form appears as you see in Figure 8-1. The drop-down list control
contains the names of three drivers, the selected name of which is sent to a new instance of a
workflow designed to retrieve the driver’s motor vehicle information and return a completed
DataSet. The DataSet is then bound to the list view controls you see—one for vehicle informa-
tion and one for violation information, if any.
Chapter 8 Calling External Methods and Workflows 155
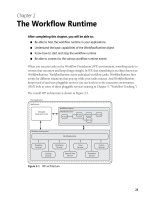
Figure 8-1 The MVDataChecker primary user interface
When you click the Retrieve MV Data button, you initiate a new workflow instance. The user
interface disables the retrieve button as well as the driver drop-down list control and displays
a “searching” notice, which you see in Figure 8-2. The picture control you see at the bottom of
the form is an animated image file. The application simply shows or hides the label and
picture box control as required.
Figure 8-2 The MVDataChecker “searching” user interface
When the workflow instance has completed its work, it uses an activity we’ll create to fire an
event the host application intercepts, which tells the host application that data is available.
Because Windows Forms ListView controls don’t bind directly to DataTable objects, we’ll
iterate through the tabular data and insert the rows in the view ourselves after retrieving the
data from the workflow. Completed ListView controls are shown in Figure 8-3.
156 Part II Working with Activities
Figure 8-3 The MVDataChecker user interface with retrieved data
At this point in the application’s execution, you might decide to retrieve another driver’s
information or quit the application. If you quit the application while a search is progressing,
the actively executing workflow instance is aborted.
With that brief tour of the application complete, let’s look at the code we need to write to
make all this work, starting with the interface we need to provide to WF so that it can raise
that “data available” event I mentioned.
Creating Service Interfaces
The service interface is entirely yours to create, and it should be based on the data you want to
communicate between your workflow instance and your host application. For this sample
application, imagine you need to design a workflow to retrieve driver information from vari-
ous sources and that you want the information collated into a single data structure—a DataSet
with multiple DataTables, one table for vehicle identification information and one table for
driver traffic violations. In reality, you’d retrieve this data from some source, or from a set of
different sources, but we’ll simply use imaginary data to keep things more focused on the
workflow itself. In the host application, we’ll display the (bogus) data in a pair of ListView
controls.
You’ll pass in to the workflow instance the name of the driver, which the workflow instance
uses to look up the driver and vehicle information. With the data in hand, the workflow
instance notifies the host application that data is ready, and the host application reads and
displays the information.
So we really need just a single method in our interface: MVDataUpdate. We know we want to
send a DataSet, so we’ll pass a DataSet into MVDataUpdate as a method parameter.
Chapter 8 Calling External Methods and Workflows 157
Creating a workflow data communication interface
1. The sample application, MVDataChecker, comes in two forms: incomplete and
complete. The \Workflow\Chapter8\MVDataChecker\ directory I mentioned
contains the incomplete application so that you fill in the missing code as you follow
the steps I outline throughout the chapter. However, the completed solution in the
\Workflow\Chapter8\MVDataChecker Completed\ directory contains the fully opera-
tional application you can use as well. Feel free to compare the two, work back and forth,
or use the completed application as a pattern if you like. To open either solution, drag
the .sln file onto an executing copy of Visual Studio.
2. There should be three projects contained within this solution. In the Visual Studio
Solution Explorer, expand the MVDataService project and open the IMVDataService.cs
file for editing.
3. Locate the namespace definition. After the opening brace for the MVDataService
namespace, add this code and then save the file:
public interface IMVDataService
{
void MVDataUpdate (DataSet mvData);
}
That’s it! Well, that’s all you need to do to create an interface. However, we need to add an
attribute to make this interface suitable for use with WF. Let’s look at that next.
Using the ExternalDataExchange Attribute
Although we have an interface, IMVDataService, we haven’t yet done enough to provide this
interface to WF and have WF actually use the interface for data communications. To do that,
we need to add the ExternalDataExchange attribute.
Note
Later we’ll also add attributes associated with correlation. We’ll look at correlation
attributes in greater detail in Chapter 17, “Correlation and Local Host Communication,”
but for now, just think of correlation as a way to keep different data requests sorted out.
I mention it here because your data communication interface is where you specify correlated
data values.
The ExternalDataExchange attribute is simply a marker that WF uses to identify interfaces
suitable for local communications service use. Remember the wca.exe tool I mentioned? Both
it and Visual Studio use this attribute to identify this interface as one your workflow instance
can use. Let’s add that attribute now, along with the correlation attributes we need.
158 Part II Working with Activities
Note Don’t let the phrase “marker attribute” fool you into believing the ExternalDataEx-
change attribute isn’t a critical component. It most certainly is. The workflow runtime looks for
this attribute when attempting to make external data transfers. Without it, data transfers
between workflow and host are not possible.
Creating a workflow data communication interface
● Open Visual Studio if it isn’t already open, and with the IMVDataService.cs file open for
editing, add the following line of code just prior to the interface definition:
[ExternalDataExchange]
The complete IMVDataService interface should look like the code you see in Listing 8-1. Don’t
worry about compiling the applications at this point. We’ll need to add more code before it
will compile without error.
Listing 8-1 IMVDataService.cs completed
using System;
using System.Collections.Generic;
using System.Text;
using System.Workflow.Activities;
using System.Workflow.Runtime;
using System.Data;
namespace MVDataService
{
[ExternalDataExchange]
public interface IMVDataService
{
void MVDataUpdate(DataSet mvData);
}
}
Chapter 8 Calling External Methods and Workflows 159
Using ExternalDataEventArgs
Earlier I mentioned that, to the host application, communications from the executing
workflow appear as events. The host application can’t know beforehand precisely when
the workflow instance will have data, and polling for data is terribly inefficient. So WF uses
the asynchronous model that .NET itself uses and fires events when data is available. The host
application hooks those events and reads the data.
Because we want to send information to the recipient of our event, we need to create a custom-
ized event argument class. If you’ve created a custom event argument class in your previous
work, you probably used System.EventArgs as the base class.
WF external data events, however, require a different argument base class if only to carry the
instance ID of the workflow instance issuing the event. The base class we use for external data
events is ExternalDataEventArgs, which itself derives from System.EventArgs, so we’re on famil-
iar ground. In addition, there are two other requirements: we must provide a base constructor
that accepts the instance ID (a Guid), which in turn passes the instance ID to the base con-
structor, and we must mark our argument class as serializable using the Serializable attribute.
Let’s now build the external data event argument class we need.
Creating a workflow data event argument class
1. With the MVDataService project still open in Visual Studio, locate the
MVDataAvailableArgs.cs file and open it for editing.
2. You should find only the using directives and the namespace definition in the file, so
after the opening brace for the namespace definition, add the following lines of code:
[Serializable]
public class MVDataAvailableArgs : ExternalDataEventArgs
{
}
3. Finally, we need to add the required constructor to provide the base class with the
workflow instance ID:
public MVDataAvailableArgs(Guid instanceId)
: base(instanceId)
{
}
The complete event argument class is shown in Listing 8-2.
160 Part II Working with Activities
Listing 8-2 MVDataAvailableArgs.cs completed
using System;
using System.Collections.Generic;
using System.Text;
using System.Workflow.Activities;
using System.Workflow.Runtime;
namespace MVDataService
{
[Serializable]
public class MVDataAvailableArgs : ExternalDataEventArgs
{
public MVDataAvailableArgs(Guid instanceId)
: base(instanceId)
{
}
}
}
Creating External Data Services
Now we come to a more difficult section, that being our task to create the bridging code for
the external data service. The host must have some code it can use to access the data that the
workflow instance is trying to communicate. We will use a tool to build activities for the work-
flow to use (that’s in the next section), but no tool exists for the host side of the communica-
tions connection.
Here, we’ll build a slightly simplified version of a full connection-bridging architecture. This
version supports only workflow-to-host communication. (We’ll build a general-purpose bidi-
rectional bridge you can reuse when we get to Chapter 17.) The connection bridge we’ll build
is divided into two parts: the connector, which implements the interface we developed earlier,
and the service, which among other things is responsible for raising the “data available” event
as well as providing a “read” method to pull the data from the workflow.
Tip
This is code you provide, not WF. The approach I take when writing local data
exchange services may differ from code you would write. This is fine. The only requirement is
that the local data-exchange services implement the communications interface and provide a
mechanism for retrieving the data to be exchanged.
Why this complexity? Unlike traditional .NET objects, workflow instances are executing
within the confines of the workflow runtime. So events into and out of the workflow instance
are brokered by the workflow runtime. The workflow runtime must do this because your host
application could be trying to send data to a workflow instance that has been persisted and
removed from active execution.
Chapter 8 Calling External Methods and Workflows 161
Returning to our bridge, the connection class maintains a field the workflow will fill with
returned data. For the sample application we’re building here, we don’t allow concurrent
workflow instances, but that’s merely at the convenience of this sample application.
Nothing prevents us from executing concurrent workflow instances in general, as we’ll see
in Chapter 17.
Naturally, each workflow instance would likely return different data, at least if it was passed a
different driver than another workflow instance. It’s the connection class’s responsibility to
implement the host side of the interface we developed, as well as to keep the data straight.
When the host asks for data, the connection class makes sure the correct DataSet is returned
given the workflow instance ID it was given.
The service class handles a few tasks for us. First, it registers the ExternalDataService with the
workflow runtime so that we can communicate between host and workflow instances. It
maintains a singleton copy of the connection class and binds itself to that class as the service
provider. The service class also serves as a factory object to make sure we have one and only
one connection class. And it provides the “read” method we’ll use to pull the data from the
workflow instance. (If we implemented a bidirectional interface, the service class would also
provide for the “write” method.) Let’s build these classes now.
Creating the bridge connector class
1. With the MVDataService project open in Visual Studio, locate the MVDataConnector.cs
file and open it for editing.
2. You should find only the using directives and the namespace definition in the file. So
after the opening brace for the namespace definition, add the following lines of code:
public sealed class MVDataConnector : IMVDataService
{
private DataSet _dataValue = null;
private static WorkflowMVDataService _service = null;
private static object _syncLock = new object();
}
The _dataValue field retains the data generated by the workflow instance. The _service
field holds the singleton instance of the data service object. And the _syncLock object is
used merely for thread synchronization while assigning values in static methods.
3. Following the fields, we add a static property to access the singleton service object. Here
is the code to add:
public static WorkflowMVDataService MVDataService
{
get { return _service; }
set
{
if (value != null)
{
162 Part II Working with Activities
lock (_syncLock)
{
// Re-verify the service isn't null
// now that we're locked
if (value != null)
{
_service = value;
} // if
else
{
throw new InvalidOperationException(
"You must provide a service instance.");
} // else
} // lock
} // if
else
{
throw new InvalidOperationException(
"You must provide a service instance.");
} // else
}
}
4. Mirroring the accessor property for the service, we need to add a property to access the
data. Add this code following the code you added in the preceding step:
public DataSet MVData
{
get { return _dataValue; }
}
5. Because the connector class derives from IMVDataService, we must implement
MVDataUpdate:
public void MVDataUpdate(DataSet mvData)
{
// Assign the field for later recall
_dataValue = mvData;
// Raise the event to trigger host read
_service.RaiseMVDataUpdateEvent();
}
The workflow uses this method to store the DataSet in the data value field. It raises the event
to let the host know data is available. The full bridge connector class is shown in Listing 8-3.
Note that we’re not ready to compile the entire application just yet. We still have a bit more
code to add.
Listing 8-3 MVDataconnector.cs completed
using System;
using System.Collections.Generic;
using System.Text;
using System.Workflow.Activities;
using System.Workflow.Runtime;
using System.Data;
Chapter 8 Calling External Methods and Workflows 163
namespace MVDataService
{
public sealed class MVDataConnector : IMVDataService
{
private DataSet _dataValue = null;
private static WorkflowMVDataService _service = null;
private static object _syncLock = new object();
public static WorkflowMVDataService MVDataService
{
get { return _service; }
set
{
if (value != null)
{
lock (_syncLock)
{
// Re-verify the service isn't null
// now that we're locked
if (value != null)
{
_service = value;
} // if
else
{
throw new InvalidOperationException(
"You must provide a service instance.");
} // else
} // lock
} // if
else
{
throw new InvalidOperationException(
"You must provide a service instance.");
} // else
}
}
public DataSet MVData
{
get { return _dataValue; }
}
// Workflow to host communication method
public void MVDataUpdate(DataSet mvData)
{
// Assign the field for later recall
_dataValue = mvData;
// Raise the event to trigger host read
_service.RaiseMVDataUpdateEvent();
}
}
}
164 Part II Working with Activities
Creating the bridge service class
1. With the MVDataService project again open in Visual Studio, locate the
WorkflowMVDataService.cs file and open it for editing.
2. As with the MVDataConnector class, we need to add the class definition and fields.
So copy the following code into the WorkflowMVDataService.cs file following the
opening namespace brace:
public class WorkflowMVDataService
{
static WorkflowRuntime _workflowRuntime = null;
static ExternalDataExchangeService _dataExchangeService = null;
static MVDataConnector _dataConnector = null;
static object _syncLock = new object();
public event EventHandler<MVDataAvailableArgs> MVDataUpdate;
private Guid _instanceID = Guid.Empty;
}
3. The _instanceID field needs to be accessible from outside the class, so add the following
property:
public Guid InstanceID
{
get { return _instanceID; }
set { _instanceID = value; }
}
4. We now add a static factory method we’ll use to create instances of this class. We do this
so that all the important housekeeping is accomplished as we create instances of this
bridge service. For example, we need to make sure the ExternalDataService service is
plugged into the workflow runtime. We’ll also add the bridge connector class we just cre-
ated as a pluggable service so that the workflow has access to the data connection class.
Therefore, add this method following the property we added in step 3:
public static WorkflowMVDataService CreateDataService(Guid instanceID,
WorkflowRuntime workflowRuntime)
{
lock (_syncLock)
{
// If we're just starting, save a copy of the workflow
// runtime reference.
if (_workflowRuntime == null)
{
// Save instance of the workflow runtime.
_workflowRuntime = workflowRuntime;
} // if
Chapter 8 Calling External Methods and Workflows 165
// If we're just starting, plug in ExternalDataExchange service.
if (_dataExchangeService == null)
{
// Data exchange service not registered, so create an
// instance and register.
_dataExchangeService = new ExternalDataExchangeService();
_workflowRuntime.AddService(_dataExchangeService);
} // if
// Check to see if we have already added this data
// exchange service.
MVDataConnector dataConnector = (MVDataConnector)workflowRuntime.
GetService(typeof(MVDataConnector));
if (dataConnector == null)
{
// First time through, so create the connector and
// register as a service with the workflow runtime.
_dataConnector = new MVDataConnector();
_dataExchangeService.AddService(_dataConnector);
} // if
else
{
// Use the retrieved data connector.
_dataConnector = dataConnector;
} // else
// Pull the service instance we registered with the
// connection object.
WorkflowMVDataService workflowDataService =
MVDataConnector.MVDataService;
if (workflowDataService == null)
{
// First time through, so create the data service and
// hand it to the connector.
workflowDataService = new WorkflowMVDataService(instanceID);
MVDataConnector.MVDataService = workflowDataService;
} // if
else
{
// The data service is static and already registered with
// the workflow runtime. The instance ID present when it
// was registered is invalid for this iteration and must be
// updated.
workflowDataService.InstanceID = instanceID;
} // else
return workflowDataService;
} // lock
}
166 Part II Working with Activities
5. The connection object we created in the preceding section (“Creating the bridge connec-
tor class”) keeps an instance of the bridge object we created in step 4. We now will add
a static helper method to return the bridge service instance. Although this might seem
more than is necessary now, later when we address correlation it’ll become apparent
why we did things this way:
public static WorkflowMVDataService
GetRegisteredWorkflowDataService(Guid instanceID)
{
lock (_syncLock)
{
WorkflowMVDataService workflowDataService =
MVDataConnector.MVDataService;
if (workflowDataService == null)
{
throw new Exception("Error configuring data service " +
"service cannot be null.");
} // if
return workflowDataService;
} // lock
}
6. Next we add our (private) constructor and destructor. As with the bridge connection
class, we need to make sure we break the circular references we’re building between the
bridge connection object and the bridge service object. Here are the lines of code you
need:
private WorkflowMVDataService(Guid instanceID)
{
_instanceID = instanceID;
MVDataConnector.MVDataService = this;
}
~WorkflowMVDataService()
{
// Clean up
_workflowRuntime = null;
_dataExchangeService = null;
_dataConnector = null;
}
7. Although we’ve added some important things to the bridge service class, not the least of
which is the introduction of the ExternalDataService to the workflow runtime, we still
have to add code that represents a major functional aspect—the ability to read and return
the data to the host application. The bridge connection object actually maintains the
connection state (the data), but the host uses this service to gain access to that data. Here
is the read method we add:
public DataSet Read()
{
return _dataConnector.MVData;
}