microsoft visual basic game programming for teens phần 8 pdf
Bạn đang xem bản rút gọn của tài liệu. Xem và tải ngay bản đầy đủ của tài liệu tại đây (1.01 MB, 40 trang )
fontSpr.ScaleFactor = 3
PrintText fontImg, fontSpr, 10, 180, C_RED, _
“B I G H U G E F O N T !”
fontSpr.ScaleFactor = 0.6
PrintText fontImg, fontSpr, 10, 260, C_PURPLE, _
“This Is A Smaller Font”
d3ddev.EndScene
End Sub
Private Sub Form_KeyDown(KeyCode As Integer, Shift As Integer)
If KeyCode = 27 Then Shutdown
End Sub
Private Sub Form_Paint()
d3ddev.Present ByVal 0, ByVal 0, 0, ByVal 0
End Sub
Level Up
This chapter provided a core technique in the ability to print text on the screen, which has
been ignored up to this point (although displaying status information on the screen in
previous sample programs would have been very useful). The ability to display a message
on the screen is absolutely crucial, so you are likely to find yourself using the code pro-
vided in this chapter more than any other.
Chapter 13
■
Core Technique: Drawing Text260
T
his chapter explains the core technique of detecting collisions between two sprites
in a game. This is a higher-level technique than previous topics you have learned
so far, which have focused more on the key aspects of just getting something on
the screen. Now that you have a complete prototype for the game up and running (per
Chapter 12, “Walking Around in the Game World”), you can focus on these higher-level
things. This chapter shows you how to identify when the player has hit a tile that is
impassable (such as an ocean square), and this technique is refined over the next three
chapters when dealing with non-player characters (NPCs).
Here is a breakdown of the major topics in this chapter:
■
Rectangle intersection
■
Writing a reusable collision function
■
Keeping track of “bad” tiles
■
Checking for tile collisions
■
Revising the scroll data display
■
The CollisionTest program
Reacting to Solid Objects
Collision detection is an important technique that you should learn. It is an absolute
requirement for every game ever made. I can’t think of any game that does not need col-
lision detection, because it is such an essential aspect of gameplay. Without collisions,
there is no action, goal, or purpose in a game. There is no way to die without collisions
261
Core Technique:
Collision Detection
chapter 14
taking place. In other words, collision detection makes the sprites in a game come to life,
and makes the game believable.
Rectangle Intersection
Traditional collision detection involves the comparison of two rectangles on the screen,
usually representing the bounding boxes around two sprites. A function available within
the Windows API gives you a quick answer to the question of a collision between two
sprites. This function is called
IntersectRect
:
Public Declare Function IntersectRect _
Lib “user32” Alias “IntersectRect” ( _
lpDestRect As RECT, _
lpSrc1Rect As RECT, _
lpSrc2Rect As RECT) _
As Long
IntersectRect
returns the intersection rectangle,
lpDestRect
, with the union of the two
other rectangles (although this information is not usually needed). Two additional
RECT
structures are required in the call to this function, and they contain the location and size
of each sprite.
Writing a Reusable Collision Function
It is helpful to write a support function that sets up the two
RECT
structures by represent-
ing the two sprites that need to be checked for a collision. By encapsulating this support
code inside a function, you can reduce the amount of code that you must write to check
for multiple collisions in your game (which can become quite tedious if you have to set
up the structures for every single instance). I recommend adding this
Collision
function
to the Sprite.bas file:
Public Function Collision( _
ByRef sprite1 As TSPRITE, _
ByRef sprite2 As TSPRITE) As Boolean
Dim dest As RECT
Dim rect1 As RECT
Dim rect2 As RECT
‘set up the first rect
rect1.Left = sprite1.x
rect1.Top = sprite1.y
rect1.Right = sprite1.x + sprite1.width
rect1.Bottom = sprite1.y + sprite1.height
Chapter 14
■
Core Technique: Collision Detection262
‘set up the second rect
rect2.Left = sprite2.x
rect2.Top = sprite2.y
rect2.Right = sprite2.x + sprite2.width
rect2.Bottom = sprite2.y + sprite2.height
‘check for collision
If IntersectRect(dest, rect1, rect2) <> 0 Then
Collision = True
Else
Collision = False
End If
End Function
Keeping Track of “Bad” Tiles
For the purposes of detecting collisions within the Celtic Crusader game, it is important
first to check tile numbers for valid movement regions on the map. Water tiles, solid
object tiles, and so on should be impassable; in other words, these are blocking tiles that
the player should not be able to cross.
The whole process of limiting the player’s movement in the game world is done by mak-
ing use of a list of impassable tiles. You can store these tile numbers in a data file to be
loaded at runtime or just set an array containing the tile numbers that you know are
impassable.
I created a simple
Integer
array to keep track of the bad tiles:
Dim badtiles() As Integer
Then initialize the bad tiles with just a few tile numbers for testing purposes. In the com-
plete game I fill this array with all of the impassable tiles. This really shouldn’t be a very
large number in the end, because most of the tiles in Mappy are, in fact, for creating ter-
rain that the player can walk on. Just as an example, tile 2 is the water tile, which certainly
should not be walked on!
Public Sub BuildTileCollisionList()
ReDim badtiles(5)
badtiles(0) = 2
badtiles(1) = 34
badtiles(2) = 44
badtiles(3) = 54
badtiles(4) = 79
End Sub
Reacting to Solid Objects 263
When it comes time to actually check the list of bad tiles, you can use the following func-
tion. Do you see how unfriendly this function is, with the hard-coded array range (0 to
4)? You need either to modify this value when adding new items to the bad tiles array or
create a constant that specifies the number of bad tiles. I am keeping it simple so you can
focus mainly on the subject of collision and not on support code.
Public Function IsBadTile(ByVal tilenum As Long) As Boolean
Dim n As Long
For n = 0 To 4
If badtiles(n) - 1 = tilenum Then
IsBadTile = True
Exit Function
End If
Next n
IsBadTile = False
End Function
Checking for Tile Collisions
The main tile collision subroutine called from within the game loop is called
Check-
TileCollisions
. This subroutine scans the current tile under the player’s feet and then runs
it by the
IsBadTile
function to determine if the current tile number is on the black list. If
that is true, then the next step is to prevent the player from moving over that tile. By call-
ing this
CheckTileCollisions
subroutine before the tiles are drawn and before the scroll win-
dow is drawn, you can cause the player to actually take a step back to counter the
movement that triggered the tile collision. As far as the player is concerned, the sprite just
stopped at the edge of the impassable tile. What actually happened is that the sprite moved
onto the tile and was moved off it by the same amount of space. By the time the scene is
rendered, it appears that the sprite just stopped.
Public Sub CheckTileCollisions()
Dim tilenum As Long
tilenum = CurrentTile()
If IsBadTile(tilenum) Then
Scroll 0, 0
Select Case heroSpr.AnimSeq
Case 0
ScrollY = ScrollY + HEROSPEED
Case 1
ScrollY = ScrollY + HEROSPEED
ScrollX = ScrollX - HEROSPEED
Chapter 14
■
Core Technique: Collision Detection264
Case 2
ScrollX = ScrollX - HEROSPEED
Case 3
ScrollX = ScrollX - HEROSPEED
ScrollY = ScrollY - HEROSPEED
Case 4
ScrollY = ScrollY - HEROSPEED
Case 5
ScrollX = ScrollX + HEROSPEED
ScrollY = ScrollY - HEROSPEED
Case 6
ScrollX = ScrollX + HEROSPEED
Case 7
ScrollX = ScrollX + HEROSPEED
ScrollY = ScrollY + HEROSPEED
End Select
End If
End Sub
Revising the Scroll Data Display
At this point, I need to show you some of the code I changed in the program to accom-
modate the tile collision routines. This code was originally found back in Chapter 12 in
the WalkAbout program, which is the game’s first prototype. The following code includes
some support routines that I wrote to provide the current player’s position and tile num-
ber (which were programmed in the
ShowScrollData
subroutine previously).
Public Function TileAt(ByVal x As Long, ByVal y As Long) As Long
Dim tile As point
tile.x = x \ TILEWIDTH
tile.y = y \ TILEHEIGHT
TileAt = mapdata(tile.y * MAPWIDTH + tile.x)
End Function
Public Function CurrentTile() As Long
CurrentTile = TileAt(PlayerPos.x, PlayerPos.y)
End Function
Public Function PlayerPos() As point
‘get tile pos at center of screen
PlayerPos.x = ScrollX + SCREENWIDTH / 2
PlayerPos.y = ScrollY + SCREENHEIGHT / 2
End Function
Reacting to Solid Objects 265
Public Sub ShowScrollData()
Static old As point
Dim tile As point
tile.x = PlayerPos.x \ TILEWIDTH
tile.y = PlayerPos.y \ TILEHEIGHT
If (tile.x <> old.x) Or (tile.y <> old.y) Then
‘erase the background
DrawSurface wood, 0, 0, 639, 30, backbuffer, 0, 449
old = tile
PrintText fontImg, fontSpr, 5, 452, C_WHITE, _
“Scroll=(“ & PlayerPos.x & “,” & PlayerPos.y & “) “
PrintText fontImg, fontSpr, 5, 466, C_WHITE, _
“Tile(“ & tile.x & “,” & tile.y & “)=” & CurrentTile()
End If
End Sub
Another thing this code does is make use of the new
PrintText
subroutine that was pro-
vided in the previous chapter for printing text on the screen. I modified the
ShowScrollData
subroutine so that it would print the scrolling and tile numbers at the bottom of the
screen rather than in the window caption. Along the way, I came up with a nice image to
fill the space at the bottom of the screen. This is a wood-grain bitmap image, loaded into
a surface and drawn at the bottom of the screen during each screen update. I created and
loaded this image using the following code in
Sub Main
:
Dim wood As Direct3DSurface8
Set wood = LoadSurface(App.Path & “\bottom.bmp”, 644, 32)
The CollisionTest Program
A lot of changes were made to the WalkAbout program during the development of
collision-detection code, with the resulting program for this chapter (CollisionTest). I do
not want to list the source code for the project in each chapter because the source code is
starting to get somewhat complex, and I prefer that you focus on the algorithms and indi-
vidual functions and subroutines that are covered in each chapter.
I encourage you, therefore, to load the current project that you copied from the CD-ROM
to your hard drive and examine the program running. At this point, I am confident that
you have gained enough experience entering code that it is no longer necessary for me to
include complete listings of each program. In each chapter from here on out I use the
Chapter 14
■
Core Technique: Collision Detection266
same code that was originally developed for the WalkAbout program, with incremental
updates and improvements along the way.
With the tile-collision code added to the original WalkAbout program, the resulting new
program has been called CollisionTest and is available on the CD-ROM in \sources
\chapter14. Figure 14.1 shows the new version of the game running. Note the player is
standing next to a solid, impassable tile.
Level Up
This chapter provided an introduction to collision detection. You learned about the basic
collision between two sprites—or more accurately, between two rectangles—using the
IntersectRect function available in the Windows API (and greatly simplifies the collision
code that you would otherwise have to write yourself). You then learned how to imple-
ment tile collision in the game so you can specify a certain tile number as impassable. By
modifying some of the code in the game, it is now possible to prevent the player from
walking on specific tiles.
Level Up 267
Figure 14.1 The CollisionTest program demonstrates tile-collision checking within the game.
This page intentionally left blank
Non-Player
Characters
(NPCs)
Chapter 15
Creating the Character Classes . . . . . . . . . . . . . . . . . . . . . . . . . . . . . .271
Chapter 16
Adding NPCs to the Game World . . . . . . . . . . . . . . . . . . . . . . . . . . . .279
Chapter 17
Talking with NPCs . . . . . . . . . . . . . . . . . . . . . . . . . . . . . . . . . . . . . . . .293
Chapter 18
Engaging in Combat with NPCs . . . . . . . . . . . . . . . . . . . . . . . . . . . . . .303
PART IV
T
he fourth part of this book covers the subject of non-player characters (NPCs) for
the most part, although the subject of character classes is applicable to the pri-
mary player’s character (PC). This part starts off with a chapter on creating char-
acter classes, explaining how to load and save character classes from binary data files. The
next three chapters focus on adding NPCs to the game world. Just getting NPCs into the
game world is the first issue; following that, you expand on the idea by making it possible
to interact with the NPCs by communicating and—when necessary—engaging in combat
with them. By the time you have finished with this part of the book, you have a very
playable game in Celtic Crusader.
T
his chapter provides a discussion of player attributes and the creation of character
classes. You learn how to take the designs of the character classes and make use of
them in the game itself—at the source code level. I am unable to provide a com-
plete tutorial on constructing a player generation system (with randomly generated
attributes, an attractive screen, and so forth) due to the time involved in building a user
interface. However, I point you in the right direction and give you the essentials for creat-
ing each of the five character classes described in Chapter 3, “Designing the Game.” This
important chapter fills a sorely needed discussion on this topic, which has been put aside
until this point by the necessity of creating the game engine itself. Now you can finally get
into player creation and begin to populate the game world.
Here is a breakdown of the major topics in this chapter:
■
Character classes and attributes
■
Gaining experience and leveling up
■
The base character classes
■
Character data files
■
The character class data type
■
Loading and saving binary character data files
■
The character-editor program
Character Classes and Attributes
All of the previous chapters have focused on the difficult task of getting a player, fully ani-
mated, to walk around in the game world. Both the animation and the movement should
271
Creating the
Character Classes
chapter 15
be realistic, and tile-collision detection should prevent the player from walking through
solid and impassable tiles (such as water). Now that these basic problems have been
solved, you can get more into the game’s design and into the nuances of combat and NPC
interaction.
As you may recall from Chapter 3, the player attributes are as follows:
■
Strength represents the character’s ability to carry a weight and swing a weapon. It
is generally good for the warrior and knight classes, which carry blunt weapons.
Strength is used to calculate the attack value for the character.
■
Dexterity represents the agility of the character, the ability to manipulate objects
(like a weapon), and the skill with which the player uses his or her hands in gen-
eral. A very low dexterity means the character is clumsy, while a very high dexterity
means the character can perform complex actions.
■
Intellect represents the character’s ability to learn, remember things, and solve
problems. A very high intellect is required by the mage class, while relatively low
intellect is common in fighter classes, where brute force is more important than
mental faculties.
■
Charisma represents the character’s attractiveness and generally affects how others
respond to the character. A character with very high charisma attracts others, while
very low charisma repels others.
■
Stamina represents a character’s endurance, the ability to continue performing an
activity for a long period of time. Very high stamina provides a character with the
ability to engage in lengthy battles without rest, while a character with low stamina
tires quickly (and is likely to fall in battle).
Gaining Experience and Leveling Up
One of the most rewarding aspects of a role-playing game (RPG) is gaining experience by
performing actions in the game (usually combat) and leveling up your character. When
you start the game, the character is also just starting out as a level 1 with no experience.
This reflects the player’s own skill level with the game, and that is the appeal of an RPG:
Yo u, the player, gain experience with the game while your PC gains experience at the same
time.
Both you and your character improve as you play the game, so you transfer some of your
own identity to the character, and in some cases, younger players even assume some of the
identity of their inspiring characters. This fascinating give-and-take relationship can
really draw someone into your game if you design it well! Like I have said, cut back on the
magic and let players really get out in the game world and experience some good, solid
combat to make the whole experience feel more real.
Chapter 15
■
Creating the Character Classes272
The Base Character Classes
The standard, or base, classes can be used for the player as well as for the non-player
characters (NPCs). You should feel free to create as many classes as you want to make your
game world diversified and interesting. The classes I have described here are just the usual
classes you find in an RPG, which you might consider the stock classes. Each class also has
subclasses, or specialties within that class. For instance, Paladins are really just a subclass
of the Knight, which may include Teutonic Knight, Crusader, and so on.
When you are designing a game, you can make it as historically accurate or as fictional as
you want; don’t feel compelled to make every class realistic or historically based. You
might make up a completely fictional type of Knight subclass, such as a Dark Knight or
Gothic Knight, with some dark magic abilities. However, I want to encourage you to shy
away from overdoing the magic system in a game. Many RPGs I have played use charac-
ter classes that might be thought of as wizards on steroids, because the whole game boils
down to upgrading spells and magic, with little emphasis on “realistic” combat.
You would be surprised by how effective an RPG can be with just a few magic abilities.
You can really go overboard with the hocus pocus, and that tends to trivialize a well-
designed storyline and render interesting characters into fireball targets. No warrior
should be able to do any magic whatsoever. Think about it: The warriors are basically bar-
barians—massive, hulking fighters who use brute force to bash skulls on the battlefield.
That this type of character can become civilized and educated is ludicrous.
Of course, don’t limit yourself on my account. I’m just pointing out some obvious design
concerns with characters. If you really want a world of magic, then go ahead and create
magical characters; that sounds like a really fun game, as a matter of fact! If you are
designing a traditional RPG, then be realistic with your classes and keep the magic rea-
sonable. Think about The Lords of the Rings; these stories are the sole source of inspiration
for every RPG ever made. Everything since J.R.R. Tolkien has been derivative!
Tables 15.1 through 15.5 present my idea of a character class structure that you can use in
the game.
In addition to these combat classes, you might want to create some base classes for some
of the regular people in the world, like townsfolk, peasants, farmers, and so on. These non-
combat NPCs might all just share the same character class (with weak combat skills, poor
experience, and so on). See Table 15.6.
One design consideration that you might use is the concept of class modifiers. Say you have
a set of stock classes like those listed in the preceding tables. Instead of re-creating a class
from scratch using similar values, you can create a subclass based on the parent class, but
that modifies the attributes by a small amount to produce the new class with custom
attributes.
Character Classes and Attributes 273
Say, for instance, that you want to create a new type of Warrior called the Berserker, which
is an extremely stupid and ugly character with immense strength and stamina. Sounds a
little bit scary, doesn’t it? By setting the base class of the Berserker to Warrior, you can then
modify the base class at any time and the Berserker automatically is changed along with
the base class (Warrior). This works great for balancing the game play without requiring
that you modify every single subclass that you have used in the game.
Class modifiers must be dealt with in code rather than in a character-editor program,
therefore I don’t use subclass modifiers (although the idea is a good one).
Chapter 15
■
Creating the Character Classes274
Table 15.1 Warrior
Attribute Value
Strength +8
Dexterity +4
Intellect –3
Charisma 0
Stamina +6
Table 15.2 Knight
Attribute Value
Strength +6
Dexterity +4
Intellect –3
Charisma +5
Stamina +3
Table 15.3 Rogue (Thief)
Attribute Value
Strength –1
Dexterity +7
Intellect +3
Charisma +1
Stamina +5
Table 15.4 Scout (Archer)
Attribute Value
Strength +3
Dexterity +8
Intellect –2
Charisma +1
Stamina +5
Table 15.5 Mage
Attribute Value
Strength –6
Dexterity +3
Intellect +9
Charisma +4
Stamina +5
Table 15.6 Peasant
Attribute Value
Strength +1
Dexterity +1
Intellect 0
Charisma +1
Stamina +1
Using Character Classes in the Game
You know what type of data you want to use in the game based on the descriptions of the
various classes. How, then, do you make use of those classes in the game? Among the many
ways that you could approach this problem, two solutions immediately come to mind:
■
You can hard code all of the character classes using source code.
■
You can load character classes from data files.
The first option seems to be more reasonable, especially when you are just getting started.
It does help to have a custom data type ready for use before deciding which method you
would prefer to use in the game. Ultimately, I think it is best to use the second option,
which means you store character class information outside the program in data files. This
is a good idea because it allows you to make changes to the character classes to balance
the gameplay and enhance the game, all without requiring you to edit source code and
recompile.
Character Data Files
I would definitely store the character classes in a separate data file and use a binary file for-
mat along with VB’s
Get
and
Put
statements to read and save records (these commands give
VB the ability to work with binary files). Isn’t it easier to use a text file for character data?
I agree this is a good idea for development, but text files are a pain. Seriously. Not only are
they a pain to open and parse out the data you need, but text files can be edited by any-
one using Notepad! At least with a binary character data file you have one layer of protec-
tion over your data—and I’m fully aware of how easy it is to edit data using a hex editor
program. The second reason for using binary data files is that they are extremely easy to
use in source code. You can create a custom structure for your characters and then load
and save an entire record using that structure, automatically, using VB’s binary data file
input/output routines.
In contrast, using a text file format means you must load the text data into the program
and then parse it into the appropriate variables, which is a lot of unnecessary code when
the binary format fills your character data automatically.
If you plan to create a full-featured RPG on your own, then you may want to write a sim-
ple VB program that uses VB’s file input/output routines to load and save character data
files, with the ability to create new files and edit existing characters. I give you an example
of that code following the next section. First, let’s talk about the character class data type.
The Character Class Data Type
The character class data type is a structure (
Type
) that is used in the game as well as in the
binary data files. This custom data type includes the character’s name, class, experience,
Using Character Classes in the Game 275
and level, as well as the five attributes. In addition, this data type is future proof (in that
it is expandable with the use of filler strings and integers at the end of the data type). You
can add new attributes to the character class by taking away from the filler arrays and fill-
ing in the same number of bytes. This is important because without the filler data, you
would have to type in all the character class records again every time you changed the
record format.
Public Type TCHARACTER
name As String * 20
classtype As String * 20
experience As Integer
level As Integer
strength As Integer
dexterity As Integer
intellect As Integer
charisma As Integer
stamina As Integer
fillerstr As String * 80
fillerint(10) As Integer
End Type
By using filler fields, you can take an item out of one of the filler arrays to add new fields,
and then the character-editor program and the data files still work. For instance, suppose
you want to add a new field to the characters that tracks their total number of kills. (That
is a pretty neat field to add to the character’s data, come to think of it!) To do this, you
take one value out of the fillerint array and add the field immediately before or after the
array. You must make the change so that the data file still looks exactly the same in mem-
ory, which means you have to add fields directly before or after the array itself. The same
goes for the fillerstr string, which is defined as 80 bytes long. Suppose you want to add a
new text field to the character classes, such as a Hometown field, for instance. Decide how
many bytes to use for this new field, define the field with that number, and then take away
from the filler array. Here is what the changes might look like:
Hometown As String * 20
fillerstr As String * 60
TotalKills As Integer
fillerint(9) As Integer
End Type
Loading and Saving Binary Character Data Files
You can open a file to read or write a record of the
TCHARACTER
type using the following
code. The first function is called
LoadCharacterBinaryFile
. This function opens the specified
filename and reads the first record from the file into a temporary
TCHARACTER
variable. It
Chapter 15
■
Creating the Character Classes276
then closes the file and returns the record. You could store all of your game’s characters in
a single data file with multiple records stored in the file; feel free to do this if you want,
although you will have to write an editor program that supports multiple records per file.
I think it is simpler to just store one character per file.
Public Function LoadCharacterBinaryFile( _
ByVal filename As String) As TCHARACTER
Dim filenum As Integer
Dim dude As TCHARACTER
filenum = FreeFile()
Open filename For Binary As filenum Len = Len(dude)
Get filenum, , dude
Close filenum
LoadCharacterBinaryFile = dude
End Function
A similar routine saves a character record to a binary data file using the custom
TCHARACTER
structure:
Public Sub SaveCharacterBinaryFile( _
ByVal filename As String, _
ByRef dude As TCHARACTER)
Dim filenum As Integer
filenum = FreeFile()
Open filename For Binary As filenum Len = Len(dude)
Put filenum, , dude
Close filenum
End Sub
The only problem with this technique is that you have to write your own character-editor
program that saves the information into the binary data file. One weird way to do it is to
create the character classes in code and then call
SaveCharacterBinaryFile
with each one to
save the characters. As you might imagine, this is a very time-consuming task that is totally
unnecessary. What you need is an editor program.
The Character-Editor Program
Luckily for you, I have already made such a program. It’s called Simple Character Editor
and is located in \sources\chapter15 on the CD-ROM for your convenience. This program
Using Character Classes in the Game 277
should be considered an example, not a complete character-editor program. It does, how-
ever, succeed in dealing with the key attributes of the PCs and NPCs. Using this editor
program, you can create a whole multitude of different NPCs for the game just to give the
player some level-up fodder: peasants, evil creatures, Viking explorers, Viking warlords,
and random NPCs of various classes.
The idea behind the character data files is not to create a separate file for every single char-
acter in the game, but only for the different character classes. You might have many NPCs
that are Warriors, Knights, Rogues, Scouts, and Mages, all using the same classes available
to your player’s character. Remember that you can create as many characters in the game
as you want, all based on the same classes. While you can create as many different classes
as you want, just remember that you aren’t editing individuals, just classes.
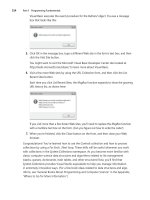
The five classes have been created using the Simple Character Editor program, as shown
in Figure 15.1. I recommend loading up the CharacterEditor project yourself and modi-
fying the program to suit your needs. Since there is a user interface involved, I won’t
bother listing the source code for the editor program here. (The source code is short, but
doesn’t account for the controls on the form.)
Level Up
This chapter filled in the details of character attributes and classes. Now that things are
looking pretty good in the game department, you can focus some attention again on char-
acter design. The last few chapters have focused on designing the game world and inter-
acting with the world in general. After having read this chapter, I’m sure you are eager to
add some characters to the world and give the player something to do! Stay tuned, because
the next chapter gets into that subject.
Chapter 15
■
Creating the Character Classes278
Figure 15.1 The Simple Character Editor program is a prototype character-class editor for an RPG.
A
role-playing game is only fun if the game world is sufficiently populated to allow
interaction and fighting with computer-controlled players. These non-player
characters,or NPCs for short, are a vital element of a role-playing game (RPG).
Although some types of RPGs prefer to reserve NPC for human characters, I simplify the
issue and define an NPC as any type of character in the game other than the player’s
character (PC) and animals. Animals are defined as the native fauna of the game world,
and do not necessarily have to be recognizable creatures. You might have alien-type ani-
mals in your game, but the difference is that fauna do not engage in combat, and there-
fore should not be grouped with NPCs.
This chapter fills the role of explaining how to add NPCs to the game world, and also
squeezes in a sorely needed discussion of player attributes and the entire player-creation
process. Although I am unable to provide a complete tutorial on constructing a player-
generation system for this game, I point you in the right direction and provide the essen-
tials for creating each of the five character classes described in Chapter 3, “Designing the
Game.” Throughout this chapter, you have NPCs with which the player may engage in
battle; therefore, the discussion of player attributes (and NPC attributes) is called for.
Here is a breakdown of the major topics in this chapter:
■
Introduction to NPCs
■
Creating reusable NPCs
■
Initializing the NPCs
■
Moving the NPCs
■
Setting a random destination
■
Drawing the NPCs
279
Adding NPCs
to the Game World
chapter 16
Introduction to NPCs
I focus all of my remaining attention on building up the Leinster Region of the game
world. (You may recall that Leinster is one of the four regions in 9th-century Ireland and
consists of the most towns and ruins on the map.) As you might imagine, the creation of
an entire game world is a daunting task that requires attention to detail and an investment
of time, and it should be directed toward your game’s overall storyline. Since I’m limited
by the scope of this book, I have to give you the tools you need to take this game to the
level you want, according to your own imagination. In essence, I am giving you the game
engine and the tools, rather than a completely polished game—without apology, as this is
how it should be. I do not want to limit your creative potential with my particular vision
for a game. Take this as far and wide as you possibly can!
By the time you have finished this chapter, you have a new, improved version of the Celtic
Crusader game (which is still more of a game engine at this point than a complete game)
available. The version that you see developed in this chapter is shown in Figure 16.1. The
game has basic NPC support by the time you finish this chapter.
Chapter 16
■
Adding NPCs to the Game World280
Figure 16.1 Hero: “Help, I’m surrounded by Viking warriors!”
Starting Position and Range of Movement
The most important thing to consider (after loading the NPC’s images, that is) is the start-
ing position. Where does the NPC start off in the game? After this, the next most impor-
tant thing to consider is this NPC’s behavior: What does this character do in the game
world? The starting position is an actual pixel X,Y location in the game world. Depending
on the behavioral subroutine being used by each NPC, you may want to set the starting
position in the middle of a town, so that when the NPC reaches a new destination after
walking around for a while, it is basically centered on a town. (Most of the population
should be near towns.)
The starting position also specifies where NPCs respawn after being killed (with addi-
tional randomness applied along with, perhaps, a different name). The NPC’s range
should keep that character relatively close to his or her starting point, and the character’s
behavior is then based on the movement state (which might be stopped, walking, running,
and so on). By respawning an NPC, perhaps at the other side of the game world, you can
keep the game flowing smoothly without allowing a rampaging player to decimate your
plans for challenging gameplay! Indeed, one thing you might consider is increasing the
experience and level of each NPC that is killed, so that over time the game world gets more
and more challenging for the player. You explore these issues in the next two chapters.
A Simple State Engine
At this early stage in the game, I have created a very simple subroutine (which is called a
“state engine” because it reacts to the character’s current state). This subroutine directs the
behavior of the NPCs. You can add behavioral subroutines and states to the game as you
learn how to control the NPCs. For starters, I have an enumerated list called
NPCSTATES
that
the
TNPC
type uses to keep track of an NPC’s location and behavioral properties (such as
the starting, current, and destination points in the game world).
‘keeps track of NPC state
Public Enum NPCSTATES
NPC_STOPPED = 0
NPC_WALKING = 1
End Enum
As you learn in the next two chapters, you can add new states to the list, such as
NPC_FLEEING
,
NPC_TALKING
, and
NPC_ATTACKING
.
Benevolent Versus Malevolent NPCs
You want to use basically two types of NPCs in the game (in addition to animals, perhaps,
for scenery). Benevolent NPCs are harmless people like villagers, townsfolk, peasants, and
perhaps even local law enforcement. (Have you considered the possibility of having local
Introduction to NPCs 281
guards attack the player if you harm any local peasants? That would be a fascinating aspect
of the game.) The other type of NPC is malevolent in nature—that is, characters opposed
to the player, including evil creatures, outlaws, bandits, and of course in the context of this
game: Vikings (which should be particularly tough to fight, given the theme of the game).
Creating Reusable NPCs
The NPCs are based on the standard character classes (created with the Simple Character
Editor program that you saw in the previous chapter), but a little bit of randomness
applied to the characters makes them interesting, while not requiring you to creating cus-
tom characters with the editor. The randomness might affect the attributes if you want,
but I prefer to just give each NPC a random experience and level to make them more or
less powerful than the player (but not beyond reason). Keep the random NPCs within a
certain range of the player’s experience and level to keep the game interesting.
The previous chapter also introduced you to the custom
TCHARACTER
structure used by the
binary data files and that keeps track of characters in memory. The
TNPC
structure (in the
next section) works in tandem with
TCHARACTER
to let you add NPCs to the game world and
move them around (which is the best you can hope for at this stage, but stay tuned).
The Custom NPC Data Types and Arrays
The custom data type that tracks each individual NPC is called
TNPC
. This structure allows
you to keep tabs on every NPC in the game, with variables that track the NPC’s state, start-
ing position, current position, destination, and so on.
‘keeps track of each character
Public Type TNPC
name As String
state As NPCSTATES
startpos As point
curpos As point
destpos As point
classindex As Integer
SpeedDelay As Integer
SpeedCount As Integer
Facing As Integer
End Type
The game actually uses a series of arrays to manage the NPCs (that is, to move, animate,
and draw them on the screen).
NUMCHARS
defines the number of unique character classes
being used in the game. This is an important distinction to make, because this constant
doesn’t refer to the total number of NPCs in the game, just the number of available classes
Chapter 16
■
Adding NPCs to the Game World282
(presumably classes that you have loaded from the binary data files, per the Simple Char-
acter Editor program).
The
charImages
array is unique only to the classes and is not used by every single NPC. This
is a shared array. The
charClasses
array is of type
TCHARACTER
and is also limited to the dis-
tinct classes.
On the other hand, two arrays keep track of every single NPC in the game. These two
arrays,
charStates
and
charSprites
,are oftypes
TNPC
and
TSPRITE
, respectively, and have an
array size specified by the
NUMNPCS
constant. The important thing to remember here is that
these last two arrays are what you work with. A variable in
TNPC
,
classindex
, specifies the
index into the
charImages
and
charClasses
arrays that are shared.
The end result is that you can load a Warrior class from warrior.DAT, open a bitmap image
containing the animated sprite of this warrior, and then create 1, 10, 50, or 100 individual
NPCs that share this bitmap and class data. Those individual NPCs use
charStates
and
charSprites
. If you are at all confused on this point, then just go ahead and start poring
through the source code in the completed project on the CD-ROM (located in
\sources\chapter16\CelticCrusader1), run the project, and observe how these array vari-
ables are being used. You also gain more familiarity with them over the next two chapters.
‘generic data for the character classes
‘images and data are shared by the NPCs
Const NUMCHARS As Long = 1
Dim charImages(NUMCHARS) As Direct3DTexture8
Dim charClasses(NUMCHARS) As TCHARACTER
‘unique data for each individual NPC
Const NUMNPCS As Long = 10
Dim charStates(NUMNPCS) As TNPC
Dim charSprites(NUMNPCS) As TSPRITE
Initializing the NPCs
I have written a subroutine called
InitCharacters
that initializes all of the NPCs in the
game. This subroutine is what you modify when you want to load new characters
designed with the Simple Character Editor program (in addition to putting together the
animated sprite frames using a tool such as Pro Motion). The subroutine is somewhat
hard coded at present because the game is using just a single class of NPC, but you mod-
ify it over the next two chapters as the game comes to life.
Public Sub InitCharacters()
Dim p As point
Dim n As Long
Creating Reusable NPCs 283
‘set up all the base character classes, sprites, and images
‘so far we’re only using a single type of character—Viking Warrior
charClasses(0) = LoadCharacterBinaryFile(App.Path & “\warrior.dat”)
Set charImages(0) = LoadTexture(d3ddev, App.Path & “\viking_walking.bmp”)
‘now create the individual characters used in the game
‘all of these will share the base data above
For n = 0 To NUMNPCS - 1
‘initialize sprite data
InitSprite d3ddev, charSprites(n)
With charSprites(n)
.FramesPerRow = 8
.FrameCount = 8
.AnimDelay = 2
.width = 96
.height = 96
End With
‘start NPCs at the player’s location
‘(to test NPC movement at this stage)
p.x = PLAYERSTARTX * TILEWIDTH
p.y = PLAYERSTARTY * TILEHEIGHT
‘customize the Viking character
With charStates(n)
‘this is the key! points to the base image/sprite/data
.classindex = 0
.name = “Viking”
.startpos = p
.curpos = p
.SpeedDelay = 1
.SpeedCount = 0
.state = NPC_WALKING
SetRandomDestination n
End With
Next n
End Sub
Chapter 16
■
Adding NPCs to the Game World284