Windows Server 2003 Clustering & Load Balancing phần 8 pps
Bạn đang xem bản rút gọn của tài liệu. Xem và tải ngay bản đầy đủ của tài liệu tại đây (834.78 KB, 41 trang )
8. Now you’re ready to configure DHCP as a resource in the cluster. To do this,
open the Cluster Administrator tool, as shown in Figure 6-2. Once opened,
you can go to the File menu and choose to configure a new application. Once
selected, open the Cluster Application Wizard.
Chapter 6: Designing a Highly Available Solution with Windows Services 269
OsbNetw / Windows Server 2003 Clustering & Load Balancing / Shimonski/ 222622-6 / Chapter 6
Figure 6-1. Viewing the DHCP Server console
P:\010Comp\OsbNetw\622-6\ch06.vp
Tuesday, March 25, 2003 10:16:19 AM
Color profile: Generic CMYK printer profile
Composite Default screen
9. When you open the wizard, as seen in the following illustration, you begin
the process of creating a DHCP cluster. The wizard helps to configure an
application to run in a cluster. This wizard takes you through all the steps
you need to follow to create or select a Virtual Server and prepare an application
to be clustered.
Next, as seen in Figure 6-3, you can create a Virtual Server. Again, to reiterate
what was learned in past chapters, a Virtual Server is what the client will access
270 Windows Server 2003 Clustering & Load Balancing
OsbNetw / Windows Server 2003 Clustering & Load Balancing / Shimonski/ 222622-6 / Chapter 6
Figure 6-2. Cluster Administrator
P:\010Comp\OsbNetw\622-6\ch06.vp
Tuesday, March 25, 2003 10:52:42 AM
Color profile: Generic CMYK printer profile
Composite Default screen
OsbNetw / Windows Server 2003 Clustering & Load Balancing / Shimonski/ 222622-6 / Chapter 6
to get to the applications on the cluster. Two nodes exist and what they share
between them is a name and an IP address, which the client will access to get
to the resources hosted on both nodes.
10. In Figure 6-3, you have the option to create a new server or you can use one
that’s already created. Select which one you want, and then click Next.
11. In the next illustration, you can create a new resource group for your Virtual
Server. Because I already made one prior to launching the wizard, I’m selecting
it here. You can also create a new one if you want to.
Chapter 6: Designing a Highly Available Solution with Windows Services 271
Figure 6-3. Creating a new Virtual Server
P:\010Comp\OsbNetw\622-6\ch06.vp
Tuesday, March 25, 2003 10:16:20 AM
Color profile: Generic CMYK printer profile
Composite Default screen
272 Windows Server 2003 Clustering & Load Balancing
OsbNetw / Windows Server 2003 Clustering & Load Balancing / Shimonski/ 222622-6 / Chapter 6
12. After selecting your resource group, give it a name for the Virtual Server, as
seen in the following illustration. Do this so you can have a meaningful name
that represents a role within the cluster. I kept it simple, but you can make the
name as elaborate as you need to keep it distinguished from the rest of the
resources. Then, click Next.
13. Now that you have your new Virtual Server and resource group set up, you need
to configure an IP address to associate the resource with the cluster and the clients.
In the following illustration, you can configure the IP address and the network
name. You need to supply a unique IP address that the clients will access to get
to the resource, which is the DHCP service. In this example, I supplied an IP
address and a network name the clients will need to use to access this resource.
P:\010Comp\OsbNetw\622-6\ch06.vp
Tuesday, March 25, 2003 10:16:20 AM
Color profile: Generic CMYK printer profile
Composite Default screen
Chapter 6: Designing a Highly Available Solution with Windows Services 273
OsbNetw / Windows Server 2003 Clustering & Load Balancing / Shimonski/ 222622-6 / Chapter 6
14. After clicking Next, you have to select some advanced Virtual Server properties,
as seen in the following illustration. You can configure quite a few things here.
First, understand that up to now, you’ve provided what’s needed for the resource
to function, but you can configure a few more things now instead of later.
Select Resource Group Properties and click the Advanced Properties button.
15. In the next illustration, check over the failover and failback options. You learned
about both services in the first few chapters of the book. If you want to configure
these options, do so now. Also, remember, all these are optional and you can
configure them later. They’re only here for ease of use.
P:\010Comp\OsbNetw\622-6\ch06.vp
Tuesday, March 25, 2003 10:16:20 AM
Color profile: Generic CMYK printer profile
Composite Default screen
274 Windows Server 2003 Clustering & Load Balancing
OsbNetw / Windows Server 2003 Clustering & Load Balancing / Shimonski/ 222622-6 / Chapter 6
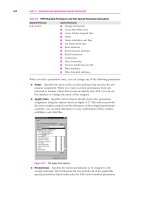
16. In the next section of Advanced Properties configuration you’ll configure IP
address parameters further than what you already designated earlier in the
wizard. This is shown in the next illustration. The Parameters tab is important
for the success of your DHCP resource. In this tab, you’ll find the IP address
you already assigned the Virtual Server but, more important, you can see what
network it wants to use.
17. Understand that when you use the Cluster Service, you always have two
individual network cards connected to two completely different networks. If
you configure the resource on the wrong network, then clients won’t be able to
reach it. In this tab, you can configure on which network the resource is located.
In this example, I configured the LAN network instead of the Heartbeat network.
By default, when I looked at it the first time, it was set for the wrong network,
so that would have impeded communications. You must configure this properly
for the cluster to work! Visibly verify that your connections are properly marked
and connected for communications to take place. You can click Apply when
you’ve set it the way you want it.
18. The last resource you can configure is the Advanced Network Name Resource
Properties, as seen in the next illustration. In this dialog box, you can configure
the network name if needed. This has already been done, though, so you have
no need to change it.
P:\010Comp\OsbNetw\622-6\ch06.vp
Tuesday, March 25, 2003 10:16:20 AM
Color profile: Generic CMYK printer profile
Composite Default screen
Chapter 6: Designing a Highly Available Solution with Windows Services 275
OsbNetw / Windows Server 2003 Clustering & Load Balancing / Shimonski/ 222622-6 / Chapter 6
19. Next, configure the manager of the resource. In this part of the wizard, you can
create a cluster resource to manage the actual application you’re clustering.
Here, you’ll answer Yes and create a resource for the application, as shown in
the illustration.
P:\010Comp\OsbNetw\622-6\ch06.vp
Tuesday, March 25, 2003 10:16:21 AM
Color profile: Generic CMYK printer profile
Composite Default screen
276 Windows Server 2003 Clustering & Load Balancing
OsbNetw / Windows Server 2003 Clustering & Load Balancing / Shimonski/ 222622-6 / Chapter 6
20. After clicking Next, the following illustration shows you how to set up the
resource type. DHCP Service comes preconfigured, so you needn’t worry about
it. Simply drop down the menu and select the DHCP Service option.
21. Click Next again. You’ll need to specify a name for this specific resource. I
selected the DHCPGROUP but, again, you can select whatever seems logical
in your own environment. After you configure what you need in the following
illustration, click Next to create the resource.
22. You can also click the Advanced Properties button to configure the Restart
policy and other dependencies if you need to do so. Click Advanced Properties.
P:\010Comp\OsbNetw\622-6\ch06.vp
Tuesday, March 25, 2003 10:16:21 AM
Color profile: Generic CMYK printer profile
Composite Default screen
OsbNetw / Windows Server 2003 Clustering & Load Balancing / Shimonski/ 222622-6 / Chapter 6
In the next illustration, you can see the options available, such as the Restart or
Do not restart options, within the Resource Group. The restart policy allows the
group to restart itself after a certain threshold passes.
23. If you need to configure Dependencies, then you can also work through that
configuration here. Click the Dependencies tab and choose Modify. Then,
double-click a physical disk resource, an IP address resource, and a network
name resource, so you can add them. Click OK to have them all added.
In Figure 6-4, I removed one resource, so you can see what happens if you
don’t meet the requirements, such as having a name, an IP address, or a shared
storage device.
24. In the next illustration, you generate an error if any of the resources are missing
that need to be applied, such as an IP address or shared storage devices. Make
sure you have your cluster configured properly or you won’t be able to finish
the configuration. I always add or create problems in the test environment to
help solve problems that could arise during the configuration of the production
environment.
Chapter 6: Designing a Highly Available Solution with Windows Services 277
P:\010Comp\OsbNetw\622-6\ch06.vp
Tuesday, March 25, 2003 10:16:21 AM
Color profile: Generic CMYK printer profile
Composite Default screen
25. This is the time to cluster your DHCP service. Once you click Next, the wizard
prompts you for the location of the DHCP database files. Select the dependent
disk that was left out of Figure 6-4. Close the wizard and you’ll have to bring
the group online. You can right-click it, and then select Bring Online.
26. That’s it! Now you only need to configure your scopes and you’re finished.
Open the DHCP console and right-click the server on which you want to set
up the scope.
Congratulations! You’ve built your first resource into the clustered server solution.
Now, you should feel comfortable knowing your DHCP service is highly available.
You can always test the solution, if needed, by powering down one server and seeing
if the other server takes over. If so, then you’re all set. If not, you need to do some
troubleshooting to see why this didn’t work. Some of the most common causes of
failure are misconfiguration, so go back through Chapters 1 through 3 if you’re having
an issue with your cluster. Now, let’s look at our next resource: the Windows Internet
Naming Service.
Highly Available WINS
Just like DHCP, Windows Internet Naming Service (WINS) is a service used on the server
to make life easier for you and your network. WINS is a core part of the Windows 2000
and Server 2003 operating systems. Although you can do away with this service in a pure
Windows 2000 and above network, it still comes standard with all servers’ OSs you
purchase. WINS is responsible for managing the NetBIOS name to IP address association
on your network in a database, so you can cut down on the amount of NetBIOS broadcasts
that occur on your network. The NetBIOS protocol, when configured on any workstation,
generally broadcasts its name by default, causing massive amounts of broadcast traffic,
depending on the size of your network. All other services like the Master Browser
service, for example, which helps maintain the browse list in My Network Places, is
also made better by the use of the WINS service. When it’s used correctly, WINS is a
278 Windows Server 2003 Clustering & Load Balancing
OsbNetw / Windows Server 2003 Clustering & Load Balancing / Shimonski/ 222622-6 / Chapter 6
Figure 6-4. Modify Dependencies dialog box
P:\010Comp\OsbNetw\622-6\ch06.vp
Tuesday, March 25, 2003 10:54:30 AM
Color profile: Generic CMYK printer profile
Composite Default screen
Chapter 6: Designing a Highly Available Solution with Windows Services 279
OsbNetw / Windows Server 2003 Clustering & Load Balancing / Shimonski/ 222622-6 / Chapter 6
network bandwidth saver. Now that you understand what WINS can do for you and
your network, you should also be able to make it highly available. Let’s see how.
Configuring WINS for High Availability
After reading so much of this book, it’s no wonder you probably want to cluster and
load balance everything you see! Although this is a great idea for reliability and
disaster-recovery scenarios, it does cost more and it adds complication to the design,
which you’ll see when you create a Highly Available WINS solution. Before we get into
the complexity of maintaining it, let’s look at setting it up. In this example, I cut out some
of the excessive screenshots you’ll see as being redundant from the DHCP configuration
exercise. You can follow most of the same steps, except where inapplicable. I’ll let you
know the differences in configuration and steps. First, the same rules apply when it comes
to working on building a highly available service. You need the cluster in place already,
so make sure you have a Microsoft Windows 2000 Advanced Server or Windows
Server 2003 running and functional. You might want to review Chapters 2 and 3 to
make sure you have it configured properly. Let’s look at the install.
1. First, make sure you have a viable cluster up and running. This is important.
Don’t install WINS yet to any server.
2. Next, add WINS (as the WINS service) to your cluster nodes.
3. To add the WINS service to your servers, go to Start | Settings | Control Panel |
Add/Remove Programs | Add/Remove Windows Components.
4. Once you select this button, open the Components dialog box, and move to the
Networking Services category. Don’t select anything yet, though, because we
have more configurations to make here.
5. Click Networking Service | Details button.
6. Clicking the Details button enables you to drill down into the Networking
Service, as seen in the following illustration where I checked WINS for
installation, and then press the OK button.
P:\010Comp\OsbNetw\622-6\ch06.vp
Tuesday, March 25, 2003 10:16:21 AM
Color profile: Generic CMYK printer profile
Composite Default screen
7. Once you finish, you’ll begin the install of the service. As you did with DHCP,
follow the prompts and install the service.
8. You can now install the WINS service on the other node in the cluster.
9. Now that you’ve finished installing WINS on each node, you’ll want to adjust
your IP addressing configuration.
You need to adjust your TCP/IP configuration so the server points to the
Virtual IP address (VIP) for WINS. To accomplish this, continue the steps.
10. Right-click My Network Places | Properties.
11. Right-click Network Connection | Properties.
12. Click TCP/IP and select it. Once it’s selected, click the Properties button.
13. Click Advanced | click the WINS tab.
14. Enter the VIP address to be used for WINS. You can see this in Figure 6-5. Now
your clustered nodes will register their records with WINS successfully.
15. Once you finish installing WINS on each node and have configured the proper IP
addresses, you must create a clustered resource for them both to be a part of. The
hardest thing to remember about clustering is you must make two entities appear
as one and this is where the creation of the clustered resource comes in to play.
280 Windows Server 2003 Clustering & Load Balancing
OsbNetw / Windows Server 2003 Clustering & Load Balancing / Shimonski/ 222622-6 / Chapter 6
Figure 6-5. Creating a clustered WINS resource
P:\010Comp\OsbNetw\622-6\ch06.vp
Tuesday, March 25, 2003 10:16:21 AM
Color profile: Generic CMYK printer profile
Composite Default screen
16. Also, remember, you need three dependencies: shared storage, a shared
network name, and a shared IP address, as shown in Figure 6-5.
As you did with DHCP, you can create this resource with the Configure
Application Wizard. This is always the quickest and easiest way for you to
create a resource. The wizard walks you through each step.
17. Start the Cluster Administrator tool by going to Start | Programs |
Administrative Tools | Cluster Administrator.
18. You need to connect to the cluster you want to configure.
19. In Cluster Administrator, go to the Configure Application option in the File menu.
20. Run the Cluster Application Wizard.
21. Once you run the wizard, as seen in the following illustration, you continue
through the same steps as you did when we clustered the DHCP service.
22. After the wizard greets you, click Next, so you can either create a new Virtual
Server or configure an existing Virtual Server. I recommend you create a new
one for this exercise.
23. After you follow the prompts to create the Virtual Server, you can then create
an application resource on the Create Application Cluster Resource page, as
seen in the next illustration.
Chapter 6: Designing a Highly Available Solution with Windows Services 281
OsbNetw / Windows Server 2003 Clustering & Load Balancing / Shimonski/ 222622-6 / Chapter 6
P:\010Comp\OsbNetw\622-6\ch06.vp
Tuesday, March 25, 2003 10:16:22 AM
Color profile: Generic CMYK printer profile
Composite Default screen
282 Windows Server 2003 Clustering & Load Balancing
OsbNetw / Windows Server 2003 Clustering & Load Balancing / Shimonski/ 222622-6 / Chapter 6
24. Click the resource type named WINS Service, and then click Next.
25. Create a name and description for the new WINS resource.
26. Select the Advanced Properties, so you can add a physical disk resource, an
IP address resource, and a network name resource. Remember, again, this is
basically the same process you used to configure DHCP earlier.
27. Add your new resources as dependencies and follow the rest of the wizard
through its defaults to finish creating your new Cluster Application.
28. Note, the wizard eventually prompts you for the location of the WINS database
files and this is important. You must make sure that the WINS database files
are placed on the disk in the group. If you don’t, it will fail. Take care not to
change this to a disk that isn’t in the group you just configured.
The default location is initially for the dependent disk, so you shouldn’t have
to configure anything.
29. That’s it! Follow the rest of the wizard prompts to the end and select your
defaults. You have now created a new WINS resource.
This new resource is a little more difficult to care for, so let’s continue this discussion
on WINS. To finish the WINS cluster resource you just created, make sure it shows up
in the Cluster Administrator and is in an online state. If it is in an offline state, then
you can right-click it, and then click Bring Online. Test your group by making sure the
cluster resource has been properly clustered. Do this by right-clicking the group and
selecting Move Group. If your group moves, then you can rest assured the basics of
clustering the WINS resource have been done properly. Now, you should feel comfortable
knowing your WINS service is highly available, so let’s look at more advanced features
of clustering your resources.
P:\010Comp\OsbNetw\622-6\ch06.vp
Tuesday, March 25, 2003 10:16:22 AM
Color profile: Generic CMYK printer profile
Composite Default screen
Chapter 6: Designing a Highly Available Solution with Windows Services 283
OsbNetw / Windows Server 2003 Clustering & Load Balancing / Shimonski/ 222622-6 / Chapter 6
Highly Available Databases
In this section, we look at some of the details that revolve around clustering a service
and how it affects the systems you’re working with. Because WINS shares a database
that’s populated with NetBIOS and IP address–based records, you must make that
database accessible to both clustered nodes. Then, when items are deleted or changed,
both nodes have the same information to hand out to requesting clients. The following
are some additional details to remember when sharing a database in a cluster:
•
The database files must be configured properly to support sharing between
the cluster nodes. For this to happen, you need to make sure that when you
configure WINS on a node, your Winstmp.mdb and Wins.mdb files need to be
considered. Make sure they’re installed on the clustered storage device, so they
can share it.
•
On a set of clustered nodes, the WINS database and its related files reside on a
cluster storage device in the path specified for the WINS resource, as seen in
Figure 6-6 and also here:
%SystemRoot%\System32\WINS
Figure 6-6. Viewing the WINS database files on a local drive
P:\010Comp\OsbNetw\622-6\ch06.vp
Tuesday, March 25, 2003 10:16:22 AM
Color profile: Generic CMYK printer profile
Composite Default screen
284 Windows Server 2003 Clustering & Load Balancing
OsbNetw / Windows Server 2003 Clustering & Load Balancing / Shimonski/ 222622-6 / Chapter 6
•
When you back up the WINS directory, you need to know some of the items it
creates. When the backup is done, a subfolder under the WINS folder called
Wins_bak is created, as well as a subfolder under that named New, which will
contain copies of the Wins.mdb file, the Wins.pat file, and a copy of the jet
database log file. The jet database log files will be numbered: JXXXXXX.log.
All these files are important and, if necessary, will be used to restore the WINS
database.
•
Finally, make sure you don’t change any permissions on the directory! Don’t
change the default settings for the NTFS file system permissions on your
%SystemRoot%\System32\WINS folder or you might lose access to it from
your accounts and it could cause errors to arise.
Now that you know where the database resides and what pieces are attached to
its overall functionality, let’s back up the database so, if the data is lost or damaged,
you have a way to recover your information quickly.
Backing Up and Restoring WINS on a Cluster
Backing up a WINS database on a Windows-based cluster is important. In this section,
you learn how to back up this (and any) database, so you can be ready for such a
disaster if it strikes.
If you were running a traditional WINS server that wasn’t clustered at all—just
installed and managed as a stand-alone server—then you could back up the WINS
database directly from the WINS MMC console. You can do this by going to the WINS
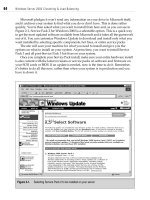
MMC located at Start | Settings | Control Panel | Administrative Tools | WINS. Once
you open the MMC, you can back up the WINS database by going to the Back Up
Database command in the Action menu, as seen in the next illustration.
This isn’t available here because the database is clustered and can’t be backed up. This
creates a problem, so you need a valid workaround. You have to find a way to back up
P:\010Comp\OsbNetw\622-6\ch06.vp
Tuesday, March 25, 2003 10:16:22 AM
Color profile: Generic CMYK printer profile
Composite Default screen
the database in case of a possible disaster. Here’s how you can restore a system in case
a clustered solution fails.
Make sure you completely understand the last two sections. You must have an
established and functional cluster solution to install the WINS service on to and you
must have a shared drive resource where the \Winnt\System32\Wins folder will
reside. This way, the shared disk is where all your files are, and is the one place you
can back up the entire shared database. Next, you should know what your game plan
is going to be to back up the database because the option to do so isn’t available. If it
isn’t available, then you have only one alternative: back up the shared resource with a
backup program. Now, you can use any program for your shared storage backup but,
because most people will have Ntbackup available, we’ll look at that option.
1. When you want to start the backup, your first task is to take the WINS resource
offline. Go into the Cluster Administrator, right-click the resource, and then
select to take it offline.
2. Once offline, you can run the Ntbackup utility. To run it, go to Start | Run,
enter Ntbackup in the blank run box, and enter Ntbackup on the Open field.
Press OK and you open Ntbackup.
3. Once you open the Ntbackup utility, a wizard or the welcome screen greets
you. If you get the wizard, click the option to select Advanced mode and you’ll
go to the welcome screen. If you went directly to the welcome screen, you need
to click the Backup tab, as seen in Figure 6-7.
In Figure 6-7, you can see WINS folder was selected in the left-hand navigation
pane of the Ntbackup utility.
4. The right-hand pane is the individual file within that WINS directory. Select
the WINS directory. By default, you also select all the files within it.
If you’re using the Ntbackup utility for this purpose, you might have issues
with the Windows Scheduler. Using the scheduler could become increasingly
difficult because you might not know, at any given time, which of your clustered
nodes will own the required resource group. Cluster.exe, discussed in Chapter 2,
can be incorporated into batch files to automate what you need to make happen.
The batch file can also be used to incorporate Ntbackup batch jobs. You need to
know how to make a basic batch file to automate what you need done. The batch
file you can write will be able to move the group to the right node, so you can take
the node offline to back up the database. Once you finish, you can also use the
batch file to bring the node back up online when you finish, and then move
the group back to the other node if you want. Refer to Chapter 2 to learn about the
command-line features to perform this step.
5. Next, open the WINS MMC again and we’ll learn another way to back up the
database, which I find much easier than the previous way. Here, you can have
the database backed up on shutdown.
Chapter 6: Designing a Highly Available Solution with Windows Services 285
OsbNetw / Windows Server 2003 Clustering & Load Balancing / Shimonski/ 222622-6 / Chapter 6
P:\010Comp\OsbNetw\622-6\ch06.vp
Tuesday, March 25, 2003 10:16:22 AM
Color profile: Generic CMYK printer profile
Composite Default screen
286 Windows Server 2003 Clustering & Load Balancing
OsbNetw / Windows Server 2003 Clustering & Load Balancing / Shimonski/ 222622-6 / Chapter 6
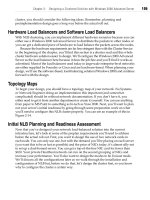
6. Open WINS MMC and right-click the WINS server | Properties | General tab.
Click to select the Back up database during server shutdown check box, as seen
in the next illustration.
Figure 6-7. Using Ntbackup
P:\010Comp\OsbNetw\622-6\ch06.vp
Tuesday, March 25, 2003 10:16:23 AM
Color profile: Generic CMYK printer profile
Composite Default screen
This backs up the WINS database each time a shutdown occurs. The only downside
to this is having the shutdown. This is also less flexible than the other method, but it’s
much easier to manage and is recommended because of its ease of use.
Don’t use this as a way to test a production cluster. You’d want this set for when
your servers have problems and have to be rebooted. This isn’t something you’d want
to use on a server if you don’t have to because better methods are available for a higher
price. This is simply another solution you can use if you want to use the tools you
already have available.
CONCLUSION
What you learned in this chapter can be applied to nearly any service. Now that you
know how to do the two hardest ones, you should have no problem going through and
clustering the gambit of what Windows 2000 and Server 2003 servers will let you cluster.
Let’s recap what you’ve learned up to now. In this chapter, you learned how to apply
some of Microsoft’s networking infrastructure services, such as WINS and DHCP, to
the high-availability model. Services like DHCP always must be available to service
your network clients. If they aren’t available, you could lose service on your network.
Applying Highly Available solutions like the ones you’ve read about in this chapter
might save you some headaches in the future.
Chapter 6: Designing a Highly Available Solution with Windows Services 287
OsbNetw / Windows Server 2003 Clustering & Load Balancing / Shimonski/ 222622-6 / Chapter 6
P:\010Comp\OsbNetw\622-6\ch06.vp
Tuesday, March 25, 2003 10:16:23 AM
Color profile: Generic CMYK printer profile
Composite Default screen
OsbNetw / Windows Server 2003 Clustering & Load Balancing / Shimonski/ 222622-6 / Chapter 6
Blind Folio 6:288
P:\010Comp\OsbNetw\622-6\ch06.vp
Tuesday, March 25, 2003 10:16:23 AM
Color profile: Generic CMYK printer profile
Composite Default screen
CHAPTER 7
Building Advanced
Highly Available
Load-Balanced
Configurations
289
OsbNetw / Windows Server 2003 Clustering & Load Balancing / Shimonski/ 222622-6 / Chapter 7
P:\010Comp\OsbNetw\622-6\ch07.vp
Monday, March 24, 2003 11:52:40 AM
Color profile: Generic CMYK printer profile
Composite Default screen
Copyright 2003 by The McGraw-Hill Companies, Inc. Click Here for Terms of Use.
I
n this chapter, you learn how to take your knowledge of load balancing and apply it
to building load-balanced solutions facing the Internet. In this chapter, you continue
to build your knowledge from all the previous chapters in the book and focus on
advanced NLB concepts to apply with Windows Server 2003, which includes theory,
design, and security. Once you understand what this product does, we’ll build a
load-balanced cluster with it. The chapter ends with troubleshooting tips and things
to remember when rolling out a high-availability solution. We’re nearing the end
of the book and this is the last chapter in which we build an actual cluster. By now,
I hope you’ve built enough clusters so you can design one for yourself or your
organization. Let’s begin by looking at some advanced network load balancing (NLB)
predesign planning.
PREDESIGN PLANNING
In this section, we look at some of the advanced features of using NLB. NLB was
covered in Chapter 3, where you learned how to set up a load-balanced solution with
Windows Server 2003.
First, let’s do a small review, and then build the more advanced features.
NLB Advanced Design and Troubleshooting
In this section, we’ll explore some design tips and tricks to build on your current NLB
knowledge, and design a Highly Available NLB solution for your network. This first
discussion centers on NLB traffic considerations and planning. Then you learn about
design tips for installing and mixing node types.
NLB Traffic Planning
While using NLB, you want to ensure your data isn’t bottlenecking anywhere because,
as we’ve mentioned previously, it’s critical for you to optimize every part of a Highly
Available solution for it to work as advertised. You want it to operate faster, if anything
else. You also want to make sure the Highly Available solution is scalable and redundant,
but you definitely want to be certain your bandwidth needs are considered first.
In the following diagram, I’ll highlight a possible network load-balanced solution
and explain each section of the diagram for planning bandwidth considerations. In
Figure 7-1, I planned a simple NLB Highly Available solution for a provider of web
services. This is a web portal that requires nothing more than a secure web site. In
other words, keep it simple, we aren’t selling anything. All I need is a reliable web site
that’s always up and running (like a listing of information) and it must be secure from
the Internet. You also want to ensure no one will be penetrating your company’s
network from the Internet. Remember, the design itself isn’t what we’re focusing on
now. Our real focus is on the actual network design in relation to traffic design. Let’s
look at each section in depth.
290 Windows Server 2003 Clustering & Load Balancing
OsbNetw / Windows Server 2003 Clustering & Load Balancing / Shimonski/ 222622-6 / Chapter 7
P:\010Comp\OsbNetw\622-6\ch07.vp
Monday, March 24, 2003 11:52:40 AM
Color profile: Generic CMYK printer profile
Composite Default screen
Chapter 7: Building Advanced Highly Available Load-Balanced Configurations 291
OsbNetw / Windows Server 2003 Clustering & Load Balancing / Shimonski/ 222622-6 / Chapter 7
Figure 7-1. Sample diagram of a possible network load-balanced solution
P:\010Comp\OsbNetw\622-6\ch07.vp
Monday, March 24, 2003 11:52:41 AM
Color profile: Generic CMYK printer profile
Composite Default screen
292 Windows Server 2003 Clustering & Load Balancing
OsbNetw / Windows Server 2003 Clustering & Load Balancing / Shimonski/ 222622-6 / Chapter 7
In Figure 7-1, I numbered sections of the diagram I want you to pay attention to
when planning bandwidth and trying to optimize your investment.
1. In the first section of the diagram, I flagged the Internet-based routers for you
to review. You need to do an analysis on what kind of traffic could come to
your new web site. Let’s say this is some kind of informational site, such as
Maps of New York, and you know you’re going to get hundreds of hits every
hour, with peak traffic during holiday months. You don’t want to undercut
yourself, so plan your bandwidth wisely. I recommend starting with at least a
full T1 (1.544MB) line, so you can reprovision it and downgrade it, if necessary.
Reprovisioning lines, although it’s a hassle, isn’t a difficult task. I also recommend
you get two lines and have them connect to two different points of presence
(POP). You needn’t get two ISPs or Telcos to do this either. You can get Sprint
and AT&T or you can ask AT&T to give you two different POPs. This adds
redundancy within the Telco itself because if it has problems, you have a
second chance at life! Next, you want to have the best router hardware you can
get. Although I like all flavors of hardware, I am definitely a Cisco advocate.
I suggest a 2600 series Cisco Router or above. You can use older 2500s, but I
advise you don’t because most of them have Ethernet ports, not Fast Ethernet
Ports. You’re locking yourself into 10 Mbps and half-duplex, instead of 100
Mbps and full-duplex communication, which eliminates CSMA/CD and
collisions on the wire. Finally, make sure you have enough memory in your
routers and that your cabling has been tested and verified.
2. In the second section, you want to pay attention to your firewalls. Now, I am
also a fan of many firewall vendors and brands so I won’t sit here and tell you
which ones you should purchase, but making a highly available and load-
balanced solution out of the firewalls should also be on your list for this solution.
I suggest making sure that whichever one you pick (Checkpoint, Symantec,
Cisco, Nokia), it is scalable, and if possible, redundant. Since we already started
talking about Cisco, I will continue with them. In this diagram, you can visualize
that we have two Cisco PIX firewalls (I am using Version 515 here). I have two,
and between them I have a failover cable for redundancy in case one of them
fails. I will also make sure that they are running at 100 Mbps and full-duplex
on each Fast Ethernet Port. Make sure that the connection (100 Mbps full-
duplex to the Switch) is located on section 3.
3. In the third section, you have your first switch connection. Again, you can use
whatever you want, but I will continue with Cisco. I have a Cisco 4006 series
switch with Layer-3 functionality. In other words, it’s a switch and a router
combined. Each port of this connection is configured at 100 Mbps and full-duplex
and that CPU and memory utilization is very low. Also, the switch I chose is a
little overkill for the solution, but I have another plan for this company to implement
ecommerce and a new DMZ, so I am planning for scalability! I am also using
P:\010Comp\OsbNetw\622-6\ch07.vp
Monday, March 24, 2003 11:52:41 AM
Color profile: Generic CMYK printer profile
Composite Default screen
Chapter 7: Building Advanced Highly Available Load-Balanced Configurations 293
OsbNetw / Windows Server 2003 Clustering & Load Balancing / Shimonski/ 222622-6 / Chapter 7
this switch because it is the lowest grade Layer-3 switch in its class with the
port density I need for future growth. The 4000 and the newer 4500’s are the
smallest enterprise switches I would use.
4. In the fourth section, I am highlighting the front-end connections to the NLB
cluster nodes. This would be the connection to the NIC cards that have a
Virtual IP address enabled. Figure 7-2 shows the IP address view of Figure 7-1.
The Virtual IP address is 12.1.3.10 and this front-end network must be at 100
Mbps full-duplex if possible. This is where most of your traffic will be on the
Cluster. Make sure the NIC cards on your NLB hosts are optimized with the
best possible drivers, the best possible cards and set at 100 Mbps full-duplex
hardcoded to eliminate auto-negotiation problems. Auto-negotiation is what a
port on a switch or a NIC card does to adjust to the line speed present. In other
words, if you have a network Switch with 10/100-Mbps ports and NICs that
will work at that speed, auto-negotiation will make a best effort to adjust to
speed that both are willing to operate and communicate on. Every port that
auto-negotiates must advertise the modes in which it is able and willing to
operate, and most likely, if you have up-to-date gear, you will find that it will
negotiate to the higher speed like 100 Mbps.
5. In the fifth section, make sure your uplink from your front-end switch to
your back-end switch is also optimized at 100/full. Be careful to avoid switch
flooding, as covered in Chapters 2 and 3. You don’t want your back-end
network flooded with heartbeat traffic, so you might want to use a hub and
an uplink to the switch to save money or set up a separate VLAN. Either way,
make sure your main traffic paths are optimized as much as possible.
6. In the sixth section, make sure your back-end NIC cards are set at 100 Mbps
and full-duplex. The only time this changes is if you want to eliminate switch
flooding and if you use a hub. If this is the case, leave the NIC to autonegotiate
the speeds you want.
7. In the seventh section, make sure your heartbeat traffic over your private
network is optimized. This isn’t the most crucial point of the cluster, so make
it the best you can, using at least 10 Mbps and half-duplex, although setting
this to 100 Mbps and full-duplex is definitely the better solution.
8. In the eighth section, this is your back-end network switch. I have another
Cisco 4006 with Layer-3 capabilities for routing between the different subnets.
I have this connected to my front-end network switch and my back-end
network firewall. All connections are optimized at 100 Mbps full-duplex.
9. In the ninth section, you must put a back-end firewall into a network of this
kind. Because you’re connecting to the public Internet, make sure you have,
at the least, the most minimal form of protection you can get. In this case,
you can see an uplink between the servers from switch to switch could be
P:\010Comp\OsbNetw\622-6\ch07.vp
Monday, March 24, 2003 11:52:41 AM
Color profile: Generic CMYK printer profile
Composite Default screen