Firewalls For Dummies 2nd Edition phần 8 potx
Bạn đang xem bản rút gọn của tài liệu. Xem và tải ngay bản đầy đủ của tài liệu tại đây (1.26 MB, 44 trang )
2. If you have purchased a license for Norton Personal Firewall, then
start the installation by running
CDSTART.exe from the product
CD-ROM, and continue with Step 4.
3. If you have downloaded a 15-day trial version of Norton Personal
Firewall, then start the downloaded 750KB application named
NPF15Try.exe.
A Delivering Norton Personal Firewall 2003 window appears. The appli-
cation will download and unpack a 25MB file. After this is done, click the
Launch button to start the downloaded
CDSTART.exe application.
4. In the Welcome to Norton Personal Firewall window, click Install
Norton Personal Firewall.
Windows Installer will prepare the installation and start the Setup
program.
5. On the Welcome to Norton Personal Firewall Setup page, click Next.
6. On the License Agreement page, read the license agreement and then
select the I Accept the License Agreement option and click Next.
7. On the Run LiveUpdate After Installation page, select whether you
want to update the software after installation, and click Next.
8. On the Set the Destination Folder page, accept the default destination
folder and click Next.
9. On the Ready to Install page, click Next to start the installation.
Setup will now install the software on your computer. This will take a few
minutes.
10. On the Please Register Norton Personal Firewall page, click Next if
you want to register the software, or click Skip.
If you register the software, you have to fill out a few additional pages.
11. On the Readme page, read the installation notes and click Next.
12. On the Installation Successful page, click Finish to complete the
installation.
After the installation, you have to restart the computer.
13. On the Installer Information page, click Yes to restart the computer.
The computer will now restart.
14. After the restart and logon, the Security Assistant window appears.
You can click Next to configure Norton Personal Firewall now, or click
Close to configure the software later.
You can configure all the settings in the Security Assistant from the
Security Center dialog box later.
292
Part IV: Deploying Solutions Using Firewall Products
15. If you selected to enable LiveUpdate during installation, the
LiveUpdate window appears. Click Next to see the updates found.
For a security product, it is always a good idea to use the latest version
of the software.
16. If updates are found, click Next to download and install the updates.
LiveUpdate downloads and installs the updates from the Symantec Web
site.
17. After all updates are installed, click Finish to complete the update of
the software.
It is possible that some of the updates require you to restart the com-
puter again. Click OK to confirm the restart.
The Norton Personal Firewall globe icon now appears in the Windows system
tray in the lower-right corner of the screen.
When you want to start the Security Center, just double-click the globe icon
in the system tray.
Norton Personal Firewall
configuration tasks
The following section provides you with step-by-step configuration instruc-
tions for typical tasks that you do when working with Norton Personal Firewall.
ߜ To start the Security Center:
1. Choose Start➪All Programs➪Norton Personal Firewall➪Norton
Personal Firewall or double-click the globe icon in the Windows
system tray.
ߜ To block all traffic instantly:
1. Open the Security Center (or the Security Monitor).
2. In the Security Center or Security Monitor dialog box, click the
Block Traffic button.
or
1. Right-click the globe icon in the Windows system tray, and click
Block Traffic.
ߜ To change Trusted Zone (Home Networking) settings:
1. Open the Security Center.
2. In the Security Center main screen, select Personal Firewall and
then click Configure.
293
Chapter 15: Configuring Personal Firewalls
3. In the configuration dialog box, select the Home Networking tab.
4. On the Home Networking tab, click Add or Remove to configure
the Trusted Zone.
ߜ To enable ad blocking:
1. Open the Security Center.
2. In the Security Center main screen, select Ad Blocking and then
click Configure.
3. In the Ad Blocking dialog box, select the Turn on Ad Blocking
check box.
ߜ To disable or enable the Alert Tracker (half-globe icon) on screen:
1. Open the Security Center.
2. In the Security Center window, click the Options button.
3. On the General tab of the Options dialog box, disable or enable
the Show the Alert Tracker check box.
ߜ To inspect log files:
1. Open the Security Center.
2. In the Security Center window, select Statistics.
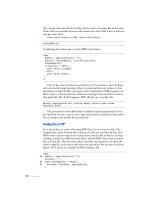
3. In the Statistics screen, click the View Logs button.
4. In the Log Viewer window, select one of the nine logging cate-
gories, as shown in Figure 15-28.
Figure 15-28:
Log Viewer
window.
294
Part IV: Deploying Solutions Using Firewall Products
Chapter 16
Microsoft’s Firewall: Internet
Security and Acceleration Server
In This Chapter
ᮣ Faster, more secure Internet access with ISA Server
ᮣ How ISA Server works
ᮣ The two editions of ISA Server
ᮣ How to install ISA Server
ᮣ The three types of clients
ᮣ The two types of rules
ᮣ How to let the “good guys” in
M
icrosoft Internet Security and Acceleration Server 2000 — quite a
mouthful, but the name is an apt description of what Microsoft’s entry
in the firewall market does. In this chapter, we explore what ISA Server (as it
is commonly known) can do for you and how it performs its two functions:
providing Internet security and accelerating Internet access by caching Web
content.
How do you pronounce it?
Nobody likes to use the long, cumbersome name
“Microsoft Internet Security and Acceleration
Server,” so everyone just uses the abbreviated
form, ISA Server. But how do you pronounce it?
Is it “eye-sah” or “I-S-A?” Even the developers
at Microsoft who wrote this software don’t
agree. Half the developers pronounce it one way,
the other half, the other way. And if they can’t
agree on a pronunciation, you are certainly
allowed to use the pronunciation that sounds
best to you.
Making Internet Access Faster
and More Secure
Microsoft created a solution that addresses two problems that many organi-
zations face when connecting their network to the Internet: making the best
possible use of network bandwidth to the Internet, and screening all network
traffic to and from the Internet to ensure that traffic is allowed by your
Security policies. In other words, ISA Server caches Web content in addition
to being a firewall. Here’s how ISA Server performs these tasks:
ߜ Accelerating Internet Access: No matter how much Internet bandwidth
you have, as more people in your company or organization use the
Internet for more purposes, everyone is bound to see a slowdown before
too long because of increasing usage of your link to the Internet. Your
link to the outside world is becoming congested. Much of the network
traffic of many organizations consists of employees viewing Web pages
that co-workers accessed just minutes or hours ago. Because of this
duplication, ISA Server — which screens all network traffic to and from
the Internet — keeps a copy of most Web pages in a cache, and when
the same Web page is accessed again soon, ISA Server retrieves the page
from its cache rather than from the Internet. The most noticeable effect
is that the Web browser receives the requested page faster and can dis-
play it with almost no delay. The other effect is that little or no network
bandwidth to the Internet is used when someone requests a Web page
that is already in ISA Server’s cache. Everyone benefits: Web surfers
often see the requested Web pages faster, and you save money because
you don’t have to buy more bandwidth to the Internet.
ߜ Securing Internet Access: ISA Server can inspect both outgoing and
incoming Internet traffic and decide whether this traffic is allowed
according to the rules that you defined. For example, if Fred tries to
download a file from the Internet, ISA Server checks whether Fred is
allowed to download files, whether Fred is allowed to do this during
this time of the day, whether access to the specific Web location is
allowed, and whether files of this type can be downloaded. ISA Server is
very flexible when it comes to enforcing rules for Internet access. Also,
like every good firewall, ISA Server allows inbound network traffic only
when it is part of a data transfer that was initiated from someone in your
organization — such as a Web page that a server returns after a user
requested the page — or if you specifically allow the incoming traffic,
such as allowing requests from people on the Internet who access your
public Web server.
296
Part IV: Deploying Solutions Using Firewall Products
Looking under the Hood: How ISA Works
How does ISA Server do it? First, like any good firewall, ISA Server can perform
packet filtering and stateful inspection. Second, ISA Server works as a proxy
server. A proxy server intercepts Internet requests, examines them, and then
issues the request to the Internet, making them look as if they originated from
the proxy server. This means that no direct connection ever exists between an
internal computer and an external computer. Essentially, a proxy server acts
as an agent that sends IP traffic, receives IP traffic, and fetches Web pages on
a client’s behalf.
Take a look at two examples of how this process works. In the first example, a
user’s browser issues a request for a Web page. Because the browser is aware
of the presence of a proxy server, it doesn’t request the Web page directly.
Instead, it contacts the proxy server and asks the proxy server to retrieve the
Web page. The proxy server then requests the Web page from the Web server
and sends the results to the browser. Just like a butler who performs the
shopping for you and everyone in your household, the proxy server is the
computer that issues all Internet requests and appears as the initiator of all
requests to the outside world.
In the second example, a user downloads mail messages from a mail server
on the Internet. Inside the computer, the request is translated into a series of
IP packets. Depending on your configuration, these IP packets are then inter-
cepted by a piece of client software and sent to the proxy server, or the proxy
server may intercept them en route without the client computer’s knowledge.
297
Chapter 16: Microsoft’s Firewall: Internet Security and Acceleration Server
Running the numbers
When evaluating ISA Server, calculate how
much money the reduction of Internet traffic can
save you and how this cost compares to the cost
of ISA Server. For example, suppose that you are
paying $200 per month to your ISP to access the
Internet. The bandwidth that the ISP provides for
this amount is not enough for your needs, and
doubling the capacity will cost you another $200
a month. Buying a new server and installing
Windows 2000 and ISA Server may cost you as
much as $5,000, but the resulting reduction in
bandwidth usage means that you won’t have to
buy the additional bandwidth at $200 a month. In
this example, you’ll need 25 months to break
even, but with ISA Server you also get a first-rate
firewall, and ISA Server allows you to monitor all
Internet usage. Buying separate products for
these functions could cost you thousands of dol-
lars. By running the numbers for your own com-
pany or organization, you may find that ISA
Server can more than pay for itself and even
save you money in the long run.
Again, the proxy server changes the outgoing information. In this case, it
changes the header of each IP packet to disguise the packets so it looks as if
the packets came from the proxy server. When return packets are received
from the mail server on the Internet, ISA Server again changes the informa-
tion in the packet headers before sending the packets on to the client.
Because of this manipulation of header information, both the mail program
on the client computer and the mail server on the Internet are unaware of the
role that the proxy server plays. Depending on the type of network traffic
involved, ISA Server can request content as a proxy for a client (in the case of
Web traffic) or it can establish an IP connection on behalf of the client (in the
case of non-Web traffic). In either case, the client computer and the server
that it tries to contact never communicate directly with each other.
One thing to keep in mind about this process is that ISA Server always per-
forms Network Address Translation (NAT) between internal and external
computers. NAT is explained in detail in Chapter 3.
Using a proxy server offers a number of benefits:
ߜ All Internet traffic passes through a single point where you can control it
and apply the rules that enforce your Internet Acceptable Use policy and
your Security policy. Unlike a packet-filtering firewall, a proxy server can
examine entire communication sequences, such as the requesting and
receiving of a Web page, and is not limited to checking single IP packets.
ߜ Because servers on the Internet never see the actual IP addresses of the
computers that establish a connection, a proxy server effectively hides
your internal network structure. Furthermore, the proxy server can drop
all network packets that are not valid before they ever reach the client.
ߜ Your entire company or organization requires only a single IP address
that is valid on the Internet, which is the IP address of the proxy server.
For your internal IP addresses, you can use addresses from the private
IP addressing ranges defined in RFC 1918. Using private IP addresses
completely ensures that nobody from the Internet can initiate a direct
connection with a computer on your network, and you won’t have to
pay your ISP to use a large number of IP addresses for Internet access.
ISA Server performs the roles of a proxy server and a caching server rather
well, but it can do even more. Here’s a list of some of the other features that
make it a very capable firewall:
ߜ Dynamic Packet Filters: Whenever a client issues an Internet request,
ISA Server duly opens the ports that are required for this connection —
but only for the time that the ports need to be open. When someone on
the Internet tries to connect to the ISA Server computer using any port
other than one of those that has been opened for a limited time to
accommodate a client request, ISA Server doesn’t respond in any way to
the connection attempt. A curious hacker or malicious intruder gets no
indication that the computer running ISA Server is even running at all.
298
Part IV: Deploying Solutions Using Firewall Products
ߜ Static Packet Filters: Clients don’t initiate all connections, nor are inter-
nal clients always involved in the network traffic that ISA Server handles.
For example, ISA Server may route network traffic between the Internet
and your perimeter network or DMZ (demilitarized zone). In order to
accomplish such routing and other tasks, you have to configure ISA
Server with static packet filters. These static packet filters allow or deny
traffic through your ISA Server firewall based on the protocol used and
the source and destination IP addresses and ports. For more information
on DMZs, see Chapters 11 and 12.
ߜ Application Filters: Packet filters determine what network traffic ISA
Server forwards, based on the characteristics of each IP packet — the
protocol used and the source and destination IP addresses and ports.
However, packet filters can’t determine whether ISA Server forwards
network traffic based on patterns that span more than one IP packet.
For example, to make a decision about whether to forward the packets
that comprise an e-mail message, ISA Server must be able to assemble
the incoming IP packets that comprise an e-mail message, assemble the
message, and then examine the contents of the message. In other words,
ISA Server can apply rules based on Application layer protocols, such as
SMTP and HTTP. For ISA Server to apply rules at the application level, it
must have application filters that are designed with knowledge about the
characteristics of the Application layer protocol. ISA Server contains sev-
eral built-in application filters — for example, an SMTP filter for applying
rules to incoming e-mail. ISA Server is particularly strong when it comes
to examining HTTP traffic. Developers can also create more application
filters in addition to the ones that are included with ISA Server.
ߜ Server Publishing and Web Publishing: Sometimes you want external
users to have access to servers that are located on your internal network.
For example, you may have a public Web server that you want to make
available to users on the Internet. Or, your screened subnet may contain
your company’s public DNS server or mail server. Server publishing rules
allow you to make these servers available to the Internet. Web publishing
gives you similar functionality for Web servers. In addition, because ISA
Server can cache published Web content, Web publishing provides perfor-
mance benefits for users who access your Web server from the Internet
through the ISA Server-based firewall.
299
Chapter 16: Microsoft’s Firewall: Internet Security and Acceleration Server
Adding new features
If you are publishing a Web or mail server with
ISA Server, you should take a look at Feature
Pack 1, which is a collection of useful tools and
additions that simplify publishing of these types
of servers. Feature Pack 1 offers other features,
too, but most of the added value comes in the
area of publishing. The best part is that you can
download this add-on for free from
www.microsoft.com/isaserver.
ߜ Monitoring and Reporting: ISA Server provides multiple levels of moni-
toring. You can choose to have ISA Server log several types of information,
including Internet access by internal users, incoming network packets
from the Internet that ISA Server blocks, or even every single network
packet that ISA Server processes. You can — and should — regularly
review these logs and a few of the more readable reports that ISA Server
creates from the logs. Because the logs can be very detailed, they are a
powerful tool for keeping track of all aspects of your organization’s
Internet access. ISA Server also includes tools that allow you to monitor
ISA Server’s operations and your company’s Internet traffic. You can even
configure ISA Server to contact you when a predefined condition, such as
a security breach, has occurred.
ߜ Support for Remote Access: Many companies allow remote access into
their internal network by employees. These users may be working from
home or traveling. Virtual private networks, or VPNs, have become
increasingly popular for providing this access. A VPN is a secure connec-
tion that is accomplished over an insecure connection by using an encryp-
tion mechanism. In most cases, a user establishes a connection to the
Internet via an Internet Service Provider. The user then establishes a
secure connection to his or her company’s remote access server over the
Internet. After this connection has been established, all further traffic
between the user’s computer and the company’s internal network is
encrypted. This connection is completely transparent to all applications
that access the company’s internal network from the remote computer.
These applications access the internal servers as if the user’s computer
were directly connected to the internal network. Configuring a VPN often
turns into a lot of work because the firewall and the VPN server need to be
configured. ISA Server simplifies this process by making it very easy to
configure both ISA Server settings and the Windows 2000 RRAS (Routing
and Remote Access) service in one procedure. You can configure ISA
Server to allow VPN clients to connect to your network in as little as three
mouse clicks after you have done your planning. More importantly, using
ISA Server’s wizards ensure that you don’t accidentally end up with an
insecure configuration.
ߜ Extensibility: This may be the most impressive aspect of ISA Server.
Anything that you wish ISA Server did for you, but Microsoft hasn’t
thought of, can be acquired by using the ISA Server SDK (Software
Development Kit). Programmers can use this SDK to extend the function-
ality of ISA Server. Anyone familiar with a scripting language, such as
Microsoft Visual Basic, can create scripts that automate common admin-
istrative tasks. With knowledge of a programming language, such as C++,
you can create an ISA Server extension that handles network packets or
streams of network packets according to the rules that are built into
this extension. Third-party vendors have also developed a number of
extensions that perform tasks, such as virus checking or blocking user
access to Web sites based on categories into which these Web sites fit.
300
Part IV: Deploying Solutions Using Firewall Products
Choosing between the Two Editions
Now that you know about what ISA Server can do for you, you may decide to
evaluate it further. Pretty soon you will discover that ISA Server comes in two
editions, the Standard Edition and the Enterprise Edition, and you begin to
wonder, “Which of these editions is right for me?” Because the Enterprise
Edition is considerably more expensive than the Standard Edition, examine
what you may gain by using the Enterprise Edition. The Enterprise Edition can
do everything that the Standard Edition does — and more. You should con-
sider the Enterprise Edition only if you need any of the added functionality that
it provides over the Standard Edition. The Enterprise Edition can help you
ߜ Build big servers: You can install ISA Server Standard Edition on a
computer that has up to four processors. This hardware configuration
covers most servers in existence today. However, some large organiza-
tions use servers that have eight or more processors. Microsoft requires
that you use the Enterprise Edition on servers with more than four
processors.
ߜ Distribute the load: By using ISA Server Enterprise Edition you can
create an array of multiple ISA Server computers that automatically dis-
tribute the load of client requests among themselves. Although you may
be tempted to add more processors to the ISA Server computer as the
load on your firewall grows, you can often achieve the same increase in
performance more efficiently and effectively by creating an array of mul-
tiple computers running ISA Server. All computers in an array must run
ISA Server Enterprise Edition.
ߜ Manage the work: Arrays give you another benefit besides distributing
the workload among multiple computers. When you create an ISA Server
array, all computers in an array work together to perform largely identi-
cal tasks. You can also manage all the servers in such an array as a
single unit. Doing so saves you a lot of administrative work. Remember
that you need the Enterprise Edition to create an array.
301
Chapter 16: Microsoft’s Firewall: Internet Security and Acceleration Server
Some servers cost more
Purchasing a large server with multiple proces-
sors results not only in a higher cost for the
hardware, but if you use that server to run ISA
Server, remember that Microsoft licensing rules
require you to buy an ISA Server license for
each processor that is installed in the ISA
Server computer. However, after you have taken
care of the per-processor licenses, you can
allow as many client computers as you want to
access the Internet through the ISA Server
computer. Other firewall products, in contrast,
are priced based on the number of clients.
ߜ Administer an enterprise: ISA Server allows an organization to adopt
enterprise policies. An enterprise administrator can use these rules to
enforce corporate security policies enterprise-wide and to ensure that all
ISA Server arrays in the enterprise use these rules. An enterprise admin-
istrator can also decide how much leeway an array administrator has in
augmenting enterprise policies. Enterprise policies apply only to arrays,
so to implement enterprise-wide policies, you must use ISA Server
Enterprise Edition for all ISA Server computers in your organization.
Preparing for Installation
Installing ISA Server is easy. You can insert the CD in your computer’s
CD-ROM drive, complete the installation wizard within five minutes, and the
ISA Server installation is finished. However, if you haven’t planned adequately
for your ISA Server installation, or if you make incorrect decisions during the
installation, you may create a huge security risk for your network. So, to help
you avoid these situations, take a look at what you should consider before
installing ISA Server.
First, carefully examine your network infrastructure. Will it require arrays, or
do you just need a single ISA Server computer? If you do need arrays, you need
to implement Active Directory in your company. Active Directory is Microsoft’s
directory service. Committing your organization to Active Directory is an issue
that you have to assess based on many factors, only some of which are related
to ISA Server. The implications of implementing Active Directory go beyond the
scope of this book, but fortunately, even if you’re not ready to move to Active
Directory entirely, you can create an Active Directory-based domain that con-
tains only your ISA Server computers. This allows you to create an ISA Server
array even before you are ready for an all-out implementation of Active
Directory.
After you begin using Active Directory in your network, you have to do one
more thing: You need to modify the Active Directory schema so that Active
Directory can store ISA Server data. Although modifying the Active Directory
schema for ISA Server can be done easily enough, it can have some major
implications on your Active Directory and thus your network. Before installing
ISA Server as an array, make sure that you understand all the implications.
For more information on this topic, see Active Directory For Dummies, by
Marcia R. Loughry (published by Wiley Publishing, Inc.).
This chapter covers installing ISA Server as a standalone, or non-array, server,
which doesn’t require Active Directory. Don’t worry, though — you can later
upgrade to the Enterprise Edition and then promote an ISA Server standalone
server to an array, and ISA Server even preserves most of your settings.
302
Part IV: Deploying Solutions Using Firewall Products
You should definitely do a few basic tasks before installing ISA Server:
ߜ Map your network: Make sure that you have a list of all IP addresses that
are used in your network, including those that you will use for future
expansion. If your ISP assigned you static IP addresses, create a list that
includes the IP address or addresses that the ISA Server computer uses to
connect to the Internet. If you use a dialup connection to connect to the
Internet, you can skip this step. Finally, if you are planning to use a demili-
tarized zone (DMZ), create another list of the IP addresses in the DMZ.
ߜ Install all hardware: Add all the required hardware to the ISA Server
computer. ISA Server requires at least one NIC (network information
center) that’s connected to your internal network. The connection to the
Internet can be another NIC or a modem. You can’t use the same NIC to
connect to the Internet and your internal network if you want to use the
firewall functionality of ISA Server.
ߜ Install Windows 2000 Server: Install Windows 2000 Server and include
only the components that are required. In particular, don’t install any of
the optional network components or Internet Information Services (IIS).
Also, check to make sure that Windows 2000 detected all hardware
(NICs, modems, and so forth) during installation. After you’re done
installing Windows 2000 Server, also install the latest Service Pack and
any critical hot fixes. Your computer should be as secure as possible
before you install a firewall on it.
You can also run ISA Server on Microsoft Windows Server 2003. To install it in
this configuration, you need Service Pack 1 for ISA Server or later. The Release
Notes for Service Pack contain important information on how to proceed with
this type of installation. You can download the latest Service Pack from
www.microsoft.com/isaserver.
ߜ Configure TCP/IP: Use the Networking applet in the Control Panel to con-
figure the TCP/IP settings for all network adapters. Configure the internal
adapter with an IP address that is valid on your internal network. If you
are connecting to the Internet via a NIC, configure that adapter with an IP
address that your ISP provided.
ߜ Configure the default gateway: While using the Networking applet in
the Control Panel, also configure a default gateway. The default gateway
is the destination to which a computer sends all IP packets for which it
doesn’t have a specific route. Because your computer doesn’t have
routes for any destinations on the Internet, you have to ensure that ISA
Server can forward all packets for external destinations to the Internet.
Therefore, you should configure a default gateway only for the NIC that
you will connect to the Internet. Don’t configure a default gateway for
your internal network adapter. Yes, we know, it looks strange to leave
this prominent box in the TCP/IP Properties dialog box empty, but doing
so is required in order for ISA Server to route packets correctly.
303
Chapter 16: Microsoft’s Firewall: Internet Security and Acceleration Server
ߜ Configure the routing table: By defining the default gateway, you have
told Windows 2000 how to route packets to the Internet. Next, you have to
tell Windows 2000 how to route any packets that go to computers on your
internal network. If your network contains only one range of network
addresses, such as 192.168.1.0 to 192.168.1.255, then this indicates that
Windows 2000 built the required entries when you configured the network
adapter that is connected to your internal network. If your internal net-
work contains more than one range of network addresses, you have to
add those to the routing table by using the
route add command. You can
find more information about this command in Windows 2000 Server online
help. Similarly, if you are using a DMZ, make sure that the routing table
contains the entries that are required in order for Windows 2000 to send
all packets to the DMZ through the network adapter that is attached to it.
You can easily confirm that Windows 2000 Server has the correct routing
table entries by opening a command prompt window and typing route
print. Figure 16-1 shows what the output of the
route print command
looks like with an internal network of 192.168.1.0 and a DMZ of 23.10.10.0.
Notice that the default gateway is on the same network as the network
adapter with the IP address 23.10.10.200. This is the NIC that connects
this computer to the Internet.
ߜ Configure the dialup connection: If you are connecting to the Internet
via a phone line, you have to configure a dialup connection. To do this,
open the Network and Dial-Up Connections item in the Control Panel,
and then double-click New Connection. Follow the instructions in the
Network Connection Wizard to configure the dialup connection with
the telephone number and logon information for your Internet Service
Provider.
Figure 16-1:
The output
of the
route
command.
304
Part IV: Deploying Solutions Using Firewall Products
Installing ISA Server
Installing ISA Server is easy. A setup wizard asks you for a few pieces of infor-
mation, and when you are finished providing this information, ISA Server
starts. Be careful during the setup, however, because it’s very easy to enter
incorrect information, and doing so may compromise your network’s secu-
rity. In this section, you learn what to watch out for and how to configure ISA
Server so that it protects your network the way it’s intended.
Gathering information
During the installation, ISA Server requires several pieces of information.
Collect this information before you start the installation. Here is a checklist:
ߜ CD Key: Like many Microsoft products, ISA Server requires that you pro-
vide the CD Key. You can find this ten-digit number on an orange sticker
on the back of the ISA Server CD case.
ߜ Cache size and location: ISA Server uses a portion of your computer’s
hard drive for caching Web objects that client computers request. Before
installing ISA Server, make a note of which hard drive has enough space
for this cache. The recommended size is 100 MB and another 0.5 MB for
each user. You can change the amount of disk space and location after
installation, but you should start out with a configuration that works.
Make a note of the drive that you will use for caching and how much
space you will allocate. You can also spread out the cache over multiple
hard drives. To allow for efficient cache access and to ensure security,
any drive that you use for caching has to be formatted with the NTFS file
system.
ߜ The Local Address Table (LAT): ISA Server uses a table to keep track of
all IP addresses that are on the internal network. This table is referred to
as the Local Address Table, or LAT. Initially, ISA Server builds the LAT
based on information that you provide during setup. Misconfiguring the
LAT is the worst mistake that you can make. The LAT should contain
only the addresses on your internal network. If you add any external
addresses to your LAT, you will be opening serious security holes. If the
LAT doesn’t contain all internal IP addresses, some client computers
may not be able to communicate with the Internet. Make sure that you
have a list of all internal IP addresses when you start the installation of
ISA Server.
305
Chapter 16: Microsoft’s Firewall: Internet Security and Acceleration Server
When you have gathered all required information, you can start the installa-
tion of ISA Server:
1. Log on to Windows with an account that is a member of the
Administrators group.
2. Insert the ISA Server CD-ROM.
The screen in Figure 16-2 appears. If it doesn’t, start the Setup program
manually from the CD.
3. In the Microsoft ISA Server Setup screen, click Install ISA Server.
4. Click Continue.
5. Type the CD key, and then click OK twice.
Good thing you made sure you had the CD key before you started! You
wouldn’t want to start searching for it now while you are in the middle of
the installation.
Figure 16-2:
The ISA
Server
Setup
screen.
306
Part IV: Deploying Solutions Using Firewall Products
Getting the best performance
One of the best things that you can do to
improve the performance of your server is to
optimize how the hardware is used. In the case
of ISA Server, you should place the cache file
on a hard drive by itself. So, if you have a hard
drive that is not used for other heavy data
access or to hold the operating system, place
the cache file on that hard drive. You can also
place the cache file on the same hard drive as
Windows, but performance won’t be as good as
it would be with a dedicated hard drive for
caching.
6. Read the license agreement and click I Agree.
7. Click the button for the installation type that you want to perform:
Typical Installation, Custom Installation, or Full Installation.
The Typical Installation works best in most environments. You have to
choose another installation type only if you are setting up an H.323 infra-
structure to allow users on the Internet to connect to users in your net-
work for teleconferencing or voice over IP (VOIP) phone calls, or if you
need to install the Message Screener, which is an ISA Server component
that performs filtering of incoming e-mail. You can also use the Custom
Installation if you want to install only the administration tools on a com-
puter that isn’t running ISA Server.
8. If a dialog box appears that informs you that ISA Server Setup can’t
join an array, click OK.
If you are installing ISA Server Enterprise Edition, you have to prepare
Active Directory before creating an array. Because you are installing a
standalone server, you can ignore this warning if it appears.
9. In the next dialog box, click Yes to install ISA Server as a Standalone
Server. You don’t want to join an ISA Server array at this point.
10. When ISA Server Setup prompts you for the installation mode, ensure
that Integrated Mode is selected, and then click Continue.
Integrated Mode gives you both caching of Web objects and firewall pro-
tection. Integrated Mode is the best choice for connecting your network
to the Internet. Generally, you select a different mode only if you use
another firewall or caching server in conjunction with ISA Server.
If your computer is running Internet Information Services (IIS) and IIS
uses TCP port 80 or 8080, ISA Server Setup displays the warning mes-
sage shown in Figure 16-3. The Setup program warns you that it is stop-
ping IIS because ISA Server uses the same ports as IIS, and services
running under Windows can’t share the same port. The ISA Server
Setup program only temporarily stops IIS, but IIS will run again the
next time you restart your computer. After the ISA Server installation is
complete, you should change the ports that IIS is using or, better yet,
remove IIS.
Figure 16-3:
The IIS
warning.
307
Chapter 16: Microsoft’s Firewall: Internet Security and Acceleration Server
11. Click OK to acknowledge that ISA Server Setup has stopped your
Web sites.
Next, ISA Server displays a dialog box with choices for the cache config-
uration. You can use multiple cache files, one on each hard drive. To do
so, specify the size for each drive. To prevent ISA Server from placing a
cache file on one of your drives, simply enter 0 as the size of the cache
file on that drive.
12. To configure caching in this dialog box, select the drive that you want
ISA Server to place the cache file on, type the size of the cache file,
and then click Set. When you’re done, click OK.
ISA Server displays a dialog box that prompts you for your internal IP
addresses. You can enter these addresses manually or let ISA Server
create them automatically.
13. When ISA Server prompts you to enter your network’s internal IP
address ranges, click Construct Table to display the dialog box shown
in Figure 16-4.
When you enter the internal address ranges, ISA Server creates the LAT.
This is what you prepared for by configuring your routing table and
noting all internal address ranges. It is important to configure your rout-
ing table correctly because ISA Server uses this information to create
the LAT for you.
14. In the Local Address Table dialog box, check the check box to indicate
that you want to add addresses from the Windows routing table, and
then check the check box for the network adapter that is connected to
your local network.
Don’t select any network cards connected to the Internet or the DMZ. If
you are using the private address ranges that ISA Server Setup refers to
Figure 16-4:
The Local
Address
Table
construction
dialog box.
308
Part IV: Deploying Solutions Using Firewall Products
for your internal network, you can also check the check box that will
add these ranges to the LAT.
15. Click OK.
A warning message appears, prompting you to ensure that the LAT con-
tains the correct addresses. Remember that your LAT should contain all
the IP addresses on your local network and not any other IP addresses.
16. Click OK to acknowledge the warning message about the dangers of a
misconfigured LAT.
ISA Server displays the results of the automatic creation of the LAT con-
tents. (See Figure 16-5.)
17. In the listing of internal IP addresses confirm that all internal IP
addresses are listed and that none of the IP addresses listed are exter-
nal to your network or in the DMZ.
If your routing table was configured before you started the installation,
the list of internal IP addresses should be complete. If the list doesn’t
have the correct entries, you can add or remove entries here.
Making a mistake when configuring the LAT can cause ISA Server to treat
the Internet as a trusted network, thus rendering ISA Server completely
ineffective. During the installation, always double-check that your LAT
only contains internal addresses. Better yet, triple-check this setting
before you continue.
18. Click OK in the Microsoft Internet Security and Acceleration Server
Setup dialog box.
After ISA Server Setup finishes, you are prompted to run the Getting
Started Wizard.
Figure 16-5:
The Local
Address
Table
confirmation
dialog box.
309
Chapter 16: Microsoft’s Firewall: Internet Security and Acceleration Server
19. Deselect the check box to run the wizard, and then click OK.
You can start the wizard at any time from the ISA Server console. This
wizard is rather helpful in guiding you through the most important con-
figuration steps, and you should explore it later, but right now you won’t
use it.
Before continuing, you should ensure that ISA Server has been updated with
the most recent fixes for problems that have appeared since the program was
created. Fortunately, ISA Server is one of the most secure firewalls on the
market, but Microsoft has released a few fixes for problems. First, install the
latest Service Pack, and then install any recommended hot fixes. In most cases,
you will also benefit from Feature Pack 1, a free set of ISA Server enhance-
ments. You can download all of these from
www.microsoft.com/isaserver.
Now that your ISA Server is running, you are ready to configure client com-
puters to access the Internet through ISA Server. After your client computers
are configured and you set up rules to allow these clients to access the
Internet, setup is complete.
Connecting by telephone
If you use ISA Server to connect to an ISP via a modem, you have to perform a
few additional steps. Before you begin configuring ISA Server, though, make
sure that you have already configured a dialup connection in Windows that
contains the telephone number and other required settings to connect to your
ISP. When you create the dialup connection, make sure that you select to allow
all users to access this dialup connection. Next, you have to configure ISA
Server to use this dialup connection. To do this, you first have to configure
310
Part IV: Deploying Solutions Using Firewall Products
Help! I can no longer get to the Internet
“How come I can no longer access the
Internet?” This is probably the most frequently
asked question after an administrator has
installed ISA Server. The answer is — nothing
is wrong. ISA Server is just doing its job —
protecting your network and not allowing any
network traffic to pass through ISA Server. It
simply means that ISA Server is functioning cor-
rectly. To allow yourself or other users to
access the Internet, you have to create access
rules that allow outgoing traffic. This chapter
shows you how to configure these rules. And
don’t forget that ISA Server also blocks incom-
ing traffic from the Internet. After all, that’s what
a firewall is supposed to do. If anybody on the
Internet is trying to connect to your ISA Server
computer, he or she won’t even be able to tell
that the computer exists.
an ISA Server dialup entry, which is a link that ISA Server uses to refer to the
connection settings that you defined. You then have to tell ISA Server to use
this dialup entry to connect to the Internet. To do all these things, perform
the following steps:
1. Open ISA Management from the Microsoft ISA Server menu.
The ISA Management window opens.
2. In the Console Tree (the left pane), expand Server and Arrays, your
server, and Policy Elements, and then click Dial-up Entries.
3. In the Details pane (the right pane), click Create a Dial-Up Entry.
The New Dial-up Entry dialog box appears.
4. Type a name for your dialup entry, type an optional description, and
then click Select to link the dialup entry to the dialup connection that
you have defined in Windows.
The Select Network Dial-up Connection dialog box appears.
5. Select the dialup connection that you want to use and then click OK.
6. To tell ISA Server which credentials to use when connecting to your
ISP, click Set Account.
The Set Account dialog box appears.
7. Enter the user name and password that your ISP has assigned to you
and then click OK.
The dialog box should look similar to the one shown in Figure 16-6.
8. Click OK to save your settings.
Figure 16-6:
The New
Dial-up
Entry dialog
box.
311
Chapter 16: Microsoft’s Firewall: Internet Security and Acceleration Server
9. In the Console Tree, expand Network Configuration, and then click
Routing.
The Default Rule appears in the Details pane.
10. Right-click the default rule, and on the shortcut menu click
Properties.
The Default Rule Properties dialog box appears.
11. On the Action tab of the Default Rule Properties dialog box, check the
Use Dial-Up Entry for Primary Route check box, and then click OK.
You have configured ISA Server to send all requests from clients for
HTTP requests to the Internet via the dialup entry. Next, you have to
configure ISA Server to use this entry, as well as for requests that use
other protocols.
12. In the Console Tree, right-click Network Configuration and choose
Properties from the context menu that appears.
13. In the Network Configuration Properties dialog box, check the Use
Dial-Up Entry check box and then click OK.
Now ISA Server uses the dialup entry for all Internet requests. The dialup
entry, in turn, dials the dialup connection with the user settings that you
configured in the dialup entry. And if you are not at all confused about dialup
issues by this point, you have already turned into a firewall nerd.
Examining the Three Clients
ISA Server supports three different client types. Before you configure the
client computers to use ISA Server, you have to understand what each of
these client types does and which one — or which combination of these —
will work best for your needs. Take a look at each of the clients.
SecureNAT client
Configuring your computer as a SecureNAT client ensures that any IP packet
from the client computer goes straight to the ISA Server computer. ISA Server
then performs NAT (Network Address Translation) — converting between
addresses that you use inside your network and ISA Server’s address on the
Internet. While ISA Server is doing this, it also applies all security rules that
you configured, thus the name SecureNAT.
312
Part IV: Deploying Solutions Using Firewall Products
Any computer or other device that uses the TCP/IP protocol suite can be a
SecureNAT client. All you have to do is configure the computer’s default gate-
way to the internal IP address of the ISA Server computer. For example, if the
internal IP address of the ISA Server computer is 192.168.1.1 and you are con-
figuring a client computer running Windows 2000, just do the following steps:
1. Right-click the My Network Places icon on the desktop, and then
choose Properties from the context menu that appears.
The Network and Dial-up Connections window appears.
2. Right-click the network adapter that you are configuring, and then
choose Properties from the context menu.
The Properties dialog box for your network connection appears.
3. Scroll down until you find the entry for Internet Protocol (TCP/IP).
Select the entry without clearing the check box next to it, and then
click the Properties button.
The Internet Protocol (TCP/IP) Properties dialog box appears, shown in
Figure 16-7.
4. Enter the internal IP address of your ISA Server computer in the
Default Gateway field of the Internet Protocol (TCP/IP) Properties
dialog box.
5. Click OK twice and then close the Network and Dial-Up Connections
window.
Figure 16-7:
The Internet
Protocol
(TCP/IP)
Properties
dialog box.
313
Chapter 16: Microsoft’s Firewall: Internet Security and Acceleration Server
Configuring the default gateway on computers using other operating systems
is similar to the configuration of a Windows 2000 computer. Generally, you
can find information on how to do this in an online help system that is
included with your computer.
After a computer is configured as a SecureNAT client, ISA Server intercepts all
IP traffic from the client to the Internet as it arrives at ISA Server. The client is
not even aware of the presence of a firewall.
Firewall Client
If your computer is running at least a moderately recent version of Windows
(Windows 95 OSR2, 98, Me, NT, 2000, XP, or Windows Server 2003), you can
install Firewall Client software on your computer. The Firewall Client inter-
cepts all Winsock (Windows Sockets) requests from applications that use
TCP/IP and forwards them to ISA Server over a connection that it previously
established with the ISA Server computer. This includes all network traffic
that uses the TCP and UDP protocols and that is not addressed to the local
network, which comprises the vast majority of Internet traffic. Installing the
Firewall Client gives you several advantages over configuring your computer
as a SecureNAT client:
ߜ User authentication: Before the Firewall Client sends any data, it estab-
lishes a session with ISA Server. Part of this session involves authentica-
tion, which means that ISA Server knows which user is sending the data
that follows. Therefore, you can then use user-based rules, confident in
the knowledge that ISA Server knows how to apply them. For example,
you can set up a rule that allows only the CEO of your company to access
a sports site. ISA Server and the Firewall Client work together to deter-
mine whether a request for this site is indeed coming from the CEO.
ߜ Support for complex protocols: Some network protocols require more
than one connection to perform an action. ISA Server supports some of
these multiconnection protocols for all clients. However, because the
Firewall Client can communicate with ISA Server about how different
connections fit together, Firewall Clients can use almost any protocol
that uses more than one connection.
Before you can use the Firewall Client on a computer, you have to install it
from a shared directory that ISA Server creates. You can’t install the Firewall
Client directly from the CD because the installation uses configuration infor-
mation from your ISA Server computer. To install the Firewall Client, perform
the following steps:
314
Part IV: Deploying Solutions Using Firewall Products
1. On the client computer’s desktop, click the Start button, and then
choose Run from the menu that appears.
The Run dialog box appears.
2. In the Open box, type \\server\mspclnt\setup.exe (where server is
the name of the ISA Server computer), and then click OK.
The Microsoft Firewall Client Install Wizard appears.
3. In the Install Wizard, click Next twice, and then click Install.
The Firewall Client software is installed.
4. Click Finish.
That’s it. Don’t you wish every software installation were that easy?
Now that the Firewall Client is installed, you can access the Internet through
ISA Server. You may notice an icon in the system tray on your desktop. You
can right-click this icon to disable the Firewall Client (if you ever need to) or
to request updated configuration information from ISA Server.
Don’t install the Firewall Client on the ISA Server computer itself. Doing so
prevents ISA Server from functioning correctly. If you need to access the
Internet from the ISA Server computer, use the Web Proxy Client or configure
packet filters.
Web proxy client
The remaining client type is the Web proxy client, which can retrieve only Web
objects. These are objects that are accessed from your Web browser by using
the HTTP or FTP protocols. You can configure most Web browsers, such as
Netscape Navigator and Microsoft Internet Explorer, as Web proxy clients.
Also, some other applications, such as MSN Messenger, can function as Web
proxy clients. A Web proxy client gives you the best possible performance for
retrieving objects from the Web, and it’s smart enough to get configuration
information from ISA Server so that it can always communicate with ISA
Server most efficiently. The configuration of your Web proxy clients depends
on the browser or other Web applications that you use. The following steps
tell you how to configure Microsoft Internet Explorer as a Web proxy client:
1. In Internet Explorer, choose Tools➪Internet Options from the main
menu.
The Internet Options dialog box appears.
315
Chapter 16: Microsoft’s Firewall: Internet Security and Acceleration Server
2. Click the Connections tab, and then click the LAN Settings button.
The Local Area Network (LAN) Settings dialog box appears, shown in
Figure 16-8.
3. In the Local Area Network (LAN) Settings dialog box, check the Use A
Proxy Server check box, type the name of your ISA Server computer
in the Address box, and then type 8080 in the Port box.
4. For the best performance when accessing Web sites on your internal
network, check the Bypass Proxy Server for Local Addresses check
box and then click OK twice.
After you configure your Web browser to use ISA Server as a proxy server, it
forwards all requests for Web objects to ISA Server instead of trying to retrieve
them directly.
You can configure the Web browser on the computer running ISA Server as a
Web proxy client, which enables the browser to access the Internet. If you do
end up wanting to configure the browser on the ISA Server computer as a
Web proxy client, make sure that you configure the proxy settings to point to
the internal IP address of your ISA Server computer.
The best client for you
So far, you’ve had a chance to see what each client can do. Now you’re proba-
bly wondering which one to use. The answer depends on your Internet
access needs. And, for the best possible performance, you may want to use
two or three of the clients on your computer at the same time. You can use
Table 16-1 to make a decision about which clients to use:
Figure 16-8:
The LAN
Settings
dialog box in
Internet
Explorer.
316
Part IV: Deploying Solutions Using Firewall Products