HP-UX/Tru64 UNIX System Administration Interoperability phần 6 docx
Bạn đang xem bản rút gọn của tài liệu. Xem và tải ngay bản đầy đủ của tài liệu tại đây (2.48 MB, 36 trang )
Performance Monitoring
Commands and Utilities
Chapter 8
181
Commands and Utilities
The HP-UX and Tru64 UNIX operating systems have commands and utilities for monitoring system
performance.
The collect utility (Tru64 UNIX)
The Tru64 UNIX collect command is a system monitoring tool that records or displays specific operating
system data over an extended period of time. Any set of the subsystems, such as file systems, message queue,
tty, or header can be included in or excluded from data collection. You can display data at the terminal, or
store it in either a compressed or encompassed data file. Data files can be read and manipulated from the
command line, or through use of command scripts. See the collect(8) reference page for additional
information.
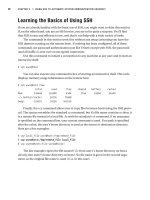
The dxsysinfo utility (System Information Utility) (Tru64 UNIX)
This graphical user interface, which runs on Tru64 UNIX, provides general information about the operating
system and version, the amount of RAM, and number of CPUs. You can use it to monitor CPU activity, in-use
memory, available swap space, and file system usage. The following illustrates this utility.
Performance Monitoring
Commands and Utilities
Chapter 8
182
GlancePlus/UX (HP-UX)
GlancePlus/UX is a performance monitoring and diagnostic tool that lets you examine system activities,
identify and resolve performance bottlenecks, and tune your system for more efficient operation.
GlancePlus/UX is an optional product from HP that runs on HP-UX as well as some other UNIX variants.
GlancePlus/UX provides useful performance data in real time in your choice of character or graphic mode.
From the Global Screen, you can access various other screens which display data in histogram, percentage,
and list form; many of these lists can be filtered. These other screens include the following.
• Process List Screen
• CPU Report Screen
• Memory Report Screen
• Disk Report Screen.
A detailed description of GlancePlus/UX is available in the HP-UX 11i System Administration Handbook and
Toolkit by Marty Poniatowski.
The iostat command (HP-UX and Tru64 UNIX)
The iostat command supplies statistics on how much I/O the system is performing; a system may be
performing poorly because it is I/O bound.
The HP-UX operating system and the Tru64 UNIX operating system both offer the iostat command, but they
each have a different output. Furthermore, there is an option offered only by HP-UX.
HP-UX -t reports terminal statistics as well as disk statistics.
The Tru64 UNIX implementation allows you to specify a drive parameter to force iostat to display specific
drives.
The default output of the commands differs greatly. Here is the output from the iostat command run on an
HP-UX system.
HP-UX # iostat
device bps sps msps
c1t15d0 0 0.0 1.0
Here is the output from the iostat command run on a Tru64 UNIX system.
Tru64UNIX # iostat
tty floppy0 dsk0 cpu
tin tout bps tps bps tps us ni sy id
0 0 0 0 4 0 0 0 3 97
Also, note that the Tru64 UNIX implementation only reports on the first two disk drives by default.
See the appropriate iostat reference page for more information.
The ipcs command (HP-UX and Tru64 UNIX)
This utility, which is implemented on both operating systems, displays certain information about active
interprocess communication facilities. There is only one difference between the two implementations in terms
of options.
HP-UX -C corefile allows you to specify a file, which is a core file or a directory created by
savecrash or savecore, instead of /dev/kmem.
The default output of the command as implemented in HP-UX corresponds to the command with the -a
option under Tru64 UNIX.
Performance Monitoring
Commands and Utilities
Chapter 8
183
The output of this command also differs depending on the implementation, as illustrated here.
HP-UX
# ipcs
IPC status from /dev/kmem as of Wed Mar 12 15:32:45 2003
T ID KEY MODE OWNER GROUP
Message Queues:
q 0 0x3c1c0555 -Rrw w w- root root
q 1 0x3e1c0555 rw-r r root root
Shared Memory:
m 0 0x411c05cc rw-rw-rw- root root
m 1 0x4e0c0002 rw-rw-rw- root root
m 2 0x41206998 rw-rw-rw- root root
m 3 0x301c3e81 rw-rw-rw- root root
Semaphores:
s 0 0x411c05cc ra-ra-ra- root root
s 1 0x4e0c0002 ra-ra-ra- root root
s 2 0x41206998 ra-ra-ra- root root
Tru64 UNIX
# ipcs -a
Message Queues:
T ID KEY MODE OWNER GROUP CREATOR CGROUP CBYTES QNUM QBYTES LSPID LRPID
STIME RTIME CTIME
q 0 0x418d02eb rw root system root system 0 0 16384 3 136928
16:34:51 16:34:51 2:35:31
Shared Memory:
T ID KEY MODE OWNER GROUP CREATOR CGROUP NATTCH SEGSZ CPID
LPID ATIME DTIME CTIME
m 0 0x618d0821 rw root daemon root daemon 0 57776 136480
197673 15:11:47 15:11:47 14:01:18
Semaphores:
T ID KEY MODE OWNER GROUP CREATOR CGROUP NSEMS OTIME CTIME
s 0 0x696e6974 ra-r r root system root system 8 2:35:32 2:35:32
s 1 0x418d02eb ra root system root system 1 2:35:31 2:35:31
s 2 0x618d0821 ra root daemon root daemon 1 15:11:47 14:01:18
The lpana command (HP-UX)
This HP-UX utility prints LP spooler performance information, which you can use to optimize the
configuration of the entire printer spooler system.
The netstat command (HP-UX and Tru64 UNIX)
Both the HP-UX operating system and the Tru64 UNIX operating system implement the netstat command to
displays network statistics. There are differences in the options for each version:
HP-UX -g shows multicast information for network interfaces.
-v shows additional routing information.
Tru64 UNIX -A displays either the address of any protocol control blocks associated with sockets or the
addresses of routing table entries with bitmasks.
-b displays the contents of Mobile IPv6 binding cache.
Performance Monitoring
Commands and Utilities
Chapter 8
184
-d displays the number of dropped packets.
-g displays statistics since the system was last booted.
-H displays the Address Resolution Protocol (ARP) table.
-I interface -s displays the DNA Data Link Layer counters (64-bit values) for the
specified network interface and the adapter’s status and characteristics.
-I interface -c displays the current access filter for the specified network interface.
-m displays information about memory allocated to the data structures associated with
network operations.
-o displays the DNA Data Link Layer counters (old 32-bit values) for the specified network
interface and the adapter’s status and characteristics.
-R displays the host’s routing tables on each Resource Affinity Domain (RAD), if the system
is NUMA-capable.
-t displays timer information.
-u displays information about domain sockets (UNIX domain).
-v displays more verbose output.
-x displays the status of the IPsec Security Associations (SAs).
-X displays the status of the Internet Key Exchange (IKE) Protocol SAs.
-z displays the current network interface statistics or protocol statistics, then sets them to
zero.
OpenView (HP-UX)
Hewlett-Packard’s OpenView offers a complete portfolio of service-driven management solutions including
performance measurement tools. OpenView is an optional product which runs on the HP-UX operating
system.
The HP OpenView Performance Agent for UNIX, previously the HP OpenView MeasureWare Agent for
UNIX, captures performance, resource, and transaction data from HP 9000 series servers. Using minimal
system resources, the software continuously collects, logs, summarizes, and time stamps resource and
performance measurement data from applications, databases, networks and operating systems.
HP PerfView is an analysis tool that lets you examine data from the HP OpenView Performance Agent for
UNIX.
The psrinfo and pinfo commands (Tru64 UNIX)
These Tru64 UNIX commands display information about processors including the current state of the
processor, how long it has been on line, its processor speed in MHz, and whether or not it has an internal
floating point processor.
Performance Monitoring
Commands and Utilities
Chapter 8
185
SAM (HP-UX)
The HP-UX System Administration Manager provides a facility for monitoring the performance of various
aspects of the operating system.
SAM initiates commands to accomplish these tasks; the following provides a correspondence of these facilities
to the commands used.
The System Properties facilities displays system data.
Disk and Terminal Activity iostat -t
Inter-Process Communication Facility Status ipcs
Process with Highest CPU Usage top
System Activity sar
Virtual Memory Activity vmstat
Performance Monitoring
Commands and Utilities
Chapter 8
186
The sar command (HP-UX and Tru64 UNIX)
The System Activity Reporter is a standard utility on HP-UX and is available on earlier versions of Tru64
UNIX with the SVE extension to the operating system. There are two sar commands: the system activity
reporter (sar) and the system activity report package (sa1, sa2, sadc).
The system activity reporter and the system activity report package have the same differences; they are as
follows.
HP-UX -A is equivalent to a slightly different set of options.
-M reports the per-processor data on a multiprocessor system (similar to the -P option
below).
-w reports system swapping and switching activity (similar to the -p and -g options below).
Tru64 UNIX -A is equivalent to a slightly different set of options.
-g and -p report paging activities (similar to the -w option above).
-k reports kernel memory allocation activities.
-r reports unused memory pages and disk blocks.
-P processorid reports the activity for a specified processor (similar to the -M option
above).
See the appropriate reference page for more information on the sar command.
The showmount command (HP-UX and Tru64 UNIX)
The showmount command displays the names of all hosts that have NFS file systems mounted. This command
is common to both operating systems however there are additional options under Tru64 UNIX.
Tru64 UNIX -t nnn specifies a time-out value in seconds; the default is 25 seconds.
-T specifies an infinite time-out.
The sys_check utility (Tru64 UNIX)
This Tru64 UNIX utility is a system census and configuration verification tool that is also used to aid in
diagnosing system errors and problems. You can use sys_check to create an HTML report of your system's
(hardware and software) configuration and to perform an analysis of the operating system parameters and
attributes such as those that tune the performance of the system.
A report generated by sys_check provides warnings if it detects problems with any current settings. Note
that while sys_check can generate hundreds of useful warnings, it is not a complete and definitive check of
the health of your Tru64 UNIX system.
See the sys_check (8) reference page for additional information.
Performance Monitoring
Commands and Utilities
Chapter 8
187
SysMan Menu (Tru64 UNIX)
The SysMan Menu on Tru64 UNIX provides a means for monitoring various aspects of the operating system.
These menu items trigger commands to perform monitoring functions as follows.
SysMan Station (Tru64 UNIX)
The SysMan Station, which is proprietary to the Tru64 UNIX operating system, lets you monitor a system or
cluster and administer system resources. You can see how long the system has been running continuously,
use the icons in the View windows to check the status of an object, and use the SysMan Station icon in the
CDE front panel to monitor the status of the system as a whole. You also can launch the SysMan Menu to
administer the system or invoke applications directly from the SysMan Station. On launching the SysMan
Station, the Status Monitor window is displayed giving the administrator the current status of the File
systems, Network, Storage, and System attention groups by default. An example is shown here.
The default attention groups that you can monitor are:
File Systems Any AdvFS or UFS file systems.
Network The network and devices, such as tu0, which are connected to the local
host.
Storage Storage devices connected to buses and device interfaces.
- Hardware
View central processor unit (CPU) information psrinfo -v
- Monitoring and Tuning
View virtual memory (VM) statistics vmstat 1 10
View Input/Output (I/O) statistics iostat 1 10
View Uptime statistics uptime
- Support and Services
Create escalation report sys_check
Create configuration report sys_check
Performance Monitoring
Commands and Utilities
Chapter 8
188
System The events associated with the system components.
In addition, the Views option menu allows you to display the hierarchical structure of the group in the Views
Pane. These groups are:
AdvFS File systems Displays a view of all AdvFS domains.
Hardware Displays a view of all devices, from the CPU to individual disks.
Mounted File systems Displays a view of the file systems that are currently mounted.
Physical File systems Displays a view of all UFS and AdvFS file systems available.
The time and timex commands (HP-UX and Tru64 UNIX)
The time command gives a quick indication of system performance by timing a given command and
displaying the real, system, and user time required for the command to stderr. The HP-UX operating system
and the Tru64 UNIX operating system both implement this command; the options and the output are
identical in both implementations.
The HP-UX operating system also offers the timex command, which enables you to display total system
activity or process accounting data with respect to the command being timed. See the timex(1) reference page
for more information.
The top command (HP-UX and Tru64 UNIX)
The top command displays the current top processes on the system, periodically updating the information.
Raw CPU percentage data is used to rank the processes. When you issue this command on an HP-UX
operating system, you can specify the delay between screen updates, a specific count of displays, your choice
of user names or user identifiers, and a specific number of processes to be displayed.
The top command is not part of the base Tru64 UNIX operating system, but it is distributed as freeware on
the Associated Products CD (APCD).
The uptime and w commands (HP-UX and Tru64 UNIX)
Both the HP-UX and Tru64 UNIX operating systems implement the UNIX uptime and w commands, which
displays the current time and the amount of time since the system was booted, and the number of users
logged in. There are differences in the implementations of these commands, however.
HP-UX -h suppresses the heading.
-l uses the long output format.
-s uses the short form of output for displaying terminal information.
-u prints only the first line, which describes the overall state of the system; this is the
default.
-w prints a summary of the current activity on the system for each user.
Tru64 UNIX uptime -m displays the Mach factor instead of the load average, which is the default.
w -f suppresses the from field.
w -h suppresses the system summary and the heading line.
w -l prints the information in the long output format.
w -m displays the Mach factor instead of the load average, which is the default.
w -s prints the information in short format.
Performance Monitoring
Commands and Utilities
Chapter 8
189
w -u prints the system summary only, which is equivalent to the uptime command without
any options.
The output of the uptime command differs only slightly between both operating systems. Under HP-UX, the
format of the time is given in AM or PM, where Tru64 UNIX displays the time in 24-hour format.
HP-UX
# uptime
3:16pm up 66 days, 20:33, 3 users, load average: 5.71, 5.31, 5.26
Tru64 UNIX
# uptime
15:15 up 183 days, 13:38, 2 users, load average: 0.22, 0.22, 0.25
The vmstat command (HP-UX and Tru64 UNIX)
Although both HP-UX and Tru64 UNIX offer this virtual memory statistics command, the implementation of
the command options differs greatly; only the -f option, which reports the number of forks, is identical. Here
are the options for each:
HP-UX -d reports the disk transfer information, in the form of transfers per second, as a separate
section.
-n provides an output format, which separates the default output into distinct virtual
memory information and CPU data sections; these are more easily read on an 80-column
display device.
-S reports the number of processes swapped in and out (si and so) instead of page reclaims
and address translation faults (re and at).
-s prints the total number of several kinds of paging-related events from the kernel sum
structure that have occurred since boot-up or since vmstat was last executed with the -z
option.
-z clears all accumulators in the kernel sum structure.
Tru64 UNIX -D displays debugging information.
-i displays virtual memory statistics (pagesize, procs, memory, pages, intr, cpu).
-M displays information about memory usage by buckets.
-p displays statistics for the vm and ubc subsystems for Resource Affinity Domains (RADs).
-P displays accumulated statistics about physical memory use.
-r rad_id displays virtual memory statistics for the specified RAD only.
-R displays information for all RADs.
-s displays accumulated statistics along with the page size.
-w appends iowait information to the default output.
The output of this command varies between the operating systems. Here is the default output from this
command run on an HP-UX system.
Performance Monitoring
Commands and Utilities
Chapter 8
190
HP-UX # vmstat
procs memory page faults cpu
r b w avm free re at pi po fr de sr in sy cs us sy id
1 0 0 9838 11494 7 14 1 0 0 0 0 96 168602 26 29 15 56
Here is the default output of the command run on a Tru64 UNIX system.
Tru64UNIX # vmstat
Virtual Memory Statistics: (pagesize = 8192)
procs memory pages intr cpu
r w u act free wire fault cow zero react pin pout in sy cs us sy id
3 118 41 14K 9713 6051 182M 20M 75M 223K 30M 9406 20 49 410 0 3 97
Chapter 9
191
9 Print System
To administer the print system, a system administrator must be able to initialize the printer spooler (also
known as the LP spooler), add printers, control printer operations, enable or disable printers, start and stop
the printer spooler, and remove a printer from the printer spooler, among other tasks.
The methods for performing these tasks, and their administrative tools vary greatly between both operating
systems, but Tru64 UNIX supports many of the same System V style printer commands as HP-UX.
Print System
Commands and Utilities
Chapter 9
192
Commands and Utilities
The administrator of an HP-UX operating system has the option of using SAM (the preferred method) or
individual commands to set up and maintain the print system on his or her computer.
The administrator of a Tru64 UNIX operating system can use either the lprsetup (the preferred method) or
individual commands to set up and maintain the print system. Accessing the Print Services from the SysMan
Menu under Version 5.1B invokes the lprsetup utility. There is also an obsolete command, printconfig, that
can be used.
The accept command (HP-UX)
This command permits the lp command to accept print requests for each named LP printer or printer class
destination queue.
The lp command (HP-UX and Tru64 UNIX)
This command queues files for printing
The lpadmin command (HP-UX)
This command configures the LP spooler to describe printers, classes, and devices; it can be used to add and
remove printers and change the default printer
The lpc command (Tru64 UNIX)
The line printer control command features a number of arguments with which you can control the printer
operation:
help Prints a one-line description of the specified lpc command argument. If an argument
variable is not specified, the list of arguments is displayed.
abort Terminates an active lpd daemon and then disables printing. This prevents the lpr or lp
command from starting a new lpd daemon.
check Examines the printer description file and other components of the printing environment for
potential configuration errors for each named printer
clean Removes any temporary files, data files, and control files (for example, files that do not form
a complete printer job) from the specified print spooling directory.
disable Turns off the specified print spooling queue. This prevents the lpr or lp command from
entering new jobs in the queue.
down message Turns off the specified print queue, disables printing, and enters the specified message in
the printer status file. You do not need to quote the message because remaining arguments
are treated the same as echo. You can use the down argument to take down a printer and
inform users. If a printer is down, the lpq command indicates that the printer is down.
enable Enables spooling for the specified printers. This enables the lpr or the lp command to enter
print jobs in the spooling queue.
exit Exits from lpc.
quit Exits from lpc.
Print System
Commands and Utilities
Chapter 9
193
restart Attempts to start a new lpd daemon for the specified printer. This argument is useful if
some abnormal condition causes the daemon to terminate unexpectedly and leave jobs in
the queue. If this occurs, the lpq command indicates that no daemon is present. If a daemon
is hung, you must kill the process, then restart the daemon by using the restart argument.
start Enables printing and starts a spooling daemon for the specified printer.
status [printer] Displays the status of the specified printer daemon and queue. The status argument shows
if the queue is enabled, if printing is enabled, the number of entries in the queue, and the
status of the printer's lpd daemon. If a printer name is not supplied, information about all
printer daemons and queues is displayed.
stop Stops a spooling daemon after the current job is complete and disables printing.
topq [printer] Puts print jobs in the queue in the specified order. You can specify the print jobs by also
specifying a request_ID variable or a username variable.
up Enables all printing and starts a new printer daemon. Cancels the down argument.
The lpfence command (HP-UX)
This command defines the minimum required priority for the spooled file to be printed
The lpmove command (HP-UX)
This command moves print requests, which were queued by the lp command, from one printer to another
The lprsetup utility (Tru64 UNIX)
The Tru64 UNIX lprsetup utility features the following options:
add Adds a printer
modify Modifies an existing printer’s characteristics
delete Deletes a printer
exit Exits the lprsetup utility
view Displays the current /etc/printcap file entry for the printer
quit Exits the lprsetup utility
Help Displays online help about the lprsetup utility.
The lpsched command (HP-UX)
This command schedules print requests originated with the lp command; lpsched is invoked by /sbin/rc,
which creates a background process that runs until lpshut is executed
The lpshut command (HP-UX)
This command shuts down the line printer scheduler.
The lpstat command (HP-UX and Tru64 UNIX)
Without specified options, the lpstat command displays the status of all requests made by the lp and lpr
commands. See the appropriate reference page for more information on these options.
Print System
Commands and Utilities
Chapter 9
194
The HP-UX version of the lpstat utility supports the XBD specification, Section 10.2, Utility Syntax
Guidelines, except the option-arguments are optional and cannot be presented as separate arguments
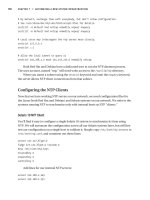
The printconfig utility (Tru64 UNIX)
The Tru64 UNIX printconfig utility is used for adding, modifying, and deleting printer entries in the
/etc/printcap file. Its main window is shown in Figure 9-1 on page 194.
.
Figure 9-1 Tru64 UNIX printconfig Main Window
The reject command (HP-UX)
This command permits the lp command to reject subsequent print requests for each named destination
queue; printing requests that are already queued continue to be processed.
Print System
Commands and Utilities
Chapter 9
195
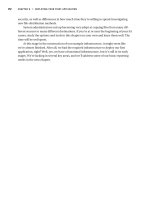
SAM (HP-UX)
When you use SAM to perform HP-UX print system management, you use the SAM Printers and Plotters
window to open the SAM LP Spooler window, from which you can access the SAM Printers and Plotters dialog
box; these are shown in Figure 9-2 on page 195, Figure 9-3 on page 196, and Figure 9-4 on page 197,
respectively.
The HP-UX SAM utility allows you to control various aspects of printer configuration and operation.
Selecting the Printers and Plotters icon in SAM’s main window opens the SAM Printers and Plotters Window.
Figure 9-2 SAM Printer and Plotters Window
Selecting the LP Spooler icon in the SAM Printer and Plotters window opens the LP Spooler Window.
Print System
Commands and Utilities
Chapter 9
196
Figure 9-3 SAM LP Spooler Window
Selecting the Printers and Plotters icon in the LP Spooler window opens the Printers and Plotters dialog box.
Print System
Commands and Utilities
Chapter 9
197
Figure 9-4 SAM Printers and Plotters Dialog Box
Print System
Initializing the Printer Spooler
Chapter 9
198
Initializing the Printer Spooler
Initializing the printer spooler consists of adding a printer to the printer spooler, accepting print requests for
the printer, enabling the printer, and turning on the printer spooler.
Under the HP-UX operating system, you can choose to perform these steps individually using HP-UX
commands or you can use SAM to add a printer and all these functions are done automatically. See the
HP-UX manual titled Managing Systems and Workgroups for information on planning a printer
configuration.
Similarly, using the Tru64 UNIX lprsetup command or the printconfig graphical user interface performs all
the additional functions when a printer is added. Adding a printer is discussed in the next section. See the
Tru64 UNIX System Administration manual for information on printer configuration.
Print System
Adding a Printer
Chapter 9
199
Adding a Printer
You can add a a local printer, a remote printer, or a networked printer to an HP-UX system or to a Tru64
UNIX system.
Adding a Local Printer
This section describes how to install a local printer (that is, a directly-connected printer) to an HP-UX system
and to a Tru64 UNIX system.
HP-UX
Using SAM to Add a Local Printer
Follow these steps:
1. Collect the following information:
• What is the name the printer will use?
Printer names can be up to fourteen alphanumeric characters in length; the alphabetic characters
may be in either upper or lower case and the underscore (_) is also allowed.
• What is the device file name the printer or plotter will use?
SAM creates the device file for you by using the default device file named lp_printer-name. You can
override the default device file name by specifying your device file name when you provide the printer
information.
• Is the model script in the /usr/spool/lp/model directory; for example, laserjetIIISi for an HP LaserJet
IIISi.
• What is the print request priority for this printer?
The default is 0.
• (Optional) To which class should the printer be added?
Printer class names follow the same rules as printer names, that is, fourteen alphanumeric characters
and underscore is allowed as an alphanumeric character.
• Will this printer be the system’s default printer?
2. Physically connect the printer(s) to your system. Refer to the instructions shipped with your printer. You
may need to shut down your system and turn off the power when you are changing the hardware
configuration of your system.
3. Invoke SAM.
4. Double-click the Printers and Plotters icon.
The Printers and Plotters window opens.
5. Double-click the LP Spooler icon.
The LP Spooler window opens.
6. Double-click the Printers and Plotters icon.
The Printers and Plotters dialog box opens.
Print System
Adding a Printer
Chapter 9
200
7. Select Action->Add Local Printer/Plotter and the menu item that corresponds to the printer you are
adding:
• Add Parallel Printer/Plotter
• Add Serial (RS-232) Printer/Plotter
• Add HP-IB Printer/Plotter
• Add Printer with Nonstandard Device File
• Add Printer/Plotter to a TSM Terminal
The corresponding dialog box opens.
8. Highlight the interface you want to use for the printer connection.
9. Provide the appropriate additional information (for example, port number or bus address).
10. Select OK.
Select the Diagnose Missing Card button and follow the directions if the interface is not listed.
NOTE The device driver must be part of the kernel to add the printer to the printer spooler. If the
driver is not currently configured into the kernel, SAM prompts you to add the driver(s)
and reboot the system.
11. Provide the following information in the printer interface dialog box:
a. Enter the printer name.
b. Select the Printer/Model Interface.
c. Select the Printer Class, if applicable.
d. Choose the Request Priority.
e. Select the check box to make this printer the default destination of print jobs.
12. Select OK.
Commands
Alternatively, you can choose to add a local printer by entering administrative commands on the command
line. Here are the steps to do so:
1. Either log in as root or use the su command to switch to super user.
2. Stop the printer spooler with the lpshut command.
3. Add the printer to the printer spooler with the lpadmin command. See the lpadmin (1M)l reference page
for additional information.
4. Use the accept command to allow print requests to be accepted for the new printer:
5. Use the enable command to enable the new printer to process print requests:
6. Restart the printer spooler with the lpsched command.
Tru64 UNIX
You can use either the lprsetup utility or its graphical user interface, printconfig, to add a local printer.
These utilities will perform the following actions:
Print System
Adding a Printer
Chapter 9
201
• Creates, or edits the existing /etc/printcap file
• Creates a spooling directory
• Creates an error log file
• Creates an accounting file
• Creates the device special files.
The printconfig Utility (Tru64 UNIX)
The following examples shows how a printer is added with the printconfig utility, assuming the physical
connections have been made.
The recommended action is to accept the default values for an initial printer installation. Then you can use
printconfig to modify the configuration later if required.
1. Log in as root or use the su command to switch to super user.
2. Gather the following information:
• What is the printer type?
• What is the printer name?
• Which device pathname should be used?
• Will this printer be the default printer?
3. Invoke the printconfig utility.
The printconfig Window opens.
4. Select the printer type from this list shown, then select Configure
Print System
Adding a Printer
Chapter 9
202
The Local Printer Settings dialog box opens.
The next available printer name is displayed by default. Here, the printer name is lp0.
5. Enter the printer alias names.
6. Specify the Direct connection type by selecting the first radio button.
7. Enter the special device file for this printer.
8. Choose Commit to write the options to the /etc/printcap file.
The printer now appears in the list of configured printers.
With the printconfig utility, you have the capability of designating this printer as the default printer by
selecting it from the list of configured printers then selecting Make Default.
Also, you can change the settings for this printer by selecting it from the list of configured printers, then
selecting the Modify button.
The lprsetup Utility (Tru64 UNIX)
The following example shows how to use the lprsetup command to set up a printer on the local system. Some
tables are truncated to shorten the example.
1. Log in as root or use the su command to switch to super user.
2. Gather the following information:
• What is the printer name?
Print System
Adding a Printer
Chapter 9
203
• What is the printer alias?
• Which device pathname should be used?
• Do you want to run accounting for this printer? If so, what is the file name of the accounting file?
• What is the name of the spooler directory?
• What is the name of the error log file for this printer?
• Will this printer be the default printer?
• Do you want to change the values of any printcap parameters for this printer? If so, what is the
symbol of each parameter?
• Did you want to include any comments in the /etc/printcap file for this printer?
3. Invoke the lprsetup utility.
# /usr/sbin/lprsetup
The lprsetup utility displays your choices for you in many instances; it also displays the default value in
brackets.
4. Respond to the Command prompt with add and press
Return.
5. Respond to the printer name to add prompt by either entering the printer name and pressing
Return or
pressing
Return to accept the default value.
6. Confirm your entry by entering
y and pressing Return.
7. Enter any printer synonym, that is the printer alias and press
Return.
8. Enter the device pathname and press
Return or accept the default value by pressing Return without an
entry.
9. You have the capability to capture print job accounting data by answering y, the default value, at the next
prompt. If you do, you will also be prompted for the accounting file.
10. The lprsetup utility prompts you for the full pathname of the spooler directory.
11. Enter the name of the printer error log file and press
Return.
12. Be sure to specify the dev connection type for a local printer and press
Return.
13. Enter the baud rate and press
Return.
14. The lprsetup utility prompts you to determine if you want to change any of these values, or if you want
to specify additional symbols, for example, the page length specification. See the printcap (4) reference
page for additional information.
15. Next, you are prompted for any comments. Enter n if you do not want any comments; enter y if you do and
proceed to enter your comment at the # prompt. Pressing Return at the end of a text string continues the
comment and generates a new line with the # prompt. Pressing Return without entering any text on a
line ends the comment entry.
16. Enter exit or quit at the lprsetup prompt to quit.
Adding a Remote Printer
A remote printer refers to a printer that is directly connected to a remote host or is otherwise treated as local
by the remote host.
Print System
Adding a Printer
Chapter 9
204
You configure your local print queue so that print jobs are sent to the remote host over the network. These
jobs are then printed on the remote host.The remote printer’s network card emulates the remote lpd protocol
so that they appear as remote hosts with an attached printer. If you are setting up a remote printer from a
remote system, list the local system (the client) in the hosts.lpd file or hosts.equiv file of the remote
system (the host).
HP-UX
To configure a remote printer into your printer spooler, you must be able to access the system with the printer
via a LAN. The process of adding a remote printer is similar to that of adding a local printer, though you will
need to supply SAM with some slightly different information. Remote printers cannot be members of a
printer class.
Using SAM to Add a Remote Printer
Follow these steps:
1. Ensure that the remote printer is installed and operational on the remote host system.
2. Collect the following information:
• What is the name the printer will use?
Printer names can be up to fourteen alphanumeric characters in length; the alphabetic characters
may be in either upper or lower case and the underscore (_) is also allowed.
• What is the name of the remote system for this printer?
• Is the remote system a Berkeley Software Distribution (BSD) UNIX system?
BSD systems do not understand certain options that are given transparently. They disable the lp
-oparm options and do not understand the lpadmin -o option.
• What is the print request priority for this printer?
The default is 0.
• (Optional) What is the “cancel” model on the remote system?
• (Optional) What is the “status” model on the remote system?
• Will you allow anyone to cancel print requests?
• Will this printer be the system’s default printer?
3. Invoke SAM on the local system.
4. Double-click the Printers and Plotters icon.
The Printers and Plotters window opens.
5. Double-click the LP Spooler icon.
The LP Spooler window opens.
6. Double-click the Printers and Plotters icon.
The Printers and Plotters dialog box opens.
7. Select Action->Add Remote Printer/Plotter.
Print System
Adding a Printer
Chapter 9
205
The Add Remote Printer/Plotter dialog box opens.
8. Enter the name you want to call this printer.
9. Enter the name of the system to which the printer is attached.
10. Enter the name of the printer as it is known to the remote system.
11. Designate with a check in the check box if the remote system is a BSD system, for example, a Tru64 UNIX
system.
12. Enter the Remote Cancel model, if appropriate.
13. Choose the Remote Status Model, if appropriate.
14. Choose the Default Request Priority.
15. Designate with a check in the check box if anyone can cancel a print request to this remote printer.