office 2010 All-in-One For Dummies phần 7 pot
Bạn đang xem bản rút gọn của tài liệu. Xem và tải ngay bản đầy đủ của tài liệu tại đây (3.91 MB, 82 trang )
Book V
Chapter 2
Refining Your
Worksheet
463
Getting a Better Look at the Worksheet
Unsplitting and unfreezing
Use one of these techniques to keep your worksheet from splitting or freez-
ing to death:
✦ Unsplitting: Click the Split button again; double-click one of the split
bars to remove it; or drag a split bar into the top or left side of the work-
sheet window.
✦ Unfreezing: On the View tab, click the Freeze Panes button and choose
Unfreeze Panes on the drop-down list.
Hiding columns and rows
Another way to take the clutter out of a worksheet is to temporarily hide col-
umns and rows:
After you go to the trouble of freezing the
screen or zooming in to a position you’re com-
fortable with, you may as well save your view
of the screen as a customized view. That way,
you can call upon the customized view when-
ever you need it. View settings, the window
size, the position of the grid on-screen, and
cells that are selected can all be saved in a
customized view.
Follow these steps to create a customized
view:
1. On the View tab, click the Custom Views
button.
You see the Custom Views dialog box. It
lists views you’ve already created, if you’ve
created any.
2. Click the Add button.
The Add View dialog box appears.
3. Enter a name for the view and click OK.
To switch to a customized view, click the
Custom Views button, select a view in the
Custom Views dialog box, and click the Show
button.
Your own customized views
34_497487-bk05ch02.indd 46334_497487-bk05ch02.indd 463 3/25/10 8:43 PM3/25/10 8:43 PM
464
Comments for Documenting Your Worksheet
✦ Hiding columns or rows: Drag over the column letters or row numbers of
the columns or rows that you want to hide. Dragging this way selects
entire columns or rows. Then go to the Home tab, click the Format button,
choose Hide & Unhide, and choose Hide Columns or Hide Rows.
✦ Unhiding columns and rows: Select columns to the right and left of the
hidden columns, or select rows above and below the hidden rows. To
select columns or rows, drag over their letters or numbers. Then go
to the Home tab, click the Format button, choose Hide & Unhide, and
choose Unhide Columns or Unhide Rows.
It’s easy to forget where you hid columns or rows. To make sure that all col-
umns and rows in your worksheet are displayed, click the Select All button
(or press Ctrl+A) to select your entire worksheet. Then go to the Home tab,
click the Format button and choose Hide & Unhide➪Unhide Columns; click
the Format button again and choose Hide & Unhide➪Unhide Rows.
Comments for Documenting Your Worksheet
It may happen that you return to your worksheet days or months from now
and discover to your dismay that you don’t know why certain numbers or
formulas are there. For that matter, someone else may inherit your work-
sheet and be mystified as to what the heck is going on. To take the mystery
out of a worksheet, document it by entering comments here and there.
A comment is a note that describes part of a worksheet. Each comment is
connected to a cell. You can tell where a comment is because a small red tri-
angle appears in the upper-right corner of cells that have been commented
on. Move the pointer over one of these triangles and you see the pop-up
box, a comment, and the name of the person who entered the comment, as
shown in Figure 2-2. Click the Show All Comments button on the Review tab
to see every comment in a worksheet.
Here’s everything a mere mortal needs to know about comments:
✦ Entering a comment: Click the cell that deserves the comment, go to the
Review tab, and click the New Comment button. Enter your comment in
the pop-up box. Click in a different cell when you finish entering your
comment.
✦ Reading a comment: Move the pointer over the small red triangle and
read the comment in the pop-up box (refer to Figure 2-2).
✦ Finding comments: On the Review tab, click the Previous or Next button
to go from comment to comment.
✦ Editing a comment: On the Review tab, select the cell with the com-
ment, click the Edit Comment button, and edit the comment in the
pop-up box. You can also right-click the cell and choose Edit Comment.
34_497487-bk05ch02.indd 46434_497487-bk05ch02.indd 464 3/25/10 8:43 PM3/25/10 8:43 PM
Book V
Chapter 2
Refining Your
Worksheet
465
Selecting Cells in a Worksheet
Figure 2-2:
Comments
explain
what’s
what in a
worksheet.
✦ Deleting comments: On the Review tab, click a cell with a comment,
and then click the Delete button, or right-click the cell and choose
Delete Comment. To delete several comments, select them by
Ctrl+clicking and then click the Delete button.
✦ Deleting all comments in a worksheet: Select all comments and then,
on the Review tab, click the Delete button. You can select all comments
by clicking the Find & Select button on the Home tab, choosing Go To,
and in the Go To dialog box, clicking the Special button and choosing
Comments in the Go To Special dialog box.
If your name doesn’t appear in the pop-up box after you enter a comment
and you want it to appear there, go to the File tab, choose Options, select
the General category in the Excel Options dialog box, and enter your name in
the User Name text box.
You can print the comments in a worksheet. On the Page Layout tab, click
the Page Setup group button, and on the Sheet tab of the Page Setup dialog
box, open the Comments drop-down list and choose At End of Sheet or As
Displayed on Sheet.
Selecting Cells in a Worksheet
To format, copy, move, delete, and format numbers and words in a work-
sheet, you have to select the cells in which the numbers and words are
found. Here are ways to select cells and the data inside them:
✦ A block of cells: Drag diagonally across the worksheet from one corner
of the block of cells to the opposite corner. You can also click in one
corner and Shift+click the opposite corner.
34_497487-bk05ch02.indd 46534_497487-bk05ch02.indd 465 3/25/10 8:43 PM3/25/10 8:43 PM
466
Deleting, Copying, and Moving Data
✦ Adjacent cells in a row or column: Drag across the cells.
✦ Cells in various places: While holding down the Ctrl key, click different
cells.
✦ A row or rows: Click a row number to select an entire row. Click and
drag down the row numbers to select several adjacent rows.
✦ A column or columns: Click a column letter to select an entire column.
Click and drag across letters to select adjacent columns.
✦ Entire worksheet: Click the Select All button, the square to the left of
the column letters and above the row numbers; press Ctrl+A; or press
Ctrl+Shift+Spacebar.
Press Ctrl+Spacebar to select the column that the active cell is in; press
Shift+Spacebar to select the row where the active cell is.
You can enter the same data item in several different cells by selecting cells
and then entering the data in one cell and pressing Ctrl+Enter. This tech-
nique comes in very handy, for example, when you want to enter a place-
holder zero (0) in several different cells.
Deleting, Copying, and Moving Data
In the course of putting together a worksheet, it is sometimes necessary to
delete, copy, and move cell contents. Here are instructions for doing these
chores:
✦ Deleting cell contents: Select the cells and then press the Delete key; on
the Home tab, click the Clear button and choose Clear Contents; or
right-click and choose Clear Contents. (Avoid the Delete button on the
Home tab for deleting cell contents. Clicking that button deletes cells as
well as their contents.)
✦ Copying and moving cell contents: Select the cells and use one of these
techniques:
• Cut or Copy and Paste commands: When you paste the data, click
where you want the first cell of the block of cells you’re copying or
moving to go. (Book I, Chapter 2 explains copying and moving data in
detail.) Be careful not to overwrite cells with data in them when you
copy or move data. After you paste data, you see the Paste Options
button. Click this button and choose an option from the drop-down
list to format the data in different ways.
• Drag and drop: Move the pointer to the edge of the cell block, click
when you see the four-headed arrow, and start dragging. Hold down
the Ctrl key to copy the data.
34_497487-bk05ch02.indd 46634_497487-bk05ch02.indd 466 3/25/10 8:43 PM3/25/10 8:43 PM
Book V
Chapter 2
Refining Your
Worksheet
467
Handling the Worksheets in a Workbook
Handling the Worksheets in a Workbook
As a glance at the bottom of the worksheet tells you, each workbook comes
with three worksheets named (not very creatively) Sheet1, Sheet2, and
Sheet3. Follow these instructions to move among, add, delete, rename, and
change the order of worksheets:
✦ Moving among worksheets: To go from one worksheet to another, click
a worksheet tab along the bottom of the screen. If you can’t see a tab,
click one of the scroll arrows to the left of the worksheet tabs.
✦ Renaming a worksheet: Right-click the worksheet tab, choose Rename
on the shortcut menu, type a new name, and press Enter. You can also
go to the Home tab, click the Format button, choose Rename Sheet on
the drop-down list, and enter a new name. Spaces are allowed in names,
and names can be 31 characters long. Brackets ([]) are allowed in
names, but you can’t use these symbols: / \ : ? and *.
✦ Selecting worksheets: Click the worksheet’s tab to select it. To select
several worksheets, Ctrl+click their tabs or click the first tab and then
Shift+click the last tab in the set. To select all the worksheets, right-click
a tab and choose Select All Sheets on the shortcut menu.
✦ Rearranging worksheets: Drag the worksheet tab to a new location. As
you drag, a tiny black arrow and a page icon appear to show you where
the worksheet will land after you release the mouse button. You can also
select a sheet, go to the Home tab, click the Format button, and choose
Move or Copy Sheet on the drop-down list. The Move or Copy dialog box
appears, as shown in Figure 2-3. Select the sheet in the Before Sheet list
where you want the worksheet to go and click OK.
✦ Inserting a new worksheet: Click the Insert Sheet button (you can find it
to the right of the worksheet tabs); press Shift+F11; or on the Home tab,
open the drop-down list on the Insert button and choose Insert Sheet.
Figure 2-3:
Besides
dragging
it, you can
move a
worksheet
in this dialog
box.
34_497487-bk05ch02.indd 46734_497487-bk05ch02.indd 467 3/25/10 8:43 PM3/25/10 8:43 PM
468
Keeping Others from Tampering with Worksheets
✦ Deleting a worksheet: Select the sheet, and on the Home tab, open the
drop-down list on the Delete button and choose Delete Sheet. You can
also right-click a worksheet tab and choose Delete. Be careful because
you can’t restore your deleted worksheet by pressing the Undo button.
✦ Copying a worksheet: Select the sheet, hold down the Ctrl key, and drag
the worksheet tab to a new location.
✦ Color-coding a worksheet: Right-click a worksheet tab and choose Tab
Color. Then select a color in the submenu, or choose More Colors and
select a color in the Colors dialog box. You can also select a worksheet
tab, go to the Home tab, click the Format button, choose Tab Color on
the drop-down list, and choose a color on the submenu.
You can change the size of columns or apply numeric formats to the same
addresses in different worksheets by selecting all the sheets first and then
formatting one worksheet. The formats apply to all the worksheets that you
select. Being able to format several different worksheets simultaneously
comes in handy, for example, when your workbook tracks monthly data and
each worksheet pertains to one month. Another way to handle worksheets
with similar data is to create the first worksheet and copy it to the second,
third, and fourth worksheets with the Copy and Paste commands.
Keeping Others from Tampering with Worksheets
People with savvy and foresight sometimes set up workbooks so that one
worksheet holds raw data and the other worksheets hold formulas that cal-
culate the raw data. This technique prevents others from tampering with the
raw data. Furthermore, if the worksheet with raw data is hidden, the chance
it will be tampered with is lower; and if the worksheet is protected, no one
can tamper with it unless they have a password. These pages explain how to
hide a worksheet so that others are less likely to find it and how to protect a
worksheet from being edited.
Hiding a worksheet
Follow these instructions to hide and unhide worksheets:
✦ Hiding a worksheet: Select the worksheet you want to hide, go to the
View tab, and click the Hide button. You can also right-click the work-
sheet’s tab and choose Hide on the shortcut menu. And you can also dis-
play the worksheet, go to the Home tab, click the Format button, and
choose Hide &Unhide➪Hide Sheet.
✦ Unhiding a worksheet: On the View tab, click the Unhide button, select
the name of the worksheet you want to unhide in the Unhide dialog box,
and click OK. To open the Unhide dialog box, you can also right-click
any worksheet tab and choose Unhide; or go to the Home tab, click the
Format button, and choose Hide & Unhide➪Unhide Sheet.
34_497487-bk05ch02.indd 46834_497487-bk05ch02.indd 468 3/25/10 8:43 PM3/25/10 8:43 PM
Book V
Chapter 2
Refining Your
Worksheet
469
Keeping Others from Tampering with Worksheets
Protecting a worksheet
Protecting a worksheet means to restrict others from changing it — from for-
matting it, inserting new rows and columns, or deleting rows and columns,
among other tasks. You can also prevent any editorial changes whatsoever
from being made to a worksheet. Follow these steps to protect a worksheet
from tampering by others:
1. Select the worksheet that needs protection.
2. On the Review tab, click the Protect Sheet button.
You see the Protect Sheet dialog box shown in Figure 2-4. You can also
open this dialog box by going to the Home tab, clicking the Format
button, and choosing Protect Sheet.
3. Enter a password in the Password to Unprotect Sheet box if you want
only people with the password to be able to unprotect the worksheet
after you protect it.
4. On the Allow All Users of This Worksheet To list, select the check box
next to the name of each task that you want to permit others to do.
For example, click the Format Cells check box if you want others to be
able to format cells.
Deselect the Select Locked Cells check box to prevent any changes from
being made to the worksheet. By default, all worksheet cells are locked,
and by preventing others from selecting locked cells, you effectively pre-
vent them from editing any cells.
5. Click OK.
If you entered a password in Step 3, you must enter it again in the
Confirm Password dialog box and click OK.
Figure 2-4:
Select what
you want
others to be
able to do.
To unprotect a worksheet that you protected, go to the Review tab and click
the Unprotect Sheet button. You must enter a password if you elected to
require others to have a password before they can unprotect a worksheet.
34_497487-bk05ch02.indd 46934_497487-bk05ch02.indd 469 3/25/10 8:43 PM3/25/10 8:43 PM
Book V: Excel
470
34_497487-bk05ch02.indd 47034_497487-bk05ch02.indd 470 3/25/10 8:43 PM3/25/10 8:43 PM
Chapter 3: Formulas and Functions
for Crunching Numbers
In This Chapter
✓ Constructing a formula
✓ Using cell ranges in formulas
✓ Naming cell ranges
✓ Referring to cells in other worksheets
✓ Copying formulas to other columns and rows
✓ Preventing errors in formulas
✓ Using functions in formulas
F
ormulas are where it’s at as far as Excel is concerned. After you know
how to construct formulas, and constructing them is pretty easy, you
can put Excel to work. You can make the numbers speak to you. You can
turn a bunch of unruly numbers into meaningful figures and statistics.
This chapter explains what a formula is, how to enter a formula, and how to
enter a formula quickly. You also discover how to copy formulas from cell
to cell and how to keep formula errors from creeping into your workbooks.
Finally, this chapter explains how to make use of the hundred or so func-
tions that Excel offers.
How Formulas Work
A formula, you may recall from the sleepy hours you spent in math class,
is a way to calculate numbers. For example, 2+3=5 is a formula. When you
enter a formula in a cell, Excel computes the formula and displays its results
in the cell. Click in cell A3 and enter =2+3, for example, and Excel displays
the number 5 in cell A3.
Referring to cells in formulas
As well as numbers, Excel formulas can refer to the contents of different
cells. When a formula refers to a cell, the number in the cell is used to com-
pute the formula. In Figure 3-1, for example, cell A1 contains the number 2;
cell A2 contains the number 3; and cell A3 contains the formula =A1+A2. As
35_497487-bk05ch03.indd 47135_497487-bk05ch03.indd 471 3/25/10 8:45 PM3/25/10 8:45 PM
472
How Formulas Work
shown in cell A3, the result of the formula is 5. If I change the number in cell
A1 from 2 to 3, the result of the formula in cell A3 (=A1+A2) becomes 6, not
5. When a formula refers to a cell and the number in the cell changes, the
result of the formula changes as well.
Figure 3-1:
A simple
formula.
Formula in the formula bar
Results of the formula
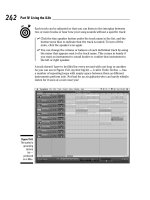
To see the value of using cell references in formulas, consider the worksheet
shown in Figure 3-2. The purpose of this worksheet is to track the budget of
a school’s Parent Teacher Association (PTA):
Figure 3-2:
Using
formulas
in a
worksheet.
✦ Column C, Actual Income, lists income from different sources.
✦ Column D, Projected Income, shows what the PTA members thought
income from these sources would be.
✦ Column E, Over/Under Budget, shows how actual income compares to
projected income from the different sources.
35_497487-bk05ch03.indd 47235_497487-bk05ch03.indd 472 3/25/10 8:45 PM3/25/10 8:45 PM
Book V
Chapter 3
Formulas and
Functions for
Crunching Numbers
473
How Formulas Work
As the figures in the Actual Income column (column C) are updated, figures
in the Over/Under Budget column (column E) and the Total Income row (row
8) change instantaneously. These figures change instantaneously because
the formulas refer to the numbers in cells, not to unchanging numbers
(known as constants).
Figure 3-3 shows the formulas used to calculate the data in the worksheet in
Figure 3-2. In column E, formulas deduct the numbers in column D from the
numbers in column C to show where the PTA over- or underbudgeted for the
different sources of income. In row 8, you can see how the SUM function is
used to total cells in rows 3 through 7. The end of this chapter explains how
to use functions in formulas.
Figure 3-3:
The
formulas
used to
generate
the numbers
in Figure
3-2.
Excel is remarkably good about updating cell references in formulas when
you move cells. To see how good Excel is, consider what happens to cell
addresses in formulas when you delete a row in a worksheet. If a formula
refers to cell C1 but you delete row B, row C becomes row B, and the value
in cell C1 changes addresses from C1 to B1. You would think that references
in formulas to cell C1 would be out of date, but you would be wrong. Excel
automatically adjusts all formulas that refer to cell C1. Those formulas now
refer to cell B1 instead.
In case you want to know, you can display formulas in worksheet cells instead
of the results of formulas, as was done in Figure 3-3, by pressing Ctrl+’ or click-
ing the Show Formulas button on the Formulas tab (you may have to click the
Formula Auditing button first, depending on the size of your screen). Click the
Show Formulas button a second time to see formula results again.
Referring to formula results in formulas
Besides referring to cells with numbers in them, you can refer to formula
results in a cell. Consider the worksheet shown in Figure 3-4. The purpose of
this worksheet is to track scoring by the players on a basketball team over
three games:
35_497487-bk05ch03.indd 47335_497487-bk05ch03.indd 473 3/25/10 8:45 PM3/25/10 8:45 PM
474
How Formulas Work
Figure 3-4:
Using
formula
results
as other
formulas.
✦ The Totals column (column E) shows the total points each player scored
in the three games.
✦ The Average column (column F), using the formula results in the Totals
column, determines how much each player has scored on average. The
Average column does that by dividing the results in column E by 3, the
number of games played.
In this case, Excel uses the results of the total-calculation formulas in
column E to compute average points per game in column F.
Operators in formulas
Addition, subtraction, and division aren’t the only operators you can use in
formulas. Table 3-1 explains the arithmetic operators you can use and the
key you press to enter each operator. In the table, operators are listed in the
order of precedence.
35_497487-bk05ch03.indd 47435_497487-bk05ch03.indd 474 3/25/10 8:45 PM3/25/10 8:45 PM
Book V
Chapter 3
Formulas and
Functions for
Crunching Numbers
475
How Formulas Work
Table 3-1 Arithmetic Operators for Use in Formulas
Precedence Operator Example
Formula
Returns
1 % (Percent)
=50%
50 percent, or 0.5.
2 ^ (Exponentiation)
=50^2
50 to the second power,
or 2500.
3 * (Multiplication)
=E2*4
The value in cell E2 multi-
plied by 4.
3 / (Division)
=E2/3
The value in cell E2 divided
by 3.
4 + (Addition)
=F1+F2
+F3
The sum of the values in
those cells.
4 – (Subtraction)
=G5–8
The value in cell G5 minus 8.
5 & (Concatenation)
=“Part
No.
”&D4
The text Part No. and the
value in cell D4.
6 = (Equal to)
=C5=4
If the value in cell C5 is
equal to 4, returns TRUE;
returns FALSE otherwise.
6 <> (Not equal to)
=F3<>9
If the value in cell F3 is not
equal to 9, returns TRUE;
returns FALSE otherwise.
6 < (Less than)
=B9<E11
If the value in cell B9 is
less than the value in cell
E11; returns TRUE; returns
FALSE otherwise.
6 <= (Less than or
equal to)
=A4<=9
If the value in cell A4 is
less than or equal to 9,
returns TRUE; returns
FALSE otherwise.
6 > (Greater than)
=E8>14
If the value in cell E8 is
greater than 14, returns
TRUE; returns FALSE
otherwise
6 >= (Greater than
or equal to)
=C3>=D3
If the value in cell C3 is less
than or equal to the value
in cell D3; returns TRUE;
returns FALSE otherwise.
35_497487-bk05ch03.indd 47535_497487-bk05ch03.indd 475 3/25/10 8:45 PM3/25/10 8:45 PM
476
The Basics of Entering a Formula
Another way to compute a formula is to make use of a function. As “Working
with Functions” explains later in this chapter, a function is a built-in formula
that comes with Excel. SUM, for example, adds the numbers in cells. AVG
finds the average of different numbers.
The Basics of Entering a Formula
No matter what kind of formula you enter, no matter how complex the for-
mula is, follow these basic steps to enter it:
1. Click the cell where you want to enter the formula.
2. Click in the Formula bar if you want to enter the data there rather
than in the cell.
3. Enter the equals sign (=).
You must be sure to enter the equals sign before you enter a formula.
Without it, Excel thinks you’re entering text or a number, not a formula.
4. Enter the formula.
For example, enter =B1*.06. Make sure that you enter all cell addresses
correctly. By the way, you can enter lowercase letters in cell references.
Excel changes them to uppercase after you finish entering the formula.
The next section in this chapter explains how to quickly enter cell
addresses in formulas.
When a formula includes more than one opera-
tor, the order in which the operators appear in
the formula matters a lot. Consider this formula:
=2+3*4
Does this formula result in 14 (2+[3*4]) or 20
([2+3]*4)? The answer is 14 because Excel
performs multiplication before addition in
formulas. In other words, multiplication
takes precedence over addition. The order in
which calculations are made in a formula that
includes different operators is called the order
of precedence. Be sure to remember the order
of precedence when you construct complex
formulas with more than one operator:
1. Percent (%)
2. Exponentiation (^)
3. Multiplication (*) and division (/); leftmost
operations are calculated first
4. Addition (+) and subtraction (-); leftmost
operations are calculated first
5. Concatenation (&)
6. Comparison (<, <=, >,>=, and <>)
To get around the order of precedence prob-
lem, enclose parts of formulas in parentheses.
Operations in parentheses are calculated
before all other parts of a formula. For example,
the formula =2+3*4 equals 20 when it is written
this way: =(2+3)*4.
The order of precedence
35_497487-bk05ch03.indd 47635_497487-bk05ch03.indd 476 3/25/10 8:45 PM3/25/10 8:45 PM
Book V
Chapter 3
Formulas and
Functions for
Crunching Numbers
477
Speed Techniques for Entering Formulas
5. Press Enter or click the Enter button (the check mark on the
Formula bar).
The result of the formula appears in the cell.
Speed Techniques for Entering Formulas
Entering formulas and making sure that all cell references are correct is a
tedious activity, but fortunately for you, Excel offers a few techniques to
make entering formulas easier. Read on to find out how ranges make entering
cell references easier and how you can enter cell references in formulas by
pointing and clicking. You also find instructions here for copying formulas.
Clicking cells to enter cell references
The hardest part about entering a formula is entering the cell references cor-
rectly. You have to squint to see which row and column the cell you want
to refer to is in. You have to carefully type the right column letter and row
number. However, instead of typing a cell reference, you can click the cell
you want to refer to in a formula.
In the course of entering a formula, simply click the cell on your worksheet
that you want to reference. As shown in Figure 3-5, shimmering marquee
lights appear around the cell that you clicked so that you can clearly see
which cell you’re referring to. The cell’s reference address, meanwhile,
appears in the Formula bar. In Figure 3-5, I clicked cell F3 instead of entering
its reference address on the Formula bar. The reference F3 appears on the
Formula bar, and the marquee lights appear around cell F3.
Get in the habit of pointing and clicking cells to enter cell references in for-
mulas. Clicking cells is easier than typing cell addresses, and the cell refer-
ences are entered more accurately.
Figure 3-5:
Clicking to
enter a cell
reference.
Click a cell to enter its cell reference address in a formula
35_497487-bk05ch03.indd 47735_497487-bk05ch03.indd 477 3/25/10 8:45 PM3/25/10 8:45 PM
478
Speed Techniques for Entering Formulas
Entering a cell range
A cell range is a line or block of cells in a worksheet. Instead of typing cell
reference addresses one at a time, you can simply select cells on your
worksheet. In Figure 3-6, I selected cells C3, D3, E3, and F3 to form cell range
C3:F3. This spares me the trouble of entering the cell addresses one at a
time: C3, D3, E3, and F3. The formula in Figure 3-6 uses the SUM function
to total the numeric values in cell range C3:F3. Notice the marquee lights
around the range C3:F3. The lights show precisely which range you’re select-
ing. Cell ranges come in especially handy where functions are concerned
(see “Working with Functions” later in this chapter).
Figure 3-6:
Using a cell
range in a
formula.
Cell rangeSelect cells to enter a range
To identify a cell range, Excel lists the outermost cells in the range and
places a colon (:) between cell addresses:
✦ A cell range comprising cells A1, A2, A3, and A4 is listed this way: A1:A4.
✦ A cell range comprising a block of cells from A1 to D4 is listed this way:
A1:D4.
You can enter cell ranges on your own without selecting cells. To do so, type
the first cell in the range, enter a colon, and type the last cell.
Naming cell ranges so that you
can use them in formulas
Whether you type cell addresses yourself or drag across cells to enter a cell
range, entering cell address references is a chore. Entering =C1+C2+C3+C4,
for example, can cause a finger cramp; entering =SUM(C1:C4) is no piece of
cake, either. To take the tedium out of entering cell ranges in formulas, you
can name cell ranges. Then, to enter a cell range in a formula, all you have to
35_497487-bk05ch03.indd 47835_497487-bk05ch03.indd 478 3/25/10 8:45 PM3/25/10 8:45 PM
Book V
Chapter 3
Formulas and
Functions for
Crunching Numbers
479
Speed Techniques for Entering Formulas
do is select a name in the Paste Name dialog box or click the Use in Formula
button on the Formulas tab, as shown in Figure 3-7. Naming cell ranges has an
added benefit: You can choose a name from the Name Box drop-down list and
go directly to the cell range whose name you choose, as shown in Figure 3-7.
Figure 3-7:
Choosing a
named cell
range.
Choose a name to move there Enter a named cell range in a formula
Naming cell ranges has one disadvantage, and it’s a big one. Excel doesn’t
adjust cell references when you copy a formula with a range name from one
cell to another. A range name always refers to the same set of cells. Later
in this chapter, “Copying Formulas from Cell to Cell” explains how to copy
formulas.
Creating a cell range name
Follow these steps to create a cell range name:
1. Select the cells that you want to name.
2. On the Formulas tab, click the Define Name button.
You see the New Name dialog box.
3. Enter a descriptive name in the Name box.
Names can’t begin with a number or include blank spaces.
4. On the Scope drop-down list, choose Workbook or a worksheet name.
35_497487-bk05ch03.indd 47935_497487-bk05ch03.indd 479 3/25/10 8:45 PM3/25/10 8:45 PM
480
Speed Techniques for Entering Formulas
Choose a worksheet name if you intend to use the range name you’re
creating only in formulas that you construct in a single worksheet. If
your formulas will refer to cell range addresses in different worksheets,
choose Workbook so that you can use the range name wherever you go
in your workbook.
5. Enter a comment to describe the range name, if you want.
Enter a comment if doing so will help you remember where the cells
you’re naming are located or what type of information they hold. As I
explain shortly, you can read comments in the Name Manager dialog
box, the place where you go to edit and delete range names.
6. Click OK.
In case you’re in a hurry, here’s a fast way to enter a cell range name:
Select the cells for the range, click in the Name Box (which you find to the
left of the Formula bar; refer to Figure 3-7), enter a name for the range, and
press the Enter key.
Entering a range name as part of a formula
To include a cell range name in a formula, click in the Formula bar where
you want to enter the range name and then use one of these techniques to
enter the name:
✦ On the Formulas tab, click the Use in Formula button and choose a cell
range name on the drop-down list (refer to Figure 3-7).
✦ Press F3 or click the Use in Formula button and choose Paste Names on
the drop-down list. You see the Paste Name dialog box (refer to Figure
3-7). Select a cell range name and click OK.
Quickly traveling to a cell range that you named
To go quickly to a cell range you named, open the drop-down list on the
Name Box and choose a name (refer to Figure 3-7). The Name Box drop-
down list is located to the left of the Formula bar.
To make this trick work, the cursor can’t be in the Formula bar. The Name
Box drop-down list isn’t available when you’re constructing a formula.
Managing cell range names
To rename, edit, or delete cell range names, go to the Formulas tab and click
the Name Manager button. You see the Name Manager dialog box, as shown
in Figure 3-8. This dialog box lists names, cell values in names, the worksheet
on which the range name is found, and whether the range name can be
applied throughout a workbook or only in one worksheet. To rename, edit, or
delete a cell range name, select it in the dialog box and use these techniques:
35_497487-bk05ch03.indd 48035_497487-bk05ch03.indd 480 3/25/10 8:45 PM3/25/10 8:45 PM
Book V
Chapter 3
Formulas and
Functions for
Crunching Numbers
481
Speed Techniques for Entering Formulas
✦ Renaming: Click the Edit button and enter a new name in the Edit Name
dialog box.
✦ Reassigning cells: To assign different cells to a range name, click the Edit
button. You see the Edit Name dialog box. To enter a new range of cells,
either enter the cells’ addresses in the Refers To text box or click the
Range Selector button (it’s to the right of the text box), drag across the
cells on your worksheet that you want for the cell range, and click the Cell
Selector button again to return to the Edit Name dialog box.
✦ Deleting: Click the Delete button and click OK in the confirmation box.
Figure 3-8:
The Name
Manager
dialog box.
Referring to cells in different worksheets
Excel gives you the opportunity to use data from different worksheets in a
formula. If one worksheet lists sales figures from January and the next lists
sales figures from February, you can construct a “grand total” formula in
either worksheet to tabulate sales in the two-month period. A reference to a
cell on a different worksheet is called a 3D reference.
Construct the formula as you normally would, but when you want to refer
to a cell or cell range in a different worksheet, click a worksheet tab to move
to the other worksheet and select the cell or range of cells there. Without
returning to the original worksheet, complete your formula in the Formula
bar and press Enter. Excel returns you to the original worksheet, where you
can see the results of your formula.
35_497487-bk05ch03.indd 48135_497487-bk05ch03.indd 481 3/25/10 8:45 PM3/25/10 8:45 PM
482
Copying Formulas from Cell to Cell
The only thing odd about constructing formulas across worksheets are the
cell references. As a glance at the Formula bar tells you, cell addresses in
cross-worksheet formulas list the sheet name and an exclamation point (!) as
well as the cell address itself. For example, this formula in Worksheet 1 adds
the number in cell A4 to the numbers in cells D5 and E5 in Worksheet 2:
=A4+Sheet2!D5+Sheet2!E5
This formula in Sheet 2 multiplies the number in cell E18 by the number in
cell C15 in Worksheet 1:
=E18*Sheet1!C15
This formula in Worksheet 2 finds the average of the numbers in the cell
range C7:F7 in Worksheet 1:
=AVERAGE(Sheet1!C7:F7)
Copying Formulas from Cell to Cell
Often in worksheets, the same formula but with different cell references is
used across a row or down a column. For example, in the worksheet shown
in Figure 3-9, column F totals the rainfall figures in rows 7 through 11. To
enter formulas for totaling the rainfall figures in column F, you could labori-
ously enter formulas in cells F7, F8, F9, F10, and F11. But a faster way is to
enter the formula once in cell F7 and then copy the formula in F7 down the
column to cells F8, F9, F10, and F11.
When you copy a formula to a new cell, Excel adjusts the cell references in
the formula so that the formula works in the cells to which it has been
copied. Astounding! Opportunities to copy formulas abound on most work-
sheets. And copying formulas is the fastest and safest way to enter formulas
in a worksheet.
Follow these steps to copy a formula:
1. Select the cell with the formula you want to copy down a column or
across a row.
2. Drag the AutoFill handle across the cells to which you want to copy
the formula.
This is the same AutoFill handle you drag to enter serial data (see
Chapter 1 of this mini-book about entering lists and serial data with the
AutoFill command). The AutoFill handle is the small black square in the
lower-right corner of the cell. When you move the mouse pointer over it,
it changes to a black cross. Figure 3-9 shows a formula being copied.
35_497487-bk05ch03.indd 48235_497487-bk05ch03.indd 482 3/25/10 8:45 PM3/25/10 8:45 PM
Book V
Chapter 3
Formulas and
Functions for
Crunching Numbers
483
Detecting and Correcting Errors in Formulas
3. Release the mouse button.
If I were you, I would click in the cells to which you copied the formula
and glance at the Formula bar to make sure that the formula was copied
correctly. I’d bet you it was.
You can also copy formulas with the Copy and Paste commands. Just make
sure that cell references refer correctly to the surrounding cells.
Figure 3-9:
Copying a
formula.
Drag the AutoFill handle
Detecting and Correcting Errors in Formulas
It happens. Everyone makes an error from time to time when entering formu-
las in cells. Especially in a worksheet in which formula results are calculated
into other formulas, a single error in one formula can spread like a virus and
cause miscalculations throughout a worksheet. To prevent that from hap-
pening, Excel offers several ways to correct errors in formulas. You can cor-
rect them one at a time, run the error checker, and trace cell references, as
the following pages explain.
By the way, if you want to see formulas in cells rather than formula results,
go to the Formulas tab and click the Show Formulas button (or press Ctrl+’).
Sometimes seeing formulas this way helps to detect formula errors.
35_497487-bk05ch03.indd 48335_497487-bk05ch03.indd 483 3/25/10 8:45 PM3/25/10 8:45 PM
484
Detecting and Correcting Errors in Formulas
Correcting errors one at a time
When Excel detects what it thinks is a formula that has been entered incor-
rectly, a small green triangle appears in the upper-left corner of the cell
where you entered the formula. And if the error is especially egregious, an
error message, a cryptic three or four letters preceded by a pound sign (#),
appears in the cell. Table 3-2 explains common error messages.
Table 3-2 Common Formula Error Messages
Message What Went Wrong
#DIV/0! You tried to divide a number by a zero (0) or an empty cell.
#NAME You used a cell range name in the formula, but the name isn’t
defined. Sometimes this error occurs because you type the name
incorrectly. (Earlier in this chapter, “Naming cell ranges so that
you can use them in formulas” explains how to name cell ranges.)
#N/A The formula refers to an empty cell, so no data is available for
computing the formula. Sometimes people enter N/A in a cell as a
placeholder to signal the fact that data isn’t entered yet. Revise the
formula or enter a number or formula in the empty cells.
#NULL The formula refers to a cell range that Excel can’t understand.
Make sure that the range is entered correctly.
#NUM An argument you use in your formula is invalid.
#REF The cell or range of cells that the formula refers to aren’t there.
#VALUE The formula includes a function that was used incorrectly, takes
an invalid argument, or is misspelled. Make sure that the function
uses the right argument and is spelled correctly.
To find out more about a formula error and perhaps correct it, select the cell
with the green triangle and click the Error button. This small button appears
beside a cell with a formula error after you click the cell. The drop-down list
on the Error button offers opportunities for correcting formula errors and
finding out more about them.
Running the error checker
Another way to tackle formula errors is to run the error checker. When the
checker encounters what it thinks is an error, the Error Checking dialog box
tells you what the error is, as shown in Figure 3-10. To run the error checker,
go to the Formulas tab and click the Error Checking button (you may have to
click the Formula Auditing button first, depending on the size of your
screen).
35_497487-bk05ch03.indd 48435_497487-bk05ch03.indd 484 3/25/10 8:45 PM3/25/10 8:45 PM
Book V
Chapter 3
Formulas and
Functions for
Crunching Numbers
485
Detecting and Correcting Errors in Formulas
If you see clearly what the error is, click the Edit in Formula Bar button,
repair the error in the Formula bar, and click the Resume button in the
dialog box (you find this button at the top of the dialog box). If the error isn’t
one that really needs correcting, either click the Ignore Error button or click
the Next button to send the error checker in search of the next error in your
worksheet.
Figure 3-10:
Running
the error
checker.
Tracing cell references
In a complex worksheet in which formulas are piled on top of one another
and the results of some formulas are computed into other formulas, it helps
to be able to trace cell references. By tracing cell references, you can see
how the data in a cell figures into a formula in another cell. Also, if the cell
contains a formula, you can tell which cells the formula is gathering its data
from to make its computation. You can get a better idea of how your work-
sheet is constructed, and in so doing, find structural errors more easily.
Figure 3-11 shows how cell tracers describe the relationships between cells.
A cell tracer is a blue arrow that shows the relationships between cells used
in formulas. You can trace two types of relationships:
Figure 3-11:
Tracing the
relationships
between
cells.
35_497487-bk05ch03.indd 48535_497487-bk05ch03.indd 485 3/25/10 8:45 PM3/25/10 8:45 PM
486
Working with Functions
✦ Tracing precedents: Select a cell with a formula in it and trace the for-
mula’s precedents to find out which cells are computed to produce the
results of the formula. Trace precedents when you want to find out
where a formula gets its computation data. Cell tracer arrows point from
the referenced cells to the cell with the formula results in it.
To trace precedents, go to the Formulas tab and click the Trace
Precedents button (you may have to click the Formula Auditing button
first, depending on the size of your screen).
✦ Tracing dependents: Select a cell and trace its dependents to find out
which cells contain formulas that use data from the cell you selected.
Cell tracer arrows point from the cell you selected to cells with formula
results in them. Trace dependents when you want to find out how the
data in a cell contributes to formulas elsewhere in the worksheet. The
cell you select can contain a constant value or a formula in its own right
(and contribute its results to another formula).
To trace dependents, go to the Formulas tab and click the Trace
Dependents button (you may have to click the Formula Auditing button
first, depending on the size of your screen).
To remove the cell tracer arrows from a worksheet, go to the Formulas tab
and click the Remove Arrows button. You can open the drop-down list on
this button and choose Remove Precedent Arrows or Remove Dependent
Arrows to remove only cell-precedent or cell-dependent tracer arrows.
Working with Functions
A function is a canned formula that comes with Excel. Excel offers hundreds
of functions, some of which are very obscure and fit only for use by rocket
scientists or securities analysts. Other functions are very practical. For
example, you can use the SUM function to quickly total the numbers in a
range of cells. Instead of entering =C2+C3+C4+C5 on the Formula bar, you
can enter =SUM(C2:C5), which tells Excel to total the numbers in cell C2, C3,
C4, and C5. To obtain the product of the number in cell G4 and .06, you can
use the PRODUCT function and enter =PRODUCT(G4,.06) on the Formula bar.
Table 3-3 lists the most common functions. To get an idea of the numerous
functions that Excel offers, go to the Formulas tab and click the Insert
Function button. You see the Insert Function dialog box shown in Figure
3-12. (Later in this chapter, I show you how you this dialog box helps you
use functions in formulas.) Choose a function category in the dialog box,
35_497487-bk05ch03.indd 48635_497487-bk05ch03.indd 486 3/25/10 8:45 PM3/25/10 8:45 PM
Book V
Chapter 3
Formulas and
Functions for
Crunching Numbers
487
Working with Functions
choose a function name, and read the description. You can click the Help on
This Function link to open the Excel Help window and get a thorough
description of the function and how it’s used.
Table 3-3 Common Functions and Their Use
Function Returns
AVERAGE(number1,number2,. . .) The average of the numbers in the cells
listed in the arguments
COUNT(value1,value2,. . .) The number of cells that contain the num-
bers listed in the arguments
MAX(number1,number2,. . .) The largest value in the cells listed in the
arguments
MIN(number1,number2,. . .) The smallest value in the cells listed in the
arguments
PRODUCT(number1,number2,. . .) The product of multiplying the cells listed in
the arguments
STDEV(number1,number2,. . .) An estimate of standard deviation based on
the sample cells listed in the argument
STDEVP(number1,number2,. . .) An estimate of standard deviation based
on the entire sample cells listed in the
arguments
SUM(number1,number2,. . .) The total of the numbers in the arguments
VAR(number1,number2,. . .) An estimate of the variance based on the
sample cells listed in the arguments
VARP(number1,number2,. . .) A variance calculation based on all cells
listed in the arguments
Using arguments in functions
Every function takes one or more arguments. Arguments are the cell refer-
ences or numbers, enclosed in parentheses, that the function acts upon. For
example, =AVERAGE(B1:B4) returns the average of the numbers in the cell
range B1 through B4; =PRODUCT(6.5,C4) returns the product of multiplying
the number 6.5 by the number in cell C4. When a function requires more
than one argument, enter a comma between the arguments (enter a comma
without a space).
35_497487-bk05ch03.indd 48735_497487-bk05ch03.indd 487 3/25/10 8:45 PM3/25/10 8:45 PM