o reilly Unix Backup and Recovery phần 6 docx
Bạn đang xem bản rút gọn của tài liệu. Xem và tải ngay bản đầy đủ của tài liệu tại đây (565.29 KB, 73 trang )
Example 14-9. Adding the New Logical Logs
curtis$ oninit -s
curtis$ for I in 1 2 3 4 5 6 ; do
> onparams -a -d llogdbs
> done
Logical log successfully added.
Logical log successfully added.
Logical log successfully added.
Logical log successfully added.
Logical log successfully added.
Logical log successfully added.
You now must perform a level-0 archive to make these logs available for use. (An example
level-0 archive is shown in Example 14-10.)
Example 14-10. A Level-0 Archive
curtis$ ontape -s
Please enter the level of archive to be performed (0, 1, or 2) 0
Please mount tape 1 on /informix/logical/crash/crash.level.0 and press
Return to continue
100 percent done.
Please label this tape as number 1 in the arc tape sequence.
This tape contains the following logical logs:
35
Program over.
As shown in Example 14-11, we now switch logs three times, which will cause the current log
to be one of the new logs on the separate dbspace. Then we will force a checkpoint and
perform a logical log backup. This will free the logs that are on the old dbspace, so that we
may drop them.
Example 14-11. Performing a Log Switch and Starting Continuous Backups
curtis$ onmode -l ; onmode -l ; onmode -l
curtis$ onmode -c
curtis$ ontape -c
Page 397
Example 14-11. Performing a Log Switch and Starting Continuous Backups (continued)
Performing continuous backup of logical logs.
Please mount tape 1 on /informix/logical/crash.log and press Return to
continue
In another window, we run an onstat -l that shows us that the logical log backup is done. We
now can stop the ontape -c with a Ctrl-C. We also can drop the original three logical logs. See
Example 14-12 for an example of these steps.
Example 14-12. Example onstat Output and onparams Command
curtis$ onstat -l # (output abbreviated)
address number flags uniqid begin size
used
a04b424 1 U-B 34 100233 250
1
a04b440 2 U-B 35 10032d 250
15
a04b45c 3 U-B 36 100427 250
0
a04b478 4 U C-L 0 300035 250
0
a04b494 5 F 0 30012f 250
0
a04b4b0 6 F 0 300229 250
0
a04b4cc 7 F 0 300323 250
0
a04b4e8 8 F 0 30041d 250
0
a04b504 9 F 0 300517 250
0
curtis$ onparams -d -l 1
WARNING: Dropping a logical log file.
Do you really want to continue? (y/n)y
Logical log 1 successfuly dropped.
curtis$ onparams -d -l 2
WARNING: Dropping a logical log file.
Do you really want to continue? (y/n)y
Logical log 2 successfully dropped.
curtis$ onparams -d -l 3
WARNING: Dropping a logical log file.
Do you really want to continue? (y/n)y
Logical log 3 successfully dropped.
curtis$ onstat -l # (output abbreviated)
address number flags uniqid begin size
used
a04b478 4 U C-L 37 300035 250
7
a04b4
94
5
F
0
30012f
250
0
a04b4
94
5
F
0
30012f
250
0
a04b4b0 6 F 0 300229 250
0
a04b4cc 7 F 0 300323 250
0
a04b4e8 8 F 0 30041d 250
0
a04b504 9 F 0 300517 250
0
At this point, we have successfully moved all logical logs into the new dbspace. The following
steps are purely a matter of personal preference. I like my logs to be numbered starting with
one. In order to do that, I have to add three more and drop the last three, as demonstrated in
Example 14-13. The new logs will be given
Page 398
log numbers 1-3. Then we drop logs 7-9 in reverse order. (It's less confusing to delete them in
reverse order.)
Example 14-13. Dropping and Adding Logical Logs
curtis$ onparams -a -d llogdbs
Logical log successfully added.
curtis$ onparams -a -d llogdbs
Logical log successfully added.
curtis$ onparams -a -d llogdbs
Logical log successfully added.
curtis$ onparams -d -l 9
WARNING: Dropping a logical log file.
Do you really want to continue? (y/n)y
Logical log 9 successfully dropped.
curtis$ onparams -d -l 8
WARNING: Dropping a logical log file.
Do you really want to continue? (y/n)y
Logical log 8 successfully dropped.
curtis$ onparams -d -l 7
WARNING: Dropping a logical log file.
Do you really want to continue? (y/n)y
Logical log 7 successfully dropped.
curtis$ onstat -l # (output abbreviated)
address number flags uniqid begin size
used
a04b424
1
A
0
300611
250
0
a04b424
1
A
0
300611
250
0
a04b440 2 A 0 30070b 250
0
a04b45c 3 A 0 300805 250
0
a04b478 4 U C-L 37 300035 250
16
a04b494 5 F 0 30012f 250
0
a04b4b0 6 F 0 300229 250
0
Recommendation: Mirror Essential dbspaces
If you have the space, it is best to mirror the entire database. However, many places do not
have that luxury. It doesn't take up much disk space to mirror the essential dbspaces, though.
The essential dbspaces are those that contain the sys-master database and the physical and
logical logs. Of these, the most essential dbspace would be the one that contains the logical
logs. That is because all other dbspaces can be recovered up to the point of failure-if the
logical logs are intact.
When creating dbspaces, they can be set up as mirrored dbspaces. (This is demonstrated in the
previous example about moving your logs to dedicated dbspaces.) However, it also can be
done after the dbspace is created. Since we've already covered creating a mirrored dbspace,
this section covers turning on mirroring for an existing dbspace. Assume for this example that
we have a dbspace called
Page 399
plogdbs, and that we wish to mirror it to /informix/physlog_mirror.dbf. We would run the
commands shown in Example 14-14.
Example 14-14. Adding Mirroring to an Existing dbspace
$ onspaces -m plogdbs -f /informix/physlog_mirror.dbf -y
$ onstat -d # (output abbreviated)
a12a728 3 2 3 1 M informix plogdbs
(The M flag above says that the plogdbs is mirrored.)
address chk/dbs offset size free bpages flags pathname
(It lists two chunks below. One is primary and the other secondary.)
a12a358 2 2 0 5000 2447 PO-
/informix/physlog.dbf
a12a508 2 2 0 5000 0 MO-
/informix/physlog_mirror.dbf
Recommendation: Leave Room for the Logs
Remember that the logical logs are absolutely essential for maintaining the integrity of your
database. A common problem with many installations is that the logs become full. This is
caused by either not backing up the logs or a long transaction that keeps too many logs open.
Back up your logical logs
Informix instances must have their logical logs backed up. If you do not back them up, all
logical logs eventually become full. Once this happens, all activity on the instance stops, and
you are forced to do a logical log backup. The problem is that backing up the logical logs
requires creating more logical log entries. If all logs are full, you can't back up the logs.
The only option that remains is a special tool that can be run only by Informix support. They
have to be able to dial or telnet into your system. They then transfer the file to your system, run
it, and remove it. They do not allow you to keep the tool, and there is no way for you to get it
without Informix accessing your system. In short, this is not a situation you want to be in.
Informix recently introduced a new parameter that prevents logical log entries from becoming
full. Unfortunately, it is turned off by default.* The LBU_PRESERVE parameter (found in the
onconfig file) needs to be set to 1 to reserve the last logical log for administrative activity,
such as logical log backups.
Long transactions
Another "log full" problem is caused by a long transaction. A long transaction occurs when a
user or application starts a transaction and does not commit it
* I really don't understand this one. This is such a bad situation to get into, I can't imagine anyone who
wouldn't want to turn on this new feature.
Page 400
within a reasonable time. The problem with this is that a log cannot be freed if it contains an
uncommitted transaction. Suppose there are 10 logical logs, and a long transaction is started in
the first log. Once the first log is full, Informix moves on to the next log, but it cannot free the
first log for reuse until the long transaction is completed and that log file has been backed up. If
the transaction were allowed to remain open until the 10
th
log was full, there would be no
more free logs. One transaction has managed to span the entire set of logical logs. This is why
it is called a long transaction. One might think that the transaction could be rolled back.
However, rolling back a transaction requires creating more logical log entries. No more
logical log entries can be created because there are no more free logical logs. Does that sound
familiar?
The long-transaction problem is why they introduced the high-water-mark parameters that are
found in the onconfig file. The first is the long-transaction high-water mark (LTXHWM), and
its default value is 50. Once the percentage of full logical logs reaches this value, the
transaction is automatically aborted and rolled back. However, since other transactions are
allowed to continue, the logical logs are still in danger of filling up. The second parameter, the
long-transaction exclusive-access high-water mark (LTXEHWM), is designed to protect the
instance from this; its default value is 60. If the percentage of full logs reaches this value, most
database activity is suspended and the transaction is given "exclusive access" to the remaining
logical logs so that it can complete its rollback. The values of 50 and 60 are the new default
values for these parameters, and oninit complains if you attempt to initialize an instance with
values higher than these.
In summary, leave the LTXHWM and LTXEHWM values where they are and turn on
LBU_PRESERVE by changing its value to 1 in the onconfig file. Fore more details about these
values, consult the IDS Administration Guide.
Which Backup Utility Should I Use?
Before examining how to perform Informix backups, we need to understand the various backup
options that are available to an Informix DBA. There are three backup utilities available with
Informix: onbar, onarchive, and ontape.
A Quick History of onarchive, onbar, and ontape
Around 1993 and 1994, very large Informix databases started to appear. (Back then, "large"
meant anything greater than 100 GB.) The only utility that Informix customers had was ontape.
ontape's one big flaw is that it is single-threaded. How do you back up 100 GB to a single
device, especially when the devices available could back up only at rates ranging from 500
KB/s to 3 MB/s? Informix customers started screaming for a multithreaded backup system. (I
was one of them.)
Page 401
Informix, in an attempt to meet these demands, purchased the rights to a thirdparty program that
became known as onarchive. Its syntax was arcane, complex, and completely unlike any other
command on Unix. (It wasn't as complex as sendmail, but it was close!) The forward-slash
method of passing options to a command seemed bizarre to most Unix system administrators,
and it came with a manual that is almost the size of this book.
I was there
By the time in my career that I met onarchive, I had learned dozens of products just by
browsing the manuals. I read the onarchive manual cover to cover four times and attended the
Informix onarchive class. I was still confused. The most disconcerting part of the class was
how the instructor kept talking about this thing called onbar that would soon replace
onarchive.
I remember having 15 open bug reports for onarchive at one time. I remember calling support
and getting the feeling that they didn't want to support the product any more than I wanted to use
it. I remember spending months configuring and testing our onarchive setup. Informix came and
saw what we did and thought it was one of the most impressive onarchive installations they
had ever seen.
Then we tested the restore. It didn't work. No matter what we did, we couldn't restore the
instance that we had backed up with onarchive. It just wouldn't work. Suddenly we received
approval to buy a much faster tape drive and go back to ontape.
As a result of the input that they received from the field, Informix began work on a replacement
for onarchive almost immediately. onbar was released with Version 7.21. Unfortunately, this
created a problem. Users who need the multithreaded capabilities of onbar were required to
purchase an interface to their storage manager-at a cost of more than $5000 per system. To
avoid that cost, people who needed a multithreaded backup product were still being driven
toward onarchive; this product, despite its incredible complexity and horrible reputation,
remained the only choice available for some customers.
Informix wanted to fix this problem, so they negotiated an arrangement with Legato Systems
that allowed them to bundle a scaled-down version of Legato NetWorker with IDS 7.3. This
product is known as Informix Storage Manager, or ISM. It allows you to send up to four data
streams simultaneously to four storage devices (i.e., one data stream per drive). This is enough
parallelism to back up a relatively large instance. Assuming that each data stream can "stream"
each of four DLT 7000s, that is a total potential throughput of 40 MB/s, 144 GB/hr, or 1.1 TB
in an eight-hour period. (Unfortunately, on many systems, you'll need more than one thread to
stream a device; this reduces the overall effective throughput of an ISM/onbar combination, but
it is still going to be faster than ontape.)
Page 402
Don't use onarchive
If you downloaded both the Archive and Backup Guide and the Backup and Restore Guide
from you might get the impression that there are three
viable options for backing up Informix databases: ontape, onbar, and onarchive. The manuals
do explain that onbar is designed to work with storage managers, and ontape and onarchive
are not. What the documentation does not explain is why two products (ontape and onarchive)
that appear to perform the same function exist. Further, you might get the impression after
reading the manual that onarchive is the way to go. It's not.
The release of ISM means that there remains no valid reason for configuring a new backup
system using onarchive. If you can live without multithreaded backup and recovery, use ontape
and infback.sh (or something similar). If you need multithreaded capability or want some other
advanced feature, use onbar and ISM. If you can afford an Informix server that needs more than
four backup threads, you can afford a full-featured storage manager and its interface to onbar.
If you're having trouble convincing your management to spend that money, show them this
chapter.
Informix plans to phase out onarchive over time. You can already see references that say things
like "onbar is the preferred solution for 7.3," and "ontape and onarchive are supported for
now." The only reason that they don't drop onarchive today is there are still people using it. I
wouldn't be surprised if a future release of Informix configures onarchive in such a way that
you would no longer be able to make backups with it. The restore functionality will be left for
those who still have onarchive backup tapes. (I doubt that Informix will drop ontape, though,
because it's so easy to use and support. They aren't adding any new features to it, but that could
be considered a feature in itself.)
Some people reading this section may disagree with my assessment of onarchive's value. They
like the flexibility that such a complex product offers them. They don't care that they need to
read almost 500 pages of documentation just to figure out how to back up their Informix
database. They've figured it out now-and they don't want to have to figure out another product.
If that is how you feel, please know that you are in the minority. The whole reason that onbar
exists is that the Informix user community was in an uproar about onarchive. Remember also
that a product that is difficult to use is difficult to support. Informix is probably doing
everything it can to put this utility behind them. If you're using onarchive today, you should
seriously consider looking at onbar as soon as possible or going back to ontape if you can.
Trust me: onbar is as easy as it gets.
Page 403
Pick a Utility, but Not Any Utility
Here is a quick summary of the three utilities available for Informix backups:
onbar
onbar is the latest in Informix backup technology and is used only for interfacing with
storage managers like the Informix Storage Manager (ISM). (onbar is covered in "Physical
Backups with a Storage Manager: onbar.") If you are running Informix 7.3 or greater, onbar
offers enhanced functionality and flexibility.
onarchive
onarchive was Informix's first attempt at an enhanced product, but its incredible complexity
caused it to be just a stopgap measure until onbar was available. onarchive will not be
supported in the future and therefore should not be used as the basis for any new backup
system. (See "Don't use onarchive," earlier in this chapter, for more information.)
ontape
ontape is Informix's oldest backup utility, but it's still going strong. It does not interface
with storage managers, therefore it is the easiest and best way to perform physical backups
without a storage manager.
In summary, if you do not have a storage manager, you really should be using ontape if you can.
If your database is really large, and you need the multithreaded capabilities of onbar, you
should either purchase a third-party storage manager or upgrade to a recent version of Informix
that includes a free (albeit scaled-down) storage manager. Once you have done that, you can
use the advanced functionality of onbar. I would not advise designing any new backup systems
around onarchive. It is too difficult to learn, and it is being phased out.
Physical Backups Without a Storage Manager: ontape
If you do not have access to a storage manager, ontape might be the perfect tool for you. This
section covers ontape's basic usage, then shows you how to automate it using shell scripts.
Many environments without storage managers use ontape to automate their backups.
Despite its age, many people continue to use ontape for several reasons:
Informix version
ontape does not require a storage manager. If you are not running Informix 7.3 or greater,
you do not have ISM. That means that you will need to purchase a
Page 404
storage manager and its interface to onbar. If you are running a version older than Informix
7.21, you don't even have access to onbar.
Cost
ontape is free. Although onbar itself is free, it will cost as much as $7000 per host* to
purchase the interface to onbar, even if you already have one of the commercial storage
management applications (e.g., those discussed in Chapter 5, Commercial Backup
Utilities).
Ease of use
ontape is a breeze to learn. It has four required options, -s for archive,** -c for continuous
backups, -a for automatic backups, and -r for restore. That's it. In contrast, onarchive is a
nightmare of complexity. Its manual spans 436 pages, compared to ontape's 49 pages or
onbar's 125 pages. onbar is much simpler to use than onarchive, but adding a storage
manager into the picture still makes it more complicated than ontape. (The slight increase
in complexity does come with greatly increased functionality, though.)
ontape is easy to use. Even more importantly, ontape recoveries work! ontape was developed
many years ago, before the advent of backup automation in the Unix world. It was ahead of its
time with multilevel backups, but it does have one design flaw: it was designed to be run by an
operator on a console. It prompts the operator for information even during normal operations. It
was not designed for automated backups, but that doesn't mean you can't use it that way. Many
scripts have been written that answer its prompts, providing a level of functionality never
envisioned by the original programmers. Before looking at how to automate the use of ontape,
though, we cover its basic usage.
Configuring ontape
Prior to running ontape, you must configure some parameters using the onmonitor utility. This
utility changes these parameters in the file $INFORMIXDIR/etc/$ONCONFIG, where
$INFORMIXDIR is a required environment variable specifying the Informix directory, and
$ONCONFIG is a required environment variable specifying the name of the Informix
configuration file. It is an editable text file, but not all changes will go into effect until you
restart the instance if you edit it manually. Specifically, the LTAPE parameters must be
changed using onmonitor if you want them to go into effect immediately. To configure ontape,
run the onmonitor utility, choosing menu option A (for Archive) and T (for Tape Parameters).
(An
* Every commercial backup application charges per host for its interface to the database backup
applications. In a large Informix environment, this can therefore reach $100,000 very quickly. It does
provide significantly better functionality, but it is difficult to justify such an expense for a little 1-GB
instance.
** I finally figured out why archive is -s! It stands for ''save"!
Page 405
ontape backup of an instance is referred to as an archive.) This takes you into a screen that
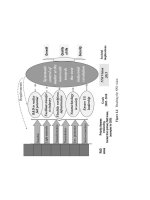
looks like Figure 14-1.
Press ESC to change tape parameters.
Press Interrupt to return to Archive menu.
Press F2 or CTRL-F for field level help.
Press F2 or CTRL-F for field level help.
MODIFYING TAPE PARAMETERS
Tape Device [/dev/rmt/0c ]
Block Size [ 32] Kbytes Tape Size [
102400] Kbytes
Log Tape Device [/dev/rmt/0c ]
Block Size [ 32] Kbytes
Tape Size [ 10240] Kbytes
Figure 14-1. onmonitor tape parameters menu
The values in Figure 14-1 should be changed to ones appropriate for your environment. The
appropriate values are also listed in Table 14-1.
Table 14-1. Tape Configuration Values
Variable in the
$ONCONFIG file
Value in onmonitor
Screen Purpose
TAPEDEV
Tape Device Device to which archives (backups) are sent
TAPEBLK
Block Size Block size of tape device in kilobytes
TAPESIZE
Tape Size Size of tape in kilobytes
LTAPEDEV
Log Tape Device Device to which logical log backups are sent
LTAPEBLK
Block Size Block size of log device in kilobytes
LTAPESIZE
Tape Size Specifies the tape device for logical log backups.
These values usually are set once and should be changed only if your configuration changes.
One of the best ways to do this is to make the device name to which you are backing up a
symbolic link to the real device. For example, you can specify that the tape device is
/informix/tapedev and make that a symbolic link to /dev/rmt/Ocn. That would allow you to
change the actual tape device without accessing onmonitor. Although optimum block size
settings are determined by your tape drive manufacturer, a value of 64 or 128 is quite common.
You should experiment with different values to see how they affect backup performance.*
* It is usually true that the bigger the block size, the better the backup performance. However, in
recent tests I found that a block size of 64 KB was actually faster than a block size of 128 KB. Your
mileage may vary.
Page 406
I like to set the TAPESIZE parameter to something slightly larger than the instance size but
less than the actual tape size. For example, suppose you have a 16-GB tape but a 4-GB
instance. One option would be to set the tape size to 15 GB and not worry about changing it
again for a long time. You also could set it at 5 GB, and then watch the logs to make sure that
backups complete. Once backups start failing because the tape is filling up, change the
TAPESIZE parameter to 8 GB. This method lets you to see how big the instance is growing
over time, allowing you to document when the instance is going to exceed the size of your
16-GB tape drive so you can purchase a bigger tape drive long before it ever becomes a
problem. Setting the TAPESIZE to 15 GB would result in successful archives for a long time,
followed by a failure once the database got bigger than 15 GB. Unfortunately, though, you
would have no idea when it is going to reach 16 GB and have very little time to purchase a
bigger tape drive.
Some DBAs prefer to set the TAPESIZE parameter to the size of the tape and then chart the
growth of the instance with sysdbspaces. You should do whatever works best for you!
It should be noted that Informix backups can span tapes. It will
prompt the operator for a second tape if the first one fills up. However, if
you are automating your backups with shell scripts, the prompt probably
will not get answered, and the backup will fail.
Tape or Disk?
Informix assumes that the devices that you specify for TAPEDEV and LTAPEDEV are tape
drives, as evidenced by the variable names. It is common, however, to use files on disk
instead. To back up to disk, Informix needs an empty disk file to which it can write. This
usually is done with the touch command. For example, the previous example window shows
the Log Tape Device set to /informix/logical/crash.log. This is a disk file created by issuing
the following command:
$ touch /informix/logical/crash.log
What's wrong with tape?
One of the most difficult things about ontape's continuous backups is that they are designed to
back up the logical logs to a single tape. Once the tape fills up, the logical log backups stop,
and the logical logs begin to fill up. If all logical logs fill up during this time, all activity on the
instance is suspended. This means that the DBA must constantly watch several tape drives,
swapping tapes throughout the day. Nor can he tell how full a tape is getting. (A DBA could
write a separate
Page 407
script to monitor how many logs have been written to a device and use that to estimate how full
the tape is getting. However, different compression ratios may cause this estimate to be way
off.) It doesn't help that Informix requires a separate tape device for each instance. What does a
DBA do with a machine that has several Informix instances on it?
If you are archiving to tape, make sure that your scripts rewind
the tape before starting an archive. Failure to do so may result in
unexpected results!
Backing up to disk can help
The alternative is to back up the logical logs to disk. All of the logical log backups on a single
host can share a single /logical filesystem. For each Informix instance, you'll need a script that:
1. Stops continuous backups for a moment
2. Moves the current logical log backup file to a date/timestamped file
3. Creates another logical log backup file
4. Starts continuous backups again
Once this has been done, the only management required is monitoring the available space in the
filesystems where you're sending your logical logs and deleting old logical log files that have
been backed up.
Is it OK to back up to disk?
Some DBAs feel that the logical logs are extremely important and that backing them up to disk
places them at risk. Disks can fail. If the disk drive that contains your logical logs fails at the
same time as the disk drive that contains your database, you are out of luck. They feel it is safer
to get the backups out to tape.
There are strong arguments for backing up to disk. Proponents say the value added by backing
up to disk far outweighs the added risk. They also say that backing up to tape has risks as well.
Their reasoning is as follows:
• Backing up to disk allows complete automation. No one has to remember to swap tapes, no
one needs to be available to swap tapes, continuous backups just happen. It's always a good
thing to automate backups. Why have operators swapping tapes when a simple shell script will
do the job-day in and day out?
Page 408
• The slowest part of an Informix database restore is the reading of the logical logs. Placing the
logical logs on disk significantly increases the speed of this critical path of a restore.
• The all-your-eggs-in-one-basket problem is solved by using remote devices. For example,
elvis logical logs can back up to a filesystem on apollo-all you need to do is specify
apollo:/logical/servername/logfile as the logical tape device. This significantly reduces the
chance that both the logical tape device and the database instance will be damaged at the same
time.
• The proponents of logical log backups to tape also would contend that backing up to disk
would not protect the data from a fire that destroys both systems. Don't forget that a fire also
would destroy any tapes that are in the drives.
• Tape is safer than disk, right? The quicker the logical logs get to tape, the safer they are.
Performing logical log backups to disk actually makes this easier. Why is that? If the logical
logs are being backed up to disk, logging can be stopped and started throughout the day,
creating multiple log files. These log files can be immediately backed up using a homegrown or
commercial backup system. They can even be backed up or copied multiple times. This is
something that is impossible with tape backups. As long as the tape device is open by Informix,
it can't be accessed. Talk about putting all your eggs in one basket! Instead, you could easily
have multiple copies of the disk backup, as well as tape copies that can be sent off-site without
disturbing Informix.
Doesn't Informix try to rewind the tape?
A common misconception is that Informix rewinds the tape before and/or after a backup or
restore. This is what is commonly used as an argument against disk backups. It also is
commonly used to explain why you are not supposed to put more than one archive on a tape
device.
Informix does not rewind the tape at any time. It expects the tape to be rewound already. This
allows you to back up to disk or to put multiple archives on a single tape by using the
no-rewind device. Recent changes to the Informix FAQ and discussions in the
comp.databases.informix newsgroup have confirmed this.
If you do back up to disk, all "tape" management is up to you. ontape will not know that the
backup really went to disk. It is up to you to track that information and to manipulate disk
devices during a restore so that the "tape" is always where ontape expects it to be.
Page 409
However, if you do put multiple archives or log backups on a tape
by using the no-rewind device, a restore from those backups will not work.
This is because Informix opens and closes the tape several times during a
restore, expecting it to rewind. If you have multiple backups on a tape, you
must copy each backup to a separate tape in order to do a restore.
The two-gigabyte file size limit
There is one downside to backing up to disk. Informix still has a 2-GB file-size limit, so you
will not be able to create a disk archive of a database that results in a file larger than 2 GB.
There are two options that you can explore to get around the 2-GB file-size limitation:
• Use expect (or the expect module of perl) to respond to the prompts from ontape.
• Don't use ontape; use onbar.
Use expect to swap tapes. The first option is to use expect or perl to respond to the multiple
prompts from ontape. You then could set the TAPESIZE parameter to something just short of 2
GB. Once ontape reaches this size, it will prompt you for a second tape. You then could use
expect to move the first file from its original location, create another file, and respond to
ontape's prompt for a second tape. This method will allow you to make an archive as large as
the available space on the filesystem.
Use a storage manager and onbar. The second option, and one you should seriously consider,
is to use Informix Storage Manager (or some other storage manager) and onbar. This
combination would work around the 2-GB limit, still allow you to back up to disk if you wish,
while providing you with the features that are available only in onbar.
Backing Up the Instance
The Informix term for a backup of an instance is an archive. First, you must configure
TAPEDEV as explained in "Configuring ontape," earlier in this chapter. Then to perform an
archive, run one of the following commands:
$ ontape -s # on a 5.x instance
$ ontape -s <-Llevel> # on a 6.x and higher instance
You may specify a 0, 1, or 2 for level. Specifying a 0 performs a full archive. Specifying a
1 causes Informix to back up anything that has changed since the last
Page 410
I'll Use Disk for Continuous Backups
I remember once managing five or six Informix instances and having to run down the hall
into the server room to swap tapes because a logical log tape was full, causing our
production Informix instance to hang. (We used TK70s for this.) I had to open five or six
windows every time we rebooted an instance, just so we could start continuous backups
to tape. Then I remember the day that we wrote rclogs.sh. Suddenly, we had a program
that would start logical logging for us. We could reboot a host, and continuous backups
would just magically turn on. We went from a few instances to well over 50 and never
had to swap a tape again. (We also never had to explain to an angry manager why her
Informix database was temporarily unavailable during the busiest time of her day.) I
can't imagine going back to the old way.
level 0. Specifying a 2 causes Informix to back up anything that has changed since the last level
1 or 0. If you do not specify the level using the -L option, ontape prompts for it. ontape also
prompts you to hit Enter once you have mounted the tape.
If ontape detects that it has reached the end of a volume, it prompts for another tape. ontape
supports three levels and multivolume archives but cannot use more than one device at a time;
you must use the same device throughout the archive. Once the volume on that device is full,
you must swap that volume and answer ontape's prompts for the next tape. If you are backing
up to disk, this means that you have to move the original backup file to another location.
Backing Up the Logical Logs
Recovering an Informix instance from an archive recovers the database to the point in time that
the archive was taken. In order to redo any transactions that have occurred since then, you also
must restore the logical logs. In order for the logs to be available during a restore, you must
back them up. You can:
Back up the logs continuously
ontape offers a particular type of logical log backup, referred to as "continuous backups."
by using the -c option of ontape. ontape runs continuously in the foreground, appending
logical logs to the storage media as it becomes full.
Back up the logs manually
A "manual backup" is a one-time backup performed by the -a option of ontape. It
overwrites the storage media with all full logical logs and the current logical log.
Page 411
Back up the logs with a script and the ALARMPROGRAM parameter
As of 7.xx, there is a new way to back up your logs. You can use the ALARMPROGRAM
parameter to automatically run a shell script for you when a log is full or is manually
closed.
Elect not to back up the logs
You could decide not to back up the logical logs. This is done by setting the backup device
to /dev/null.
Backing up logical logs continuously
The historically preferred way to back up your logical logs is to use the continuous backup
option of ontape. When continuous backups are running, logical logs are automatically backed
up to the specified device as soon as they are full. The logs are appended to the backup device,
which is held open by Informix as long as continuous backups are running.
To perform a continuous backup of the logical logs, run the following command:
$ ontape -c
This command prompts you to hit Enter once you have mounted the tape; from then on, it
performs a continuous backup of the logical logs to the storage media until you enter Ctrl-C or
kill the process. It continues to append logical log backups to a particular piece of media until
the media is full. A tape is "full" when ontape can longer write to it, or the amount of data that
has been written to it exceeds the value specifid by the TAPESIZE parameter in the onconfig
file.
Backing up logical logs manually
Another method of backing up logical logs is to perform a manual backup only when required.
This method differs from continuous backups in two ways. First, it is a onetime backup that
backs up full logs, along with the current logical log. It opens the device once, writes these
logs to it, and closes the device. Second, and perhaps more important, a manual backup
overwrites any backups found on the storage media. To perform a manual backup of the logical
logs, run the following command:
$ ontape -a
There are some environments that have written automation scripts around this command. They
monitor the logs to see how many are full. Once a certain percentage of them are full, they run
the ontape -a command to back up the logs. A script that operates in this way is simulating the
continuous backup operation of ontape -c. It requires more tape or disk space than the
continuous backup method, because it backs up the current log whether it is full or not, whereas
continuous backups back up logs only when they are full.
Page 412
There is nothing wrong with simulating continuous backups using scripts and ontape -a, and it
is slightly easier to automate than ontape -c. This is exactly what the ALARMPROGRAM is for.
You specify the script that Informix should run whenever a log is full.
Electing no backup of logical logs
The least preferred method of backing up the logical logs is to not back them up at all. You do
this by setting the LTAPEDEV value to /dev/null, which causes Informix to mark the logs as
backed up as soon as they become full. (See the earlier explanation under "Configuring ontape"
for details on how to do this.) Since no actual backup occurs, this is not an option to use if you
will need point-in-time recovery. Using this option allows you to recover only from your latest
archive. You will not be able to redo any transactions since the time of that archive. This
option typically is used only for development instances or instances in which data is loaded
only via batch loads. If you are considering using this option for a batch-load instance, you
should experiment with this option and with the continuous backup option. Find out the impact
of both on your environment, including performance during loads and recovery speed.
To Oracle DBAs: This is the Informix equivalent to running an
Oracle database in NOARCHIVELOG mode.
Automating Archives with ontape: the infback.sh Utility
infback.sh is a shell script that automates performing archives with ontape. Before examining
how infback.sh works, we explain why automating ontape backups is difficult.
Why automating ontape is difficult
The ontape utility is simple and flexible, but automating it has always been some-what
difficult, because it is a little picky about how it receives the answers to its questions. For
example, some versions of ontape do not accept a typical "here document,"* as shown in
Example 14-15.
* A here document is a Unix trick that allows a script to answer prompts from a command. It starts
with <STRING and ends with STRING.
Page 413
Example 14-15. Calling ontape with a Here Document
LEVEL=0
ontape -s <EOF >/tmp/logfile
$LEVEL
EOF
ontape now accepts the use of a -L level argument, but it still requires you to respond to a
prompt after executing the command. ontape can still give you difficulties if you use the syntax
in Example 14-15.
The method shown in Example 14-15 is often mentioned in FAQs and other books, but it does
not work on every version of Informix. The method that does always seem to work is shown in
Example 14-16.
Example 14-16. A More Reliable Way to Call ontape
LEVEL=0
echo "$LEVEL
"| ontape -s | head -100 > /tmp/logfile
There are two differences between the methods shown in Example 14-15 and Example 14-16.
The first difference is the way in which the answers are passed to ontape; the second method
seems to be a little more robust. The second difference between the two methods is the
addition of the head command in the second one. The head command is not required but is a
good precaution in case the backup device becomes full. Here's why: once ontape detects that
the backup device is full, it prompts for a second tape. It is not very easy to provide a second
tape and answer this prompt without using a program such as expect.* (There is a way to
answer prompts like this by redirecting stdin and stdout to named pipes, but that can be
really tricky with ontape. ontape prompts repeatedly for the second tape and things get pretty
ugly very quickly.) The head command keeps this repeated prompting from happening, since it
truncates the output to 100 lines, but once the 100 lines have been reached, ontape aborts.
How infback.sh works
infback.sh is a shell script that automates performing archives with ontape. (As discussed
earlier, its one limitation is that it cannot handle multivolume archives.)
* expect is a public domain utility designed to answer a program's prompts for information. It is
sophisticated enough to be able to give different answers for different conditions, such as a full tape.
A typical shell script and here document can provide only one set of answers to a program. While
using expect would probably increase the functionality of the script, I have tried very hard not to
require the installation of other packages to make mine work.
Page 414
infback.sh consists of several files:
infback.sh
This is the main backup program that looks at the configuration files to decide how and
what to back up.
rclogs.sh
This program is another main program that automates continuous backups of the logical
logs using ontape -c.
infback.conf
This file is used by infback.sh to specify how, when, and what to back up.
inftab
This file lists all Informix instances on a machine. It is used by dbstart.informix.sh,
rclogs.sh, and infback.sh to determine what instances are on the machine.
localpath.sh, rempath.sh, config.guess
These files accompany these other programs and assist them in determining what commands
to run on various Unix platforms.
infback.sh is based on the same logic as Oracle's oraback.sh and Sybase's
syback.sh.infback.sh:
• Uses a global tabulation file (inftab) to list all Informix instances
• Uses a global configuration file (infback.conf5) to configure backups
• Automatically performs full or incremental backups of all instances found in inftab
• Optionally performs full or incremental backups of any instances listed on the command line
• Can write archives to disk or tape
• Sends email, notifying of the success or failure of the backup
• Backs up databases that reside on raw partitions or filesystems
infback.sh can be called in one of three ways:
With no arguments
If you call infback.sh with no arguments, it decides what to back up and what device to use
by looking at infback.conf.
With arguments specifying backup parameters
You can tell infback.sh which device and level to use by giving them as arguments. If you
do this without giving it a list of instances to back up, it will back up any instances it finds
in inftab. If you specify instances to back up, it will back up only the instances that you
specify.
Page 415
With at as the first argument, with or without backup parameter arguments
Specifying at as the first argument causes infback.sh to look at infback.conf to determine
what time to back up. It then schedules an at job using the same arguments given after the at
argument. (That means that the scheduled backup will figure out what and how to back up
via either infback.conf or the arguments that were given.)
When infback.sh runs
One of the first things that infback.sh does is to check if the word ''skip" is in field 2 of
infback.conf. If so, it skips the backup once and removes the word "skip" from infback.conf.
(This allows a DBA to manually skip tonight's backup, but does not allow the DBA to
accidentally disable backups forever.)
If infback.sh determines that it is not supposed to skip the backup, it then needs to determine
what instances to back up ($INSTANCE_LIST), what level backup to run ($LEVEL), and
what device to use ($DEVICE). How infback.sh does this depends on which arguments (if
any) it receives.
If infback.sh is called with no arguments
If called with no arguments, like this:
$ infback.sh
infback.sh looks at the third field in infback.conf to determine what level of backup to run.
That field specifies the full backup day. If today is the full backup day, then it performs a
level-0 archive. If it is not today, it performs a level-1 archive. infback.sh then looks at fields
6 and 7 of infback.conf to get the name of the device server and device to which it should back
up. Finally, it looks at inftab for a list of instances to back up.
If infback.sh is called with arguments specifying backup parameters
If infback.sh is called with arguments as follows:
$ infback.sh level [device/host:device] [instancea instanceb ]
it will determine its level and device from the arguments. If it also receives a list of instances
to back up, it will use that as the list of instances. If not, it determines the list of instances to
back up by listing each instance list in inftab. The arguments and their possible values are as
follows:
level
This should be a valid level for an Informix archive (0, 1, or 2).
Page 416
device |host:device
This should be a valid device name or directory name. It also can be
hostname:device (e.g., apollo:/dev/rmt/Ocbn).
[instancea instanceb ]
These arguments are optional. You may specify one or more Informix instances to back up.
Specifying no instances causes infback.sh to back up all instances listed in inftab.
If infback.sh is called with at as the first argument
If infback.sh is called with at as the first argument (as it would be called in cron or at):
$ infback.sh at
infback.sh sets the $TIME variable so that the backups take place at a specified time. If it is a
level-0 backup, infback.sh sets the $TIME variable to the value in field 4. If it is a level-1
backup, it sets the $TIME variable to the value in field 5. infback.sh then schedules an at job
that will perform the backup at the time specified by $TIME. If there were other arguments
given after the at argument, those arguments are passed to the scheduled run of infback.sh.
When the at job runs infback.sh, it will then determine what and how to back up based on the
arguments (if any) that it was given.
The backup begins
Once the actual backup is supposed to run, infback.sh checks to see if the database is up. If it is
not, infback.sh complains and exits. If it is up, infback.sh checks to see if there is enough space
to make a change to the onconfig file.* What it does next depends on whether you specified that
compression should be used.
If there is a value specified in infback.conf for $COMPRESS, infback.sh creates a named pipe
called $INFORMIXDIR/$INSTANCElevel.$LEVEL.fifo, and changes TAPEDEV to that
filename. It does this using onmonitor, so the change will be effective immediately. After
creating the named pipe and telling ontape to use it, it calls compress and tells it to read from
the named pipe, compress the data, and write it to the location specified as the original device.
infback.sh then calls either ontape or tbtape, depending on the version of Informix you are
running,** passing
* This part is to get around an old problem that may have been fixed in newer versions of Informix. If
you attempted to change the config file, and the filesystem was full, you would end up with an empty
config file!
** Believe it or not, this script works just fine with Informix 5! It might even work with Informix 4,
but I haven't seen one of those in ages.
Page 417
it the appropriate level. It checks the status of the backup command and, if backing up to disk,
compresses the backup file.
If there is no value specified for $COMPRESS, infback.sh sets TAPEDEV to
$DEVICE_SERVER : $DEVICE_FILE using onmonitor. It then calls ontape to perform
the archive to the specified device.
Installing infback.sh and its configuration files
If you'd like to use infback.sh, you'll need to install the files in the appropriate directory,
configure inftab and infback.conf, and customize infback.sh to your environment.
Copy infback.sh, localpath.sh, rempath.sh, and config.guess into the same directory (e.g.,
$INFORMIXDIR/local/bin) and make sure that they are executable. Copy inftab and
infback.conf into a directory to which Informix can write (e.g., $INFORMIXDIR/etc).
infback.sh needs to be able to write to this directory for the "skip" feature to work. inftab and
infback.conf can be placed in the same directory as the other files, but they do not need to be.
Editing the infback.sh configuration files
If you have not already done so, you should configure inftab for use on this system. For details
on how to do that, see "Edit the inftab file" earlier in this chapter.
Editing infback.conf. infback.conf is the configuration file for infback.sh and rclogs.sh. It
should contain one line for each machine in the following format:
hostname.master::full_day:full_time:inc_time:device_server:archive_dest:allow_
ids:compress:mail_ids
hostname.master
Replace hostname with the base hostname. For example, if the hostname is
apollo.domain.com, this field should contain apollo.master.
full_day
This is the day of the week that full backups should run. (All other days of the week will
receive level-1 backups.)
full_time
If using the at argument, this is the time that the program should schedule level-0 backups.
Suppose that it says 1900, and the full backup day is Mon. At 1500 on Monday, there is a
cron job that runs infback.sh at. That will see that Monday is a full backup day and
schedule an at job to run at 1900.
inc_time
If using the at argument, this is the time that the program should schedule level-1 backups.
Page 418
device_server
Set this to the hostname of the server that contains the backup device. If it is the same as
this host, enter the base hostname only (just like in the first field). For all other hosts, use
the Fully Qualified Domain Name (FQDN) if it is appropriate.
archive_dest
This should be set to a device or directory that will contain all archives. If it is a directory,
make sure that it is writable by Informix. Also, if it is a directory, infback.sh will create a
subdirectory for each instance inside this directory.
allow_ids
This is a |-separated list of user IDs that are allowed to run infback.sh. This is usually only
Informix.
mail_ids
This is a comma-separated list of user IDs that should receive mail about the success of
infback.sh.
Editing infback.sh. There are a few minor changes that you need to make to the infback.sh file
itself. Locate the following variable and function declarations in the top of the script, and set
them to the appropriate value for your environment:
DEBUG=
Set this to Y if you want to see debug information for all functions (i.e., turns on set-x).
BINDIR=
Set this to the directory where you copied the backup programs (e.g.,
$INFORMIXDIR/local/bin).
LOGDIR=
Set this to the directory where you want infback.sh to log its information (e.g.,
$INFORMIXDIR/log).
LOG=
Set this to the full path of the name of the log file you want it to use (e.g.,
$LOGDIR/infback.log).
INFCONF=
Set this to the full path of infback.conf (e.g., $INFORMIXDIR/etc/infback. conf).
INFORMIX=
Set this to the user that owns the Informix instance (usually informix).
INFTAB=
Set this to the full path of inftab (e.g.,
$INFORMIXDIR/etc/inftab).
Page 419
TMP=
Set this to the directory you want infback.sh to use for temporary files.
Preback
Anything that is put inside this function will be executed prior to running the backup.
Postback
Anything that is put inside this function will be executed when the backups are finished.
Centralized configuration
Just like oraback.sh, the configuration file infback.conf can be shared via NFS. If multiple
servers share the same configuration file, and you are using the at argument, you could make
changes to all Informix backups by changing one file. Suppose that Informix backups currently
are set up to run full backup on Sunday at 1900. However, you know that the network will be
down this Sunday. With most homegrown backup scripts, you would need to log into several
servers and change multiple cron entries. With a centralized infback.conf file, you need only to
change field 3 for each server from "Sun" to "Mon." If you know that there will be some
intensive processing this evening, you also could skip all infback.sh backups by putting the
word "skip" in field 2.
Scheduling backups
To use all scheduling features of infback.sh, create a cron entry that calls infback.sh at a time
earlier than the earliest time specified in fields 4 and 5 in infback.conf. Since most backups are
run after 6:00 P.M., a common entry would be like the following:
0 17 * * * /informix/local/bin/infback.sh at
This says to run the script with the at argument at 5:00 P.M. This causes infback.sh to look at
the infback.conf file to determine what level of backup to run and what time to run it. It then
will schedule an at job for the appropriate time.
The reason for keeping the entry as late as possible is to allow the DBAs to make changes to
infback.conf. Since infback.sh does not look at the file until 5:00 P.M., they can change
tonight's backup time or skip tonight's backups by changing the file any time before then.
Why Automating Continuous Backups Is Difficult
The original design of ontape -c continuous backups was that they would be run from an
operator's console. They also would be monitored by that operator; when
Page 420
the system prompted for another tape, the operator would respond by changing tapes.
Automating a program that was designed to run and be monitored by a human around the clock
is a challenge. It's even more difficult than automating an archive. ontape is designed to
continue logging to a tape until the tape is full. Although you can write a program that will
monitor the tape and let you know when it is full, how does the program notify you so you can
replace the tape? The program can send you an email, but if you're not reading your email or
the email gets lost in transit, the tape does not get swapped. Then, processing is eventually
halted on that instance once all the logical logs become full and are not backed up. The secret
to complete automation is to back up to disk instead. Backing up to disk does remove the need
to swap tapes, but it's slightly more involved than simply changing the LTAPEDEV field to a
disk.
Any automated system designed to automate continuous backups needs to manage many things.
The program must emulate the human that ontape was originally designed to interact with. Here
are the tasks that must be handled:
Put a tape in drive
ontape expects a device it can write to. Historically this has been a tape drive with a tape
in it. The way to emulate that on disk is to use the touch command to create a file that
Informix can write to. The file needs to be owned by the Informix user ID and writable to
both the Informix user and Informix group.
Watch for a full tape
Historically this was done by watching the terminal for a prompt. When backing up to tape,
there are a couple of ways to do this. One way is to write a program that watches how
many logs are backed up and checks that number against the number of logs you have
determined will fit on a tape. This is somewhat complicated but is preferred over the
second method. The second method would be to use the onstat -l command to watch for
logs that get filled but are not backed up. This means that the tape device is already full,
since no more logs are being backed up. (The problem with this method is that you may
need to swap tapes very quickly, and you do not get notified right away.) When backing up
to disk, the "tape" becomes full when the filesystem is full. Therefore, you simply need to
monitor the filesystem where you are sending the logical logs. You then need to compress
or remove files to make room for more continuous backups. You can start doing this once a
filesystem reaches a certain threshold, such as 75 percent.
Remember that Informix depends on the TAPESIZE parameter to tell it how much data
will fit on a "tape." It considers the tape full once it has put that
Page 421
much data on a tape, and it will request another tape. If it encounters a filesystem or tape
that is actually full (as evidenced by a failed attempt to write more data) prior to reaching
this value, the archive will actually abort.
Swap tapes
When backing up to tape, you must swap tapes manually. A program that is running
continuous backups for you will need to notify you in some way that this needs to happen. If
backing up to disk, this is done by moving the "tape" file to another location and re-creating
a file in the same location using the touch and chown commands.
Tell ontape there is another tape
When using continuous backups, this is the difficult part to automate. As mentioned
previously, ontape has a tendency to immediately send hundreds of prompts to a program
trying to talk to it, so it's somewhat impractical to actually try to answer these prompts. It
works just as well to stop continuous backups, then restart them once you've swapped the
"tape." A good way to stop them is to use the onmode -z command. If you can keep track of
the session ID that is associated with your ontape process, you simply pass this value to the
onmode -z command, and it will close the session gracefully. If that doesn't work, you can
always kill the process ID.
If you are using Informix 5.x, never kill an ontape process of any
kind with the -9 option. The instance will need to be restarted to recover
from this. (Informix 7.x recovers from this condition gracefully.)
Move the backup tape or disk to another location
It doesn't do any good to back up your logical logs to a tape or disk and then leave that
backup sitting right on the server. You need to move the backup to another location. When
backing up to tape, this must be done manually of course. When backing up to disk, this can
be automated by copying the file to an NFS-mounted filesystem or running another backup
program to back it up to a tape somewhere else. Do something other than just leave the one
file or tape all by itself on the server, especially if you are backing up to disk. Copying it
to another location on disk is so simple. Not copying it leaves you open to an electrical
surge that takes out both the backup disk and the disk(s) that contained the instance.
The rclogs.sh program was written to automate all of the preceding tasks.
Page 422
Automating Continuous Backups: the rclogs.sh Utility
The rclogs.sh program can back up to either tape or disk, but it works best if backing up to disk
because it can automate the "swap tapes" step by automatically moving and creating files as
needed. The first step that rclogs.sh performs is to check that the Informix instance is online. It
performs a while loop until the instance reports "On-line" or "Read-only." If it stays in this
loop for 60 seconds, it exist with an error. Without this feature, a malfunctioning instance
would prevent other instances from starting when this program is called from dbstart.
The next thing that rclogs.sh does is check to see if there are any ontape -c backups running for
this instance. If so, it stops them. If rclogs.sh was called with the stop argument, it then exits. If
it was called with the start argument, it then needs to "swap tapes." If backing up to disk,
rclogs.sh moves the continuous backup file to a date/timestamped file and creates an empty file
for the next ontape -c session. If backing up to tape, this program cannot be run from cron; it
must be run manually from a terminal because once it stops the ontape -c session, it can only
notify the operator running the program to swap the tape and wait for notification that this has
been done. Once rclogs.sh knows that the tape has been swapped, it will start a new ontape -c
session in the background. It then queries Informix to verify that continuous backups are running
and sends notification of success or failure.
Installing rclogs.sh and its configuration files
Install the files rclogs.sh, localpath.sh, rempath.sh, and config.guess in the same directory
(e.g., $INFORMIXDIR/local/bin) and make sure that they are all executable. Install inftab and
infback.conf in a directory writable by informix (e.g., $INFORMXDIR/etc.) (These two
files do not have to be in the same directory as the executables, but they can be.)
Editing rclogs.sh and its configuration files
Make sure you have already configured the inftab and infback.conf files for use on this system;
details on how to do this can be found in the previous section, "Editing the infback.sh
configuration files." (The only field that rclogs.sh uses from infback.conf file is the mail IDs
field.)
Check the site-specific section at the top of rclogs.sh and make sure that all the values are
appropriate for your environment. The following values are found there:
DEBUG=
Set this to Y if you wish to see debug information (set -x).
Page 423
INFTAB=
Set this to the full path of your inftab file.
COMPRESS=
Set this to the compression command that you wish to use (e.g., gzip).
COMPSUFF=
If you change the compression command from the default value of "compress," then you
need to change this value. It is the suffix that your compression command uses (e.g., use gz
for gzip).
BINDIR=
Set this to the location of infback.sh and the other programs (e.g.,
$INFORMIXDIR/local/bin).
THRESHHOLD=
This should be set to a percentage between 50 and 100 if you are backing up to disk. Once
the filesystem specified by $ARCHIVEDEST is this full, it does some extra cleanup and