solaris 9 student guide part 2 sa299 phần 3 docx
Bạn đang xem bản rút gọn của tài liệu. Xem và tải ngay bản đầy đủ của tài liệu tại đây (417.07 KB, 86 trang )
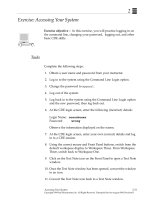
Exercise: Managing swap Utility Configuration (Level 2)
Managing Swap Configuration 4-15
Copyright 2002 Sun Microsystems, Inc. All Rights Reserved. Enterprise Services, Revision A
3. Run the df -h command.
Does the /export directory have sufficient space to add 20 Mbytes
of swap space?
_____________________________________________________________
4. Create a 20-Mbyte swap file in the /export directory, and add it to
the system swap space.
_____________________________________________________________
5. Use the swap -l command to verify that the new swap space is
available.
_____________________________________________________________
6. Use the swap -s command to verify that the new swap space is
available.
How does the output differ between the swap -l command and the
swap -s command?
_____________________________________________________________
7. Remove the swap file created in Step 4.
8. Use the swap utility to verify that the swap space is no longer
available.
9. Add a disk partition as a swap slice to your existing swap space.
10. Add the new swap partition to the /etc/vfstab file to make the
partition permanent. To verify this change, you must reboot the
system.
11. After the reboot, verify that the additional swap space exists by
using the swap utility.
Is the newly listed swap partition the same as the one you added to
the /etc/vfstab file?
_____________________________________________________________
12. Verify the additional swap space exists using the df -h command.
Why is the newly created swap space listed in the /etc/vfstab file
not listed in the output of the df -h command?
_____________________________________________________________
13. To return the system to its initial swap configuration, remove the
additional swap space entry from the /etc/vfstab file, and reboot
the system.
14. Remove the additional swap slice using the swap -d command.
Exercise: Managing swap Utility Configuration (Level 3)
4-16 Advanced System Administration for the Solaris™ 9 Operating Environment
Copyright 2002 Sun Microsystems, Inc. All Rights Reserved. Enterprise Services, Revision A
Exercise: Managing swap Utility Configuration (Level 3)
In this exercise you add and remove a swap space.
Preparation
To prepare for this exercise:
● Each student will configure swap space on their assigned
workstation.
● Each student should unconfigure the additional swap space before
exiting the lab exercise.
● Make sure that the /export directory exists on your system.
● Each student uses disk slice 5 on their system for this exercise.
Note – The actual swap statistics will vary depending on the
configuration of each system.
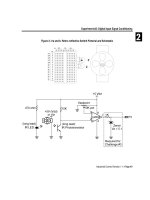
To support disk requirements for the remaining labs in this course,
partition the second disk using the information in Table 4-3.
Table 4-3 Partition Information
Slice Size Use
0 5 Mbytes State database replica
1 5 Mbytes State database replica
3 5 Mbytes State database replica
4 310 Mbytes Root (/) mirror
5 512 Mbytes Swap/dump
6 free Flash
Exercise: Managing swap Utility Configuration (Level 3)
Managing Swap Configuration 4-17
Copyright 2002 Sun Microsystems, Inc. All Rights Reserved. Enterprise Services, Revision A
Task Summary
Perform the following tasks:
● Obtain a report of the swap space usage on the system.
● List the swap areas that are configured on the system.
● Configure additional swap space using a swap file.
● Configure additional swap space using a disk partition.
● Unconfigure the additional swap space.
Tasks and Solutions
This section describes the tasks you must perform, and lists the solutions
to these tasks. To determine the amount of disk space used by a swapfs
file system, complete the following steps:
1. Run the swap -s command.
# swap -s
total: 106240k bytes allocated + 8528k reserved = 114768k used, 566776k
available
What is the total number of bytes actually allocated and currently in
use?
106, 240 Kbytes
What is the number of bytes allocated and not currently in use but
reserved by processes for possible future use?
8528 Kbytes
What is the total amount of swap space, both allocated and reserved?
114,768 Kbytes
What is the total swap space currently available for future
reservation and allocation?
566,776 Kbytes
Exercise: Managing swap Utility Configuration (Level 3)
4-18 Advanced System Administration for the Solaris™ 9 Operating Environment
Copyright 2002 Sun Microsystems, Inc. All Rights Reserved. Enterprise Services, Revision A
2. Run the swap -l command.
# swap -l
swapfile dev swaplo blocks free
/dev/dsk/c0t0d0s1 136,1 16 1206736 1084736
List the physical swap area configured on your system.
/dev/dsk/c0t0d0s1
How much total swap space is in the listed swap device?
12,06,736 Kbytes
How much space is available for the listed device?
1,084,736 Kbytes
3. Run the df -h command.
# df -h
Filesystem size used avail capacity Mounted on
/dev/dsk/c0t0d0s0 1.4G 876M 503M 64% /
/proc 0 0 0 0% /proc
mnttab 0 0 0 0% /etc/mnttab
fd 0 0 0 0% /dev/fd
swap 552M 24K 552M 1% /var/run
swap 554M 2M 552M 1% /tmp
/dev/dsk/c0t0d0s7 2.0G 9K 1.9G 1% /export
Does the /export directory have sufficient space to add
20 Mbytes of swap space?
Yes
4. Create a 20-Mbyte swap file in the /export directory, and add it to
the system swap space.
# mkfile 20m /export/swapfile
# swap -a /export/swapfile
5. Use the swap -l command to verify that the new swap space is
available.
# swap -l
swapfile dev swaplo blocks free
/dev/dsk/c0t0d0s1 136,1 16 1206736 1084736
/export/swapfile - 16 40944 40944
Exercise: Managing swap Utility Configuration (Level 3)
Managing Swap Configuration 4-19
Copyright 2002 Sun Microsystems, Inc. All Rights Reserved. Enterprise Services, Revision A
6. Use the swap -s command to verify that the new swap space is
available.
# swap -s
total: 106256k bytes allocated + 8512k reserved = 114768k used, 587512k
available
How does the output differ between the swap -l command and the
swap -s command?
The swap -l command output is a listing of each space, whereas the
swap -s command output only produces a cumulative report.
7. Remove the swap file created in Step 4.
# swap -d /export/swapfile
# rm /export/swapfile
8. Use the swap utility to verify that the swap space is no longer
available.
# swap -l
swapfile dev swaplo blocks free
/dev/dsk/c0t0d0s1 136,1 16 1206736 1084736
# swap -s
total: 106240k bytes allocated + 8528k reserved = 114768k used, 566776k
available
9. Add a disk partition as a swap slice to your existing swap space.
# swap -a /dev/dsk/c
#
t
#
d
#
s5
10. Add the new swap partition to the /etc/vfstab file to make the
partition permanent. To verify this change, you must reboot the
system.
# vi /etc/vfstab
/dev/dsk/c#t#d#s5 - - swap - no -
11. After the reboot, verify that the additional swap space exists by
using the swap utility.
# swap -l
swapfile dev swaplo blocks free
/dev/dsk/c0t0d0s1 136,1 16 1206736 1206736
/dev/dsk/c1t0d0s3 32,3 16 614704 614704
Is the newly listed swap partition the same as the one you added to
the /etc/vfstab file?
Yes
Exercise: Managing swap Utility Configuration (Level 3)
4-20 Advanced System Administration for the Solaris™ 9 Operating Environment
Copyright 2002 Sun Microsystems, Inc. All Rights Reserved. Enterprise Services, Revision A
12. Verify the additional swap space exists using the df -h command.
Why is the newly created swap space listed in the /etc/vfstab file
not listed in the output of the df -h command?
The df -h output does not produce an entry for the additional swap utility
devices, however the added swap space is reflected in the total swap space.
13. To return the system to its initial swap configuration, remove the
additional swap space entry from the /etc/vfstab file, and reboot
the system.
# vi /etc/vfstab
14. Remove the additional swap space using the swap -d command.
# swap -d /dev/dsk/c#t#d#s5
Exercise Summary
Managing Swap Configuration 4-21
Copyright 2002 Sun Microsystems, Inc. All Rights Reserved. Enterprise Services, Revision A
Exercise Summary
?
!
Discussion – Take a few minutes to discuss the experiences, issues, or
discoveries that you had during the lab exercises.
● Experiences
● Interpretations
● Conclusions
● Applications
Copyright 2002 Sun Microsystems, Inc. All Rights Reserved. Enterprise Services, Revision A
Module 5
ManagingCrashDumpsandCoreFiles
Objectives
When an operating system has a fatal error, it generates a crash dump file
(crash dump). When a process has a fatal error, it generates a core file.
Upon completion of this module, you should be able to:
● Manage crash dump behavior
● Manage core file behavior
The following course map shows how this module fits into the current
instructional goal.
Figure 5-1 Course Map
Managing Crash Dump Behavior
5-2 Advanced System Administration for the Solaris™ 9 Operating Environment
Copyright 2002 Sun Microsystems, Inc. All Rights Reserved. Enterprise Services, Revision A
Managing Crash Dump Behavior
If a fatal operating system error occurs, the operating system prints a
message to the console, describing the error. The operating system then
generates a crash dump by writing some of the contents of the physical
memory to a predetermined dump device, which is typically a local disk
slice. You can configure the dump device by using the dumpadm command.
After the operating system has written the crash dump to the dump
device, the system reboots. The crash dump is saved for future analysis to
help you determine the cause of the fatal error.
The Crash Dump
If the Solaris OE kernel encounters a problem that might endanger the
integrity of data or when the kernel encounters an unexpected hardware
fault, the panic routine is executed. Despite its name, a system panic is a
well-controlled event where memory contents are copied to a disk
partition defined as a dump device. Whatever the cause, the crash dump
itself provides valuable information to help your support engineer
diagnose the problem.
When an operating system crashes, the savecore command is
automatically executed during a boot. The savecore command retrieves
the crash dump from the dump device and then writes the crash dump to
a pair of files in your file system:
● The savecore command places kernel core information in the
/var/crash/
nodename
/vmcore.
X
file, where
nodename
is the name
returned by uname -n, and
X
is an integer identifying the dump.
● The savecore command places name list information and symbol
table information in the /var/crash/
nodename
/unix.
X
file.
Note – Within the crash dump directory, a file named bounds is created.
The bounds file holds a number that is used as a suffix for the next dump
to be saved.
Together, these data files form the saved crash dump. You can use the
dumpadm command to configure the location of the dump device and the
savecore directory.
Managing Crash Dump Behavior
Managing Crash Dumps and Core Files 5-3
Copyright 2002 Sun Microsystems, Inc. All Rights Reserved. Enterprise Services, Revision A
By default, the dump device is an appropriate swap partition. Swap
partitions are disk partitions reserved as a virtual memory, backing store
for the operating system. The swap partition contains only temporary
data; therefore, permanent data is overwritten by the crash dump.
Managing Crash Dump Behavior
5-4 Advanced System Administration for the Solaris™ 9 Operating Environment
Copyright 2002 Sun Microsystems, Inc. All Rights Reserved. Enterprise Services, Revision A
Displaying the Current Dump Configuration
To view the current dump configuration, enter the dumpadm command
without arguments, as shown in the following example:
# dumpadm
Dump content: kernel pages
Dump device: /dev/dsk/c0t0d0s1 (swap)
Savecore directory: /var/crash/host1
Savecore enabled: yes
The previous example shows the set of default values:
● The dump content is set to kernel memory pages only
● The dump device is a swap disk partition
● The directory for savecore files is set to /var/crash/host1
● The savecore command is set to run automatically on reboot
The following example shows that the current configuration is located in
the /etc/dumpadm.conf file:
# cat /etc/dumpadm.conf
# dumpadm.conf
#
# Configuration parameters for system crash dump.
# Do NOT edit this file by hand use dumpadm(1m) instead.
#
DUMPADM_DEVICE=/dev/dsk/c0t0d0s1
DUMPADM_SAVDIR=/var/crash/host1
DUMPADM_CONTENT=kernel
DUMPADM_ENABLE=yes
Changing the Crash Dump Configuration
The dumpadm command manages the configuration of the operating
system crash dump facility.
Note – Perform all modifications to the crash dump configuration by
using the dumpadm command, rather than attempting to edit the
/etc/dumpadm.conf file. Editing the file might result in an inconsistent
system dump configuration.
Managing Crash Dump Behavior
Managing Crash Dumps and Core Files 5-5
Copyright 2002 Sun Microsystems, Inc. All Rights Reserved. Enterprise Services, Revision A
The syntax of the dumpadm command is:
/usr/sbin/dumpadm [-nuy][-c
content-type
][-d
dump-device
]
[-m
min
k|
min
m|
min
%] [-r
root-dir
] [-s
savecore-dir
]
where:
-n Modifies the dump configuration so it does not run the
savecore command automatically on reboot.
-u Forcibly updates the kernel dump configuration based on
the contents of the /etc/dumpadm.conf file.
-y Modifies the dump configuration so that the savecore
command is run automatically on reboot. This is the default.
-c
content-type
Specifies the contents of the crash dump. The
content-type
can be kernel, all, or curproc. The curproc content type
includes the kernel memory pages and the memory pages of
the currently executing process.
-d
dump-device
Modifies the dump configuration to use the specified dump
device. The dump device can be an absolute path name or
swap.
-m
min
k
-m
min
m
-m min
%
Creates a minfree file in the current
savecore-dir
directory
indicating that the savecore command should maintain at
least the specified amount of free space in the file system in
which the
savecore-dir
directory is located:
• k – Indicates a positive integer suffixed with the unit k,
specifying kilobytes.
• m – Indicates a positive integer suffixed with the unit m,
specifying megabytes.
• % – Indicates a percent (%) symbol, indicating that the
minfree value is computed as the specified percentage of
the total, current size of the file system that contains the
savecore-dir
directory.
-r
root-dir
Specifies an alternative root directory relative to which the
dumpadm command should create files. If the -r argument is
not specified, the default root directory “/” is used.
-s
savecore-dir
Modifies the dump configuration to use the specified
directory to save files written by the savecore command. The
default
savecore-dir
directory is /var/crash/
hostname
,
where
hostname
is the output of the uname -n command.
Managing Core File Behavior
5-6 Advanced System Administration for the Solaris™ 9 Operating Environment
Copyright 2002 Sun Microsystems, Inc. All Rights Reserved. Enterprise Services, Revision A
Managing Core File Behavior
When a process terminates abnormally, it typically produces a core file.
You can use the coreadm command to specify the name or location of core
files produced by abnormally terminating processes.
Core Files
A core file is a point-in-time copy (snapshot) of the RAM allocated to a
process. The copy is written to a more permanent medium, such as a hard
disk. A core file is useful in analyzing why a particular program crashed.
A core file is also a disk copy of the address space of a process, at a certain
point-in-time. This information identifies items, such as the task name,
task owner, priority, and instruction queue, in execution at the time that
the core file was created.
When a core file occurs, the operating system generates two possible
copies of the core files, one copy known as the global core file and the
other copy known as the per-process core file. Depending on the system
options in effect, one file, both files, or no files can be generated. When
generated, a global core file is created in mode 600 and is owned by the
superuser. Non-privileged users cannot examine files with these
permissions.
Ordinary per-process core files are created in mode 600 under the
credentials of the process. The owner of the process can examine files with
these permissions.
Managing Core File Behavior
Managing Crash Dumps and Core Files 5-7
Copyright 2002 Sun Microsystems, Inc. All Rights Reserved. Enterprise Services, Revision A
Displaying the Current Core File Configuration
You use the coreadm command without options to display the current
configuration.
# coreadm
1 global core file pattern:
2 init core file pattern: core
3 global core dumps: disabled
4 per-process core dumps: enabled
5 global setid core dumps: disabled
6 per-process setid core dumps: disabled
7 global core dump logging: disabled
Note – The line numbers in the example are not part of the configuration.
They are part of the example only to assist with the following description
of the file.
Line 1 of the output identifies the name to use for core files placed in a
global directory. When generated, a global core file is created with
mode 600 and is owned by the superuser. Non-privileged users cannot
examine files with this permission.
Line 2 of the output identifies the default name that per-process core files
must use. This name is set for the init process, meaning it is inherited by
all other processes on the system.
Line 3 indicates that global core files are disabled.
Line 4 indicates that core file generation in the current working directory
of a process is enabled. Per-process core files are created with mode 600
with the credentials of the process. Only the owner of the process can
examine these files.
Lines 5 and 6 indicate that generation of per-process core files for
processes with setuid or setgid permissions are disabled, and the
generation of global core files for processes with setuid or setgid
permissions is disabled. If core file generation for processes with setuid
or setgid permissions is enabled, the core files generated are owned by
the superuser and have their permissions set to 600.
Line 7 identifies whether global core dump logging is enabled.
Managing Core File Behavior
5-8 Advanced System Administration for the Solaris™ 9 Operating Environment
Copyright 2002 Sun Microsystems, Inc. All Rights Reserved. Enterprise Services, Revision A
Caution – A process that has a setuid mode presents security issues with
respect to dumping core files. The files might contain sensitive
information in its address space to which the current non-privileged
owner of the process should not have access. Therefore, by default,
setuid core files are not generated because of this security issue.
By viewing the /etc/coreadm.conf file, you can verify the same
configuration parameters that were displayed with the coreadm
command.
# cat /etc/coreadm.conf
# coreadm.conf
#
# Parameters for system core file configuration.
# Do NOT edit this file by hand use coreadm(1) instead.
COREADM_GLOB_PATTERN=
COREADM_INIT_PATTERN=core
COREADM_GLOB_ENABLED=no
COREADM_PROC_ENABLED=yes
COREADM_GLOB_SETID_ENABLED=no
COREADM_PROC_SETID_ENABLED=no
COREADM_GLOB_LOG_ENABLED=no
Changing the Core File Configuration
The coreadm command allows you to control core file generation
behavior. For example, you can use the coreadm command to configure a
system so that all process core files are placed in a single system directory.
The flexibility of this configuration makes it easier to track problems by
examining the core files in a specific directory whenever a process or
daemon terminates abnormally. This flexibility also makes it easy to locate
and remove core files on a system.
Note – You should make all modifications to the coreadm configuration at
the command line by using the coreadm command instead of editing the
/etc/coreadm.conf file.
You can enable or disable two configurable core file paths, per-process
and global, separately. If a global core file path is enabled and set to
/corefiles/core, for example, then each process that terminates
abnormally produces two core files: one in the current working directory,
and one in the /corefiles/core directory.
Managing Core File Behavior
Managing Crash Dumps and Core Files 5-9
Copyright 2002 Sun Microsystems, Inc. All Rights Reserved. Enterprise Services, Revision A
Note – If the directory defined in the global core file path does not exist,
you must create it.
Users can run the coreadm command with the -p option to specify the file
name pattern for the operating system to use when generating a
per-process core file.
coreadm [-p
pattern
] [
pid
]
Only the root user can run the following coreadm command options to
configure system-wide core file options.
coreadm [-g
pattern
] [-i
pattern
] [-d
option
] [-e
option
]
“The coreadm Command Options” on page 5-10 describes the core file
options.
Managing Core File Behavior
5-10 Advanced System Administration for the Solaris™ 9 Operating Environment
Copyright 2002 Sun Microsystems, Inc. All Rights Reserved. Enterprise Services, Revision A
The coreadm Command Options
The following are some options to the coreadm command.
Note – Only the superuser can use all options, except for the -p option,
which a regular user can use.
-i
pattern
Sets the per-process core file name pattern from init to
pattern
. This option is the same as the coreadm -p
pattern
1 command, except that the setting is
persistent after a reboot.
-e
option
Enables the specified core file option, where option is:
● global – Enables core dumps by using the global
core pattern.
● process – Enables core dumps by using the
per-process core pattern.
● global-setid – Enables setid core dumps by
using the global core pattern.
● proc-setid – Enables setid core dumps by using
the per-process core pattern.
● log – Generates a syslog (3) message when a user
attempts to generate a global core file.
-d
option
Disables the specified core file option; see the -e
option
for descriptions of possible options. You can
specify multiple -e and -d options by using the
command line.
-u Updates system-wide core file options from the
contents of the configuration file /etc/coreadm.conf.
If the configuration file is missing or contains invalid
values, default values are substituted. Following the
update, the configuration file is resynchronized with
the system core file configuration.
-g
pattern
Sets the global core file name pattern to
pattern
. The
pattern must start with a forward slash (/), and can
contain any of the special embedded variables
described in Table 5-1 on page 5-11.
Managing Core File Behavior
Managing Crash Dumps and Core Files 5-11
Copyright 2002 Sun Microsystems, Inc. All Rights Reserved. Enterprise Services, Revision A
A core file named
pattern
is a file system path name with embedded
variables. The embedded variables are specified with a leading percent (%)
character. The operating system expands these variables from values in
effect when the operating system generates a core file. The possible
variables are listed in Table 5-1.
-p
pattern
Sets the per-process core file name pattern to
pattern
for each of the specified process IDs (PIDs). The pattern
can contain any of the special embedded variables
described in Table 5-1 and does not have to begin with
a forward slash (/). If
pattern
does not begin with “/”,
it is evaluated relative to the current directory in effect
when the process generates a core file.
A non-privileged user can only apply the -p option to
processes owned by that user. The superuser can apply
the -p option to any process.
Table 5-1 Pattern Options for the coreadm Command
Option Meaning
%p PID
%u Effective user ID (EUID)
%g Effective group ID (EGIC)
%f Executable file name
%n System node name (uname -n)
%m Machine hardware name (uname -m)
%t The time in seconds since midnight January 1, 1970
%% Literal %
Managing Core File Behavior
5-12 Advanced System Administration for the Solaris™ 9 Operating Environment
Copyright 2002 Sun Microsystems, Inc. All Rights Reserved. Enterprise Services, Revision A
Examples of the coreadm Command
Example 1 – Setting the Core File Name Pattern as a Regular User
When executed from a user’s $HOME/.profile or $HOME/.login file, the
following entry sets the core file name pattern for all processes run during
the login session:
coreadm -p core.%f.%p $$
Note – The $$ variable is the PID of the currently running shell. The
per-process core file name pattern is inherited by all child processes.
Example 2 – Dumping a User’s Core Files Into a Subdirectory
The following command places all of the user’s core files into the
corefiles subdirectory of the user’s home directory, differentiated by
the system node name. This example is useful for users who use many
different systems, but share a single home directory across multiple
systems.
$ coreadm -p $HOME/corefiles/%n.%f.%p $$
Managing Core File Behavior
Managing Crash Dumps and Core Files 5-13
Copyright 2002 Sun Microsystems, Inc. All Rights Reserved. Enterprise Services, Revision A
Example 3 – Enabling and Setting the Core File Global Name Pattern
The following is an example of setting system-wide parameters that add
the executable file name and PID to the name of any core file that is
created:
# coreadm -g /var/core/core.%f.%p -e global
For example, the core file name pattern /var/core/core.%f.%p causes
the xyz program with PID 1234 to generate the core file
/var/core/core.xyz.1234.
To verify that this parameter is now part of the core file configuration, run
the coreadm command again:
# coreadm
global core file pattern: /var/core/core.%f.%p
init core file pattern: core
global core dumps: enabled
per-process core dumps: enabled
global setid core dumps: disabled
per-process setid core dumps: disabled
global core dump logging: disabled
Example 4 – Checking the Core File Configuration for Specific PIDs
Running the coreadm command with a list of PIDs reports each process’s
per-process core file name pattern, for example:
# coreadm 278 5678
278: core.%f.%p
5678: /home/george/cores/%f.%p.%t
Only the owner of a process or the superuser can query a process by using
the coreadm command with a list of PIDs.
Performing the Exercises
5-14 Advanced System Administration for the Solaris™ 9 Operating Environment
Copyright 2002 Sun Microsystems, Inc. All Rights Reserved. Enterprise Services, Revision A
Performing the Exercises
You have the option to complete any one of three versions of a lab. To
decide which to choose, consult the following descriptions of the levels:
● Level 1 – This version of the lab provides the least amount of
guidance. Each bulleted paragraph provides a task description, but
you must determine your own way of accomplishing each task.
● Level 2 – This version of the lab provides more guidance. Although
each step describes what you should do, you must determine which
commands (and options) to input.
● Level 3 – This version of the lab is the easiest to accomplish because
each step provides exactly what you should input to the system. This
level also includes the task solutions for all three levels.
Exercise: Collecting the Crash Dump and Core Dump (Level 1)
Managing Crash Dumps and Core Files 5-15
Copyright 2002 Sun Microsystems, Inc. All Rights Reserved. Enterprise Services, Revision A
Exercise: Collecting the Crash Dump and Core Dump
(Level 1)
In this exercise, you configure crash dumps and core files.
Preparation
To prepare for this exercise, refer to the material in the module.
Tasks
Perform the following tasks:
● Use the dumpadm command to view the current dump configuration.
● Use the dumpadm command to change the current dump
configuration to a new swap partition.
● Collect a pair of crash dump files.
● Use the coreadm command to view the default configuration for
potential core files.
● Configure the system to collect global and per-process core files.
● Collect a global and a per-process core file.
Exercise: Collecting the Crash Dump and Core Dump (Level 2)
5-16 Advanced System Administration for the Solaris™ 9 Operating Environment
Copyright 2002 Sun Microsystems, Inc. All Rights Reserved. Enterprise Services, Revision A
Exercise: Collecting the Crash Dump and Core Dump
(Level 2)
In this exercise, you configure crash dumps and core files.
Preparation
To prepare for this exercise, refer to the material in the module.
Task Summary
In this exercise, you perform the following tasks:
● Use the dumpadm command to view the current dump configuration.
● Use the dumpadm command to change the current dump
configuration to a new swap partition.
● Collect a pair of crash dump files.
● Use the coreadm command to view the default configuration for
potential core files.
● Configure the system to collect global and per-process core files.
● Collect a global and a per-process core file.
Exercise: Collecting the Crash Dump and Core Dump (Level 2)
Managing Crash Dumps and Core Files 5-17
Copyright 2002 Sun Microsystems, Inc. All Rights Reserved. Enterprise Services, Revision A
Tasks
Perform the following tasks.
Task 1 – Using the dumpadm Command to Display the Core File
Directory Location
Complete the following steps:
1. Use the dumpadm command without arguments to view the current
dump configuration.
2. Fill in the configuration parameters from the output:
Dump content: _______________________________________________
Dump device: ________________________________________________
The savecore directory: _______________________________________
Is savecore enabled? _________________________________________
3. Use the dumpadm command to change the dump device to the
external disk drive slice 5.
4. Run the sync command to flush all previously unwritten system
buffers out to disk, ensuring that all file modifications up to that
point will be saved.
5. Force the kernel to panic and save a crash dump by using the
savecore -L command
6. When the system reboots, make sure the crash dump succeeded by
using the file command on the files of the savecore directory.
Task 2 – Using the coreadm Command to Display Default
Configuration for Potential Core Files
Complete the following steps:
1. Use the coreadm command to the display default initial
configuration.
2. Create the core file directory, and enable a global core file path.
3. Turn on logging to generate a message when a global core file is
attempted.
4. Display the configuration information to verify the changes.
5. In another terminal window, create a new directory named /dir, and
change to that directory.