Microsoft Office 2010 Product Guide part 2
Bạn đang xem bản rút gọn của tài liệu. Xem và tải ngay bản đầy đủ của tài liệu tại đây (6.44 MB, 10 trang )
Page 13 of 188
Save time and money when you edit the pictures in your Office 2010 documents like a pro,
without the need for additional photo-editing programs.
You’re putting together an important business report,
history term paper, or community newsletter—regardless,
you want your message to be memorable and look its
absolute best.
Fortunately, Office 2010 makes you look like a design
expert with a range of new and improved tools for
working with images. Apply artistic effects—such as paint
strokes, glass, or watercolor sponge—with just a couple of
clicks; use professional-quality correction and color tools
to fine-tune your pictures in no time; and use advanced
cropping and a new background removal tool so that you
always display exactly what you want your audience to
see.
Available in:
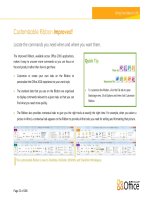
Use Live Preview to save time when editing photos. The Picture
Tools Format tab appears whenever you select a picture. Point
to an option in a gallery on that tab—such as Corrections,
Color, or Artistic Effects in Word, Excel, PowerPoint, or
Outlook—to preview the selected formatting applied to your
picture.
New and improved picture editing features in Publisher 2010
differ from those in Word, Excel, PowerPoint and Outlook. See
the Product-Specific Highlights table on page 15 for details.
Page 14 of 188
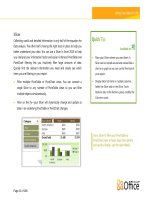
An advanced
cropping tool
displays your full
image in shadow
while you crop.
The crop to
shape feature
shown here is
available in Word,
Excel, PowerPoint,
and Outlook.
Page 15 of 188
Product-Specific Highlights
All new artistic effects, such as marker, line drawing, blur,
glass and pastels help you look like a design expert.
New correction tools, including sharpen, soften, and
improved brightness and contrast help you perfect pictures in
no time.
New color tools, including color saturation and color tone,
and an improved recolor tool, give you more flexibility for
coordinating the images in your documents.
An improved cropping tool enables you to crop to a shape or
to a selected aspect ratio, or to pan and zoom in on key
image elements just by dragging and resizing the picture
within the crop area.
A new remove background tool makes customizing image
content a breeze.
Improved photo-editing tools enable you to crop, pan, and
zoom in on your images to always show your picture’s best
side.
Improved picture placeholders make it easy to swap out
pictures while preserving the look and layout of your
document.
New picture captions allow you to choose from a gallery of
layouts such as placing the caption at the top, bottom, or
sides of your photos, or overlaying text.
A new picture swap tool enables you to swap the position of
two selected images on a page, or swap the formatting of
those images, with just a click.
Page 16 of 188
Deliver dynamic presentations that captivate your audience.
Embed and customize your video experience right in PowerPoint
2010, without the need for additional software. You can also
easily insert linked videos that you’ve uploaded to Web sites for
playback directly within your presentation.
9
Make your media fit your message perfectly every time. Edit and
manage videos you insert from your files with ease:
Embed videos. Videos that you insert from your files are now
embedded by default so you don’t have to manage
additional files when sharing your presentation with others.
Video bookmarks. Bookmark key points in your video for
quick access or trigger animations to start automatically when
a bookmark is reached during playback.
Available in:
To insert a video from your files, on the Insert tab, click
Video and then click Video from File. The Video Tools
Format and Playback tabs appear automatically
whenever a video is selected.
To insert your video from a Web site, on the Insert tab,
click Video and then click Video from Web Site.
You can now also trim, add bookmarks, and add fades
to audio that you insert in your presentation from your
files.
Video trim. Trim your video with a simple click and drag, so that your audience sees and hears exactly what you want.
9
Internet connection required for playback of linked video from a Web site location.
Page 17 of 188
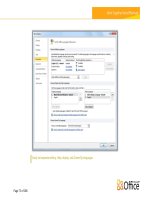
Trim video directly
from within
PowerPoint 2010.
Video tools. Add fades, video effects and styles. The formatting and effects that you apply to the videos you insert from your files
are retained while the video plays.
Video poster frame. Use your slide area to tell your story more effectively and avoid solid black rectangles that are difficult to
print. Select a frame from the video or a picture from your files as an image that fills the object area when the video is not playing.
Play video as background. Videos inserted from your files remain in the order you place them on a slide, slide layout or slide
master, enabling you to playback video as a dynamic slide background or as part of a choreographed animation sequence during
your presentation.