solaris 9 student guide part 2 sa299 phần 5 ppsx
Bạn đang xem bản rút gọn của tài liệu. Xem và tải ngay bản đầy đủ của tài liệu tại đây (605.26 KB, 86 trang )
Building a Mirror of the Root (/) File System
Configuring Solaris Volume Manager Software 9-29
Copyright 2002 Sun Microsystems, Inc. All Rights Reserved. Enterprise Services, Revision A
The Enhanced Storage Tool
You can also create the mirror by using the Enhanced Storage Tool within
the Solaris Volume Manager software.
To create a mirror:
1. Click the Volumes icon.
The previously configured RAID-0 volumes are displayed, as shown
in Figure 9-23. If these volumes are not displayed, you must first
configure the RAID-0 volumes before you can use them as
submirrors of the RAID-1 volume.
Figure 9-23 Solaris Management Console: Volume
Building a Mirror of the Root (/) File System
9-30 Advanced System Administration for the Solaris™ 9 Operating Environment
Copyright 2002 Sun Microsystems, Inc. All Rights Reserved. Enterprise Services, Revision A
2. Select Create Volume from the Action menu, as shown in Figure 9-24.
Figure 9-24 Solaris Management Console: Action Menu Window
Building a Mirror of the Root (/) File System
Configuring Solaris Volume Manager Software 9-31
Copyright 2002 Sun Microsystems, Inc. All Rights Reserved. Enterprise Services, Revision A
Because the dirty region logs that are used to track which data blocks
in the sub-mirrors have been modified and are recorded within the
state database replicas, when you create RAID-1 volumes, you can
add additional state database replicas. You do not have to create
additional replicas when creating RAID-1 volumes, but mirror
performance might suffer if you do not.
Figure 9-25 Create Volume: Create State Database Replicas
Window
3. Due to equipment limitations in the classroom, select Don’t Create
State Database Replicas, as shown in Figure 9-25.
4. Click Next to continue.
Building a Mirror of the Root (/) File System
9-32 Advanced System Administration for the Solaris™ 9 Operating Environment
Copyright 2002 Sun Microsystems, Inc. All Rights Reserved. Enterprise Services, Revision A
You can relocate the mirror to alternate disk sets.
5. If only one disk set exists on the system, select the default of <none>,
as shown in Figure 9-26.
Figure 9-26 Create Volume: Select Disk Set Window
6. Click Next to continue.
Note – When you are mirroring root, you must use the local disk set.
Building a Mirror of the Root (/) File System
Configuring Solaris Volume Manager Software 9-33
Copyright 2002 Sun Microsystems, Inc. All Rights Reserved. Enterprise Services, Revision A
The Create Volume: Select Volume Type Window window displays
which volume configurations you can create, as shown in
Figure 9-27.
Figure 9-27 Create Volume: Select Volume Type Window
7. Choose Mirror (RAID 1).
8. Click Next to continue.
Building a Mirror of the Root (/) File System
9-34 Advanced System Administration for the Solaris™ 9 Operating Environment
Copyright 2002 Sun Microsystems, Inc. All Rights Reserved. Enterprise Services, Revision A
In the Create Volume: Name Volume Window window, you can
enter a volume name, as shown in Figure 9-28. Choose a pattern that
is easy to remember so that it is easy to identify the volume types.
For example, you could name the RAID-1 volumes with names
ending in zero, such as d10. Then you can number the submirrors or
RAID-0 volumes as d11 for the first submirror and d12 for the
second submirror.
Figure 9-28 Create Volume: Name Volume Window
9. Enter 10 as the volume name d field.
10. Click Next to continue.
Building a Mirror of the Root (/) File System
Configuring Solaris Volume Manager Software 9-35
Copyright 2002 Sun Microsystems, Inc. All Rights Reserved. Enterprise Services, Revision A
11. Select metadevice d11 for use as the primary submirror, as shown in
Figure 9-29.
Figure 9-29 Create Volume: Select Primary Submirror Window
12. Click Next to continue.
Building a Mirror of the Root (/) File System
9-36 Advanced System Administration for the Solaris™ 9 Operating Environment
Copyright 2002 Sun Microsystems, Inc. All Rights Reserved. Enterprise Services, Revision A
13. Bypass the Create Volume: Select Remaining Submirrors Window
window shown in Figure 9-30, because you are mirroring the root
partition, which means that you must attach the secondary
submirror by using the command line.
● When mirroring the root (/) partition, the procedure requires a
few additional steps prior to attaching the secondary submirror.
● When building a mirror that does not already contain data, you
can select the secondary submirror, as shown in Figure 9-30.
Figure 9-30 Create Volume: Select Remaining Submirrors
Window
14. Click Next to continue.
Building a Mirror of the Root (/) File System
Configuring Solaris Volume Manager Software 9-37
Copyright 2002 Sun Microsystems, Inc. All Rights Reserved. Enterprise Services, Revision A
The Create Volume: Set Mirror Parameters Window window lets you
set the mirror parameters, as shown in Figure 9-31. These parameters
were described in the metainit command example that was used to
configure a RAID-1 volume.
Figure 9-31 Create Volume: Set Mirror Parameters Window
15. To accept the defaults, click Next to continue.
Building a Mirror of the Root (/) File System
9-38 Advanced System Administration for the Solaris™ 9 Operating Environment
Copyright 2002 Sun Microsystems, Inc. All Rights Reserved. Enterprise Services, Revision A
Review your selections in The Create Volume: Review Window
window, as shown in Figure 9-32. This window provides a
confirmation of your selections. It also provides a summary of the
commands necessary to accomplish the identical task from the
command line.
Figure 9-32 Create Volume: Review Window
16. Click Finish.
Building a Mirror of the Root (/) File System
Configuring Solaris Volume Manager Software 9-39
Copyright 2002 Sun Microsystems, Inc. All Rights Reserved. Enterprise Services, Revision A
The RAID-1 volume named d10 is created, and the display is
updated, as shown in Figure 9-33. The primary submirror (d11)is
attached to the mirror (d10), but the process of creating the mirrored
partition is not complete.
Figure 9-33 Solaris Management Console: Volumes
17. Go to the command line, and use the metaroot command to
complete building the mirror of the root (/) file system, as described
in the ‘‘Executing the metaroot Command’’ section on page 9-40.
Building a Mirror of the Root (/) File System
9-40 Advanced System Administration for the Solaris™ 9 Operating Environment
Copyright 2002 Sun Microsystems, Inc. All Rights Reserved. Enterprise Services, Revision A
Executing the metaroot Command
When creating mirrors of mounted file systems, you must update the
/etc/vfstab file to change the mount point from a slice, such as
/dev/dsk/c
#
t
#
d
#
s
#
, to a volume, such as /dev/md/dsk/d
##
. When
mirroring any mounted file system other than root (/), you can use the vi
editor to update the /etc/vfstab file.
When mirroring the root (/) file system, use the metaroot command to
modify the /etc/vfstab and /etc/system files, as follows:
metaroot
device
where
device
specifies either the metadevice or the conventional disk
device (slice) used for the root (/) file system.
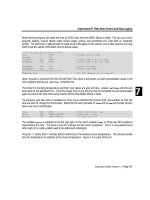
The following example shows that the /etc/vfstab file has been
updated by the metaroot command to point to the RAID-1 mirrored
metadevice.
# metaroot d10
# grep md /etc/vfstab
/dev/md/dsk/d10/dev/md/rdsk/d10/ufs1no-
In addition to modifying the /etc/vfstab file to update the root (/) file
system pointer, the metaroot command updates the /etc/system file to
contain the forceload statement that loads the kernel modules that
support the logical volumes. For example:
# tail /etc/system
forceload: misc/md_hotspares
forceload: misc/md_sp
forceload: misc/md_stripe
forceload: misc/md_mirror
forceload: drv/pcipsy
forceload: drv/simba
forceload: drv/glm
forceload: drv/sd
rootdev:/pseudo/md@0:0,10,blk
Building a Mirror of the Root (/) File System
Configuring Solaris Volume Manager Software 9-41
Copyright 2002 Sun Microsystems, Inc. All Rights Reserved. Enterprise Services, Revision A
You must reboot the system before attaching the secondary submirror.
Enter the init command to reboot the system:
# init 6
After the reboot is complete, attach the secondary submirror by using the
metattach command:
# metattach d10 d12
d10: submirror d12 is attached
Caution – Create a one-way mirror with the metainit command, and
then attach the additional submirrors with the metattach command. If
the metattach command is not used, no resynchronization operations
occur. As a result, data could become corrupted as the Solaris Volume
Manager software assumes that both sides of the mirror are identical and
can be used interchangeably.
Updating the boot-device PROM Variable
If you mirror your root (/) file system, record the alternate boot path
contained in the boot-device PROM variable. In the following example,
you determine the path to the alternate boot device by using the ls -l
command on the slice that is being attached as the secondary submirror to
the root (/) mirror.
# ls -l /dev/dsk/c1t2d0s1
lrwxrwxrwx 1 root root 46 Feb 28 08:58 /dev/dsk/c1t2d0s1
-> / /devices/pci@1f,0/pci@1/scsi@4,1/sd@2,0:b
Record the path that follows the /devices directory:
/pci@1f,0/pci@1/scsi@4,1/sd@2,0:b
Caution – When using some disk controllers, the path to the device varies
between the entries in the /devices directory and the entries in the
OpenBoot™ programmable read-only memory (PROM). In these
instances, follow the entries in the OpenBoot PROM.
Building a Mirror of the Root (/) File System
9-42 Advanced System Administration for the Solaris™ 9 Operating Environment
Copyright 2002 Sun Microsystems, Inc. All Rights Reserved. Enterprise Services, Revision A
If, for example, on one Ultra™ 5 workstation, the PCI-SCSI controller
returns:
/pci@1f,0/pci@1/scsi@4,1/sd@2,0:b
from the /devices directory, yet the show-devs command from the
OpenBoot PROM returned:
/pci@1f,0/pci@1/scsi@4,1/disk
then, the alternate boot path must be:
/pci@1f,0/pci@1/scsi@4,1/disk@2,0:b
If you do not adapt to the change when attempting to boot from the
alternate boot device, you get an error stating:
can’t open boot device
To get the system to boot automatically from the alternate boot device in
the event of a primary root submirror failure, complete the following
steps:
1. Use the OpenBoot nvalias command to define a backup_root
device alias for the secondary root mirror. For example:
ok nvalias backup_root /pci@1f,0/pci@1/scsi@4,1/disk@2,0:b
2. Redefine the boot-device variable to reference both the primary
and secondary submirrors, in the order in which you want to access
them. For example:
ok printenv boot-device
boot-device= disk net
ok setenv boot-device disk backup_root net
boot-device= disk backup_root net
In the event of primary root disk failure, the system automatically boots
from the secondary submirror. To test the secondary submirror, boot the
system manually, as follows:
ok boot backup_root
Building a Mirror of the Root (/) File System
Configuring Solaris Volume Manager Software 9-43
Copyright 2002 Sun Microsystems, Inc. All Rights Reserved. Enterprise Services, Revision A
Unmirroring the root (/) File System
Follow this procedure to unmirror the root (/) file system. This procedure
assumes that the root (/) file system is mirrored on a Solaris Volume
Manager software volume named d10, and that the mirror consists of two
submirrors. The primary submirror is d11, and the secondary submirror is
d12. To unmirror the root (/) file system, complete the following steps:
1. Run the metastat command on the mirror to verify that submirror 0
is in the Okay state.
# metastat d10
d10: Mirror
Submirror 0: d11
State: Okay
Submirror 1: d12
State: Okay
Pass: 1
Read option: roundrobin (default)
Write option: parallel (default)
Size: 243810 blocks
d11: Submirror of d10
State: Okay
Size: 243810 blocks
Stripe 0:
Device Start Block Dbase State Reloc Hot Spare
c0t0d0s0 0 No Okay Yes
d12: Submirror of d10
State: Okay
Size: 244800 blocks
Stripe 0:
Device Start Block Dbase State Reloc Hot Spare
c1t2d0s1 0 No Okay Yes
Device Relocation Information:
Device Reloc Device ID
c0t0d0 Yes id1,dad@AST34342A=____________GG954138
c1t2d0 Yes id1,sd@SSEAGATE_ST41600N_SUN1.3G141734__
Building a Mirror of the Root (/) File System
9-44 Advanced System Administration for the Solaris™ 9 Operating Environment
Copyright 2002 Sun Microsystems, Inc. All Rights Reserved. Enterprise Services, Revision A
2. Run the metadetach command on the mirror to make a one-way
mirror.
# metadetach d10 d12
d10: submirror d12 is detached
3. Because this is a root (/) file system mirror, run the metaroot
command to update the /etc/vfstab and etc/system files.
# metaroot /dev/dsk/c0t0d0s0
# grep c0t0d0s0 /etc/vfstab
/dev/dsk/c0t0d0s0/dev/rdsk/c0t0d0s0/ufs1no-
4. Reboot the system.
# init 6
5. Run the metaclear command to clear the mirror and submirrors.
The -r option recursively deletes specified metadevices and hot
spare pools, associated with the targeted metadevices specified in the
metaclear command.
# metaclear -r d10
d10: Mirror is cleared
d11: Concat/Stripe is cleared
# metaclear d12
d12: Concat/Stripe is cleared
Performing the Exercises
Configuring Solaris Volume Manager Software 9-45
Copyright 2002 Sun Microsystems, Inc. All Rights Reserved. Enterprise Services, Revision A
Performing the Exercises
You have the option to complete any one of three versions of a lab. To
decide which to choose, consult the following descriptions of the levels:
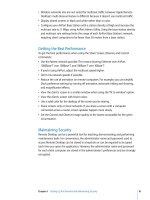
● Level 1 – This version of the lab provides the least amount of
guidance. Each bulleted paragraph provides a task description, but
you must determine your own way of accomplishing each task.
● Level 2 – This version of the lab provides more guidance. Although
each step describes what you should do, you must determine which
commands (and options) to input.
● Level 3 – This version of the lab is the easiest to accomplish because
each step provides exactly what you should input to the system. This
level also includes the task solutions for all three levels.
Exercise: Mirroring the root (/) File System (Level 1)
9-46 Advanced System Administration for the Solaris™ 9 Operating Environment
Copyright 2002 Sun Microsystems, Inc. All Rights Reserved. Enterprise Services, Revision A
Exercise: Mirroring the root (/) File System (Level 1)
In this lab, you:
● Configure the Solaris Volume Manager software to create state
database replicas
● Mirror the root (/) file system
● Update the default boot device
● Unmirror the root (/) file system
Preparation
This exercise mirrors the root (/) file system of the system disk.
This exercise mirrors the root (/) file system of the system disk. Use the
auto-layout feature for the system disk when installing the Solaris 9 OE.
This creates a root (/) partition approximately 120 Mbytes large.
As a setup requirement, the second disk on your system must be
partitioned with one slice that is equal to or larger than the root (/)
partition of the system disk. You must also partition space for the state
database replicas on the second disk. You can define how the remaining
slices of the second disk must be partitioned.
This exercise is performed on each individual system, so there is no need
to partner students with each other for this exercise. Most steps in these
procedures are executable by using either the Enhanced Storage Tool
within the Solaris Volume Manager software or by using the command
line.
For this exercise, the solutions to each step is presented using the
command-line equivalent. The Enhanced Storage Tool within the Solaris
Volume Manager software is open and used to display a visual record of
the Solaris Volume Manager software’s activities.
Exercise: Mirroring the root (/) File System (Level 1)
Configuring Solaris Volume Manager Software 9-47
Copyright 2002 Sun Microsystems, Inc. All Rights Reserved. Enterprise Services, Revision A
Tasks
Perform the following tasks:
● Map the available disk slices to the requirements for state database
replicas and root (/) file system submirrors.
● Create the state database.
● Build the mirror of the root (/) file system.
● Modify the OpenBoot PROM variables to use the mirrored device as
an alternate boot path in the event of a failure of the primary
submirror.
● Reboot the system using the secondary root (/) submirror to test the
mirror.
● Reboot the system using the primary root (/) submirror.
● Remove the mirror from the root (/) partition.
Exercise: Mirroring the root (/) File System (Level 2)
9-48 Advanced System Administration for the Solaris™ 9 Operating Environment
Copyright 2002 Sun Microsystems, Inc. All Rights Reserved. Enterprise Services, Revision A
Exercise: Mirroring the root (/) File System (Level 2)
In this lab, you:
● Configure the Solaris Volume Manager software to create state
database replicas
● Mirror the root (/) file system
● Update the default boot device
● Unmirror the root (/) file system
Preparation
This exercise mirrors the root (/) file system of the system disk. Use the
auto-layout feature for the system disk when installing the Solaris 9 OE.
This creates a root (/) partition approximately 120 Mbytes large.
As a setup requirement, the second disk on your system must be
partitioned with one slice that is equal to or larger than the root (/)
partition of the system disk. You must also partition space for the state
database replicas on the second disk. You can define how the remaining
slices of the second disk must be partitioned.
This exercise is performed on each individual system, so there is no need
to partner students with each other for this exercise. Most steps in these
procedures are executable by using either the Enhanced Storage Tool
within the Solaris Volume Manager Software or by using the command
line.
For this exercise, the solutions to each step is presented using the
command-line equivalent. The Enhanced Storage Tool within the Solaris
Volume Manager is open and used to display a visual record of the Solaris
Volume Manager software’s activities.
Exercise: Mirroring the root (/) File System (Level 2)
Configuring Solaris Volume Manager Software 9-49
Copyright 2002 Sun Microsystems, Inc. All Rights Reserved. Enterprise Services, Revision A
Task Summary
Perform the following tasks:
● Map the available disk slices to the requirements for state database
replicas and root (/) file system submirrors.
● Create the state database.
● Build the mirror of the root (/) file system.
● Modify the OpenBoot PROM variables to use the mirrored device as
an alternate boot path in the event of a failure of the primary
submirror.
● Reboot the system using the secondary root (/) submirror to test the
mirror.
● Reboot the system using the primary root (/) submirror.
● Remove the mirror from the root partition.
Tasks
Complete the following steps:
1. Open the Enhanced Storage Tool within the Solaris Management
Console, and leave it open throughout this exercise to use it as a
monitoring mechanism.
2. Fill in the blanks to record the information needed to complete this
exercise:
● Disk slice for the state database replica 1:
________________________________________________________
● Disk slice for the state database replica 2:
________________________________________________________
● Disk slice for the state database replica 3:
________________________________________________________
● Disk slice for the state database replica 4 (optional):
________________________________________________________
● Disk slice for the state database replica 5 (optional):
________________________________________________________
● Disk slice for the root file system primary submirror:
________________________________________________________
Exercise: Mirroring the root (/) File System (Level 2)
9-50 Advanced System Administration for the Solaris™ 9 Operating Environment
Copyright 2002 Sun Microsystems, Inc. All Rights Reserved. Enterprise Services, Revision A
● Metadevice to map to the root (/) file system primary
submirror:
________________________________________________________
● Disk slice for the root (/) file system secondary submirror:
________________________________________________________
● Metadevice to map to the root (/) file system secondary
submirror:
________________________________________________________
● Metadevice to map to the root (/) file system mirror:
________________________________________________________
3. Create a sufficient number of state database replicas to support the
majority consensus algorithm used in the Solaris Volume Manager
software.
What is the minimum number of state database replicas necessary to
support the majority consensus algorithm?
_____________________________________________________________
4. Create a RAID-0 volume to use as the root (/) file system’s primary
submirror.
5. Create a RAID-0 volume on the secondary drive to use as the root (/)
file system’s secondary submirror.
6. Create a RAID-1 volume as a one-way mirror using the root (/) file
system primary submirror as the source of the mirror’s data.
7. Update the /etc/vfstab file to use the RAID-1 volume as the
mount point for the root (/) file system.
8. Reboot the system.
9. Attach the RAID-0 volume used as the root (/) file system’s
secondary submirror to the RAID-1 volume, and allow the mirror
synchronization to complete before continuing.
What is the primary reason for using the command line to attach a
secondary submirror to a mirror?
_____________________________________________________________
Note – To view the status of the resynchronization process, perform the
/usr/sbin/metastat | grep resync command
10. Determine the path to the alternate root (/) device (as reported by
the Solaris 9 OE).
_____________________________________________________________
Exercise: Mirroring the root (/) File System (Level 2)
Configuring Solaris Volume Manager Software 9-51
Copyright 2002 Sun Microsystems, Inc. All Rights Reserved. Enterprise Services, Revision A
11. Determine the path to the alternate root (/) device (as reported by
the OpenBoot PROM).
_____________________________________________________________
12. Define a backup root (/) device alias.
_____________________________________________________________
13. Add the backup root (/) device alias to the boot-device variable.
_____________________________________________________________
14. Test the ability to boot the secondary root (/) submirror.
_____________________________________________________________
15. Verify the status of the root (/) submirrors.
_____________________________________________________________
16. Detach one submirror to make the root (/) mirror a one-way mirror.
_____________________________________________________________
17. Update the /etc/vfstab file to redefine the root (/) mount point
using the original disk slice and the /etc/system file to include the
forceload statements.
18. Reboot the system.
19. Clear the mirror and submirrors.
Exercise: Mirroring the root (/) File System (Level 3)
9-52 Advanced System Administration for the Solaris™ 9 Operating Environment
Copyright 2002 Sun Microsystems, Inc. All Rights Reserved. Enterprise Services, Revision A
Exercise: Mirroring the root (/) File System (Level 3)
In this lab, you:
● Configure the Solaris Volume Manager software to create state
database replicas
● Mirror the root (/) file system
● Update the default boot device
● Unmirror the root (/) file system
Preparation
This exercise mirrors the root (/) file system of the system disk. Use the
auto-layout feature for the system disk when installing the Solaris 9 OE.
This creates a root (/) partition approximately 120 Mbytes large.
As a setup requirement, the second disk on your system must be
partitioned with one slice that is equal to or larger than the root (/)
partition of the system disk. You must also partition space for the state
database replicas on the second disk. You can define how the remaining
slices of the second disk must be partitioned.
This exercise is performed on each individual system, so there is no need
to partner students with each other for this exercise. Most steps in these
procedures are executable by using either the Enhanced Storage Tool
within the Solaris Volume Manager or by using the command line.
For this exercise, the solutions to each step is presented using the
command-line equivalent. The Enhanced Storage Tool within the Solaris
Volume Manager is open and used to display a visual record of the Solaris
Volume Manager software’s activities.
Exercise: Mirroring the root (/) File System (Level 3)
Configuring Solaris Volume Manager Software 9-53
Copyright 2002 Sun Microsystems, Inc. All Rights Reserved. Enterprise Services, Revision A
Task Summary
Perform the following tasks:
● Map the available disk slices to the requirements for state database
replicas and root (/) file system submirrors.
● Create the state database.
● Build the mirror of the root (/) file system.
● Modify the OpenBoot PROM variables to use the mirrored device as
an alternate boot path in the event of a failure of the primary
submirror.
● Reboot the system using the secondary root (/) submirror to test the
mirror.
● Reboot the system using the primary root (/) submirror.
● Remove the mirror from the root (/) partition.
Tasks and Solutions
This sections provides the tasks and their solutions.
1. Open the Enhanced Storage Tool within the Solaris Management
Console, and leave it open throughout this exercise to use it as a
monitoring mechanism.
# smc &
Note – The task solutions are presented using the command-line
equivalents because every task step can be performed by using the
command line.
2. Fill in the blanks to record the information needed to complete this
exercise:
● Disk slice for the state database replica 1:
As defined for your lab system.
● Disk slice for the state database replica 2:
As defined for your lab system.
● Disk slice for the state database replica 3:
As defined for your lab system.