solaris 9 student guide part 2 sa299 phần 7 ppsx
Bạn đang xem bản rút gọn của tài liệu. Xem và tải ngay bản đầy đủ của tài liệu tại đây (880.27 KB, 86 trang )
Performing Smartcard Administration
Performing Smartcard Authentication 12-23
Copyright 2002 Sun Microsystems, Inc. All Rights Reserved. Enterprise Services, Revision A
4. To set a new PIN:
a. Select the PIN Configuration tab.
b. Enter the new PIN, and click Change.
The Change PIN: Enter PIN window appears, as shown in
Figure 12-23.
Figure 12-23 Change PIN: Enter PIN
c. Enter the current PIN. The default (current) PIN is set to
$$$$java.
d. Click OK.
5. To modify the user profiles:
a. Click the User Profiles tab.
Currently the dtlogin application is the only available and
supported application. Therefore, the profile name must be
dtlogin.
b. Type dtlogin in the User Profile Name field.
c. Add a valid user name and password for this card.
d. Click Set to update the user profile.
Performing Smartcard Administration
12-24 Advanced System Administration for the Solaris™ 9 Operating Environment
Copyright 2002 Sun Microsystems, Inc. All Rights Reserved. Enterprise Services, Revision A
Note – Users can change their own PIN using the SmartCard Console.
The Set User Profile: Enter PIN window appears, as shown in
Figure 12-24.
Figure 12-24 Set User Profile: Enter PIN Window
e. Enter a PIN for the user profile.
Caution – Do not forget the new PIN. You cannot modify the current
information on the card without the PIN.
f. Click OK in the Set User Profile: Enter PIN window.
6. Click OK.
Performing Smartcard Administration
Performing Smartcard Authentication 12-25
Copyright 2002 Sun Microsystems, Inc. All Rights Reserved. Enterprise Services, Revision A
Activating Smartcard Operations
The Smartcard is now configured and ready to use. Next, you must
activate the application configured for that Smartcard on the client.
When you activate a Smartcard, you use The Desktop Configuration
Dialog window and its four tabs:
● Cards/Authentications – Displays the current cards and the
authentication scheme used by the desktop.
● Defaults – Lets you set defaults from a list of available resources for
the desktop. These resources include the Smartcards, Card Reader,
and type of Authentication.
● Timeouts – Modify functionality
● Options – Modify functionality
To activate Smartcard operations:
1. In the SmartCard Console window, click the OCF Clients icon.
The available clients appear, as shown in Figure 12-25.
Figure 12-25 SmartCard Console Window
2. Double-click the Desktop icon.
Performing Smartcard Administration
12-26 Advanced System Administration for the Solaris™ 9 Operating Environment
Copyright 2002 Sun Microsystems, Inc. All Rights Reserved. Enterprise Services, Revision A
The Cards/Authentications Used by Desktop window appears, as
shown in Figure 12-26
Figure 12-26 Cards/Authentications Used by Desktop Window
3. Select PayFlex in the Smart Cards Used field.
Note – When you click PayFlex, two fields, Pin and User Pin, appear in
the right pane. Do not modify these fields.
4. Click Add.
5. Because the current status of the Desktop’s Smartcard capabilities is
shown as Inactive, select Activate Desktop’s SmartCard capabilities.
Performing Smartcard Administration
Performing Smartcard Authentication 12-27
Copyright 2002 Sun Microsystems, Inc. All Rights Reserved. Enterprise Services, Revision A
6. Select the Defaults tab.
The Default Resources for Desktop window appears, as shown in
Figure 12-27. In this window, you can specify a specific card and
reader or select the default that is set for the OCF Server.
Figure 12-27 Default Resources for Desktop Window
7. Click OK to continue.
Performing Smartcard Administration
12-28 Advanced System Administration for the Solaris™ 9 Operating Environment
Copyright 2002 Sun Microsystems, Inc. All Rights Reserved. Enterprise Services, Revision A
Configuring Smartcard Removal Options
You use the Timeouts and Options tabs of the Desktop Configuration
window to modify the desktop Smartcard functionality. In other words,
you are configuring the behavior of the desktop when the card is removed
from the reader.
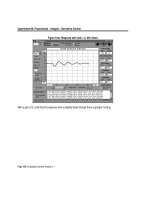
In the Timeouts tab, as shown in Figure 12-28, there are three sliders:
● Card Removal Timeout – The number of seconds that the desktop
waits after a Smartcard is removed before locking the screen.
● Reauthentication Timeout – The number of seconds that the
Reauthentication Screen is displayed.
● Card Removal Logout Wait Timeout – The number of seconds that
the desktop waits for a Smartcard to be reinserted before the desktop
displays the Reauthentication screen. If the card is not reinserted in
that amount of time, the user is logged out.
Figure 12-28 Desktop Timeouts Configuration Tab
Performing Smartcard Administration
Performing Smartcard Authentication 12-29
Copyright 2002 Sun Microsystems, Inc. All Rights Reserved. Enterprise Services, Revision A
The Options tab, as shown in Figure 12-29, has two options:
● Ignore Card Removal – When selected, removing the Smartcard does
not invoke a lock screen or logout.
● Reauthenticate After Card Removal – When selected, the
Reauthentication Screen is immediately launched when the
Smartcard is removed. When not selected, the Reauthentication
Screen is controlled by the Card Removal Logout Wait parameter set
in the Timeouts tab.
Figure 12-29 Options Tab
Performing Smartcard Administration
12-30 Advanced System Administration for the Solaris™ 9 Operating Environment
Copyright 2002 Sun Microsystems, Inc. All Rights Reserved. Enterprise Services, Revision A
To test whether you have successfully configured and activated the
Smartcard, complete the following steps:
1. Remove the card from the card reader.
2. Exit your current login session.
The Display Locked Screen window, as shown in Figure 12-30,
appears.
Figure 12-30 Display Locked Screen
3. Insert the card into the card reader.
4. Enter your login PIN.
Your new session starts.
Troubleshooting Smartcard Operations
Performing Smartcard Authentication 12-31
Copyright 2002 Sun Microsystems, Inc. All Rights Reserved. Enterprise Services, Revision A
Troubleshooting Smartcard Operations
The following sections provide some procedures for troubleshooting
Smartcard operations.
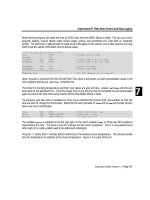
Enabling Debugging
The OCF Server in the SmartCard Console, shown in Figure 12-31,
generates a text-formatted log file. You set server debug levels and the
OpenCard tracing level to record the necessary information for debugging
and reporting problems to technical support.
Figure 12-31 Smartcard Console
To enable optional debugging using the SmartCard Console:
1. Select the OCF Server from the Navigation pane.
2. Double-click the icon representing the local system.
Troubleshooting Smartcard Operations
12-32 Advanced System Administration for the Solaris™ 9 Operating Environment
Copyright 2002 Sun Microsystems, Inc. All Rights Reserved. Enterprise Services, Revision A
The OCF Server Administration window appears, as shown in
Figure 12-32.
Figure 12-32 OCF Server Administration Window
3. Select the Debug tab.
4. To indicate the level of debugging you want, use the OCF Debug
Level slider.
5. To indicate the trace level you want, use the OpenCard Trace Level
slider.
6. If necessary, change the default debug file /var/run/ocf.log in the
OCF Debug File Location field.
7. Click OK to make the changes.
Troubleshooting Smartcard Operations
Performing Smartcard Authentication 12-33
Copyright 2002 Sun Microsystems, Inc. All Rights Reserved. Enterprise Services, Revision A
Disabling Smartcard Operations
You might need to disable Smartcard operations if a Smartcard
configuration error does not allow a user to log in with a Smartcard, or if
a system no longer needs a Smartcard login. As the root user, type the
following command to disable Smartcard operations:
# smartcard -c disable
Resolving Smartcard Configuration Problems
Smartcard configuration information is stored in the
/etc/smartcard/opencard.properties file. This file does not require
administration and should not be edited manually. However, if you
inadvertently introduce a problem in your Smartcard configuration by
using the Smartcard console or the command line, you can restore the
previous version of the opencard.properties file.
Note – This procedure assumes you have previously copied the
opencard.properties file to opencard.properties.bak.
As the root user, from the command line, perform the following steps:
1. Change to the /etc/smartcard directory.
2. Save the current version.
# cp opencard.properties opencard.properties.bad
3. Copy the previous version to the current version.
# cp opencard.properties.bak opencard.properties
Troubleshooting Smartcard Operations
12-34 Advanced System Administration for the Solaris™ 9 Operating Environment
Copyright 2002 Sun Microsystems, Inc. All Rights Reserved. Enterprise Services, Revision A
You can display the current client and server configuration by typing the
following on the command line:
# smartcard -c admin
Client Properties:
ClientName.PropertyName Value
Desktop.IButton.authmechanism = Pin=UserPin
Desktop.validcards = CyberFlex PayFlex
Desktop.PayFlex.authmechanism = Pin=UserPin
default.validcards = CyberFlex IButton PayFlex
default.authmechanism = Pin=UserPin
default.defaultaid = A000000062030400
Server Properties:
PropertyName Value
authservicelocations = com.sun.opencard.service.auth
OpenCard.trace = com.sun:1 opencard.core:1
initializerlocations = com.sun.opencard.cmd.IButtonInit
debugging = 1
debugging.filename = /var/run/ocf.log
ocfserv.protocol = rpc
authmechanism = Pin Password
language = en
cardservicelocations = com.sun.opencard.service.common
IButton.ATR =
008F0E0000000000000000000004000034909000
country = US
CyberFlex.ATR = 3B169481100601810F 3B169481100601811F
OpenCard.services =
com.sun.opencard.service.cyberflex.CyberFlexS
erviceFactory com.sun.opencard.service.ibutton.IButtonServiceFactory
com.sun.ope
ncard.service.payflex.PayFlexServiceFactory
PayFlex.ATR = 3B6900005792020101000100A9
3B6911000000579202
0101000100 3B6900002494010301000100A9
OpenCard.terminals =
com.sun.opencard.terminal.scm.SCMStc.SCMStcCa
rdTerminalFactory|SunCardReader|SunSCRI|/dev/cua/a
keys.chkey.dtlogin.user1 = AD5BE9EAE0CD8C15
keys.chkey.login.user = 3132333435363738
SunCardReader.0.ATR = 3B6900002494010301000100A9
Troubleshooting Smartcard Operations
Performing Smartcard Authentication 12-35
Copyright 2002 Sun Microsystems, Inc. All Rights Reserved. Enterprise Services, Revision A
Resolving Smartcard ATR Problems
When trying to download an applet to a Smartcard, an error message
“SmartcardInvalidCardException” might indicate that the ATR of the
Smartcard inserted in the card reader has not been added as a valid ATR
for that card type. When selecting the card type from the Smartcards
window in the Smartcard Console, if the ATR does not automatically
appear in the Add ATR window, you must add the ATR manually. The
card manufacturer will provide the ATR for you.
Resolving Smartcard Login Problems
When Smartcard operations are enabled, the Common Desktop
Environment (CDE) login screen displays the prompt: please insert
Smartcard. If you cannot log in to the system using a Smartcard because
of Smartcard setup problems, log in remotely with the rlogin or telnet
commands. You can also choose the CDE command-line login from the
local system. Become the root user, and disable Smartcard operations
from the command line:
# smartcard -c disable
Performing the Exercises
12-36 Advanced System Administration for the Solaris™ 9 Operating Environment
Copyright 2002 Sun Microsystems, Inc. All Rights Reserved. Enterprise Services, Revision A
Performing the Exercises
You have the option to complete any one of three versions of a lab. To
decide which to choose, consult the following descriptions of the levels:
● Level 1 – This version of the lab provides the least amount of
guidance. Each bulleted paragraph provides a task description, but
you must determine your own way of accomplishing each task.
● Level 2 – This version of the lab provides more guidance. Although
each step describes what you should do, you must determine which
commands (and options) to input.
● Level 3 – This version of the lab is the easiest to accomplish because
each step provides exactly what you should input to the system. This
level also includes the task solutions for all three levels.
Exercise: Configuring Smartcard for Desktop Authentication (Level 1)
Performing Smartcard Authentication 12-37
Copyright 2002 Sun Microsystems, Inc. All Rights Reserved. Enterprise Services, Revision A
Exercise: Configuring Smartcard for Desktop
Authentication (Level 1)
In this exercise, you configure a Smartcard and configure the desktop to
use a Smartcard for login authentication.
Preparation
To prepare for this exercise, refer to the material in the module.
Note – The delete command is not available on the Payflex Smartcards.
Therefore, once an applet is loaded onto a Payflex Smartcard, it cannot be
unloaded. CyberFlex Smartcards can unload applets.
Tasks
Using the SmartCard Console window, perform the following tasks:
● Enable the card reader
● Configure your Smartcard
● Activate Smartcard operations
● Test your Smartcard login
Exercise: Configuring Smartcard for Desktop Authentication (Level 2)
12-38 Advanced System Administration for the Solaris™ 9 Operating Environment
Copyright 2002 Sun Microsystems, Inc. All Rights Reserved. Enterprise Services, Revision A
Exercise: Configuring Smartcard for Desktop
Authentication (Level 2)
In this exercise, you configure a Smartcard and configure the desktop to
use a Smartcard for login authentication.
Preparation
To prepare for this exercise, refer to the material in the module.
Note – The delete command is not available on the Payflex Smartcards.
Therefore, once an applet is loaded onto a Payflex Smartcard it cannot be
unloaded. CyberFlex Smartcards can unload applets.
Task Summary
Using the SmartCard Console window, perform the following tasks:
● Enable the card reader
● Configure your Smartcard
● Activate Smartcard operations
● Test your Smartcard login
Tasks
Complete the following steps:
1. As the root user, start the SmartCard Console.
2. Select and enable the correct card reader.
3. Activate Card Services for your card.
4. Add support for a new Smartcard.
5. Load the Smartcard applet to your Smartcard.
6. Configure the PIN and user profile.
7. Activate Smartcard operations on the desktop.
8. Log out, and verify the login using the Smartcard.
Exercise: Configuring Smartcard for Desktop Authentication (Level 2)
Performing Smartcard Authentication 12-39
Copyright 2002 Sun Microsystems, Inc. All Rights Reserved. Enterprise Services, Revision A
9. Log in as user11, and start the Smartcard Console.
10. Reset the PIN to the default value, and reset the user profile to blank.
11. Log out, and attempt to log in again with the Smartcard.
12. Use the telnet command to connect to the host with the Smartcard
reader, and disable Smartcard from the command line.
Exercise: Configuring Smartcard for Desktop Authentication (Level 3)
12-40 Advanced System Administration for the Solaris™ 9 Operating Environment
Copyright 2002 Sun Microsystems, Inc. All Rights Reserved. Enterprise Services, Revision A
Exercise: Configuring Smartcard for Desktop
Authentication (Level 3)
In this exercise, you configure a Smartcard and configure the desktop to
use a Smartcard for login authentication.
Preparation
To prepare for this exercise, refer to the material in the module.
Note – The delete command is not available on the Payflex Smartcards.
Therefore, once an applet is loaded onto a Payflex Smartcard, it cannot be
unloaded. CyberFlex Smartcards can unload applets.
Task Summary
Using the SmartCard Console window, perform the following tasks:
● Enable the card reader
● Configure your Smartcard
● Activate Smartcard operations
● Test your Smartcard login
Tasks and Solutions
Complete the following steps:
1. As the root user, start the SmartCard Console.
# /usr/dt/bin/sdtsmartcardadmin &
2. Select and enable the correct card reader.
For more information, see Figure 12-6 on page 12-9.
3. Activate Card Services for your card.
For more information, see Figure 12-12 on page 12-13.
Exercise: Configuring Smartcard for Desktop Authentication (Level 3)
Performing Smartcard Authentication 12-41
Copyright 2002 Sun Microsystems, Inc. All Rights Reserved. Enterprise Services, Revision A
4. Add support for a new Smartcard.
For more information, see Figure 12-14 on page 12-15 and Figure 12-16 on
page 12-17.
5. Load the Smartcard applet to your Smartcard.
For more information, see Figure 12-18 on page 12-19.
6. Configure the PIN and user profile.
For more information, see Figure 12-23 on page 12-23 and Figure 12-24 on
page 12-24.
7. Activate Smartcard operations on the desktop.
For more information, see Figure 12-25 on page 12-25.
8. Log out, and verify the login using the Smartcard.
9. Log in as user11, and start the Smartcard Console.
# /usr/dt/bin/sdtsmartcardadmin &
10. Reset the PIN to the default value, and reset the user profile to blank.
For more information, see Figure 12-23 on page 12-23 and Figure 12-24 on
page 12-24.
11. Log out, and attempt to log in again with the Smartcard.
Login fails, you can no longer access the desktop.
12. Use the telnet command to connect to the host with the Smartcard
reader, and disable Smartcard from the command line.
# telnet instructor
Trying 192.168.0.1
Connected to instructor.
Escape character is ‘^]’.
SunOS 5.9
login: root
Password:
# smartcard -c disable
# exit
Exercise Summary
12-42 Advanced System Administration for the Solaris™ 9 Operating Environment
Copyright 2002 Sun Microsystems, Inc. All Rights Reserved. Enterprise Services, Revision A
Exercise Summary
?
!
Discussion – Take a few minutes to discuss what experiences, issues, or
discoveries you had during the lab exercise.
● Experiences
● Interpretations
● Conclusions
● Applications
13-1
Copyright 2002 Sun Microsystems, Inc. All Rights Reserved. Enterprise Services, Revision A
Module 13
ConfiguringSystemMessaging
Objectives
The syslog system messaging features track system activities and events.
You can manually generate log messages by using the logger command.
The Solaris Management Console activity is tracked by using the
messaging facilities available to the Solaris Management Console.
Regardless of the type of information you want to record, a messaging
feature exists to record it.
Upon completion of this module, you should be able to:
● Describe the fundamentals of the syslog function
● Configure the /etc/syslog.conf file
● Configure syslog messaging
● Use the Solaris Management Console log viewer
The following course map shows how this module fits into the current
instructional goal.
Figure 13-1 Course Map
Introducing the syslog Function
13-2 Advanced System Administration for the Solaris™ 9 Operating Environment
Copyright 2002 Sun Microsystems, Inc. All Rights Reserved. Enterprise Services, Revision A
Introducing the syslog Function
The syslog function, the syslogd daemon, and input from the
/etc/syslog.conf file work together to facilitate system messaging for
the Solaris 9 Operating Environment (Solaris 9 OE).
The syslog Concept
The syslog function sends messages generated by the kernel programs
and system utilities to the syslogd daemon, as shown in the Figure 13-2.
With the syslog function you can control message logging, depending on
the configuration of the /etc/syslog.conf file. The daemon can:
● Write messages to a system log
● Forward messages to a centralized log host
● Forward messages to a list of users
● Write messages to the system console
Figure 13-2 The syslog Structure
Introducing the syslog Function
Configuring System Messaging 13-3
Copyright 2002 Sun Microsystems, Inc. All Rights Reserved. Enterprise Services, Revision A
The /etc/syslog.conf File
A configuration entry in the /etc/syslog.conf file consists of two
tab-separated fields: selector and action.
The selector field has two components, a
facility
and a
level
written
as
facility.level
. Facilities represent categories of system processes
that can generate messages. Levels represent the severity or importance of
the message.
The action field determines where to send the message.
For example, when you place the following entry in the
/etc/syslog.conf file, error messages for all facilities are sent to the
/var/adm/messages file:
*.err /var/adm/messages
where:
Caution – Only use tabs as white space in the /etc/syslog.conf file.
The Solaris OE accesses the /usr/include/sys/syslog.h file to
determine the correct
facility.level
sequencing order.
*.err Is the selector field. The asterisk (*) is the
facility
, and the dot (.) is the delimiter. The
err field is the
level
of the message.
/var/adm/messages Is the action field.
Introducing the syslog Function
13-4 Advanced System Administration for the Solaris™ 9 Operating Environment
Copyright 2002 Sun Microsystems, Inc. All Rights Reserved. Enterprise Services, Revision A
Selector Field
The selector field is a semicolon-separated list of priority specifications in
the following format:
facility.level;facility.level
In the selector field syntax,
facility
is a system facility. Table 13-1 shows
values that the selector field (
facility
) can contain.
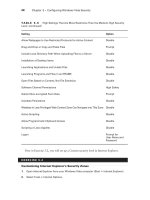
Table 13-1 Selector Field (
facility
) Options
Field Description
kern Messages generated by the kernel.
user Messages generated by user processes. This file does
not list the default priority for messages from
programs or facilities.
mail The mail system.
daemon System daemons, such as the in.ftpd and the
telnetd daemons.
auth The authorization system, including the login, su,
and ttymon commands.
syslog Messages generated internally by the syslogd
daemon.
lpr The line printer spooling system, such as the lpr and
lpc commands.
news Files reserved for the USENET network news system.
uucp The UNIX-to-UNIX copy (UUCP) system does not use
the syslog function.
cron The cron and at facilities, including crontab, at, and
cron.
local0-7 Fields reserved for local use.
mark The time when the message was last saved. The
messages are produced internally by the syslogd
daemon.
* All facilities, except the mark
facility
.
Introducing the syslog Function
Configuring System Messaging 13-5
Copyright 2002 Sun Microsystems, Inc. All Rights Reserved. Enterprise Services, Revision A
Note – You can use the asterisk (*) to select all facilities (for example
*.err); however, you cannot use * to select all levels of a
facility
(for
example, kern.*)
In the selector field syntax,
level
is the severity or importance of the
message. Each
level
includes all the levels above (of a higher severity).
Table 13-2 shows the levels in descending order of severity.
Note – Not all levels of severity are implemented for all facilities in the
same way. For more information, refer to the online manual pages.
Table 13-2 Selector Field (
level
) Options
Level Priority Description
emerg 0 Panic conditions that are normally broadcast to
all users
alert 1 Conditions that should be corrected immediately,
such as a corrupted system database
crit 2 Warnings about critical conditions, such as hard
device errors
err 3 Errors other than hard device errors
warning 4 Warning messages
notice 5 Non-error conditions that might require special
handling
info 6 Informational messages
debug 7 Messages that are normally used only when
debugging a program
none 8 Messages are not sent from the indicated
facility
to the selected file