configuring and troubleshooting windows xp professional phần 3 potx
Bạn đang xem bản rút gọn của tài liệu. Xem và tải ngay bản đầy đủ của tài liệu tại đây (818.87 KB, 82 trang )
130 Chapter 3 • Exploring the Windows XP User Interface
Q: The Quick Launch area from which I could click a button and get back to
the desktop has disappeared. How do I get it back?
A: To restore any of the Taskbar toolbars, right-click the taskbar, select Toolbars,
and click the ones that you wish to display.To restore the Quick Launch
toolbar, right-click the taskbar, select Properties, and select the checkbox
Show Quick Launch.
Q: How do I display the system time on my taskbar?
A: Right-click the taskbar, select Properties, and select Show the system clock.
Q: How do I quickly see what storage devices I have in my system?
A: Open My Computer and it will immediately display any local floppy, hard,
and removable disks. It will also show any mapped network drives.
Q: I’ve been using the Windows Classic look and customized my folder settings.
Now it is difficult to see things clearly. How can I get things back to the way
they were?
A: Change the appearance to Windows XP style and then back again to Classic
style.This will restore the settings.
Q: My screen resolution is set to 1024x768, but I have poor eyesight. How can I
change it to 640x480?
A: Right-click the desktop, select Properties, and then the Settings tab.You
can change the desktop screen resolution here. However, your systems admin-
istrators may have group policies implemented that prevent you doing this.
www.syngress.com
Frequently Asked Questions
The following Frequently Asked Questions, answered by the authors of this book,
are designed to both measure your understanding of the concepts presented in
this chapter and to assist you with real-life implementation of these concepts. To
have your questions about this chapter answered by the author, browse to
www.syngress.com/solutions and click on the “Ask the Author” form.
189_XP_03.qxd 11/9/01 2:30 PM Page 130
Exploring the Windows XP User Interface • Chapter 3 131
Q: I’m responsible for supporting laptop users in my company. I often get com-
plaints when issuing new laptops about how difficult it is for them to read
text. How can I improve things?
A: Right-click the desktop, select Properties, and then the Appearance tab.
Click Effects… and check that the Screen fonts are enabled and set to use
ClearType. This will greatly improve the display quality and readability of
text for laptop users.
www.syngress.com
189_XP_03.qxd 11/9/01 2:30 PM Page 131
189_XP_03.qxd 11/9/01 2:30 PM Page 132
Managing Windows
XP Professional
Solutions in this chapter:
■
Creating Users and Groups
■
Sharing Folders
■
Managing Storage
■
Managing Devices
■
Using the Event Viewer
■
Understanding Performance Logs
; Summary
; Solutions Fast Track
; Frequently Asked Questions
Chapter 4
133
189_XP_04.qxd 11/9/01 2:47 PM Page 133
134 Chapter 4 • Managing Windows XP Professional
Introduction
Many people today have been exposed to some version of Windows.Whether
you enjoy working on computers or not, most jobs require that you use a com-
puter to some extent. One of the goals of XP is to make an operating system that
is easier for nontechnical people to use and manage. XP is a great platform for
“power users”—users that know the ins and outs of Windows—and “novice
users” alike. In this chapter, we discuss the concepts of managing Windows XP
Professional.
First, we look at creating users and groups in XP.This is an administration
task required to manage permissions on a local Windows XP machine. Instead of
creating new users and groups, we can use the built-in accounts, such as
Administrator and Guest.The built-in users and groups have predefined permis-
sions.We examine the permissions assigned to these accounts by default in addi-
tion to how and when to change the defaults.We discuss how to make shared
folders and when to use them.We touch on managing storage and devices.This
includes topics such as basic disks, dynamic disks, volumes, partitions, and file sys-
tems. Lastly, we discuss troubleshooting by using the Event Viewer and
Performance Logs.
Creating Users and Groups
Every time you use your Windows XP machine, you must provide a valid user
account to log in and access the local machine.This user account must have the
appropriate permissions to use the machine or access will be denied.You can
assign permissions directly to the user account, or you can assign them to groups.
When assigning permissions to groups, you affect all of the users within the
group. In this section, we define the different types of user accounts and groups
available.We also learn how to create and manage each type of user and group.
What Are User Accounts?
What exactly is a user account? Think of it as your passport to access resources,
such as printers and files.Windows XP requires mandatory logon, which means
that to interact with your machine, you must have a valid user account and pass-
word. Depending on the types of resources you want to access—local or net-
work—you need either a local user account or a domain user account.
www.syngress.com
189_XP_04.qxd 11/9/01 2:47 PM Page 134
www.syngress.com
Local User Accounts
Local user accounts are just that,“local” to the machine that you are logging into.
Every XP machine maintains its own database. If you were logging into XP’s
database, it would mean that you are logging on to the local computer, or logging
on locally.A local user account gives you rights that are associated only with that
specific machine, and not the entire network. Remember:“Local” means just
that, local to the machine you are logging into.
Table 4.1 shows the default user accounts provided by Windows XP
Professional during installation.The two accounts created are Administrator and
Guest. Exercise 4.1 walks you through creating local users.
Table 4.1
Default Local User Accounts Provided with Windows XP Professional
Account Account Function
Administrator The Administrator account is the first account you will ever
use to log into Windows XP. Once you log in, you may
create new accounts and begin to configure your work-
station. A few important features of the Administrator
account are that you can never delete or disable it nor can
you remove it from the Local Administrators group.
However, you can rename the account.
Guest The Guest account is used by users who do not have an
actual account on the workstation for them to log in with,
so they can log in as guests. The Guest account does not
have a password. The Guest account is disabled by default
so you need to enable it to use it.
NOTE
One good way to secure your machine up is to create a “dummy”
Administrator account. Rename the actual Administrator account, set up
a new account called “administrator” with limited rights, and audit it
carefully. Now you can see if someone is trying to break into your
machine by using the Administrator account.
Managing Windows XP Professional • Chapter 4 135
189_XP_04.qxd 11/9/01 2:47 PM Page 135
136 Chapter 4 • Managing Windows XP Professional
Exercise 4.1 Creating Local User Accounts
with the Computer Management Console
To create a local user, you must first navigate to the Computer Management
MMC:
1. Navigate to the Computer Management applet in your administrative
tools program group (Start | Control Panel | Administrative Tools
| Computer Management).
2. Expand System Tools in Computer Management; you will see the
Local Users and Groups Icon.
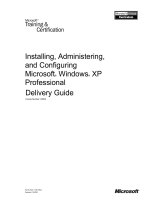
3. Expand Local Users and Groups.You will see two folders, Users and
Groups. Figure 4.1 shows these folders.
4. Right-click the Users folder and select the option New User…. This
will bring you to the New User dialog box shown in Figure 4.2.
www.syngress.com
Figure 4.1 Local Users and Groups within the Computer
Management Console
189_XP_04.qxd 11/9/01 2:47 PM Page 136
Managing Windows XP Professional • Chapter 4 137
5. Supply the following information:
■
User name The name that will be used by this account to log on.
■
Full name The actual name of the user (this may be different from
the user name).
■
Description Adds other details about the user or account (such as
what floor the user works on).
6. Enter the password and confirm it.
7. Check the desired account options:
■
User must change password at logon Requires the user to enter
a new password when he logs on.
■
User cannot change password Makes it impossible for the user
to change her password.
■
Password never expires Ensures that the password does not have
to be constantly changed by the user.
■
Account is disabled Disables the account, preventing it from being
used by anyone trying to log on.This is not the same as deleting the
account, because it still exists, but it is technically inoperable.
8. To finish, click Create, and the new user account will be created.
www.syngress.com
Figure 4.2 New User Properties Dialog Box
189_XP_04.qxd 11/9/01 2:47 PM Page 137
138 Chapter 4 • Managing Windows XP Professional
NOTE
One thing to remember is that the minimum password age is set by
default to 0 days, and the maximum password age by default is 42 days.
If this is inappropriate for your organization, you can change it in the
Local Security Settings dialog box. Go to Start | Control Panel |
Administrative Tools | Local Security Policy | Security Settings and
expand down to Password Policy. In the contents pane (right-hand side) of
Local Security Settings, you will see the default settings. Double-click the
settings to change them to what is appropriate for your security policy.
The new account will appear in the contents pane of the MMC.To find
more options or to change other options on your new user, simply right-click
new user for a pop-up menu of options, including the following:
■
Set password
■
Rename
■
Delete
■
Properties
One thing you may want to investigate is the user’s properties. Clicking on
the Properties field allows you to apply a few more important options for this
user.You will find the following two new tabs:
■
Member of Allows you to add specific groups to the user account you
have created (groups are covered in the next section).
■
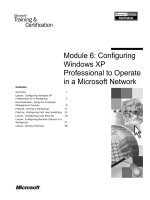
Profile tab (shown in Figure 4.3) The Profile path field assigns the
profile used by your new Local User account upon logon to the
machine.The Logon script field assigns a batch file–based login script.
The Home Folder section sets the user account to a local path for its
home folder or maps the user account to a home folder on a network
share.A home folder is where users should save all of their data.
Remember, it is best to have all data in one centralized area so that it
can easily be located and backed up.
Let’s look at another way to create a user account. First, we have to get to the
command prompt, which is a 32-bit program that runs text-based commands. It
looks like DOS (Disk Operating System), but it is not DOS. It is called
www.syngress.com
189_XP_04.qxd 11/9/01 2:47 PM Page 138
Managing Windows XP Professional • Chapter 4 139
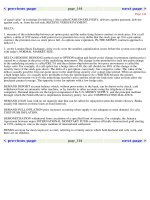
Command (abbreviated CMD) and can be run from the Run dialog box. Click
Start | Run. From the Run dialog box, type in the CMD and click OK.Typing
net and pressing E
NTER will give you the window shown in Figure 4.4.
Figure 4.4 shows all of the possible options used with the net command.To
see a list of options (including the correct syntax) for creating a user, run the fol-
lowing command from the command prompt:
NET USER /HELP
www.syngress.com
Figure 4.3 A User Account’s Profile Tab
Figure 4.4 The Command Prompt
189_XP_04.qxd 11/9/01 2:47 PM Page 139
140 Chapter 4 • Managing Windows XP Professional
NOTE
A profile is a set of configurations that you can create, or the machine
creates by default (usually ending with a .DAT extension) that defines
your environment when logging on. The environment can contain
(among other things) window size and position settings, program items,
icons, and screen colors.
The output from this command will display more information than can fit on
one screen. Let’s view all of the output by scrolling back to the top of the com-
mand prompt (use the scrollbar on the right side of the command prompt
window). Scroll down slowly and read all of the command’s switches.This may
appear to be a difficult way of creating users, but at times it is easier than going
through the graphical user interface (GUI).This is generally faster than using the
GUI.You also have the flexibility of adding these commands to a script or batch
file to automate your administrative task. Exercise 4.2 walks you through creating
a user from the command prompt. Exercise 4.3 walks you through deleting a user
account from the command prompt. Exercise 4.4 walks you through creating
local user accounts with the Control Panel User Accounts applet.
Exercise 4.2 Creating Local User
Accounts by Using the Command Line
1. Open a command prompt. Go to Start | Run. Type CMD and
click OK.
2. Next, type NET USER newuser1 /ADD.You should see “the com-
mand completed successfully” message.This lets you know that your user
was created.
3. To use the GUI to verify that your user was created, Go to Start |
Control Panel | Administrative Tools | Computer Management
and navigate down to the Users folder.You will see the new account
NEWUSER1. Minimize Computer Management.
www.syngress.com
189_XP_04.qxd 11/9/01 2:47 PM Page 140
Managing Windows XP Professional • Chapter 4 141
Exercise 4.3 Deleting Local User
Accounts by Using the Command Line
1. Go back to the command prompt and type NET USER newuser1
/DELETE.
2. This will delete the newly created user.To verify that the user account was
deleted, maximize Computer Management and refresh the right side con-
tents pane by pressing F5.The NEWUSER1 local account disappears.
Another way to check this is to pull up the command prompt and type
NET USER, which will show all the user accounts that are available on
the local machine.
Exercise 4.4 Creating Local User Accounts
with the Control Panel User Accounts Applet
Lastly, you can create a new local user account via the Control Panel by using the
following steps:
1. Go to Start | Control Panel | User Accounts Applet and double-
click the User Accounts Applet.
2. You will be asked to pick a task.You can change a current account,
create a new one, or change the way a user logs off. Select Create a
new user account from the menu.
3. In the Type a name for the new account box, type in XPTEST.
Afterwards, click Next to continue.
4. Choose whether to create a Computer Administrator or a Limited
account.The Computer Administrator account will give the new user
account administrative rights.The Limited account will give the new
user account rights to change their password, view files it creates, view
files in the shared documents folder, and change the settings for its pro-
file. Select the Computer Administrator radio button and click
Create Account.You will now see the account listed under the Pick an
account to change section of the User Accounts window.
Using the User Accounts Applet
Now that you have seen how to create local user accounts, let’s look at how to
manage them with the User Accounts applet (see Figure 4.5) from the Control
Panel.This applet provides many useful features:
www.syngress.com
189_XP_04.qxd 11/9/01 2:47 PM Page 141
142 Chapter 4 • Managing Windows XP Professional
■
Changing the login interface for users
■
Resetting users passwords
■
Changing the role of a user
■
Renaming an account
■
Enabling Fast User Switching
From the User Accounts window, you can create a new account or you can
modify an existing account.You can also change the way users log on and off.
(See Exercise 4.4 to learn how to create a new account.) Figure 4.6 shows the
logon and logoff options.
In Figure 4.6, you see two options—Use the Welcome screen and Use
Fast User Switching.The Welcome screen is an alternative way of logging onto
your computer. Instead of getting the normal Ctrl+Alt+Delete logon box, users
are given a screen that lists the available user accounts for their machine.The user
simply clicks on the user that he wishes to log on as (entering a password if
needed), and he is logged on. Disabling the Welcome screen returns the
Ctrl+Alt+Delete logon box.
www.syngress.com
Figure 4.5 The User Accounts Applet
189_XP_04.qxd 11/9/01 2:47 PM Page 142
Managing Windows XP Professional • Chapter 4 143
Enabling the Welcome screen is a requirement for Fast User Switching. Fast
User Switching is a new feature in Windows XP. It is available only when your
PC is in workgroup mode.You use Fast User Switching by clicking Start | Log
Off. On the Log Off Windows dialog box, click Switch User.You will now be
at the Welcome screen.You can log on as the same user or a different user by
choosing her name from the list.
www.syngress.com
Figure 4.6 Selecting Logon and Logoff Options
Logging On with Original Administrator Account
The Welcome screen and Fast User Switching are enabled by default in
Workgroup mode. If you have created other accounts, you may notice
that the original Administrator account is not shown on the Welcome
screen as one of the available accounts. If you wish to log on as
Administrator, you can press Ctrl+Alt+Delete twice, which will cause
Configuring & Implementing…
Continued
189_XP_04.qxd 11/9/01 2:47 PM Page 143
144 Chapter 4 • Managing Windows XP Professional
When you use Fast User Switching, users are not logged off.All of their pro-
grams continue to run. XP puts their desktop in the background and allows
another user to open a new desktop (similar to how Terminal Server works).You
can switch back and forth between the user’s desktops without having to close all
applications and save your data. Pressing the Windows logo key + L takes you
directly to the Welcome screen.You may use this, for example, when you are at
home writing a paper and someone else wants to check her mail.You can switch
over to her desktop and let her check mail without disturbing your desktop.
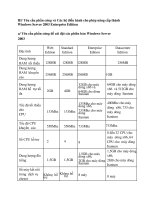
Figure 4.7 shows the options available for configuring a user account.This is
an easy way to manage your accounts. If you desire more options, you will need
to use Local Users And Computers from within Computer Management or run
lusrmgr.msc from the Run line.The options available with the User Accounts
applet are listed here:
■
Change the user’s login name
■
Reset the user’s password
■
Change the icon that appears next to the user’s name on the Welcome
screen and on the Start menu
www.syngress.com
the familiar login dialog box to appear. Another method for logging on
as Administrator is to restart Windows XP in Safe Mode.
If you want the Administrator account to show up in the list of
available accounts on the Welcome screen, you can remove all accounts
from the Administrators group and add them to the users (if you are
using the User Accounts Wizard, you would change their account type
to Limited). When the Administrator is the only account in the
Administrators group, it will show up on the list. Also, you can edit the
Registry to make the Administrator account show up on the Welcome
screen. Go to HKEY_LOCAL_MACHINE\SOFTWARE\Microsoft\Windows
NT\CurrentVersion\Winlogon\SpecialAccounts\UserList and add DWORD
Value with a name of Administrator and a value of 1.
As a security measure, you should avoid logging on to Windows XP
with accounts that have administrative privileges. If you need to admin-
ister your computer, you can always use the “Run As” feature, which will
allow you to launch applications in the context of the Administrator
account, even though you are logged in as someone else.
189_XP_04.qxd 11/9/01 2:47 PM Page 144
Managing Windows XP Professional • Chapter 4 145
■
Change the account from a limited account to an Administrator account
and vice versa
■
Delete the account from the local accounts database
Domain User Accounts
Before we cover what a domain user account is, you need to understand
domains. In Microsoft technologies, a domain is created when you make a
Windows NT or 2000 server a domain controller. Domains provide a single
point of administration and a single point of logon.All domain controllers within
the domain share the same database. Users can log into this database from any
computer within the domain.This is different than the stand-alone machine
approach we have been dealing with thus far. Now instead of users having to
remember a different username and password for each machine that they log
into, they can use the same account on every machine.This makes administration
easier as well. Now administrators have to manage only one account.
www.syngress.com
Figure 4.7 Configuring User Account Options
189_XP_04.qxd 11/9/01 2:47 PM Page 145
146 Chapter 4 • Managing Windows XP Professional
The process of joining a Windows XP machine to a domain creates a logical
association between the machine and the domain controllers. Joining the domain
creates a computer account in the domain database.This allows administrators to
centrally manage your machine with the other machines joined to the domain.A
common example of this is to create Group Policy Objects that apply machine set-
tings to all machines in the domain.This allows administrators to apply the settings
once and have them apply to all machines versus having to assign policy locally on
each machine. Exercise 4.5 walks you through joining your PC to the domain.
Exercise 4.5 Joining a Domain
1. Click Start | Control Panel | System Applet and click the
Computer Name tab. Click Network ID.This will start the Network
Identification Wizard.
2. From the How Do You Use This Computer window, choose This
computer is part of a business network, and I use it to connect
to other computers at work. Click Next to continue.
3. You will now be asked what type of network your company uses.
Choose My company uses a network with a domain. Click Next
to continue.
4. You will now be told that you need to enter the following information:
■
Username
■
Password
■
User account domain
You may optionally need to enter the following information:
■
Computer name
■
Domain name
Click Next to continue.
5. You will be asked for a domain to join and the name and password of a
user account that has the rights to join this machine to the domain.
Follow the remaining prompts and click Finish.You will have to restart
your XP Professional machine.
6. After rebooting, use the System applet in Control Panel (Use the
Computer Name tab) to verify that you are now part of the correct
domain.
www.syngress.com
189_XP_04.qxd 11/9/01 2:47 PM Page 146
Managing Windows XP Professional • Chapter 4 147
What Are Groups?
A group represents a basic container where you can add user accounts.All of the
user accounts added to a group share in the security permissions associated with
that group. In other words, when you assign permissions to a group, those per-
missions are automatically applied to all of the user accounts that are members of
the group. Creating groups can ease and aid your administrative efforts either on
the local machine or on a domain controller. Now, instead of having to assign
and manage permissions for 1,000 users, you can put those 1,000 users in a group
and assign permissions once to the group.When the permissions change, you can
change the permissions once for the group instead of 1,000 times for each user.A
group can be local or global, depending on where you make it. Let’s look at the
difference between the different types of groups.
Local Groups
Table 4.2 shows the local groups for a default installation of Windows XP
Professional. Like local users, local groups are local to the XP machine you are
currently logging into.These groups are stored in the unique database stored
locally on each XP machine. A local group can only be assigned permissions to
resources on the local machine and not to resources on the network. Exercise 4.6
walks you through creating local groups.
Table 4.2
Default Local Groups Provided with Windows XP Professional
Group Name Group Function
Administrators The local Administrators groups has unlimited and
unrestricted access to the computer.
Backup Operators Backup Operators can override security restrictions
for the sole purpose of backing up or restoring
files.
Guests Guests have the same access as the members of
the Users group, except for the Guest account,
which is further restricted.
Network Configuration Members of this particular group have some
Operators administrative privileges to manage configuration
of networking features and properties.
Power Users Power Users possess more administrative rights
with limited restrictions.
www.syngress.com
Continued
189_XP_04.qxd 11/9/01 2:47 PM Page 147
148 Chapter 4 • Managing Windows XP Professional
Remote Desktop Users Members of this group have the right to log on
remotely.
Replicator This group supports file replication within a domain.
Users Users are prevented from making system changes.
They have the least amount of system privileges of
all groups.
HelpServicesGroup This is the group for the Help and Support Services.
Exercise 4.6 Creating Local Groups
You have created local users within XP and now are going to create local groups.
There is little difference between creating a user and a group. Let’s look at cre-
ating a local group within Computer Management:
1. Click Start | Control Panel | Administrative Tools | Computer
Management. Expand System Tools, expand Local Users and
Groups, and then expand the Groups folder.
2. Right-click the Groups folder and select New Group from the menu.
This will give you the window shown in Figure 4.8.
www.syngress.com
Table 4.2 Continued
Group Name Group Function
Figure 4.8 Creating a Group in the New Group Dialog Box
189_XP_04.qxd 11/9/01 2:47 PM Page 148
Managing Windows XP Professional • Chapter 4 149
3. Type in a Group name.A good rule of thumb is to name the groups in
accordance with the users they will contain. (For instance, put all accoun-
tants into the “Accounting” group). Figure 4.8 shows a new group named
NewGroup1, to keep it simple.You can optionally add a description for
quick viewing within the contents pane of the MMC console.
4. Click Add to add members to the group.When you click Add, you are
presented with the Select Users dialog box.To add a user, type in the
name of the account. For this exercise, add the Administrator to the new
group by typing Administrator in the field below the words “Enter the
object names to select.”
5. Once you type it in, click Check Names on the right and it will
resolve the administrator to the local machine account. (You know it is
resolved because it will be underlined.)
6. Once it is resolved, click OK and you will see the Local Administrator
account appear in the Members list of the new group.
7. Click Create to create the new group.
Now you will see your new local group show up in the contents pane of
Computer Management in the Groups folder (you may have to hit F5 to refresh
your screen). Just like when you made the local user account, you can configure
the group by right-clicking it and selecting from the following options:
■
Add to a Group
■
Delete
■
Rename
■
Properties
NOTE
No new configuration tabs show up in the Local Groups Properties sheet,
as they did when you right-clicked on the new Local User account.
Now that you have created a Local Group form within the GUI, let’s use the
command prompt to do the same thing.We briefly cover these steps in Exercise
4.7, because they are very similar to the steps for creating a user account from the
command prompt.
www.syngress.com
189_XP_04.qxd 11/9/01 2:47 PM Page 149
150 Chapter 4 • Managing Windows XP Professional
Exercise 4.7 Creating and Deleting
Local Groups from the Command Prompt
1. Display the available options for the NET command. Open a commend
prompt and type net /?.
2. You will see an option for localgroup.Type net localgroup and you
will see the currently configured local groups on your XP system.
3. Type in net localgroup TEST /add and press Enter.This creates a
new group called TEST.You can see the new group by repeating Step 2.
4. Now let’s delete the new group.Type net localgroup TEST /delete.
You can confirm deletion by following Step 2 again.
Here are several rules to remember when dealing with groups:
■
Local groups can contain users
■
Local groups can contain global groups
■
Local groups can’t contain local groups
Global Groups
A global group is not local to the machine. It is created on a domain controller
with the Active Directory MMC called Active Directory Users And Computers.
When you make the group there, it is a domain-based group. If you promote a
standalone server to a domain controller, the ability to make local groups is dis-
abled (you can’t use the local accounts database anymore, you must use the
shared database instead) and everything is stored in Active Directory.This makes
administration and management even easier by centralizing everything into
one database.
NOTE
Technically speaking, you can still create local groups on a domain con-
troller, but they are not the same type of local groups previously dis-
cussed. They are called domain local groups, and they are used in the
same manner as XP’s local groups. The difference is that an XP local
group is unique to the standalone XP machine. Domain local groups are
unique to the domain in which they belong. In addition to domain local
groups and global groups, domains also have another type of group
www.syngress.com
189_XP_04.qxd 11/9/01 2:47 PM Page 150
Managing Windows XP Professional • Chapter 4 151
called a universal group. Both global groups and universal groups are
used to organize users. Domain local groups are used to assign permis-
sions to domain-based resources, such as printers or file shares.
New Functionality in XP for User Accounts
Windows XP has lots of new features. Password Hinting is a new option in XP
that is useful for users that forget their passwords.Another new feature is the
ability to upload your picture to be seen next to your Logon ID at the Welcome
screen.This makes it easy to identify the user that corresponds to the user
account.
Password Hinting
Password Hinting is an option that will allow users who have trouble remem-
bering their passwords to get a “hint” from the computer.This hint should
remind them of their password. Password hinting can only be used in a work-
group or standalone mode setting, not in a domain-based network. In other
words, it cannot be used if the computer has joined a domain.
To configure local user accounts with this added functionality, open the User
Accounts applet from Control Panel.Within this applet, you will find your local
user accounts listed under the Or Pick An Account To Change section. Click the
account that you want to configure with a password hint.This will bring up a set
of new options labeled What Do You Want To Change About Your Account.
Click Change my password.You will find in the last field that you can add a
hint to your password options. Notice that it explicitly mentions that this hint
will be available to everyone who uses the PC. Because this is the case, make the
hint something that would make sense only to the user.Add your hint and click
OK. When you log off and attempt to log back on, you will see a question mark
next to your login ID.This represents the hint. Clicking on the question mark
presents you with the hint. Remember, anyone sitting down at the computer has
access to the hint, and they may be able to figure out what the password is from
looking at it.
Picture Uploading
You can configure XP to display your picture next to your logon name at the
Welcome screen. Open the User Accounts applet from Control Panel. Under
www.syngress.com
189_XP_04.qxd 11/9/01 2:47 PM Page 151
152 Chapter 4 • Managing Windows XP Professional
the Or Pick An Account To Change section, click the user account that you want
to configure. Choose Change my picture.You can select one of the default
pictures, or you can upload your own picture by clicking Browse for more
pictures. Browse to the location of the required picture. Select the picture and
click Open.Your picture will now be displayed when you attempt to log on to
the machine. As with Password Hinting, this is not available if your computer is a
member of a domain.
Sharing Folders
To share a folder (which is essentially a resource on the machine) is to share its
contents to other users on the network. Once you share a folder, anyone with the
correct permissions can access it across the network. Permissions are granted to
user accounts or groups. Remember that you can share a folder, but not a file. In
this section, you will learn how to create shared folder resources, as well as why it
is important to share folders in the first place.
First, let’s create a new folder. Right-click a blank spot on your desktop and
select New | Folder. Give it the name New Share. It will appear on your
desktop as shown in Figure 4.9.
Now that you have created this new folder, let’s share it. Right-click the
folder and select Sharing.You will be shown a dialog box that looks different
than the sharing window from Windows 2000.You can think of this new
window as the “simple file sharing view”.You can change the view in the
Control Panel | Folder options applet.You can also change this through the
folder options of any folder (Tools | Folder Options) and clicking the View
Tab.When you open the Folder Options applet, go to the View tab and scroll to
the very bottom.The last check box will allow you to toggle between the simple
file sharing view and the normal file sharing view.The Security tab allows you to
add users and groups and to select individual permissions for each one. Figure
4.10 shows the Sharing tab in the New Share Properties dialog box.
www.syngress.com
Figure 4.9 View of a New Folder in XP
189_XP_04.qxd 11/9/01 2:47 PM Page 152
Managing Windows XP Professional • Chapter 4 153
Let’s look at the differences. Notice that in this dialog box you have an
option to make this shared folder private and only accessible to you.This is nice
because most of the time you are only sharing out a folder on your local
machine to yourself.The other option is to share it out as “share name,” and then
you can select to have users “change” your files. For this demonstration, let’s share
this folder on the network with a name of New Share. Let’s also allow users to
change the files. Once you are done, click OK and you will see a little hand
appear under your folder, as shown in Figure 4.11.This signifies that it has been
shared out as a resource. It is important to know that you can only have privately
shared out folders if you using the NTFS file system (NTFS is covered in the
next few sections).
How do you monitor all the shares on your machine? You can monitor shares
in a variety of ways.The easiest method is to view them within the Computer
Management console, as shown Figure 4.12. Open Computer Management
www.syngress.com
Figure 4.10 The Sharing Tab in the New Share Properties Dialog Box
Figure 4.11 A Shared Folder in XP
189_XP_04.qxd 11/9/01 2:47 PM Page 153
154 Chapter 4 • Managing Windows XP Professional
and expand System Tools, then Shared folders, and then the Shares subfolder.
Click the Shares folder (this takes the place of the Server Applet in Windows NT
4.0).You will now see all of the shares that are currently available on the local
machine.We made only one share, called New Share. So why do six shares
appear, as shown in Figure 4.12?
What do you notice about the five shares that we did not create versus the
one share that we did? The five shares end with a dollar sign. So what do all of
those dollar signs mean? A dollar sign indicates a hidden share.This allows
Administrators to easily perform remote administration of a system. For example,
moving files located on a server directly to the local XP desktop. A hidden share
is just that—“hidden” from the eyes of possible viewers on the network. It does
in fact exist; it is just not accessible within Network Neighborhood.Any user on
the network who was browsing through the network using Network
Neighborhood would never see the shared resource. However, if the user knew it
was out there, he could try to access it via a UNC (Universal Naming
Convention) as shown here:
\\<Computername>\<sharename> where sharename is admin$
By using this command, users could map to your admin$ share.The
admin$ share maps to the %systemroot% folder on your local hard drive (where
%systemroot% is the installation location of Windows XP) Usually %systemroot%
www.syngress.com
Figure 4.12 Using the MMC to View Shares on a Local Machine
189_XP_04.qxd 11/9/01 2:47 PM Page 154