configuring and troubleshooting windows xp professional phần 9 docx
Bạn đang xem bản rút gọn của tài liệu. Xem và tải ngay bản đầy đủ của tài liệu tại đây (1.08 MB, 82 trang )
622 Chapter 12 • Using IntelliMirror Technologies
Once a file is configured offline, it needs to be synchronized whenever it’s
changed either on the server or on the client. Even if the computer is discon-
nected from the network it can be resynchronized when the computer is recon-
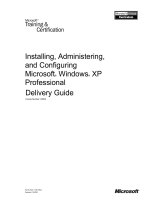
nected.You can set additional properties via the Offline Files tab of the Folder
Options dialog box (see Figure 12.42).This is access by clicking tools then folder
options from the file explorer window.
You can configure the following parameters on the Offline Files tab:
■
Enable Offline Files This enables and disables the folder for offline files.
■
Synchronize all offline files when logging on Selecting this option
will synchronize all offline files when logging on.
■
Synchronize all offline files before logging off Selecting this
option will synchronize all offline files before logging off.
■
Display a reminder every… minutes This will display a reminder
on the client machine to synchronize the offline files that have changed;
you can set the number of minutes between each reminder.
■
Create an Offline Files shortcut on the desktop This will create
an Offline Files shortcut on the desktop.
■
Encrypt offline files to secure data This selection will encrypt files
on the client computer to help increase security for these files.
■
Amount of disk space to use for temporary offline files This slider
bar will limit the amount of space available for temporary offline files.
www.syngress.com
Figure 12.42 Offline Files Tab
189_XP_12.qxd 11/12/01 11:10 AM Page 622
Using IntelliMirror Technologies • Chapter 12 623
■
Delete Files… button Deletes the offline files cached locally on your
machine.You can do this to free up disk space.
■
View Files button Shows a list of files available offline.
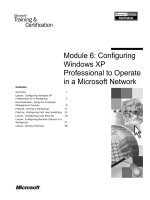
Clicking Advanced will bring up the screen shown in Figure 12.43.The
options on this property page allow you to control how your computer will
behave when the network connection is lost.
Working with Offline Files
When you synchronize your files,Windows XP compares the version of the file
on the network to the version you have on your local PC. If Windows XP
detects that someone else has changed the file, you are given the option of over-
writing the changes on the server or saving your file as a different name.
If you delete a network file on your local PC while working offline, and
someone changes the file on the server, the file will not be deleted at the next
synchronization. If you are disconnected from the network when a new file is
added to a shared network folder that you have made available offline, that new
file will be added to your computer at your next synchronization.
Synchronizing Your Data with the Network
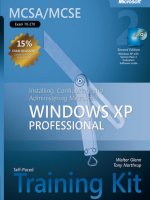
Figure 12.44 shows the Synchronization menu, which you can access by right-
clicking on the file you want to synchronize.You can synchronize by selecting
Synchronize from the menu.Additionally, when you log off or on to the net-
work you can configure the computer to automatically synchronize offline files.
www.syngress.com
Figure 12.43 Offline Files Advanced Settings
189_XP_12.qxd 11/12/01 11:10 AM Page 623
624 Chapter 12 • Using IntelliMirror Technologies
Remote Installation Services
Remote Installation Services (RIS) allow you to automatically install Windows
XP remotely across a network via a RIS server.To use RIS, you must first create
a compatible image for the computers you want to install Windows XP on. If
you are only installing on a couple of computers, or all of your computers are
very different, RIS is probably not the best choice for you. RIS requires the fol-
lowing services to be properly installed:
■
Active Directory
■
DNS
■
DHCP
Note that a RIS server must also be authorized in Active Directory.When
using RIS, you need to take the following steps to prepare for installation:
■
Create a clean install on a client machine with similar hardware to the
machines you want to use RIS with.This install should include the
operating system and any common applications you want installed on all
of the computers which will use that image.
■
Use RIPrep to get the computer ready for imaging and create the RIS
image.
www.syngress.com
Figure 12.44 Synchronization Menu
189_XP_12.qxd 11/12/01 11:10 AM Page 624
Using IntelliMirror Technologies • Chapter 12 625
When installing via RIS, you either boot from the PXE-compatible network
card or the RIS boot disk, then you select the image you want installed on the
computer.
To use RIS, your computer must have a Preboot Execution Environment
(PXE)–enabled network adapter or have a network adapter that is supported by
the RIS startup floppy disk.To create a RIS startup floppy disk, you must use the
Rbfg.exe utility found on the \RemInst\Admin\I386 folder of the Windows XP
RIS server.
RIPrep is a utility you can use to get a client ready for imaging. RIPrep con-
figures the source computer to a generic state, removing anything that is unique
to the client installation, such as the computer’s unique security ID (SID), com-
puter name, and any Registry settings unique to the client source computer.
RIPrep will also create and copy the computer’s image onto the RIS server.
Installing Windows XP with RIS
You can install Windows XP by using Microsoft’s RIS services. In order to install
Windows XP with RIS, a RIS server must be running, the server must have an
image configured for your machine, and the necessary services must be running
on the network.These services include DHCP, DNS, and Active Directory.You
must create a CD-based image before you can create a RipPrep image
Microsoft recommends granting access only to images a client can install on their
machine as a best practice.
www.syngress.com
Setting Up Windows XP RIS
Images on a Windows 2000 Server
To set up Windows XP RIS images on Windows 2000 Server, you must
install Service Pack 2 or higher on the Windows 2000 Server that is run-
ning RIS. At the time of writing, there was also a post-Service Pack 2
hotfix available for correcting a problem with CD-ROM-based images of
Windows XP. You can find further information on these issues by con-
sulting the Microsoft Knowledge Base articles, Q299316, How to Set up
Windows XP Images on a Windows 2000 Server, and Q287546, “Missing
Files” Error Message When Deploying Windows XP Images.
Configuring & Implementing…
189_XP_12.qxd 11/12/01 11:10 AM Page 625
626 Chapter 12 • Using IntelliMirror Technologies
Customizing RIS
Prestaging clients for RIS installation is possible, so that certain clients will be
directed to certain RIS servers.This is useful for load balancing and improved
security.This is done as part of the RIS installation when the server is set up and
can also be changed in the RIS server properties later.
Figure 12.45 shows the RIS properties screen for the RIS server.You can access
this via the Active Directory Users And Computers administrative tool. Browse to
the RIS server, select Properties, and then choose the Remote Install tab.
The Respond to client computers requesting service check box will
enable the RIS sever to respond to requests for RIS installations.
The Do not respond to unknown client computers check box requires
you to prestage computers when this box is checked.This means that there must
be an entry in Active Directory in order for the computer to respond to the
request for service. Creating an entry is covered later in this section.
Clicking Show Clients will present the dialog box shown in Figure 12.46.
This will allow you to view and search the RIS clients serviced by this RIS server.
Clicking Advanced from the Remote Install tab (see Figure 12.45) will dis-
play a group of tabs related to remote installation.The first one we address is the
RIS Images tab (see Figure 12.47), which displays all of the RIS images available
on the RIS server.You can also add, delete, and modify RIS images from here. In
most cases, quite a few images will be available on the RIS server.You can change
the properties of an image at this screen as well.
www.syngress.com
Figure 12.45 RIS Properties
189_XP_12.qxd 11/12/01 11:10 AM Page 626
Using IntelliMirror Technologies • Chapter 12 627
Figure 12.48 shows the RIS properties. In this example, we’ve added some
descriptive text to the help text associated with the image.You could modify the
“friendly description” as well to make the installation more meaningful. Some
information about the image itself is also available on this screen.
The New Clients tab for the RIS server is shown in Figure 12.49.The new
clients screen will control some of the options with regard to how the new
clients are configured.You can set the computer naming format from this screen,
as well as the location of the client computer account.
Figure 12.50 shows the tools that are installed for working with RIS, either
from Microsoft or from a third-party vendor.You can set the properties of the
tools installed at this screen.You can remove tools from this screen as well.
www.syngress.com
Figure 12.46 Show Remote Installation Clients Dialog Box
Figure 12.47 Images Tab
189_XP_12.qxd 11/12/01 11:10 AM Page 627
628 Chapter 12 • Using IntelliMirror Technologies
www.syngress.com
Figure 12.48 RIS Image Properties
Figure 12.49 New Clients Tab
Figure 12.50 Tools Tab
189_XP_12.qxd 11/12/01 11:10 AM Page 628
Using IntelliMirror Technologies • Chapter 12 629
Prestaging a Client for RIS Operation
In some cases, only certain RIS servers should respond to certain clients.This
could be because of network server locations, to manage bandwidth and usage, or
because multiple vendors remote installation servers are on the network.
Whatever the reason, prestaging clients is a simple process.
First, on the RIS server, check the RIS server check box Do not respond
to unknown client computers.This will prevent the Remote Installation
server from responding to requests from computers that don’t have an account in
Active Directory.
In order to prestage a client, you need to create a computer account in Active
Directory, which you can accomplish by using the Active Directory Users And
Computers administrative tool. Open the administrative tool and right-click then
select New | Computer (see Figure 12.51).
You will see the dialog shown in Figure 12.52, which will allow you to name
the computer.Type the name in the box and click Next.This will bring you to
the screen shown in Figure 12.53. From here you can choose whether the com-
puter will be a managed computer. Most computers on a business network are
managed computers. Select whether this computer will be managed (depending
on your circumstances) and click Next.
Next, you will see a confirmation dialog box. Once you click Finish, the
computer account is created in Active Directory, and the computer is ready for
Remote Installation. Naming is complete, so click Next and then select
Managed Properties.
www.syngress.com
Figure 12.51 RIS Prestage Computer
189_XP_12.qxd 11/12/01 11:10 AM Page 629
630 Chapter 12 • Using IntelliMirror Technologies
www.syngress.com
Figure 12.52 Naming
Figure 12.53 Managed Dialog
189_XP_12.qxd 11/12/01 11:10 AM Page 630
Using IntelliMirror Technologies • Chapter 12 631
Summary
Group Policies provide administrators with the ability to control and configure
user’s settings, manage user’s data, and perform remote software installation and
maintenance. Group Policies require Active Directory.The number and complexity
of Group Policy objects can adversely affect network performance and login times.
Software distribution by way of Group Policy can reduce the cost of managing
installations to many users. Software can be assigned or published.Assigning requires
the software to be installed, while publishing makes it available for users to install.
Remote Installation Services (RIS) allow you to install an operating system
across the network from a RIS server.This can make it very easy for users to
install Windows XP without having a deskside support tech present. RIS requires
a PXE-enabled network card or RIS boot disk.They also require DHCP and
DNS, as well as Active Directory. Remote Installation Services can use a lot of
network bandwidth, so plan carefully when using RIS.
Solutions Fast Track
Group Policies
; Active Directory is required for the use of Group Policies.
; Too many Group Policy Objects can adversely affect network traffic.
; Too many Group Policy Objects can adversely affect logon times.
Software Installation and Maintenance
; Active Directory is required for Software Installation and Maintenance.
; DFS (Distributed File System) can help ease network woes.
; Remember that the installation package has to travel across your network.
Offline Files and Synchronization
; Active Directory is required for offline files and synchronization.
; Depending on directory size, performing initial synchronization could
take a while.
www.syngress.com
189_XP_12.qxd 11/12/01 11:10 AM Page 631
632 Chapter 12 • Using IntelliMirror Technologies
; You can configure synchronization to automatically occur at logoff or
logon.
; You can configure reminders to remind users to synchronize.
Remote Installation Services
; Active Directory, DHCP, and DNS are required for Remote Installation
Services.
; Don’t forget to authorize a RIS server in Active Directory.
; When creating an image, you need to log into the machine as an
administrator.
; Where practical, only grant access to images a user can install on his
machine.
Q: I am trying to use RIS to install Windows XP on a computer.The computer
and network card are not PXE-compliant. Can I still use RIS?
A: Yes, if the network card is supported by the RIS boot disk. Not all network
cards are supported—check your RIS documentation from Microsoft to see
which are supported.
Q: We are concerned about hackers using tools such as l0pht to crack security
on our network. Is there something we can do with Group Policy to protect
our organization?
A: l0pht was created to crack NTLM security, but it is ineffective against
Kerberos security.Active Directory uses Kerberos natively, but it is backward
compatible to NTLM, too. However, you can disable the NTLM compati-
bility in the Computer Configuration | Windows Settings | Security
Settings | Local Policies | Security Options.
www.syngress.com
Frequently Asked Questions
The following Frequently Asked Questions, answered by the authors of this book,
are designed to both measure your understanding of the concepts presented in
this chapter and to assist you with real-life implementation of these concepts. To
have your questions about this chapter answered by the author, browse to
www.syngress.com/solutions and click on the “Ask the Author” form.
189_XP_12.qxd 11/12/01 11:10 AM Page 632
Using IntelliMirror Technologies • Chapter 12 633
Q: We use system policies on our Windows 95 and NT computers. Can I still
use them with Windows XP?
A: Yes, you can still use the system policies, and you can use the POLEDIT
utility to configure them.You must place the ntconfig.pol file(s) in the
Netlogon share of the Windows 2000 Domain Controllers.This is now
located at C:\WINNT\SYSVOL\SYSVOL.
Q: I don’t see the option to make files available offline.What should I do?
A: Make sure that the folder is configured properly to make the files available.
Also note that if fast user switching is enabled on the client computer, you
cannot use offline files.
Q: Do users need to be local administrators to install software on their computers?
A: It depends on the software.With software packaged as an MSI file or ZAP
file, the user generally does not need to be a local administrator.
Q: I want to make the offline folder unavailable. How do I do this?
A:. You can accomplish this either through the settings on the folder share, to
turn off making the folder available, or for a more permanent solution, you
can do this via Group Policy.
Q: Should I use roaming profile shares with offline folders?
A:This is a bad idea.You need to turn off Offline Folders for shares where
roaming user profiles are stored. If you do not turn off Offline Folders for a
user’s profile, you may experience synchronization problems because both
Offline Folders and Roaming Profiles try to synchronize the files in a user’s
profile.
Q: What happens if someone else changes the offline file in the network share,
and I connect and try to synchronize? Will I overwrite that user’s changes?
A: When you synchronize your files,Windows XP compares the version of the file
on the network to the version you have on your local PC. If Windows XP
detects that someone else has changed the file, you are given the option of
overwriting the changes on the server or saving your file as a different name.
www.syngress.com
189_XP_12.qxd 11/12/01 11:10 AM Page 633
189_XP_12.qxd 11/12/01 11:10 AM Page 634
Working with
Printers
Solutions in this chapter:
■
Adding a Local Printer
■
Sharing Your Local Printer
■
Connecting to a Network Printer
■
Configuring Your Printer
■
Troubleshooting Printer Problems
; Summary
; Solutions Fast Track
; Frequently Asked Questions
Chapter 13
635
189_XP_13.qxd 11/12/01 11:13 AM Page 635
636 Chapter 13 • Working with Printers
Introduction
Printing is one of the computer concepts that most people are familiar with.As
prices come down on hardware, more people are buying printers for home use.
In addition to prices coming down, printing features are increasing. Printers are
available now that can print a photo that looks exactly like the original.
Surprisingly, these advanced color printers cost less than the black and white
printers that you could buy five years ago.
Ok, so we understand why people would have printers at home—desktop
publishing, organizing bills, writing letters, and so on. In this electronic age why
would any large business ever need a printer? Doesn’t the technology exist to
have a paperless office? The technology does exist, but for whatever reason people
just love to print. If you have ever worked in desktop support, you know that
there are three things that concern most users. Can they check their e-mail, can
they surf the Internet, and can they print? Go into any office, large or small, and
you will find printers being used. In large companies, it is not uncommon for a
user to map to three or more printers. For example, he might map to a heavy-
duty network enabled LaserJet for printing text documents and a local color
printer for printing pictures. More than likely, he also maps to a few backup
printers in case one of the preferred printers go down. Some companies depend
on printing to stay in business. For example, mortgage companies could not cur-
rently survive without their printers. If you have ever applied for a mortgage
loan, you have filled out a stack of paperwork three feet high. Other companies
use printers to print manuals and booklets. It can be cheaper for a company to
buy a quality printer and do all of their book printing in-house instead of having
to send it to an outside printing press.
Printers vary drastically in price.You can get an entry-level printer for under
$100, or you can easily spend $10,000 for a high-end color LaserJet printer. Most
companies are going away from the “give everyone their own printer” approach.
This is difficult to administer.This is not to mention that, for the price of 50
local printers, you can buy yourself one or two network printers that will vastly
outperform the local printers in quality and speed.At times, local printers are
needed. For instances, any time you are printing confidential information you
probably don’t want to send your print job to a shared public printer. Usually
human resources and payroll have their own local printers.
In this chapter, you will learn how to install local printers.We also look at how
to share out local printers and make them available to network users.We then show
how to map network users to newly shared printers and how to configure printers
with the proper security setting to ensure that they are being utilized by authorized
www.syngress.com
189_XP_13.qxd 11/12/01 11:13 AM Page 636
www.syngress.com
users only.This chapter exposes you to installing, configuring, and managing
printers—both network and local.
Adding a Local Printer
Before we look at installation, let’s lay the groundwork with an understanding of
Microsoft’s printing terminology.This has changed since Windows NT 4.0 and
Windows 2000. Microsoft changed their terminology to better match how
people commonly refer to printer components. Let’s review what the compo-
nents were called in NT/2000, and then we explain the new terms. It is impor-
tant to understand both ways, because more than likely you will hear it referred
to both ways (although only one way is correct). If you heard somebody talking
about a printer, what would you think they were talking about? More than likely
you would assume that they are talking about a machine that prints.
Unfortunately, according to Microsoft NT/2000 terminology, you would be mis-
taken. In NT/2000, Microsoft called the machine that prints the print device.They
considered the printer to be the collection of software that controls the print
device, such as the print driver, the print queue, and any other needed software
files. Do you see how this can be confusing? Finally, Microsoft has changed their
terminology to something that makes a little more sense.The machine that does
the printing is called the printer (no longer called print device), and the collec-
tion of software that controls the printer is called the logical printer.The printer
driver, which is covered in great detail in the following section, is the software that
tells you computer how to instruct your printer to print. A large portion of
printing problems have to do with using an incorrect driver.The print queue con-
tains all of the jobs waiting to be printed.
Printer Drivers
By using printer drivers, every program doesn’t have to worry itself about how to
communicate with every printer on the market.The program prints the same to
all printers, and the driver handles getting the information ready. Printer drivers
translate commands from the computer’s language to the printer’s language. Per
the Windows XP Help, printer drivers consist of three files types:
■
Configuration or printer interface .dll files These files are respon-
sible for the displaying of your printer’s properties box.
■
Data file (.dll, .pcd, .gpd,or .ppd files) These files define the capa-
bilities of a printer. Capabilities include maximum resolution, duplexing,
and paper formats.
Working with Printers • Chapter 13 637
189_XP_13.qxd 11/12/01 11:13 AM Page 637
638 Chapter 13 • Working with Printers
■
Printer graphics driver file This files translates the computer com-
mands into printer commands format.
Any print device that attaches directly to a computer is considered a local
printer.The benefit of using a local print device is that it does not require a net-
work for printing.At one time or another, most users with home machines have
installed a local printer. Local print devices can be connected to USB, Firewire,
serial, and parallel ports.The easiest methods are USB and Firewire. If you plug in
a USB or Firewire print device that is natively supported in Windows XP, it will
install itself without any interaction.You simply plug it in and walk away.The
most common way of connecting a local print device to a computer is via the
parallel (or printer) port. Most personal printers available on the market today
come with software that walks you through the entire installation process. In this
section, you will learn how to install a local printer through the Add Printer
Wizard included with Windows XP, as shown in Exercise 13.1.
Exercise 13.1 Installing a Local Printer
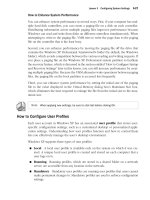
1. Click Start.
2. Choose Printers and Faxes from the menu.This will give you the
Printers and Faxes window shown in Figure 13.1.
www.syngress.com
Figure 13.1 The Printers and Faxes Window
189_XP_13.qxd 11/12/01 11:13 AM Page 638
Working with Printers • Chapter 13 639
3. Within the Printers and Faxes window, click the Add a printer link
under the Printer Tasks menu.This will start the Add Printer Wizard
shown in Figure 13.2.
4. Notice in the Welcome screen that USB, IEEE 1394 (Firewire), and
infrared printers do not require this wizard. If you have one of these
printers, clisk Cancel, connect the printer, and turn it on. Otherwise,
click Next to proceed to the Local or Network Printer Selection
window shown in Figure 13.3.
5. In the Local or Network Printer window, you must decide if you want
to install a printer that is physically attached to your computer or if you
want to install a printer that is located somewhere on your network. If
www.syngress.com
Figure 13.2 The Welcome to the Add Printer Wizard Window
Figure 13.3 Selecting a Local or Network Printer
189_XP_13.qxd 11/12/01 11:13 AM Page 639
640 Chapter 13 • Working with Printers
you are installing a local printer, you can tell Windows to automatically
detect the printer as long as is it is Plug and Play compliant. For this
exercise, choose Local printer attached to this computer and
Automatically detect and install my Plug and Play printer. Click
Next to continue.Your computer will now search for Plug and Play
compatible printers, as shown in Figure 13.4.
6. In this example, we do not have a Plug and Play compatible printer
plugged into the computer.This brings up the window shown in Figure
13.5.To install the printer manually, click Next.This will give you the
Select a Printer Port window shown in Figure 13.6.
www.syngress.com
Figure 13.4 Searching for Plug and Play Printers
Figure 13.5 The New Printer Detection Search Results Window
189_XP_13.qxd 11/12/01 11:13 AM Page 640
Working with Printers • Chapter 13 641
7. You must now select which port your printer will use.You can either
create a new port or use one of the default ports.The default ports avail-
able include:
■
LPT 1–3 Use one of these when your printer is attached to a par-
allel (printer) port.
■
COM 1–4 Use one of these when your printer is attached to a
serial port.
■
File Use this to save your print jobs to a file that you can later
submit to a print queue.
■
IR Use this when your printer is connecting via an infrared port.
For example, if you do not have a modem you will not have the
option for a fax port. Choose the correct print port (LPT 1 for this
exercise) and click Next to continue.
8. You are now prompted to install the printer software (see Figure 13.7).
You can either choose your printer from the list, or you can click Have
Disk to retrieve the software from the media provided by your printer
manufacturer as shown in Figure 13.8. For this example, we chose a
printer from the list.We chose to install the HP LaserJet 4000 Series
PCL printer. Choose the manufacturer (HP) on the left and choose the
printer model (LaserJet 4000 Series PCL) on the right.You can use the
Windows Update button to update the list of printer drivers provided
with Windows XP.After choosing your printer from the list, click Next
to continue.
www.syngress.com
Figure 13.6 Selecting a Printer Port
189_XP_13.qxd 11/12/01 11:13 AM Page 641
642 Chapter 13 • Working with Printers
9. You must now choose a name for your printer (see Figure 13.9). Be sure
to name it something descriptive so that you can easily identify it later.
For this demonstration, we accepted the default name. Click Next to
continue.
www.syngress.com
Figure 13.7 Installing Printer Software
Figure 13.8 Installing Printer Software from Disk
Figure 13.9 Naming Your Printer
189_XP_13.qxd 11/12/01 11:13 AM Page 642
Working with Printers • Chapter 13 643
10. In Figure 13.10, you have the option of sharing your printer with other
network users. Printer sharing is covered in the next section. Choose
Do not share this printer and click Next to continue.
11. You can optionally print a test page as shown in Figure 13.11. Choose
Ye s to print a test page or choose No to skip the test page. In this exer-
cise, we skipped the test page. Choose No and click Next to continue.
12. You are now given the Completing the Add Printer Wizard window (see
Figure 3.12).Verify that the information is correct and click Finish to
install your new printer. If the information is not correct, you can use the
Back button to go back and make changes to the wizard.After clicking
Finish, you will see the Copying Files window shown in Figure 13.13.
www.syngress.com
Figure 13.10 Configuring Printer Sharing
Figure 13.11 Printing a Test Page
189_XP_13.qxd 11/12/01 11:13 AM Page 643
644 Chapter 13 • Working with Printers
Once the files have finished copying, your printer will be installed and
will appear in the Printers and Faxes window, as shown in Figure 13.14.
www.syngress.com
Figure 13.12 Completing the Add Printer Wizard
Figure 13.13 The Copying Files Window
Figure 13.14 The Printers and Faxes Window
189_XP_13.qxd 11/12/01 11:13 AM Page 644
Working with Printers • Chapter 13 645
Printing to a Local Printer
from a Remote Session
Remote desktop is a new feature of Windows XP that allows you to control your
desktop remotely. It uses terminal server’s Remote Desktop Protocol (RDP) tech-
nology.When you connect remotely, the display for the machine you are con-
necting to is locked to keep prying eyes from watching.You can make your local
printers available from within a remote session. Let me explain. Say that you have
two computers: one at home named xp-homepc and one at work called xp-
workpc.You can connect from xp-homepc to the company network and take
remote control of xp-workpc.What happens if you decide to print something from
xp-workpc while you have control? It doesn’t do you much good to print some-
thing if you are going to have to drive to work to get it off of the printer.You can
make the printers attached to xp-homepc available to xp-workpc while you have
remote control.This way you can print from your work PC to your home PC. Use
the following steps to make a local printer available to a remote session:
1. Click Options from within the Remote Desktop Connection window.
2. Go to the Local Resources tab.
3. Check the box next to Printers.
NOTE
You can open the Remote Desktop Connection window is opened from
Start | All Programs | Accessories | Communications | Remote
Desktop Connection.
Sharing Your Local Printer
There are many reasons why you may want to share your local printer. Perhaps
you are on a budget, but you want to be able to print from three computers at
once. Buying one printer and sharing it is much cheaper than buying three
printers. Perhaps you want to share your printer for convenience sake. Maybe you
have the only printer in the office. Instead of everyone having to log in to your
PC to print, you can just share your local printer and allow everyone to print to
it from his or her PC.
www.syngress.com
189_XP_13.qxd 11/12/01 11:13 AM Page 645
646 Chapter 13 • Working with Printers
When sharing your printer, you should follow some guidelines for the share
name.Try not to use long filenames, or names that contains special characters or
spaces. Let’s define what would constitute a long filename. Certain programs have
difficulty printing to printer names longer than 31 characters. I know what you are
probably thinking.Who names their printers with 31+ character names? This limit
applies to the fully qualified name of the printer (basically the entire universal
naming convention for the printer). For example, you may have a printer named
hplaserjet8000, and it may be shared on a computer named chadsdesktop.The fully
qualified name of the shared printer would be \\chadsdesktop\
hplaserjet8000.This would equal a 29-character name.The characters add up
quickly. If DOS-based clients are going to be mapping to the shared printer, you
should stick to the eight dot three naming convention.This means the name should
be no more than eight characters followed by a period and three more characters.
For example, laserjet.5si would be a valid DOS-compatible printer name.
Some of the problems you may run into if you don’t follow these guidelines
are programs appearing to submit a print job, but nothing ever reaches the
printer. Some older programs will display an error message, such as an access vio-
lation, when you try to send a job to the printer. If you must use long share
names, create another logical printer with a compatible name and direct it to the
same printer. Map all of your older clients to the new shorter-named logical
printer. Renaming the printer almost always fixes these types of problems.
Configuring Print Drivers for Network Clients
One of the many tasks of a network administrator is mapping users to the correct
printers.This requires two parts—mapping the client to the correct printer and
installing the correct print driver on the client.As discussed earlier, if your
machine does not have the correct driver installed, you cannot successfully print
to the printer. If your clients are running Windows XP,Windows NT 4.0, or
Windows 2000, they automatically download the correct version of the print
driver every time they print to the print server.Windows 95 and Windows 98
will automatically install the correct driver the first time they are mapped to the
printer. However, if the print driver on the server is changed,Windows 9x clients
will continue to use the old print driver that was installed from the server.
Exercise 13.2 walks you through sharing your local printer.
Exercise 13.2 Sharing a Local Printer
1. Click Start.
www.syngress.com
189_XP_13.qxd 11/12/01 11:13 AM Page 646