e mail virus protection handbook phần 7 pps
Bạn đang xem bản rút gọn của tài liệu. Xem và tải ngay bản đầy đủ của tài liệu tại đây (500.74 KB, 52 trang )
284 Chapter 7 • Personal Firewalls
Installation
Installation couldn’t be much simpler. Choices that you have to make
during installation are minimal, and don’t require a lot of consideration.
We start with the welcome screen shown in Figure 7.80.
Clicking Next brings us to the screen shown in Figure 7.81.
Here we find some information about the program. This includes fea-
tures, as well as what’s new, things you would see in a readme file.
Clicking the Next button takes us to the screen shown in Figure 7.82.
For a registration screen, especially for a program that is free for many
people, the registration screen is pretty unobtrusive.
Next is the Requisite License screen, shown in Figure 7.83.
www.syngress.com
Figure 7.80 ZoneAlarm installer welcome.
Figure 7.81 Important information!
119_email_07 10/5/00 9:26 PM Page 284
Personal Firewalls • Chapter 7 285
Obviously, you have to accept the license agreement to continue instal-
lation. Next you have to pick your installation directory, shown in
Figure 7.84.
Like most new programs, it wants to install in C:\Program Files.
Clicking on Next takes us to the screen shown in Figure 7.85.
The installer asks you to complete a short survey. There is a Finish
button on this screen, though after the files are copied, we have one more
to go, shown in Figure 7.86.
Now the Finish button finishes. As stated on this screen, ZoneAlarm
loads the next time you boot Windows.
www.syngress.com
Figure 7.82 User information.
Figure 7.83 License agreement.
119_email_07 10/5/00 9:26 PM Page 285
286 Chapter 7 • Personal Firewalls
www.syngress.com
Figure 7.84 Select installation directory.
Figure 7.85 Survey.
Figure 7.86 Installation complete.
119_email_07 10/5/00 9:26 PM Page 286
Personal Firewalls • Chapter 7 287
Configuration
Configuration options for ZoneAlarm are also simple, at least compared to
other products we have looked at in this chapter. Upon reboot, ZoneAlarm
shows you a screen with a picture of where to find ZoneAlarm in the
Taskbar. There’s also a checkbox to not show this screen on startup.
Clicking on the icon in the Taskbar pops up the screen shown in
Figure 7.87.
Let’s examine the various buttons and controls shown here. First are
the two traffic meters shown on the left (with UP and DN on them). The
pair on the top shows traffic in and out of the computer live, like a sound
meter. As traffic is sent from the computer, the UP meter will get larger
from left to right. Below that, the pair on the bottom will show a vertical
graph that scrolls from right to left over time. So, when you have a burst of
traffic, the top bars will jump, and then drop to nothing, while the bottom
bars will show a vertical bar slowly marching from right to left.
Next is the Lock icon and Stop icon. The basic idea is that you can dis-
able Internet access to your computer when you walk away from it. The
lock setting will allow certain network access to take place, depending on
settings elsewhere. The Stop button will stop all network access, and is
intended to be a panic button of sorts.
To the right of the Stop icon is a cluster of four program icons. The
ones shown in Figure 7.87 are, from right to left, top to bottom, Napster,
ZoneAlarm, SSH, and Netscape Navigator. These are not clickable, but if
you leave the mouse pointer over the Napster icon (for example) for a
moment, it will report that Napster is listening on a particular port
number.
On the far right is a ZoneAlarm help button, which will pull up a help
document in your default Web browser (not shown).
Across the bottom are five buttons: Alerts, Lock, Security, Programs,
and Configure. We will look at each of these, starting with Alerts, shown in
Figure 7.88.
www.syngress.com
Figure 7.87 ZoneAlarm main menu.
119_email_07 10/5/00 9:26 PM Page 287
288 Chapter 7 • Personal Firewalls
ZoneAlarm will store an alert for any traffic that does not appear to be
authorized (i.e., specifically allowed by you). In this case, it looks like it’s
flagging a packet that does belong to part of a conversation that was
authorized, but for whatever reason wasn’t recognized as such. This can
happen if a packet gets corrupted, or if a duplicate arrives. I would tend to
call this particular report a false alarm.
You can see a couple of options here as well, such as whether to also
log to a file, and whether to pop up whenever an alert is generated.
The Lock button settings are shown in Figure 7.89.
Here you can configure how the Internet lock works. You can set
whether the automatic lock is enabled, whether it engages after so many
minutes, or whether it kicks in with the screen save, and whether the Pass
Lock setting takes effect. The Pass Lock option will become clear when we
get to the Programs button.
The next button is Security, shown in Figure 7.90.
The default security setting for Local is Medium, and for Internet it’s
High. By putting Local to High, I’ve blocked local access to file and printer
sharing. The idea behind the Local/Internet settings is to allow a different
class of access for local machines. By using the Advanced button, you can
configure which adapter is your Local adapter (not shown). ZoneAlarm will
determine which machines are local by the subnet that is on the adapter
you identify as local. The documentation points out that if you’re using
something like a cable modem, that may include neighbors’ machines that
you didn’t mean to include, so be cautious.
www.syngress.com
Figure 7.88 ZoneAlarm alerts.
119_email_07 10/5/00 9:26 PM Page 288
Personal Firewalls • Chapter 7 289
There are also three checkboxes along the bottom that deserve explana-
tion. The Block Local Servers will keep you from acting as a server in any
way, even when your Programs settings say it’s OK. It’s a quick way to
shut these off without modifying each program setting. Block Internet
www.syngress.com
Figure 7.89 ZoneAlarm lock settings.
Figure 7.90 ZoneAlarm security settings.
119_email_07 10/5/00 9:26 PM Page 289
290 Chapter 7 • Personal Firewalls
servers will do the same for the Internet zone. Finally, the Enable
MailSafe… checkbox controls whether MailSafe is enabled. This is a new
feature in this version of ZoneAlarm. Currently, MailSafe blocks only .vbs
attachments. ZoneLabs says they are considering adding other types. This
is likely in response to the Love Letter virus, and other variants. MailSafe
works by slightly mangling the attachment filename, which will keep it
from running automatically when it is double-clicked.
The Programs button is shown in Figure 7.91.
This is ZoneAlarm’s rulebase. For each program (identified and added
the first time you run it), ZoneAlarm keeps track of what settings you’ve
told it to use. For example, when Navigator was first run, I told it to always
allow it (see Figure 7.92).
If you click on Yes or No, it will allow or not allow access. If you check
on the Remember checkbox, it will remember that choice and not ask
again.
The programs in Figure 7.91 with a checkbox on the left are allowed
access without prompting. If there were any that were denied access, there
would be an X instead of a check, in the next column over. The ones with a
question mark in the third column prompt each time. You can also check
whether each program is allowed to act as a server, and whether they are
allowed to pass lock. Pass lock means that they will still have access when
your Internet access is locked.
The Configure button screen is shown in Figure 7.93.
www.syngress.com
Figure 7.91 ZoneAlarm program settings.
119_email_07 10/5/00 9:26 PM Page 290
Personal Firewalls • Chapter 7 291
The settings here are fairly self-explanatory. You can control whether
it’s always on top (when not in the Taskbar) and whether it loads at
startup. You can check for updates, both automatically and manually, and
you can change your registration information.
E-mail and ZoneAlarm
About the only e-mail-specific feature that ZoneAlarm has is the MailSafe
feature. This protects from a limited number of threats. Its main safety-add
is the fact that you will get prompted when a program tries to access the
Internet, which may alert you to unauthorized activity.
www.syngress.com
Figure 7.92 ZoneAlarm access prompt.
Figure 7.93 ZoneAlarm configuration screen.
119_email_07 10/5/00 9:26 PM Page 291
292 Chapter 7 • Personal Firewalls
Summary
There are any number of functions that a personal firewall might perform.
These include port blocking, file access control, execution control, content
scanning, sandboxing, and virus scanning. The mix of features that you
need in a firewall product depend entirely on what you want to accomplish.
If your intent is to control someone else’s use of your computer, such as a
child, you may want to focus on content filtering. If you need a backup
protection mechanism for when your primary protection fails, you may
want a product with strong access control. If your intent is to discern pat-
terns of attack, you may want a product that has a strong IDS capability.
In any case, your choices are not limited to the products you’ve seen
here. The personal firewall market is relatively new, and the capabilities of
each product will evolve quickly. If you have read about a particular
product here that interests you, but it’s missing a key feature, check the
current version. You may find that the latest version that has come out
since this book was printed now includes it.
FAQs
Q: How do I know my personal firewall is working?
A: There are ways you can test your personal firewall, depending on which
features it provides. If you have access to a second computer, or if you
have a friend who is willing to help, you can do simple port probing.
For example, if you Telnet to port 139, and you have file sharing
blocked, you ought to get a message that the connection could not be
established. If you want to see if it blocks some programs from
accessing the Internet, just try it. This is an excellent way to learn how
your chosen product works.
Q: How frequently should I be seeing probes? I get them all the time.
A: Unfortunately, this is normal, in the sense that it happens quite a lot.
For example, some cable modem customers report getting probed many
times per day.
Q: Can I safely shut off the alerts?
A: Many of them you can safely shut off. There are only so many times
you can look at alerts that say you’re being probed for back orifice
before it gets really boring. If you’re not vulnerable (that is, Back Orifice
isn’t installed), then there’s not a lot of reason to see the alerts, unless
www.syngress.com
119_email_07 10/5/00 9:26 PM Page 292
Personal Firewalls • Chapter 7 293
you plan to act on the information. The danger in turning off alerts
comes from net attacks that are developed all the time. If you’re fire-
walling services you do run, it is probably a good idea to keep those
particular alerts on.
Q: Where can I find out about other personal firewall products?
A: Aside from the typical magazine roundups, there is at least one Web
site dedicated to this topic: />firepers.htm.
This link was reached from the Intrusion Detection site, which is
worth checking out in its entirety: www.networkintrusion.co.uk.
Q: Are personal firewalls available for UNIX and Linux?
A: Personal firewalls are available for these platforms; they’re often free
and included with the OS. They aren’t considered a product per se, and
they act only as firewalls, whereas the Windows products add all kinds
of functions. Most of the larger commercial firewalls do run on UNIX.
Q: Are personal firewalls available for Macs?
A: Yes. Check out this link for reviews, patches, and other information
related to Mac firewalls: www.doshelp.com/mprotection.htm.
www.syngress.com
119_email_07 10/5/00 9:26 PM Page 293
119_email_07 10/5/00 9:26 PM Page 294
Securing Windows
2000 Advanced
Server and Red Hat
Linux 6 for E-mail
Services
Solutions in this chapter:
■
Disabling unnecessary services
■
Locking down ports
■
Handling maintenance issues
■
Placing the server behind a firewall
Chapter 8
295
119_email_08 10/6/00 12:29 AM Page 295
296 Chapter 8 • Securing Windows 2000 Advanced Server and Red Hat Linux 6
Introduction
Microsoft Windows 2000 Advanced Server and Red Hat Linux are capable
of high-end security. However, the out-of-the-box configurations must be
altered to meet the security needs of most businesses with an Internet
presence. This chapter will show you the steps for securing Windows 2000
Advanced Server and Red Hat Linux systems, which is a process called
hardening the server. The hardening process focuses on the operating
system, and is important regardless of the services offered by the server.
The steps will vary slightly between services, such as e-mail and http, but
are essential for protecting any server that is connected to a network, espe-
cially the Internet. Hardening the operating system allows the server to
operate efficiently and securely.
This chapter includes the essential steps an administrator must follow
to harden Windows 2000 Advanced Server and Red Hat Linux systems.
These steps include maintenance, disabling unnecessary services, locking
down ports, and placing the server behind a firewall, such as Axent Raptor
or CheckPoint Firewall-1. Although Microsoft Exchange Server may lock
down some services, many Exchange administrators will find this informa-
tion useful as they install alternative e-mail servers, such as Sendmail.
Updating the Operating System
When an operating system is first released, it may contain many security
vulnerabilities and software bugs. Vendors, such as Microsoft and Red Hat,
provide updates to their operating systems to fix these vulnerabilities and
bugs. In fact, many consulting firms recommend that companies do not
purchase and implement new operating systems until the first update is
available. In most cases, the first update will fix many of the problems
encountered with the first release of the operating system. In this section,
you will learn where to find the most current Microsoft Windows 2000
Service Packs and Red Hat Linux 6.2 Errata and Updates.
Microsoft Service Packs
The first step in hardening a Microsoft Windows 2000 Advanced Server is
to apply the most current service pack to the operating system. A service
pack provides the latest updates to an operating system. Each service pack
is a collection of fixes to the operating system, such as fixes in security,
reliability, setup, and application compatibility. Many service packs are not
required upgrades. You need to read the service pack documentation to
determine if you need to install it. You can order service packs on CD or
download them directly from the Microsoft Web site.
www.syngress.com
119_email_08 10/6/00 12:29 AM Page 296
www.syngress.com
The Microsoft Web site provides service packs at no charge. After your
initial installation of Windows 2000 Advanced Server, you should point
your browser to />servicepacks.asp to download the latest service pack. Here are the steps for
installing a typical service pack:
1. To determine the latest service pack in Windows 2000 Advanced
Server, select the Start menu and choose Updates. The browser
will automatically open and load the Microsoft Windows Update
Web page.
2. Identify the latest service pack. Figure 8.1 shows the availability of
the first Windows 2000 Service Pack, SP1, which provided many of
the bug fixes and security holes that existed in the initial release
of Windows 2000.
3. Review the service pack documentation and determine if it is
required for your system.
4. You can order the service pack on CD, or download it. To download
it, select the checkbox next to the latest service pack, then click the
download button. Follow the instructions.
5. The downloading process will download and install the service pack.
6. You must restart your computer for the service pack installation to
complete.
When your computer restarts, you will have the latest, fully-tested, patches
to the Windows 2000 operating system.
Red Hat Linux Updates and Errata Service
Packages
The first step in hardening a Linux server is to apply the most current
errata and Update Service Package to the operating system. The Update
Service Package provides the latest fixes and additions to the operating
system. It is a collection of fixes, corrections, and updates to the Red Hat
products, such as bug fixes, security advisories, package enhancements,
and add-on software. This collection of updates can also be downloaded
individually as Errata, but it is a good idea to start with the latest Update
Service Package, and then install Errata as necessary. However, you must
pay to receive the Update Service Packages, and the Errata are free. Many
Updates and Errata Service Packages are not required upgrades. You need
to read the documentation to determine if you need to install it.
Securing Windows 2000 Advanced Server and Red Hat Linux 6 • Chapter 8 297
119_email_08 10/6/00 12:29 AM Page 297
298 Chapter 8 • Securing Windows 2000 Advanced Server and Red Hat Linux 6
The Update Service Packages include all of the Errata in one package to
keep your system up-to-date. After you pay for the service, you can order
Update Service Packages on CD or download them directly from the Red
Hat Web site. To find out more about the Update Service Packages, visit
www.redhat.com/support/services/update.html, as shown in Figure 8.2.
You will learn more about Errata in the maintenance section of this
chapter.
NOTE
If a Critical Updates Package is available, it is recommended that you
download and install it after you have downloaded and installed the ser-
vice pack. The Critical Updates Package may be redundant—check to see
if the service pack includes the fixes in the Critical Updates Package.
www.syngress.com
Figure 8.1 The Windows Update home page.
119_email_08 10/6/00 12:29 AM Page 298
Securing Windows 2000 Advanced Server and Red Hat Linux 6 • Chapter 8 299
Disabling Unnecessary Services and
Ports
To harden a server, you must first disable any unnecessary services and
ports. You must also ensure that unnecessary services are removed, such
as Microsoft Server service or the Linux rlogin service. It is also important
to lock down unnecessary Transmission Control Protocol/User Datagram
Protocol (TCP/UDP) ports. Once these services and ports are secure, you
must then regularly maintain the system.
Windows 2000 Advanced Server—Services to
Disable
When a new operating system is introduced, there are many uncertainties
because the OS has not been implemented in every production environ-
ment. There are many security vulnerabilities that have not been discov-
ered. Most services on the system are not vulnerable to these weaknesses.
However, an administrator can reduce the amount of risk by removing
unnecessary services. Windows 2000 Advanced Server includes more ser-
vices than ever before, so it makes sense that an administrator would
www.syngress.com
Figure 8.2 Red Hat Updates and Errata.
119_email_08 10/6/00 12:29 AM Page 299
300 Chapter 8 • Securing Windows 2000 Advanced Server and Red Hat Linux 6
customize the system to suit the company needs. You are removing risk
when you remove unnecessary services.
The Server Service
The Windows 2000 Server service provides Remote Procedure Call (RPC)
support for file, print, and named pipe sharing. RPC is a programming
interface that allows computers to share resources with one another
remotely. In Windows, the RPC uses NetBIOS network requests. NetBIOS
is a native networking protocol for Windows and DOS networks, and is not
required when using Windows 2000 as an Internet server. If the Server ser-
vice is left running, the system is vulnerable to hackers who can exploit
NetBIOS. If the service is disabled, two-thirds of all hacker attacks can be
avoided.
To stop the Server service, you must disable it. It is recommended that
you disable the service, not remove it, because removal can potentially
damage the operating system. You must also verify that internal users do
not require the Server service. If they require the Server service (for
example, the server is used as a Windows LAN file server), you should
place those resources on a different server and make them available inter-
nally. Because of this, disabling the Server service has drawbacks, and
should be implemented only in certain situations.
1. To disable the Server service in Windows 2000 Advanced Server,
click Start | Programs | Administrative Tools | Services.
2. The Microsoft Management Console (MMC) opens with the Services
snap-in. The right-hand window lists the services installed on the
machine, as shown in Figure 8.3.
3. Scroll to the Server service, right click the service, and select
Properties.
4. The Server Properties window appears. The General tab is dis-
played by default.
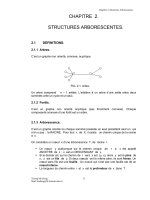
5. In the Startup type drop-down menu, select Disabled, as shown in
Figure 8.4.
6. Click the Stop button to stop the service. An Alert window appears
stating that when the Server service stops, it also stops the
Distributed File System and Computer Browser service. If you do
not require these services, select Yes to stop them.
7. Select OK. The Server service is disabled. Exit the MMC.
www.syngress.com
119_email_08 10/6/00 12:29 AM Page 300
Securing Windows 2000 Advanced Server and Red Hat Linux 6 • Chapter 8 301
www.syngress.com
Figure 8.3 MMC Services snap-in.
Figure 8.4 Disabling the Server service.
119_email_08 10/6/00 12:29 AM Page 301
302 Chapter 8 • Securing Windows 2000 Advanced Server and Red Hat Linux 6
NOTE
If you restart the system, you will receive error messages because the
Distributed File System and Computer Browser service cannot start—they
are dependent upon the Server service. Disable both services to avoid
this error upon each reboot.
Internet Information Services (IIS)
If you plan to run services available in IIS 5, such as Web, File Transfer
Protocol (FTP), or Network News Transfer Protocol (NNTP) services, you
need to read the Microsoft document “Secure Internet Information Services
5 Checklist” at www.microsoft.com/technet/security/tools.asp. This Web
site contains tools and checklists for securing many different Microsoft
products. Configuring IIS 5 for security is simpler than in previous ver-
sions because the default settings for Microsoft Windows 2000 and IIS 5
are more secure than the default settings for Windows NT 4.0 and IIS 4.
If the system will run exclusively as an e-mail server, and will not
require IIS, you should stop the unnecessary IIS, or remove it altogether.
During installation of Windows 2000 Advanced Server, you are given the
choice to install IIS 5. Simply deselect the checkbox and IIS will not install.
If you installed IIS, you can stop the services instead of removing them,
especially if you periodically use the services. You can restart a service
when needed (make sure the coinciding port is open). For instance, if you
want to use the FTP service temporarily, you can start the FTP service,
then open TCP port 21.
To stop IIS, use the following steps:
1. Access the Internet Information Services MMC by selecting Start |
Programs | Administrative Tools | Internet Services Manager.
2. By default, all the IIS applications are started. To stop them, right-
click each service and select Stop, as shown in Figure 8.5.
3. Stop the services that are not required. By default installation, the
following will be available: Default FTP Site, Default Web Site,
Administration Web Site, Default SMTP Virtual Server, and Default
NNTP Virtual Server.
4. Close the IIS MMC.
www.syngress.com
119_email_08 10/6/00 12:29 AM Page 302
Securing Windows 2000 Advanced Server and Red Hat Linux 6 • Chapter 8 303
5. The unnecessary IIS programs have been stopped. If you require
the use of an IIS program, simply open the Internet Information
Services MMC, right-click the required service, and select Start.
NOTE
The Simple Mail Transfer Protocol (SMTP) service packaged with IIS is not
required for Microsoft Exchange. Exchange has its own SMTP service.
Therefore, if you stop the IIS SMTP service, Exchange’s SMTP service will
not be affected.
www.syngress.com
Figure 8.5 Stopping services in IIS.
119_email_08 10/6/00 12:29 AM Page 303
304 Chapter 8 • Securing Windows 2000 Advanced Server and Red Hat Linux 6
Red Hat Linux—Services to Disable
Linux, by nature, is more secure than the Windows operating systems.
However, it is also not as intuitive and user-friendly as Windows.
Regardless, there are still uncertainties to every new Linux kernel that is
released and many security vulnerabilities that have not been discovered.
Most Linux services are not vulnerable to these exploits. However, just as
in Windows, an administrator can reduce the amount of risk by removing
unnecessary services. Red Hat Linux 6 includes many services, so it makes
sense that an administrator would customize the system to suit the com-
pany needs. Remember, you are reducing risk when you remove unneces-
sary services.
Inetd.conf
The inetd.conf file controls many UNIX services, including FTP and Telnet.
It determines what services are available to the system. If a service is com-
mented out, then the service is unavailable. Because this file is so pow-
erful, only the root should be able to configure it. The inetd.conf file makes
it simple to disable services that your system is not using. For instance,
you can disable the FTP and Telnet services by commenting out the FTP
and Telnet entries in the file and restarting the service. If the service is
commented out, it will not restart. The next section will demonstrate how
to disable the Telnet service.
Most administrators find it very convenient to log in to their UNIX
machines over a network for administration purposes. It allows the admin-
istrator to work remotely while maintaining network services. However, in a
high security environment, only physical access may be permitted for
administering a server. In this case, you should disable the Telnet inter-
active login utility. Once disabled, no one can access the machine via
Telnet.
1. To disable Telnet, you must edit the inetd.conf file. Open the inetd
file and locate the Telnet service, as shown in Figure 8.6.
2. Comment out the Telnet service, then write and quit the file.
3. Next, you must restart inetd.conf. Identify the process identifier
(PID) for inetd by entering:
ps aux | grep inetd
4. The second column lists the PID number. The last column lists the
process using that PID. To restart inetd, identify the PID number
and enter:
kill –HUP [PID NUMBER]
www.syngress.com
119_email_08 10/6/00 12:29 AM Page 304
Securing Windows 2000 Advanced Server and Red Hat Linux 6 • Chapter 8 305
Attempt to log on to the system using Telnet. You should fail. Note that
many services can be disabled using the inetd.conf file. You can disable
the FTP service using the same method.
Rlogin
The rlogin service (remote login) is enabled by default in the inetd.conf file.
Rlogin has security vulnerabilities because it can bypass the password
prompt to access a system remotely. There are two services associated with
rlogin: login and rsh (remote shell). Comment out these services if they are
not required and restart inetd to ensure your system is not exploited.
Locking Down Ports
TCP/IP networks assign a port to each service, such as HTTP, SMTP, and
POP3. Each port is given a number, called a port number, used to link
incoming data to the correct service. For instance, if a client browser is
requesting to view a server’s Web page, the request will be directed to port
80 on the server. The Web service receives the request and sends the Web
page to the client. Each service is assigned a port number, and each port
number has a TCP and UDP port. For instance, port 53 is used for the
Domain Name System (DNS) and has a TCP port and a UDP port. TCP port
53 is used for zone transfers between DNS servers; UDP port 53 is used for
common DNS queries—resolving domain names to IP addresses.
www.syngress.com
Figure 8.6 Commenting out the Telnet service with inetd.conf.
119_email_08 10/6/00 12:29 AM Page 305
306 Chapter 8 • Securing Windows 2000 Advanced Server and Red Hat Linux 6
Well-Known and Registered Ports
There are two ranges of ports used for TCP/IP networks: well-known ports
and registered ports. The well-known ports are the Internet services that
have been assigned a specific port. For instance, SMTP is assigned port 25
and HTTP is assigned port 80. Servers listen on the network for requests at
the well-known ports. Registered ports are temporary ports, usually used
by clients, and will vary each time a service is used. Registered ports are
also called ephemeral ports, because they last for only a brief time. The
port is then abandoned and can be used by other services.
The port number ranges are classified as follows, according to Request
for Comments (RFC) 1700. To access RFC 1700, go to />in-notes/rfc1700.txt.
Type Port number range
Well-known 1-1023
Registered 1024-65535
Most TCP/IP services use the registered ports 1024-5000 for ephemeral
ports. The registered ports above 5000 are used for services that are not
well known. You will see how well-known ports work with registered ports
in a moment.
Table 8.1 is a list of well-known TCP/UDP port numbers.
To explain how well-known ports work with registered ports, let’s take a
look at a typical Web site connection from a Web browser to a Web server.
The client sends the HTTP request from a registered TCP port, such as port
3666. The request is routed across the network to the well-known TCP port
80 of a Web server. Once a session is established, the server continues to
use port 80, and the client uses various registered ports, such as TCP port
3666 and 3667, to transfer the HTTP data.
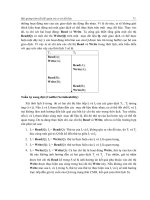
Figure 8.7 is a packet capture that displays the establishment of a TCP
session between a client and server, and the transmission of HTTP data
between them.
In frame number one of the packet capture, the source address
(192.168.10.82) is the client computer requesting the Web page. The desti-
nation address (205.181.158.21) is the Web server, which hosts the
Syngress Web site. In the summary field, the D=80 indicates that the desti-
nation TCP port is 80. The S=3666 indicates that the source TCP port is
3666. The first three frames display the TCP handshake, which establishes
a TCP connection between the client and server. In frame four, the client
requests HTTP data from the server. The request determines the HTTP ver-
sion that the client and server will use. The following frames include the
client requesting and downloading the contents of the Web page.
www.syngress.com
119_email_08 10/6/00 12:29 AM Page 306
Securing Windows 2000 Advanced Server and Red Hat Linux 6 • Chapter 8 307
www.syngress.com
Table 8.1 Commonly Used Well-known TCP/UDP Port Numbers
Protocol Port Number
FTP (Default data)
FTP (Connection dialog, control)
Telnet
SMTP
DNS
DHCP BOOTP Server
DHCP BOOTP Client
TFTP
Gopher
HTTP
POP3
NNTP
NetBIOS Session Service
Internet Message Access Protocol (IMAP), version 2
20
21
23
25
53
67
68
69
70
80
110
119
139
143
Figure 8.7 Port usage in a client/server HTTP session.
119_email_08 10/6/00 12:29 AM Page 307
308 Chapter 8 • Securing Windows 2000 Advanced Server and Red Hat Linux 6
Determining Ports to Block
When determining which ports to block on your server, you must first
determine which services you require. In most cases, block all ports that
are not exclusively required by these services. This is tricky, because you
can easily block yourself from services you need, especially services that
use ephemeral ports, as explained above.
For example, if your server is an exclusive e-mail server running SMTP
and IMAP, you can block all TCP ports except for ports 25 and 143, respec-
tively. If you want to routinely download patches from the Microsoft Updates
Web site using this server, you may be inclined to open TCP port 80.
If you block the same UDP ports 25, 80, and 143, DNS requests
are blocked because DNS queries use UDP port 53, and DNS answers
use a UDP ephemeral port (for example, the response stating that
www.syngress.com=205.181.158.215). Even if you open port 53, a different
ephemeral port may be assigned each time for the answer. Attempting to
allow access to a randomly assigned ephemeral port is almost impossible
and a waste of time. Another problem is that Microsoft and many other
sites run reverse DNS lookups on computers accessing their sites, espe-
cially when systems download software. If your DNS ports are blocked, a
reverse DNS lookup will fail, and you cannot access the site.
Therefore, you should either open all UDP ports so you can access the
Windows Updates page, or block them (except for the services you require)
and access these service packs, hot fixes, and security updates another
way. Many administrators subscribe to the Microsoft TechNet program,
which sends monthly CDs containing all service packs, host fixes, and
security patches. You can also simply download the updates from another
computer.
Blocking Ports in Windows
The TCP/IP Properties window allows you to access the TCP/IP Filtering
window. Filtering allows you to disable TCP and UDP ports, so only the
necessary ports are open. In the following example, all ports will be
blocked except those required by the e-mail server:
1. To block TCP/UDP ports on Windows 2000 Advanced Server, right-
click My Network Places on the desktop and select Properties.
2. Right-click Local Area Connection and select Properties.
3. In the scroll-down window, highlight Internet Protocol (TCP/IP)
and click the Properties button.
4. Click the Advanced button and choose the Options tab.
www.syngress.com
119_email_08 10/6/00 12:29 AM Page 308