Android SDK (phần 7) ppsx
Bạn đang xem bản rút gọn của tài liệu. Xem và tải ngay bản đầy đủ của tài liệu tại đây (2.21 MB, 50 trang )
Creating Map-Based Activities
❘
267
criteria.setAccuracy(Criteria.ACCURACY_FINE);
criteria.setAltitudeRequired(false);
criteria.setBearingRequired(false);
criteria.setCostAllowed(true);
criteria.setPowerRequirement(Criteria.POWER_LOW);
String provider = locationManager.getBestProvider(criteria, true);
Location location =
locationManager.getLastKnownLocation(provider);
updateWithNewLocation(location);
locationManager.requestLocationUpdates(provider, 2000, 10,
locationListener);
}
6. The final step is to modify the
updateWithNewLocation
method to re-center the map on the
current location using the Map Controller.
private void updateWithNewLocation(Location location) {
String latLongString;
TextView myLocationText;
myLocationText = (TextView)findViewById(R.id.myLocationText);
String addressString = "No address found";
if (location != null) {
// Update the map location.
Double geoLat = location.getLatitude()*1E6;
Double geoLng = location.getLongitude()*1E6;
GeoPoint point = new GeoPoint(geoLat.intValue(),
geoLng.intValue());
mapController.animateTo(point);
double lat = location.getLatitude();
double lng = location.getLongitude();
latLongString = "Lat:" + lat + "\nLong:" + lng;
double latitude = location.getLatitude();
double longitude = location.getLongitude();
Geocoder gc = new Geocoder(this, Locale.getDefault());
try {
List<Address> addresses = gc.getFromLocation(latitude, longitude, 1);
StringBuilder sb = new StringBuilder();
if (addresses.size() > 0) {
Address address = addresses.get(0);
for (int i = 0; i < address.getMaxAddressLineIndex(); i++)
sb.append(address.getAddressLine(i)).append("\n");
sb.append(address.getLocality()).append("\n");
sb.append(address.getPostalCode()).append("\n");
sb.append(address.getCountryName());
}
268
❘
CHAPTER 8 MAPS, GEOCODING, AND LOCATION-BASED SERVICES
addressString = sb.toString();
} catch (IOException e) {}
} else {
latLongString = "No location found";
}
myLocationText.setText("Your Current Position is:\n" +
latLongString + "\n" + addressString);
}
All code snippets in this example are part of the Chapter 8 Where Am I? project, available for download at Wrox.com.
Creating and Using Overlays
Overlays enable you to add annotations and click handling to
MapViews
. Each Overlay lets you draw
2D primitives, including text, lines, images, and shapes, directly onto a canvas, which is then overlaid
ontoaMapView.
You can add several Overlays onto a single map. All the Overlays assigned to a Map View are added
as layers, with newer layers potentially obscuring older ones. User clicks are passed through the stack
until they are either handled by an Overlay or registered as clicks on the Map View itself.
Creating New Overlays
Each Overlay is a canvas with a transparent background that is layered onto a Map View and used to
handle map touch events.
To add a new Overlay create a new class that extends
Overlay
. Override the
draw
method to draw the
annotations you want to add, and override
onTap
to react to user clicks (generally made when the user
taps an annotation added by this Overlay).
Listing 8-8 shows the framework for creating a new Overlay that can draw annotations and handle
user clicks.
LISTING 8-8: Creating a new Overlay
import android.graphics.Canvas;
import com.google.android.maps.MapView;
import com.google.android.maps.Overlay;
public class MyOverlay extends Overlay {
@Override
public void draw(Canvas canvas, MapView mapView, boolean shadow) {
if (shadow == false) {
[
Draw annotations on main map layer
]
}
else {
[
Draw annotations on the shadow layer
]
}
}
@Override
public boolean onTap(GeoPoint point, MapView mapView) {
Creating Map-Based Activities
❘
269
// Return true if screen tap is handled by this overlay
return false;
}
}
Introducing Projections
The canvas used to draw Overlay annotations is a standard
Canvas
that represents the visible display
surface. To add annotations based on physical locations, you need to convert between geographical
points and screen coordinates.
The
Projection
class lets you translate between latitude/longitude coordinates (stored as
GeoPoints
)
and x/y screen pixel coordinates (stored as
Points
).
A map’s Projection may change between subsequentcalls to draw, so it’s good practice to get a new
instance each time. Get a Map View’s Projection by calling
getProjection
.
Projection projection = mapView.getProjection();
Use the
fromPixel
and
toPixel
methods to translate from GeoPoints to Points and vice versa.
For performance reasons, you can best use the
toPixel
Projection method by passing a Point object to
be populated (rather than relying on the return value), as shown in Listing 8-9.
LISTING 8-9: Using map projections
Point myPoint = new Point();
// To screen coordinates
projection.toPixels(geoPoint, myPoint);
// To GeoPoint location coordinates
projection.fromPixels(myPoint.x, myPoint.y);
Drawing on the Overlay Canvas
You handle Canvas drawing for Overlays by overriding the Overlay’s
draw
handler.
The passed-in Canvas is the surface on which you draw your annotations, using the same techniques
introduced in Chapter 4 for creating custom user interfaces for Views. The Canvas object includes the
methods for drawing 2D primitives on your map (including lines, text, shapes, ellipses, images, etc.).
Use
Paint
objects to define the style and color.
Listing 8-10 uses a Projection to draw text and an ellipse at a given location.
LISTING 8-10: A simple Map Overlay
@Override
public void draw(Canvas canvas, MapView mapView, boolean shadow) {
Projection projection = mapView.getProjection();
Double lat = -31.960906*1E6;
continues
270
❘
CHAPTER 8 MAPS, GEOCODING, AND LOCATION-BASED SERVICES
LISTING 8-10 (continued)
Double lng = 115.844822*1E6;
GeoPoint geoPoint = new GeoPoint(lat.intValue(), lng.intValue());
if (shadow == false) {
Point myPoint = new Point();
projection.toPixels(geoPoint, myPoint);
// Create and setup your paint brush
Paint paint = new Paint();
paint.setARGB(250, 255, 0, 0);
paint.setAntiAlias(true);
paint.setFakeBoldText(true);
// Create the circle
int rad = 5;
RectF oval = new RectF(myPoint.x-rad, myPoint.y-rad,
myPoint.x+rad, myPoint.y+rad);
// Draw on the canvas
canvas.drawOval(oval, paint);
canvas.drawText("Red Circle", myPoint.x+rad, myPoint.y, paint);
}
}
For more advanced drawing features see Chapter 11, where gradients, strokes, and
filters are introduced.
Handling Map Tap Events
To handle map taps (user clicks), override the
onTap
event handler within the Overlay extension class.
The
onTap
handler receives two parameters:
➤ A
GeoPoint
that contains the latitude/longitude of the map location tapped
➤ The
MapView
that was tapped to trigger this event
When you are overriding
onTap
, the method should return
true
if it has handled a particular tap and
false
to let another Overlay handle it, as shown in Listing 8-11.
LISTING 8-11: Handling map-tap events
@Override
public boolean onTap(GeoPoint point, MapView mapView) {
// Perform hit test to see if this overlay is handling the click
if ([
perform hit test
]) {
[
execute on tap functionality
]
return true;
}
Creating Map-Based Activities
❘
271
// If not handled return false
return false;
}
Adding and Removing Overlays
Each
MapView
contains a list of Overlays currently displayed. You can get a reference to this list by
calling
getOverlays
, as shown in the following snippet:
List<Overlay> overlays = mapView.getOverlays();
Adding and removing items from the list is thread-safe and synchronized, so you can modify and query
the list safely. You should still iterate over the list within a synchronization block synchronized on the
List.
To add an Overlay onto a Map View, create a new instance of the Overlay and add it to the list, as
shown in the following snippet.
List<Overlay> overlays = mapView.getOverlays();
MyOverlay myOverlay = new MyOverlay();
overlays.add(myOverlay);
mapView.postInvalidate();
The added Overlay will be displayed the next time the Map View is redrawn, so it’s usually a good
practice to call
postInvalidate
after you modify the list to update the changes on the map display.
Annotating ‘Where Am I?’
This final modification to ‘‘Where Am I?’’ creates and adds a new Overlay that displays a white circle
at the device’s current position.
1. Start by creating a new
MyPositionOverlay
Overlay class in the Where Am I? project.
package com.paad.whereami;
import android.graphics.Canvas;
import android.graphics.Paint;
import android.graphics.Point;
import android.graphics.RectF;
import android.location.Location;
import com.google.android.maps.GeoPoint;
import com.google.android.maps.MapView;
import com.google.android.maps.Overlay;
import com.google.android.maps.Projection;
public class MyPositionOverlay extends Overlay {
@Override
public void draw(Canvas canvas, MapView mapView, boolean shadow) {
}
@Override
public boolean onTap(GeoPoint point, MapView mapView) {
272
❘
CHAPTER 8 MAPS, GEOCODING, AND LOCATION-BASED SERVICES
return false;
}
}
2. Create a new instance variable to store the current Location, and add setter and getter meth-
ods for it.
Location location;
public Location getLocation() {
return location;
}
public void setLocation(Location location) {
this.location = location;
}
3. Override the
draw
method to add a small white circle at the current location.
private final int mRadius = 5;
@Override
public void draw(Canvas canvas, MapView mapView, boolean shadow) {
Projection projection = mapView.getProjection();
if (shadow == false) {
// Get the current location
Double latitude = location.getLatitude()*1E6;
Double longitude = location.getLongitude()*1E6;
GeoPoint geoPoint;
geoPoint = new
GeoPoint(latitude.intValue(),longitude.intValue());
// Convert the location to screen pixels
Point point = new Point();
projection.toPixels(geoPoint, point);
RectF oval = new RectF(point.x - mRadius, point.y - mRadius,
point.x + mRadius, point.y + mRadius);
// Setup the paint
Paint paint = new Paint();
paint.setARGB(250, 255, 255, 255);
paint.setAntiAlias(true);
paint.setFakeBoldText(true);
Paint backPaint = new Paint();
backPaint.setARGB(175, 50, 50, 50);
backPaint.setAntiAlias(true);
RectF backRect = new RectF(point.x + 2 + mRadius,
point.y - 3*mRadius,
point.x + 65, point.y + mRadius);
// Draw the marker
canvas.drawOval(oval, paint);
canvas.drawRoundRect(backRect, 5, 5, backPaint);
canvas.drawText("Here I Am",
Creating Map-Based Activities
❘
273
point.x + 2*mRadius, point.y,
paint);
}
super.draw(canvas, mapView, shadow);
}
4. Now open the
WhereAmI
Activity class, and add the
MyPositionOverlay
to the
MapView
.
Start by adding a new instance variable to store the
MyPositionOverlay
, then override
onCreate
to create a new instance of the class, and add it to the
MapView
’s Overlay list.
MyPositionOverlay positionOverlay;
@Override
public void onCreate(Bundle savedInstanceState) {
super.onCreate(savedInstanceState);
setContentView(R.layout.main);
MapView myMapView = (MapView)findViewById(R.id.myMapView);
mapController = myMapView.getController();
myMapView.setSatellite(true);
myMapView.setStreetView(true);
myMapView.displayZoomControls(false);
mapController.setZoom(17);
// Add the MyPositionOverlay
positionOverlay = new MyPositionOverlay();
List<Overlay> overlays = myMapView.getOverlays();
overlays.add(positionOverlay);
LocationManager locationManager;
String context = Context.LOCATION_SERVICE;
locationManager = (LocationManager)getSystemService(context);
Criteria criteria = new Criteria();
criteria.setAccuracy(Criteria.ACCURACY_FINE);
criteria.setAltitudeRequired(false);
criteria.setBearingRequired(false);
criteria.setCostAllowed(true);
criteria.setPowerRequirement(Criteria.POWER_LOW);
String provider = locationManager.getBestProvider(criteria, true);
Location location = locationManager.getLastKnownLocation(provider);
updateWithNewLocation(location);
locationManager.requestLocationUpdates(provider, 2000, 10,
locationListener);
}
5. Finally, update the
updateWithNewLocation
method to pass the new location to the Overlay.
private void updateWithNewLocation(Location location) {
String latLongString;
TextView myLocationText;
274
❘
CHAPTER 8 MAPS, GEOCODING, AND LOCATION-BASED SERVICES
myLocationText = (TextView)findViewById(R.id.myLocationText);
String addressString = "No address found";
if (location != null) {
// Update my location marker
positionOverlay.setLocation(location);
// Update the map location.
Double geoLat = location.getLatitude()*1E6;
Double geoLng = location.getLongitude()*1E6;
GeoPoint point = new GeoPoint(geoLat.intValue(),
geoLng.intValue());
mapController.animateTo(point);
double lat = location.getLatitude();
double lng = location.getLongitude();
latLongString = "Lat:" + lat + "\nLong:" + lng;
double latitude = location.getLatitude();
double longitude = location.getLongitude();
Geocoder gc = new Geocoder(this, Locale.getDefault());
try {
List<Address> addresses = gc.getFromLocation(latitude,
longitude, 1);
StringBuilder sb = new StringBuilder();
if (addresses.size() > 0) {
Address address = addresses.get(0);
for (int i = 0; i < address.getMaxAddressLineIndex(); i++)
sb.append(address.getAddressLine(i)).append("\n");
sb.append(address.getLocality()).append("\n");
sb.append(address.getPostalCode()).append("\n");
sb.append(address.getCountryName());
}
addressString = sb.toString();
} catch (IOException e) {}
} else {
latLongString = "No location found";
}
myLocationText.setText("Your Current Position is:\n" +
latLongString + "\n" + addressString);
}
All code snippets in this example are part of the Chapter 8 Where Am I? project, available for download at Wrox.com.
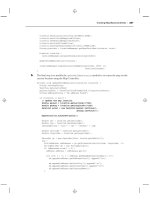
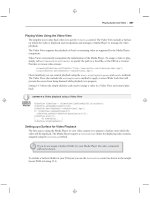
When run, your application will display your current device location with a white circle and supporting
text, as shown in Figure 8-6.
Creating Map-Based Activities
❘
275
It’s worth noting that this is not the preferred technique for displaying your current
location on a map. This functionality is implemented natively by Android through
the
MyLocationOverlay
class. If you want to display and follow your current
location, you should consider using (or extending) this class, as shown in the next
section, instead of implementing it manually as shown here.
Introducing My Location Overlay
FIGURE 8-6
The
MyLocationOverlay
class is a special Overlay designed
to show your current location and orientation on a
MapView
.
To use My Location Overlay you need to create a new
instance, passing in the application Context and target Map
View,andaddittothe
MapView
’s Overlay list, as shown
here:
List<Overlay> overlays =
mapView.getOverlays();
MyLocationOverlay myLocationOverlay =
new MyLocationOverlay(this, mapView);
overlays.add(myLocationOverlay);
You can use My Location Overlay to display both your
current location (represented as a flashing blue marker) and
your current orientation (shown as a compass on the map
display).
The following snippet shows how to enable both the
compass and marker; in this instance the Map View’s
MapController
is also passed in, allowing the Overlay to
automatically scroll the map if the marker moves
offscreen.
myLocationOverlay.enableCompass();
myLocationOverlay.enableMyLocation(mapView.getMapController());
Introducing Itemized Overlays and Overlay Items
OverlayItems
are used to supply simple maker functionality to your Map Views via the
ItemizedOverlay
class.
ItemizedOverlays
provide a convenient shortcut for adding markers to a map, letting you assign
a marker image and associated text to a particular geographical position. The
ItemizedOverlay
instance handles the drawing, placement, click handling, focus control, and layout optimization of
each
OverlayItem
marker for you.
276
❘
CHAPTER 8 MAPS, GEOCODING, AND LOCATION-BASED SERVICES
To add an
ItemizedOverlay
marker layer to your map, start by creating a new class that extends
ItemizedOverlay<OverlayItem>
, as shown in Listing 8-12.
ItemizedOverlay
is a generic class that lets you create extensions based on any
OverlayItem
-derived subclass.
Within the constructor you need to call through to the superclass after defining the bounds for your
default marker. You must then call
populate
to trigger the creation of each
OverlayItem
;
populate
must be called whenever the data used to create the items changes.
Within the implementation, override
size
to return the number of markers to display and
createItem
to create a new item based on the index of each marker.
LISTING 8-12: Creating a new Itemized Overlay
import android.graphics.drawable.Drawable;
import com.google.android.maps.GeoPoint;
import com.google.android.maps.ItemizedOverlay;
import com.google.android.maps.OverlayItem;
public class MyItemizedOverlay extends ItemizedOverlay<OverlayItem> {
public MyItemizedOverlay(Drawable defaultMarker) {
super(boundCenterBottom(defaultMarker));
populate();
}
@Override
protected OverlayItem createItem(int index) {
switch (index) {
case 1:
Double lat = 37.422006*1E6;
Double lng = -122.084095*1E6;
GeoPoint point = new GeoPoint(lat.intValue(), lng.intValue());
OverlayItem oi;
oi = new OverlayItem(point, "Marker", "Marker Text");
return oi;
}
return null;
}
@Override
public int size() {
// Return the number of markers in the collection
return 1;
}
}
Creating Map-Based Activities
❘
277
To add an
ItemizedOverlay
implementation to your map, create a new instance (passing in the Draw-
able marker image to use for each marker) and add it to the map’s Overlay list.
List<Overlay> overlays = mapView.getOverlays();
MyItemizedOverlay markers = new
MyItemizedOverlay(r.getDrawable(R.drawable.marker));
overlays.add(markers);
Note that the map markers placed by the Itemized Overlay use state to indicate if
they are selected. Use the
StateListDrawable
described in Chapter 4 to indicate
when a marker has been selected.
In Listing 8-12, the list of Overlay items is static and defined in code. More typically your Overlay items
will be a dynamic ArrayList to which you will want to add and remove items at run time.
Listing 8-13 shows the skeleton class for a dynamic Itemized Overlay implementation, backed by an
ArrayList, and supporting the addition and removal of items at run time.
LISTING 8-13: Skeleton code for a dynamic Itemized Overlay
public class MyDynamicItemizedOverlay extends ItemizedOverlay<OverlayItem>
{
private ArrayList<OverlayItem> items;
public MyDynamicItemizedOverlay(Drawable defaultMarker) {
super(boundCenterBottom(defaultMarker));
items = new ArrayList<OverlayItem>();
populate();
}
public void addNewItem(GeoPoint location, String markerText,
String snippet) {
items.add(new OverlayItem(location, markerText, snippet));
populate();
}
public void removeItem(int index) {
items.remove(index);
populate();
}
@Override
protected OverlayItem createItem(int index) {
return items.get(index);
}
continues
278
❘
CHAPTER 8 MAPS, GEOCODING, AND LOCATION-BASED SERVICES
LISTING 8-13 (continued)
@Override
public int size() {
return items.size();
}
}
Pinning Views to the Map and Map Positions
You can pin any View-derived object to a Map View (including layouts and other View Groups),
attaching it to either a screen position or a geographical map location.
In the latter case, the View will move to follow its pinned position on the map, effectively acting as an
interactive map marker. As a more resource-intensive solution, this is usually reserved for supplying the
detail ‘‘balloons’’ often displayed on mashups to provide further detail when a marker is clicked.
You implement both pinning mechanisms by calling
addView
on the
MapView
, usually from the
onCreate
or
onRestore
methods within the
MapActivity
containing it. Pass in the View you want to pin and the
layout parameters to use.
The
MapView.LayoutParams
parameters you pass in to
addView
determine how, and where, the View is
added to the map.
To add a new View to the map relative to the screen, specify a new
MapView.LayoutParams,
including
arguments that set the height and width of the View, the x/y screen coordinates to pin to, and the
alignment to use for positioning, as shown in Listing 8-14.
LISTING 8-14: Pinning a View to a map
int y = 10;
int x = 10;
EditText editText1 = new EditText(getApplicationContext());
editText1.setText("Screen Pinned");
MapView.LayoutParams screenLP;
screenLP = new MapView.LayoutParams(MapView.LayoutParams.WRAP_CONTENT,
MapView.LayoutParams.WRAP_CONTENT,
x, y,
MapView.LayoutParams.TOP_LEFT);
mapView.addView(editText1, screenLP);
To pin a View relative to a physical map location, pass four parameters when constructing the new
Map View
LayoutParams
, representing the height, width, GeoPoint to pin to, and layout alignment as
shown in Listing 8-15.
LISTING 8-15: Pinning a View to a geographical location
Double lat = 37.422134*1E6;
Double lng = -122.084069*1E6;
GeoPoint geoPoint = new GeoPoint(lat.intValue(), lng.intValue());
Mapping Earthquakes Example
❘
279
MapView.LayoutParams geoLP;
geoLP = new MapView.LayoutParams(MapView.LayoutParams.WRAP_CONTENT,
MapView.LayoutParams.WRAP_CONTENT,
geoPoint,
MapView.LayoutParams.TOP_LEFT);
EditText editText2 = new EditText(getApplicationContext());
editText2.setText("Location Pinned");
mapView.addView(editText2, geoLP);
Panning the map will leave the first
TextView
stationary in the upper left corner, while the second
TextView
will move to remain pinned to a particular position on the map.
To remove a View from a Map View, call
removeView
, passing in the View instance you wish to remove,
as shown here.
mapView.removeView(editText2);
MAPPING EARTHQUAKES EXAMPLE
The following step-by-step guide demonstrates how to build a map-based Activity for the Earthquake
project you started in Chapter 5. The new
MapActivity
will display a map of recent earthquakes using
techniques you learned within this chapter.
1. Create a new earthquake_map.xml layout resource that includes a
MapView
, being sure to
include an
android:id
attribute and an
android:apiKey
attribute that contains your Android
Maps API key.
<?xml version="1.0" encoding="utf-8"?>
<LinearLayout
xmlns:android=" />android:orientation="vertical"
android:layout_width="fill_parent"
android:layout_height="fill_parent">
<com.google.android.maps.MapView
android:id="@+id/map_view"
android:layout_width="fill_parent"
android:layout_height="fill_parent"
android:enabled="true"
android:clickable="true"
android:apiKey="myapikey"
/>
</LinearLayout>
2. Create a new
EarthquakeMap
Activity that inherits from
MapActivity
.Use
setContentView
within
onCreate
to inflate the earthquake_map resource you created in Step 1.
package com.paad.earthquake;
import android.os.Bundle;
import com.google.android.maps.MapActivity;
280
❘
CHAPTER 8 MAPS, GEOCODING, AND LOCATION-BASED SERVICES
public class EarthquakeMap extends MapActivity {
@Override
public void onCreate(Bundle savedInstanceState) {
super.onCreate(savedInstanceState);
setContentView(R.layout.earthquake_map);
}
@Override
protected boolean isRouteDisplayed() {
return false;
}
}
3. Update the application manifest to include your new
EarthquakeMap
Activity and import the
map library.
<?xml version="1.0" encoding="utf-8"?>
<manifest xmlns:android=" />package="com.paad.earthquake">
<application android:icon="@drawable/icon">
<activity
android:name=".Earthquake"
android:label="@string/app_name">
<intent-filter>
<action android:name="android.intent.action.MAIN" />
<category android:name="android.intent.category.LAUNCHER" />
</intent-filter>
</activity>
<activity android:name=".Preferences"
android:label="Earthquake Preferences"/>
<activity android:name=".EarthquakeMap"
android:label="View Earthquakes"/>
<provider android:name=".EarthquakeProvider"
android:authorities="com.paad.provider.earthquake" />
<uses-library android:name="com.google.android.maps"/>
</application>
<uses-permission android:name="android.permission.INTERNET"/>
</manifest>
4. Add a new menu option to the
Earthquake
Activity to display the
EarthquakeMap
Activity.
4.1. Start by adding a new string to the strings.xml resource for the menu text.
<?xml version="1.0" encoding="autf-8"?>
<resources>
<string name="app_name">Earthquake</string>
<string name="quake_feed">
/></string>
<string name="menu_update">Refresh Earthquakes</string>
<string name="auto_update_prompt">Auto Update?</string>
<string name="update_freq_prompt">Update Frequency</string>
<string name="min_quake_mag_prompt">
Minimum Quake Magnitude
</string>
<string name="menu_preferences">Preferences</string>
<string name="menu_earthquake_map">Earthquake Map</string>
</resources>
Mapping Earthquakes Example
❘
281
4.2. Then add a new menu identifier before modifying the
onCreateOptionsMenu
han-
dler to add the new Menu Item. It should use the text defined in Step 4.1, and when
selected it should fire an Intent to explicitly start the
EarthquakeMap
Activity.
static final private int MENU_EARTHQUAKE_MAP = Menu.FIRST+2;
@Override
public boolean onCreateOptionsMenu(Menu menu) {
super.onCreateOptionsMenu(menu);
menu.add(0, MENU_UPDATE, Menu.NONE, R.string.menu_update);
menu.add(0, MENU_PREFERENCES, Menu.NONE,
R.string.menu_preferences);
Intent startMap = new Intent(this, EarthquakeMap.class);
menu.add(0, MENU_EARTHQUAKE_MAP,
Menu.NONE,
R.string.menu_earthquake_map).setIntent(startMap);
return true;
}
5. Now create a new
EarthquakeOverlay
class that extends
Overlay
. It will draw the position
and magnitude of each earthquake on the Map View.
package com.paad.earthquake;
import java.util.ArrayList;
import android.database.Cursor;
import android.database.DataSetObserver;
import android.graphics.Canvas;
import android.graphics.Paint;
import android.graphics.Point;
import android.graphics.RectF;
import com.google.android.maps.GeoPoint;
import com.google.android.maps.MapView;
import com.google.android.maps.Overlay;
import com.google.android.maps.Projection;
public class EarthquakeOverlay extends Overlay {
@Override
public void draw(Canvas canvas, MapView mapView, boolean shadow) {
Projection projection = mapView.getProjection();
if (shadow == false) {
// TODO: Draw earthquakes
}
}
}
5.1. Add a new constructor that accepts a
Cursor
to the current earthquake data, and
store that Cursor as an instance variable.
Cursor earthquakes;
public EarthquakeOverlay(Cursor cursor, ContentResolver resolver) {
super();
earthquakes = cursor;
}
282
❘
CHAPTER 8 MAPS, GEOCODING, AND LOCATION-BASED SERVICES
5.2. Create a new
refreshQuakeLocations
method that iterates over the results Cursor
and extracts the location of each earthquake, extracting the latitude and longitude
before storing each coordinate in a List of
GeoPoints
.
ArrayList<GeoPoint> quakeLocations;
private void refreshQuakeLocations() {
if (earthquakes.moveToFirst())
do {
Double lat =
earthquakes.getFloat(EarthquakeProvider.LATITUDE_COLUMN) * 1E6;
Double lng =
earthquakes.getFloat(EarthquakeProvider.LONGITUDE_COLUMN) * 1E6;
GeoPoint geoPoint = new GeoPoint(lng.intValue(),
lat.intValue());
quakeLocations.add(geoPoint);
} while(earthquakes.moveToNext());
}
5.3. Call
refreshQuakeLocations
from the Overlay’s constructor. Also register a
DataSetObserver
on the results Cursor that refreshes the Earthquake Location list
if a change in the Earthquake Cursor is detected.
public EarthquakeOverlay(Cursor cursor) {
super();
earthquakes = cursor;
quakeLocations = new ArrayList<GeoPoint>();
refreshQuakeLocations();
earthquakes.registerDataSetObserver(new DataSetObserver() {
@Override
public void onChanged() {
refreshQuakeLocations();
}
});
}
5.4. Complete the
EarthquakeOverlay
by overriding the
draw
method to iterate over the
list of
GeoPoints
, drawing a marker at each earthquake location. In this example
a simple red circle is drawn, but you could easily modify it to include additional
information, such as by adjusting the size of each circle based on the magnitude of
the quake.
int rad = 5;
@Override
public void draw(Canvas canvas, MapView mapView, boolean shadow) {
Projection projection = mapView.getProjection();
// Create and setup your paint brush
Paint paint = new Paint();
paint.setARGB(250, 255, 0, 0);
paint.setAntiAlias(true);
paint.setFakeBoldText(true);
Mapping Earthquakes Example
❘
283
if (shadow == false) {
for (GeoPoint point : quakeLocations) {
Point myPoint = new Point();
projection.toPixels(point, myPoint);
RectF oval = new RectF(myPoint.x-rad, myPoint.y-rad,
myPoint.x+rad, myPoint.y+rad);
canvas.drawOval(oval, paint);
}
}
}
6. Return to the
EarthquakeMap
class. Within the
onCreate
method, create a Cursor that
returns the earthquakes you want to display on the map. Use this Cursor to create a new
EarthquakeOverlay
before adding the new instance to the Map View’s list of Overlays.
Cursor earthquakeCursor;
@Override
public void onCreate(Bundle savedInstanceState) {
super.onCreate(savedInstanceState);
setContentView(R.layout.earthquake_map);
String earthquakeURI = EarthquakeProvider.CONTENT_URI;
earthquakeCursor = getContentResolver().query(earthquakeURI,
null, null, null,
null);
MapView earthquakeMap = (MapView)findViewById(R.id.map_view);
EarthquakeOverlay eo = new EarthquakeOverlay(earthquakeCursor);
earthquakeMap.getOverlays().add(eo);
}
7. Finally, override
onResume
to call
requery
on the Earthquake result set whenever this Activ-
ity becomes visible. Also, override
onPause
and
onDestroy
to optimize use of the Cursor
resources.
@Override
public void onResume() {
earthquakeCursor.requery();
super.onResume();
}
@Override
public void onPause() {
earthquakeCursor.deactivate();
super.onPause();
}
@Override
public void onDestroy() {
earthquakeCursor.close();
super.onDestroy();
}
284
❘
CHAPTER 8 MAPS, GEOCODING, AND LOCATION-BASED SERVICES
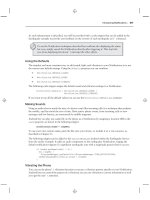
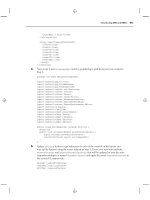
8. If you run the application and select Earthquake Map from the main menu, your application
should appear as shown in Figure 8-7.
All code snippets in this example are part of the Chapter 8 Earthquake project, available for download at Wrox.com.
SUMMARY
FIGURE 8-7
Location-based services, the Geocoder, and MapViews are
available to create intuitive, location-aware applications that
feature geographical information.
This chapter introduced the Geocoder and showed how to
perform forward and reverse geocoding lookups to translate
between map coordinates and street addresses. You were
introduced to location-based services, used to find the cur-
rent geographical position of a device. You also used them
to track movement and create proximity alerts.
Then you created interactive map applications. Using Over-
lays and Views you annotated
MapViews
with 2D graphics,
as well as markers in the form of
OverlayItems
and Views
(including View Groups and layouts).
In Chapter 9 you’ll learn how to work from the background.
You’ll be introduced to the Service component and learn
how to move processing onto background threads. To inter-
act with the user while hidden from view, you’ll use Toasts
to display transient messages and the Notification Manager
to ring, vibrate, and flash the phone.
9
Working in the Background
WHAT’S IN THIS CHAPTER?
➤ Creating, starting, and stopping Services
➤ Binding Services to Activities
➤ Setting Service priority to foreground
➤ Using AsyncTasks to manage background processing
➤ Creating background threads and using Handlers to synchronize with
the GUI thread
➤ Displaying Toasts
➤ Using the Notification Manager to notify users of application events
➤ Creating insistent and ongoing Notifications
➤ Using Alarms to schedule application events
Android offers the
Service
class to create application components specifically to handle opera-
tions and functionality that should run invisibly, without a user interface.
Android accords Services a higher priority than inactive Activities, so they’re less likely to be
killed when the system requires resources. In fact, should the run time prematurely terminate a
Service that’s been started, it can be configured to restart as soon as sufficient resources become
available. In extreme cases, the termination of a Service — such as an interruption in music
playback — will noticeably affect the user experience, and in these cases a Service’s priority can
be raised to the equivalent of a foreground Activity.
By using Services, you can ensure that your applications continue to run and respond to events,
even when they’re not in active use.
Services run without a dedicated GUI, but, like Activities and Broadcast Receivers, they still exe-
cute in the main thread of the application’s process. To help keep your applications responsive,
286
❘
CHAPTER 9 WORKING IN THE BACKGROUND
you’ll learn to move time-consuming processes (like network lookups) into background threads using
the
Thread
and
AsyncTask
classes.
Android offers several techniques for applications to communicate with users without an Activity.
You’ll learn how to use Notifications and Toasts to alert and update users without interrupting the
active application.
Toasts are a transient, non-modal dialog-box mechanism used to display information to users with-
out stealing focus from the active application. You’ll learn to display Toasts from any application
component to send unobtrusive on-screen messages to your users.
Where Toasts are silent and transient, Notifications represent a more robust mechanism for alerting
users. In many cases, when the user isn’t actively using the mobile phone it sits silent and unwatched in
a pocket or on a desk until it rings, vibrates, or flashes. Should a user miss these alerts, status bar icons
are used to indicate that an event has occurred. All these attention-grabbing antics are available to your
Android application through Notifications.
Alarms provide a mechanism for firing Intents at set times, outside the control of your application life
cycle. You’ll learn to use Alarms to start Services, open Activities, or broadcast Intents based on either
the clock time or the time elapsed since device boot. An Alarm will fire even after its owner application
has been closed, and can (if required) wake a device from sleep.
INTRODUCING SERVICES
Unlike Activities, which present a rich graphical interface to users, Services run in the background —
updating your Content Providers, firing Intents, and triggering Notifications. They are the perfect
means of performing ongoing or regular processing and of handling events even when your applica-
tion’s Activities are invisible or inactive, or have been closed.
Services are started, stopped, and controlled from other application components, including other
Services, Activities, and Broadcast Receivers. If your application performs actions that don’t depend
directly on user input, Services may be the answer.
Started Services always have higher priority than inactive or invisible Activities, making them less likely
to be terminated by the run time’s resource management. The only reason Android will stop a Service
prematurely is to provide additional resources for a foreground component (usually an Activity). When
that happens, your Service will be restarted automatically when resources become available.
If your Service is interacting directly with the user (for example, by playing music) it may be necessary to
increase its priority to that of a foreground Activity. This will ensure that your Service isn’t terminated
except in extreme circumstances, but reduces the run time’s ability to manage its resources, potentially
degrading the overall user experience.
Applications that update regularly but only rarely or intermittently need user interaction are good
candidates for implementation as Services. MP3 players and sports-score monitors are examples of
applications that should continue to run and update without a visible Activity.
Further examples can be found within the software stack itself: Android implements several Services,
including the Location Manager, Media Controller, and Notification Manager.
Introducing Services
❘
287
Creating and Controlling Services
In the following sections you’ll learn how to create a new Service, and how to start and stop it using
Intents and the
startService
method. Later you’ll learn how to bind a Service to an Activity to provide
a richer communications interface.
Creating a Service
To define a Service, create a new class that extends
Service
. You’ll need to override
onBind
and
onCreate
, as shown in Listing 9-1.
LISTING 9-1: A skeleton Service class
import android.app.Service;
import android.content.Intent;
import android.os.IBinder;
public class MyService extends Service {
@Override
public void onCreate() {
// TODO: Actions to perform when service is created.
}
@Override
public IBinder onBind(Intent intent) {
// TODO: Replace with service binding implementation.
return null;
}
}
In most cases you’ll also want to override
onStartCommand
. This is called whenever the Service is started
with a call to
startService
, so it may be executed several times within a Service’s lifetime. You should
ensure that your Service accounts for this.
The
onStartCommand
handler replaces the
onStart
event that was used prior to Android 2.0. By con-
trast, it enables you to tell the system how to handle restarts if the Service is killed by the system prior
to an explicit call to
stopService
or
stopSelf
.
The following snippet extends Listing 9-1 to show the skeleton code for overriding the
onStartCommand
handler. Note that it returns a value that controls how the system will respond if the Service is restarted
after being killed by the run time.
@Override
public int onStartCommand(Intent intent, int flags, int startId) {
// TODO Launch a background thread to do processing.
return Service.START_STICKY;
}
Services are launched on the main Application thread, meaning that any processing done in the
onStartCommand
handler will happen on the main GUI thread. The standard pattern for implementing
288
❘
CHAPTER 9 WORKING IN THE BACKGROUND
a Service is to create and run a new thread from
onStartCommand
to perform the processing in the
background and stop the Service when it’s complete (you will be shown how to create and manage
background threads later in this chapter).
This pattern lets
onStartCommand
complete quickly, and lets you control the restart behavior using one
of the following
Service
constants:
➤
START_STICKY
Describes the standard behavior, which is similar to the way in which
onStart
was implemented prior to Android 2.0. If you return this value,
onStartCommand
will
be called any time your Service restarts after being terminated by the run time. Note that on a
restart the Intent parameter passed in to
onStartCommand
will be
null
.
This mode is typically used for Services that handle their own states, and that are explicitly
started and stopped as required (via
startService
and
stopService
). This includes Services
that play music or handle other ongoing background tasks.
➤
START_NOT_STICKY
This mode is used for Services that are started to process specific actions
or commands. Typically they will use
stopSelf
to terminate once that command has been
completed.
Following termination by the run time, Services set to this mode will restart only if there are
pending start calls. If no
startService
calls have been made since the Service was terminated,
the Service will be stopped without a call being made to
onStartCommand
.
This mode is ideal for Services that handle specific requests, particularly regular processing
such as updates or network polling. Rather than restarting the Service during a period of
resource contention, it’s often more prudent tolet the Service stop and retry at the next sched-
uled interval.
➤
START_REDELIVER_INTENT
In some circumstances you will want to ensure that the com-
mands you have requested from your Service are completed.
This mode is a combination of the first two — if the Service is terminated by the run time, it
will restart only if there are pending start calls or the process was killed prior to its calling
stopSelf
.
In the latter case, a call to
onStartCommand
will be made, passing in the initial Intent whose
processing did not properly complete.
Note that each mode requires you to explicitly stop your Service, through
stopService
or
stopSelf
respectively, when your processing has completed. Both of these methods are discussed in more detail
later in this chapter.
Prior to Android SDK 2.0 (SDK API level 5) the Service class triggered the
onStart
event handler to let you perform actions when the Service started. Implementing
the
onStart
handler is now the equivalent of overriding
onStartCommand
and
returning the
START_STICKY
flag.
The restart mode you specify in your
onStartCommand
return value will affect the parameter values
passed in to subsequent calls.
Introducing Services
❘
289
Initially the Intent will be the parameter you passed in to
startService
to start your Service. After
system-based restarts it will be either null, in the case of
START_STICKY
mode, or the original Intent, if
the mode is set to
START_REDELIVER_INTENT
.
The
flag
parameter can be used to discover how the Service was started. In particular you can use the
code snippet shown in Listing 9-2 to determine if either of the following cases is true:
➤
START_FLAG_REDELIVERY
Indicates that the Intent parameter is a redelivery caused by the
system run time’s having terminated the Service before it was explicitly stopped by a call to
stopSelf
.
➤
START_FLAG_RETRY
Indicates that the Service has been restarted after an abnormal termina-
tion. Passed in when the Service was previously set to
START_STICKY
.
LISTING 9-2: Determining the cause of a system start
@Override
public int onStartCommand(Intent intent, int flags, int startId) {
if ((flags & START_FLAG_RETRY)==0){
// TODO If it’s a restart, do something.
}
else {
// TODO Alternative background process.
}
return Service.START_STICKY;
}
Registering a Service in the Manifest
Once you’ve constructed a new Service, you have to register it in the application manifest.
Do this by including a
<service>
tag within the
application
node. Use the
requires-permission
attribute to require a uses-permission for other applications to access this Service.
The following is the
service
tag you’d add for the skeleton Service you created earlier:
<service android:enabled="true" android:name=".MyService"/>
Self-Terminating a Service
Once your Service has completed the actions or processing it was started for, you should make a call
to
stopSelf
, either without a parameter to force a stop, or by passing in a
startId
value to insure pro-
cessing has been completed for each instance of
startService
called so far, as shown in the following
snippet:
stopSelf(startId);
By explicitly stopping the Service when your processing is complete, you allow the system to recover
the resources otherwise required to keep it running. Due to the high priority of Services they are not
commonly killed by the run time, so self-termination can significantly improve the resource footprint
of your application.
290
❘
CHAPTER 9 WORKING IN THE BACKGROUND
Starting, Controlling, and Interacting with a Service
To start a Service, call
startService
; you can either use an action to implicitly start a Service with the
appropriate Intent Receiver registered, or you can explicitly specify the Service using its class. If the
Service requires permissions that your application does not have, the call to
startService
will throw a
SecurityException
.
In both cases you can pass values in to the Service’s
onStart
handler by adding extras to the Intent, as
shown in Listing 9-3, which demonstrates both techniques available for starting a Service.
LISTING 9-3: Starting a Service
// Implicitly start a Service
Intent myIntent = new Intent(MyService.ORDER_PIZZA);
myIntent.putExtra("TOPPING", "Margherita");
startService(myIntent);
// Explicitly start a Service
startService(new Intent(this, MyService.class));
To use this example you would need to include a
MY_ACTION
constant in the
MyService
class and use an Intent Filter to register the Service as a provider of
MY_ACTION
.
To stop a Service use
stopService
, passing an Intent that defines the Service to stop. Listing 9-4 first
starts and then stops a Service both explicitly and by using the component name returned from a call
to
startService
.
LISTING 9-4: Stopping a Service
ComponentName service = startService(new Intent(this, BaseballWatch.class));
// Stop a service using the service name.
stopService(new Intent(this, service.getClass()));
// Stop a service explicitly.
try {
Class serviceClass = Class.forName(service.getClassName());
stopService(new Intent(this, serviceClass));
} catch (ClassNotFoundException e) {}
If
startService
is called on a Service that’s already running, the Service’s
onStartCommand
handler will
be executed again. Calls to
startService
do not nest, so a single call to
stopService
will terminate it
no matter how many times
startService
has been called.
An Earthquake Monitoring Service Example
In this chapter you’ll modify the Earthquake example you started in Chapter 5 (and continued to
enhance in Chapters 6, 7, and 8). In this example you’ll move the earthquake updating and processing
functionality into a separate Service component.
Introducing Services
❘
291
Later in this chapter you’ll build additional functionality within this Service,
starting by moving the network lookup and XML parsing to a background thread.
Later you’ll use Toasts and Notifications to alert users of new earthquakes.
1. Start by creating a new
EarthquakeService
that extends
Service
.
package com.paad.earthquake;
import android.app.Service;
import android.content.Intent;
import android.os.IBinder;
import java.util.Timer;
import java.util.TimerTask;
public class EarthquakeService extends Service {
@Override
public void onCreate() {
// TODO: Initialize variables, get references to GUI objects
}
@Override
public IBinder onBind(Intent intent) {
return null;
}
}
2. Add this new Service to the manifest by adding a new
service
tag within the
application
node.
<service android:enabled="true" android:name=".EarthquakeService"/>
3. Move the
refreshEarthquakes
and
addNewQuake
methods out of the
Earthquake
Activity
and into the
EarthquakeService
.
You’ll need to remove the calls to
addQuakeToArray
and
loadQuakesFromProvider
(leave
both of these methods in the Earthquake Activity because they’re still required). In the
EarthquakeService
also remove all references to the earthquakes ArrayList.
private void addNewQuake(Quake _quake) {
ContentResolver cr = getContentResolver();
// Construct a where clause to make sure we don’t already have
// this earthquake in the provider.
String w = EarthquakeProvider.KEY_DATE + " = " +
_quake.getDate().getTime();
// If the earthquake is new, insert it into the provider.
Cursor c = cr.query(EarthquakeProvider.CONTENT_URI,
null, w, null, null);
if (c.getCount()==0){
ContentValues values = new ContentValues();
values.put(EarthquakeProvider.KEY_DATE,
_quake.getDate().getTime());
values.put(EarthquakeProvider.KEY_DETAILS, _quake.getDetails());