how to cheat at configuring exchange server 2007 phần 6 ppt
Bạn đang xem bản rút gọn của tài liệu. Xem và tải ngay bản đầy đủ của tài liệu tại đây (2.59 MB, 62 trang )
■
Custom Select Custom in order to create a customized connector used to
connect with other systems that are not Exchange servers.
■
Internal Internal Send connectors are used to send e-mail to servers in your
Exchange organization. When selected, the connector will be configured to
route e-mail to your internal Exchange servers as smart hosts.
■
Internet Internet Send connectors are used to send e-mail to the Internet.
When selected, the connector will be configured to use Domain Name
System (DNS) MX records to route e-mail.
■
Partner Partner Send connectors are used to send e-mail to partner domains.
When selected, this connector will be configured to only allow connections to
servers that authenticate with Transport Layer Security (TLS) certificates for
Simple Mail Transfer Protocol (SMTP) domains that are included in the list of
domain-secured domains.You can add domains to this list by using the -
TLSSendDomainSecureList parameter in the Set-TransportConfig command.
Figure 6.21 Selecting the Required Send Connector Type
4. On the Address space page shown in Figure 6.22, enter the domain or domains
to which the Send connector should route mail. If the connector should be used
to route outbound mail to the Internet simply add an asterisk (*). When ready
click Next.
www.syngress.com
288 Chapter 6 • Managing the Hub Transport Server Role
429_HTC_EXCC_06.qxd 2/8/07 3:52 PM Page 288
Figure 6.22 Specifying the Address Space
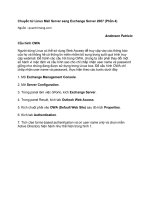
5. On the Network Settings page shown in Figure 6.23, specify how you want to
send mail with the connector. Here, you can choose to use Domain Name System
(DNS) “MX” records to route the mail automatically, or you can choose to have
all mail routed to a specified smart host.
Figure 6.23 Configuring Network Settings
Managing the Hub Transport Server Role• Chapter 6 289
www.syngress.com
429_HTC_EXCC_06.qxd 2/8/07 3:52 PM Page 289
IMPORTANT
If you’re a small shop using a cheap ISP that doesn’t allow outbound traffic
on port 25 from your DSL, you typically need to route outbound mail
through a smart host located at your ISP.
6. If you elected to use a smart host in the previous step, you now need to configure
the authentication method used to properly authenticate with the specified smart
host. If this is a smart host located at your ISP, you typically don’t need to authen-
ticate, and can safely select None, as shown in Figure 6.24. Click Next.
Figure 6.24 Configuring the Smart Host Authentication Settings
www.syngress.com
290 Chapter 6 • Managing the Hub Transport Server Role
429_HTC_EXCC_06.qxd 2/8/07 3:52 PM Page 290
www.syngress.com
Managing the Hub Transport Server Role• Chapter 6 291
7. Now it’s time to associate the connector with a Hub Transport server in the orga-
nization (Figure 6.25).The wizard will try to do this for you, but you can change
the selection if required. Click Next.
Figure 6.25 Specifying the Source Server
8. On the Configuration Summary page, make sure you configured the connector
as required, and then click Next.
9. On the Completion page, click Finish.
TIP
To create a Send connector via the Exchange Management Shell, you must
use the New-SendConnector cmdlet. For example, to create a Send Connector
similar to the one we generated in the previous steps, run the following
command:
New-SendConnector -Name ‘To ISP (Smart host)’ -Usage ‘Internet’ -
AddressSpaces ‘smtp:*.exchangehosting.dk;1’ -DNSRoutingEnabled $true -
UseExternalDNSServersEnabled $false -SourceTransportServers ‘EDFS03’
When you have created a Send connector, you can disable, enable, modify, and remove it
by selecting the respective Send connector, and then choosing the required tasks in the
Action pane.
429_HTC_EXCC_06.qxd 2/8/07 3:52 PM Page 291
Configuring DNS Lookups
You can configure a Hub Transport server to use different settings for external and internal
DNS lookups. Click the Properties of your Hub Transport server under the Server
Configuration | Hub Transport work center node. On the External DNS Lookups
tab shown in Figure 6.26, specify that DNS server(s) should be used to resolve IP addresses
of servers outside your organization.As you can see, you have the option of using the DNS
settings configured for one of the network cards in the server, or by specifying the IP address
of the DNS server(s) directly.You have the exact same options available under the Internal
DNS Lookups tab.The only difference is that under this tab you specify the DNS server(s)
that should be used to resolve IP addresses of servers inside your organization.
Figure 6.26 Configuring External DNS Lookups
Configuring Outbound Message Limits
You can configure how the Hub Transport server should process outbound messages.This is
done by opening the Property page of the respective Hub Transport server object in the
Result pane. Here, you click the Limits tab. As you can see in Figure 6.27, you have the
option of setting the retry interval—in other words, how often the Hub Transport server
should try to resend an outbound message to a destination server, which for some SMTP
servers don’t accept the message the first time it’s sent.
Under Message expiration, we can specify the amount of days a message held locally in
a message queue as undeliverable should expire. As you can see, the default setting is 2 days,
wherein the message will be removed from the message queue and a non-delivery report
(NDR) will be sent to the sender of the message.
www.syngress.com
292 Chapter 6 • Managing the Hub Transport Server Role
429_HTC_EXCC_06.qxd 2/8/07 3:52 PM Page 292
Figure 6.27 Configuring Outbound Message Limits
In addition, we can specify after how many hours a non-deliver report (NDR) should
be generated and delivered to the sender of the message. By default, the sender will be noti-
fied every fourth hour.
Finally, we can configure connection restrictions for concurrent outbound connections
and concurrent outbound connections per domain. Unless you’re dealing with a very large
organization, you should leave the connection restrictions at their defaults.
Typically, the default settings should be sufficient for most organizations, but if you’re in
a situation where you need to adjust them a little, this is the place to do it.
Receive Connectors
A Receive connector represents an inbound connection point for SMTP, and controls how a
Hub Transport server receives messages over SMTP. No Receive connector, no inbound
mail.This means that in order for a Hub Transport server to receive messages from the
Internet (from e-mail clients as well as other e-mail servers), at least one Receive connector
is required.
When you install the Hub Transport server role on a server, two Receive connectors are
created by default. A Client <servername> and a Default <servername> receive connector,
as shown in Figure 6.28.These two connectors are required in order for internal mail flow
to work.
www.syngress.com
Managing the Hub Transport Server Role• Chapter 6 293
429_HTC_EXCC_06.qxd 2/8/07 3:52 PM Page 293
Figure 6.28 Default Receive Connectors
NOTE
By default, a Hub Transport server only accepts inbound messages from other
Transport servers (that is, Hub Transport and Edge Transport servers) that are
part of the Exchange organization, authenticated Exchange users, and
internal legacy Exchange servers (Exchange 2000 and 2003). This means that
e-mail servers that are external to the organization by default cannot deliver
messages to a Hub Transport server. The reason behind this decision is to
make Hub Transport servers secure out of the box by default. “But isn’t it a
little too aggressive to not allow inbound messages from the Internet?” I
hear some of you grumble. Well, perhaps it is, but since the Exchange
Product group is convinced that all organizations around the globe will
deploy an Edge Transport server in their perimeter networks, the Exchange
Product Group doesn’t see this as an issue at all. Luckily, it’s a rather painless
process to allow untrusted e-mail servers (that is, e-mail servers not part of
the Exchange organization except the Edge Transport server) to deliver mes-
sages directly to a Hub Transport server. I’ll show you how in the section
titled “Configuring the Hub Transport Server as an Internet-Facing SMTP
Server” later in this chapter.
www.syngress.com
294 Chapter 6 • Managing the Hub Transport Server Role
429_HTC_EXCC_06.qxd 2/8/07 3:52 PM Page 294
A Receive connector only listens for connections that match the settings configured on
the respective connector.That is, connections that are received through a specific local IP
address and port, and from a particular IP address range. Receive connectors are local to the
Hub Transport server on which they’re created.This means that a receive connector created
on one Hub Transport server cannot be used by another Hub Transport server in the organi-
zation. So, by creating Receive connectors, you can control which server should receive
messages from a particular IP address or IP address range. In addition, you can create custom
connector properties for messages arriving from a particular IP address or IP address range.
You could, for example, allow larger message sizes, more recipients per message (both of
these will be covered later in this chapter) or perhaps more inbound connections.
Creating a Receive Connector
To create a Receive connector, you must perform the following steps:
1. Open the Exchange Management Console and select Hub Transport under
the Server Configuration work center node (shown back in Figure 6.28).
2. In the Result pane, select the Hub Transport server on which you want to create
the Receive connector.
3. Now click New Receive Connector in the Action pane.
4. The New SMTP Receive Connector wizard will appear.Type a descriptive name
for the connector, and select the type of connector you want to create. As can be
seen in Figure 6.29, you can select between five different Receive connector types:
■
Custom This option is used to create customized Receive connectors, which
are used to connect with systems that are not Exchange servers.
■
Internet This option is used to create a Receive connector that will receive
e-mail from servers on the Internet.This connector will be configured to
accept connections from anonymous users.
■
Internal Internal Receive connectors are used to receive e-mail from servers
within your Exchange organization. Note that this connector type will be
configured to only accept connections from internal Exchange servers.
■
Client Client Receive connectors are used to receive e-mail from authenti-
cated Exchange users.This means that this connector will be configured to
only accept client submissions from authenticated Exchange users.
■
Partner Partner Receive connectors are used to receive e-mail from partner
domains.This connector will be configured to only accept connections from
servers that authenticate with Transport Layer Security (TLS) certificates for
SMTP domains included in the list of domain-secured domains.You can add
domains to this list by using the -TLSReceiveDomainSecureList parameter in the
Set-TransportConfig command.
www.syngress.com
Managing the Hub Transport Server Role• Chapter 6 295
429_HTC_EXCC_06.qxd 2/8/07 3:52 PM Page 295
Figure 6.29 Selecting the Receive Connector Type
5. When you have selected the type of connector you want to create, click Next.
6. As shown in Figure 6.30, you now have the option of modifying the IP address
and port that should be used to receive mail. With Custom, Internet, and Partner
Receive connectors, you also have the option of entering a FQDN that should be
provided in response to HELO and EHLO commands. When ready, click Next.
Figure 6.30 Entering the Local IP Addresses that Should Be Used to
Receive Mail
296 Chapter 6 • Managing the Hub Transport Server Role
www.syngress.com
429_HTC_EXCC_06.qxd 2/8/07 3:52 PM Page 296
7. On the Configuration Summary page, click New. On the Completion page,
click Finish.
TIP
To create a Receive connector via the Exchange Management Shell, you must
use the New-ReceiveConnector cmdlet. For example, to create a Receive
Connector similar to the one we generated in the previous steps, run the fol-
lowing command:
New-ReceiveConnector -Name ‘Special Receive Connector’ -Usage
‘Custom’ -Bindings ‘0.0.0.0:25’ -Fqdn ‘mail.exchangedogfood.dk’ -
RemoteIPRanges ‘0.0.0.0-255.255.255.255’ -Server ‘EDFS03’
At any time, you can modify an existing Receive connector as required.You do this by
selecting the respective Receive connector and clicking Properties in the Action pane. In
addition, any existing Receive connectors can be disabled, enabled, and removed as necessary.
You do this by selecting the particular Receive connector and clicking the required task in
the Action pane.
Managing Message Size and Recipient Limits
Like previous versions of Exchange, Exchange 2007 allows you to restrict the size of mes-
sages users can send and receive.The message size limits can be set globally in the organiza-
tion on a per-server, per-connector level, and/or a per-user basis. Message size and recipient
limits can only be configured using the Exchange Management Shell. In the following, I’ll
show you how to configure these limits.
Configuring Global Limits
By default, the global limits are set to unlimited, as can be seen in Figure 6.31.
Figure 6.31 Listing Global Limits
Managing the Hub Transport Server Role• Chapter 6 297
www.syngress.com
429_HTC_EXCC_06.qxd 2/8/07 3:52 PM Page 297
To configure new limits that apply to all Exchange 2007 Servers in the organization,
you must use the following command:
Set-TransportConfig -MaxReceiveSize:<value> -MaxSendSize:<value> -
MaxRecipientEnvelopeLimit:<value>
NOTE
When you set the MaxReceiveSize or MaxSendSize, it’s important to note
that if you only specify a number such as 100, it defaults to kilobytes (KBs).
This means that it is generally a good idea to specify the number followed by
either KB or MB.
Configuring Server Limits
Since message size limits are controlled via Send and Receive connectors, you cannot con-
figure message size limits per server.You can, however, configure the maximum number of
recipients allowed per message.That is, the maximum number of recipients that can be
included on a single e-mail message and submitted to the Pickup directory. By default, the
maximum number of recipients is 100, which can be verified by running Get-
TransportServer | FL in the Exchange Management Shell.To change this setting, you must
use the following command:
Set-TransportServer -PickupDirectoryMaxRecipientsPerMessage:<value>
Configuring Connector Limits
By default, the default maximum message size for both Send and Receive connectors is
10MB.You can verify this by running Get-SendConnector | FL and Get-ReceiveConnector |
FL, respectively.
Send Connectors
To change the maximum message size limit on a Send connector, use the following command:
Set-SendConnector <name of connector> -MaxMessageSize:<value>
Receive Connectors
To change the maximum message size limit on a Receive connector, use the following
command:
Set-ReceiveConnector <name of connector> -MaxMessageSize:<value>
www.syngress.com
298 Chapter 6 • Managing the Hub Transport Server Role
429_HTC_EXCC_06.qxd 2/8/07 3:52 PM Page 298
NOTE
When you set the MaxMessageSize, it’s important to note that if you only
specify a number such as 100, it defaults to kilobytes (KBs). This means that it
is generally a good idea to specify the number followed by either KB or MB.
Configuring Per-User Limits
You can also configure message size limits on a per-user level, if required. Message size limits
set on a user override global limits and connector limits.The default message size limit for
both sent and received messages on a user mailbox is unlimited, as can be seen by running
Get-Mailbox | FL. In order to change this setting, run the following command:
Set-Mailbox –MaxReceiveSize:<value> -MaxSendSize:<value>
NOTE
When you set the MaxReceiveSize and MaxSendSize, it’s important to note
that if you only specify a number such as 100, it defaults to kilobytes (KBs).
This means it’s generally a good idea to specify the number followed by
either KB or MB.
Message Tracking
with Exchange Server 2007
When message tracking is enabled, all Simple Mail Transfer Protocol (SMTP) transport
activity on all messages that transfer to and from an Exchange 2007 computer with a Hub
Transport, Mailbox, or Edge Transport server role installed are recorded into a log, located by
default in the C:\Program Files\Microsoft\Exchange
Server\TransportRoles\Logs\MessageTracking directory. Message tracking logs can be used
for message forensics, mail flow analysis, reporting, and troubleshooting.
When message tracking is enabled (which is the case by default), the maximum age for
message tracking log files is 30 days. After 30 days, the oldest message tracking log files are
deleted using circular logging.This is only true if the message tracking log reaches its speci-
fied maximum size (which, by default, is 10MB), or a message tracking log file reaches its
specified maximum age.
www.syngress.com
Managing the Hub Transport Server Role• Chapter 6 299
429_HTC_EXCC_06.qxd 2/8/07 3:52 PM Page 299
NOTE
The Message Tracking directory, which is responsible for holding the message
tracking log files, has a default size limit of 250MB.
In order to launch the Message Tracking tool, perform the following steps:
1. Open the Exchange Management Console.
2. Select the Toolbox work center node.
3. Click the Message Tracking icon and select Open Tool in the Action pane.
The tool will launch after a few seconds and look for any available updates. If updated,
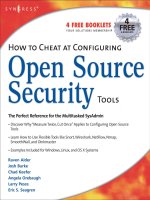
click Go to Welcome screen and you will be brought to the Message Tracking Parameters
screen shown in Figure 6.32. Here you can check the different parameters you want to
include in your search criteria. In this example, I have specified to get a list of all messages
sent to me between January 1 and January 30, 2007 from a specific e-mail address. When the
relevant parameters have been checked and specified, click Next.
Figure 6.32 The Message Tracking Parameters Page
The Message Tracking tool will now search for all messages matching the search criteria
specified on the previous screen, as shown in Figure 6.33. Here we get all sorts of informa-
www.syngress.com
300 Chapter 6 • Managing the Hub Transport Server Role
429_HTC_EXCC_06.qxd 2/8/07 3:52 PM Page 300
tion about the messages, and if we want to further filter our search, we can click Next and
check or change any relevant parameters.
Figure 6.33 List of Messages Included Based on Search Criteria
TIP
In order to use the message tracking feature to search for particular mes-
sages via the Exchange Management Shell, you can use the Get-
MessageTrackingLog cmdlet.
Using the Exchange 2007 Queue Viewer
Typically, mail flow within the organization just simply works; however, as an Exchange
administrator, one of your jobs is to regularly keep an eye on the message queues within the
Exchange organization.This is where the Queue Viewer comes in. With the Queue Viewer,
now an Exchange tool, and therefore located under the Toolbox work center node in the
Exchange Management Console, you can view information about queues and examine the
messages held within them.
www.syngress.com
Managing the Hub Transport Server Role• Chapter 6 301
429_HTC_EXCC_06.qxd 2/8/07 3:52 PM Page 301
Exchange Server 2007 uses five different types of queues, and the routing of a message
determines the type of queue where a particular message is stored. In the following, I list the
five different queues types:
Submission Queue
The submission queue is a persistent queue used by the categorizer in order to gather the
messages that need to be resolved, routed, and processed by Transport agents. Each message
received by the categorizer is a component of Exchange transport and therefore processes all
inbound messages as well as determines what to do with the messages based on information
about the intended recipients.All messages received by a transport server enter processing in
the Submission queue. Messages are submitted through SMTP-receive, the Pickup directory,
or the store driver.The categorizer retrieves messages from this queue and, among other
things, determines the location of the recipient and the route to that location. After catego-
rization, the message is moved to a delivery queue or to the unreachable queue. Each
Exchange 2007 transport server has only one Submission queue. Messages that are in the
Submission queue cannot be in any other queues at the same time.
Mailbox Delivery Queue
The Mailbox Delivery queues hold messages that are being delivered to a mailbox server by
using encrypted Exchange RPC. Mailbox Delivery queues exist on Hub Transport servers
only.The Mailbox Delivery queue holds messages that are being delivered to mailbox recipi-
ents whose mailbox data is stored on a Mailbox server not located in the same site as the
Hub Transport server. More than one mailbox delivery queue can exist on a Hub Transport
server.The next hop for a Mailbox Delivery queue is the distinguished name of the mailbox
store.
Remote Delivery Queue
Remote Delivery queues hold messages that are being delivered to a remote server using
SMTP. Remote Delivery queues can exist on both Hub Transport servers and Edge
Transport servers, and more than one Remote Delivery queue can exist on each server. Each
Remote Delivery queue contains messages that are being routed to recipients that have the
same delivery destination. On a Hub Transport server, these destinations are outside the
Active Directory site in which the Hub Transport server is located. Remote Delivery queues
are dynamically created when they are required and are automatically deleted from the server
when they no longer hold messages and the configurable expiration time has passed. By
default, the queue is deleted three minutes after the last message has left the queue.The next
hop for a Remote Delivery queue is an SMTP domain name, a smart host name or IP
address, or an Active Directory site name.
www.syngress.com
302 Chapter 6 • Managing the Hub Transport Server Role
429_HTC_EXCC_06.qxd 2/8/07 3:52 PM Page 302
Poison Message Queue
The Poison Message queue is a special queue used to isolate messages that are detected to be
potentially harmful to the Exchange 2007 system after a server failure. Messages that contain
errors potentially fatal to the Exchange Server system are delivered to the Poison Message
queue.This queue is typically empty, and if no poison messages exist, the queue does not
appear in the queue viewing interfaces.The Poison Message queue is always in a ready state.
By default, all messages in this queue are suspended.The messages can be deleted if they are
considered to be harmful to the system. In the event a message in the Poison Message queue
is determined to be unrelated to the message itself, delivery of the message can be resumed.
When delivery is resumed, the message enters the Submission queue.
Unreachable Queue
The Unreachable queue contains messages that cannot be routed to their destinations.
Typically, an unreachable destination is caused by configuration changes that have modified
the routing path for delivery. Regardless of the destination, all messages that have unreachable
recipients reside in this queue. Each transport server can have only one Unreachable queue.
When a message is received by transport, the mail item will be created and then saved
into the queue database.
TIP
With Exchange Server 2007, message queues are stored in the ESE database
unlike previous versions of Exchange, where the messages (.EML files) were
stored in a queue folder in NTFS.
As mail items are saved in the queue database, they are assigned a unique identifier. If a
particular mail item is routed or being sent to more than one recipient, the item can have
more than one destination. Each destination represents a separate routing solution for the
mail item, and each routing solution causes a routed mail item to be created. A message that
is being sent to recipients in two different domains appears as two distinct messages in the
delivery queues, even if only one transport mail item is in the database.
To launch the Queue Viewer, perform the following steps:
1. Open the Exchange Management Console.
2. Click the Toolbox work center node.
3. Click the Queue Viewer icon, and then select Open Tool in the Action pane.
www.syngress.com
Managing the Hub Transport Server Role• Chapter 6 303
429_HTC_EXCC_06.qxd 2/8/07 3:52 PM Page 303
If you have launched the Queue Viewer from a Hub Transport server, it will connect to
the local queue by default. If you want to connect to a queue stored on another Hub
Transport server, click Connect to Server in the Action pane (Figure 6.34).
Figure 6.34 The Queue Viewer Tool
From within the Queue Viewer, you can view queues and messages, as well as suspend
and resume them. In addition, you can retry a queue or message, remove a queue or message
completely, or export either of them so they can be transferred to another Hub Transport
server for further delivery.
TIP
To view or manipulate message queues or individual messages via the
Exchange Management Shell, use the Get-Queue and Get-Message cmdlets.
Introduction to the Exchange
Mail Flow Troubleshooter Tool
If you’re experiencing mail flow issues in your organization, you can also give the new
Exchange Mail Flow Troubleshooter a try.This diagnostic tool helps perform the following
functions:
www.syngress.com
304 Chapter 6 • Managing the Hub Transport Server Role
429_HTC_EXCC_06.qxd 2/8/07 3:52 PM Page 304
■
Starting with the mail flow symptoms, it moves customers through the correct
troubleshooting path.
■
Provides easy access to various data sources that are required to troubleshoot prob-
lems with mail flow.
■
Automatically diagnoses the retrieved data and presents an analysis of the possible
root causes.
■
Suggests corrective actions.
■
Provide guidance to help users manually diagnose the data where and when
automation is not possible.
In order to launch the Exchange Mail Flow Troubleshooter, perform the following steps:
1. Open the Exchange Management Console.
2. Select the Toolbox work center node.
3. Click the Exchange Mail Flow Troubleshooter icon, and then select Open
Tool in the Action pane.
When the tool has been launched, it will check to see whether any updates are available
on Microsoft.com, and then bring you to the welcome screen.You then need to enter an
identifying label for the analysis you’re about to perform, and then specify what symptoms
you’re seeing.As you can see in Figure 6.35, you can choose between six different symp-
toms, and depending on which one you select, the tool will programmatically execute a set
of troubleshooting steps to identify the root cause of the mail flow issue you’re experiencing.
The tool automatically determines what set of data is required to troubleshoot the identified
symptoms and collects configuration data, performance counters, event logs, and live tracing
information from an Exchange server and other appropriate sources.The tool analyzes each
subsystem to determine individual bottlenecks and component failures, and then aggregates
the information to provide root cause analysis.
www.syngress.com
Managing the Hub Transport Server Role• Chapter 6 305
429_HTC_EXCC_06.qxd 2/8/07 3:52 PM Page 305
Figure 6.35 The Exchange Mail Flow Troubleshooter Tool
Configuring the Hub Transport Server
as an Internet-Facing Transport Server
One of the design goals for Exchange 2007 was to be as secure as possible, by default, in the
same way that the Hub Transport server is configured to only accept messages from internal
Exchange users, Exchange servers, and legacy Exchange servers.This means that the Hub
Transport server doesn’t accept inbound messages sent from unauthenticated (untrusted) e-
mail servers, which typically define external e-mail servers on the Internet. Instead, it expects
to receive inbound messages from the Internet via an Edge Transport server in the perimeter
network.
If you’re an Exchange administrator in a small organization, or if you’re primarily doing
Exchange consulting for small shops, chances are IT budgets hinder you from deploying an
Edge Transport server in the perimeter network, when transitioning to Exchange Server
2007 (especially if the environment will only consist of a single Exchange 2007 server).
Luckily, it’s a pretty simple process to change this behavior since you just need to allow
untrusted servers to deliver messages to the Hub Transport server.This is accomplished by
enabling Anonymous users under the Permission Groups tab of the Default Receive
connector.
To get to this property page, you must do the following:
1. Open the Exchange Management Console.
2. Expand the Server Configuration work center node, and then select Hub
Transport.
www.syngress.com
306 Chapter 6 • Managing the Hub Transport Server Role
429_HTC_EXCC_06.qxd 2/8/07 3:52 PM Page 306
3. Highlight the respective Hub Transport server in the Result pane, as shown in
Figure 6.36.
Figure 6.36 The Default Receive Connector in the Exchange Management
Console
4. Open the Properties page of the Default <servername> Receive Connector in
the Wo r k pane.
5. Click the Permissions Groups tab, check Anonymous users and click OK,as
shown in Figure 6.37
Figure 6.37 The Permission Groups Tab on the Default Receive Connector
Properties Page
Managing the Hub Transport Server Role• Chapter 6 307
www.syngress.com
429_HTC_EXCC_06.qxd 2/8/07 3:52 PM Page 307
Although we haven’t covered the Edge Transport server yet, this server role is also the one
that holds all the message hygiene features available in Exchange Server 2007. If you decide not
to deploy an Edge Transport server in your perimeter network, you might wonder whether it’s
possible to let the Internet-facing Hub Transport server take care of filtering out spam and
other unwanted e-mail before it reaches your mailbox servers.The answer is yes it is; however,
because there are not any anti-spam filtering agents installed on a Hub Transport server by
default (since the Exchange Product group expects you to deploy an Edge Transport server in
the perimeter network), you must do so manually by running the install-AntispamAgents.ps1
script located in the Exchange 2007 scripts folder.This can be found under C:\Program
Files\Microsoft\Exchange Server.To run this script, do the following:
1. Open the Exchange Management Shell.
2. Type CD “program files\microsoft\exchange server\scripts” and press
Enter.
3. Run the install-AntispamAgents.ps1 script by typing .\install-
AntispamAgents.ps1, and then pressing Enter, as shown in Figure 6.38.
Figure 6.38 Installing the Anti-Spam Agents on the Hub Transport Server
4. Restart the Microsoft Exchange Transport service.
5. Close and re-open the Exchange Management Console in order for the
change to be reflected in the UI.
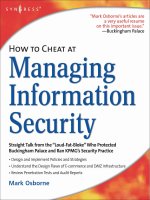
We now have a new Anti-spam tab under the Hub Transport node beneath the
Organization Configuration work center, as shown in Figure 6.39.As you can see, all the
anti-spam filtering agents normally found on an Edge Transport server are now listed here.
For an explanation of each, see Chapter 7.
www.syngress.com
308 Chapter 6 • Managing the Hub Transport Server Role
429_HTC_EXCC_06.qxd 2/8/07 3:52 PM Page 308
Figure 6.39 List of Available Anti-Spam Agents
Of course, this solution allows all spam messages and other unwanted e-mail to enter
your internal network before it’s filtered, but most small shops should be able to live with
that. If not, you might want to consider using a hygiene service such as Exchange Hosted
Services (EHS), which not only provides efficient anti-spam filtering, but also virus protec-
tion and other interesting services.You can read more about EHS at
/>Changing the SMTP Banner
Something else you might want to do in a scenario where inbound messages are directly
routed to a Hub Transport server is to change the advertised FQDN sent in HELO/EHLO
commands in SMTP.This is done under the General tab of the Default Receive connector
property page, as shown in Figure 6.40.
www.syngress.com
Managing the Hub Transport Server Role• Chapter 6 309
429_HTC_EXCC_06.qxd 2/8/07 3:52 PM Page 309
Figure 6.40 The General Tab on the Default Receive Connector Properties
Page
Disabling the EdgeSync Service
Since the EdgeSync service on the Hub Transport server isn’t used, when you don’t have an
Edge Transport server deployed in your perimeter network, it’s also a good idea to disable
this service (Figure 6.41) in order to save a few system resources. Just by simply running and
not replicating with an Edge Transport server, this service actually uses a little under 30MB.
Figure 6.41 Disabling the EdgeSync Service
310 Chapter 6 • Managing the Hub Transport Server Role
www.syngress.com
429_HTC_EXCC_06.qxd 2/8/07 3:52 PM Page 310
Pointing the MX Record
to the Hub Transport Server
The final thing you must do is point your domain’s MX record to the Hub Transport server.
This is done differently depending on your specific scenario, but typically you just need to
redirect port 25 to the IP address of the Hub Transport server in your firewall. If you’re pub-
lishing your messaging environment using an ISA 2006 Server, this is done under the To tab
on the Inbound SMTP properties page, as shown in Figure 6.42.
Figure 6.42 Redirect Inbound Mail on an ISA 2006 Server
Missed Features
There are a few drawbacks in choosing to have inbound messages go directly to a Hub
Transport server instead of via an Edge Transport server in your perimeter network, as best
practices tell us.
Attachment Filter
Although the Hub Transport server does contain some attachment options, you won’t be
able to scan the incoming MIME stream for malicious attachment types, and thereby reject
them at the protocol layer. However, you could get this functionality on a Hub Transport
Server by installing an anti-virus product such as Microsoft Forefront for Exchange
Server.
www.syngress.com
Managing the Hub Transport Server Role• Chapter 6 311
429_HTC_EXCC_06.qxd 2/8/07 3:52 PM Page 311
Address Rewrite Agent
You also won’t be able to take advantage of the address rewrite functionality since the
Address Rewrite agent can only be installed on an Edge Transport server. An explanation of
this feature is outside the scope of this chapter. Instead, refer to Chapter 7.
Summary
In this chapter, we started out taking a brief look at the changes made in regards to message
routing and architecture in Exchange Server 2007. We then went through the configuration
settings available on the Hub Transport server. Next, we discussed how you can create jour-
naling and transport rules so your organization can navigate the ever-increasing complexity
of government and industry regulations and compliance demands. We also covered the pur-
pose of Send and Receive connectors, and how to control message size limits in your orga-
nization. In addition, we took a look at the different transport server–related tools such as
Message Tracking, the Queue Viewer, and the Exchange Mail Flow Troubleshooter tools.
Finally, we went through the steps necessary to configure a Hub Transport server as the
Internet-facing transport server in your organization.
Solutions Fast Track
Message Transport and
Routing Architecture in Exchange 2007
A lot has changed in regards to transport and routing architecture in Exchange
Server 2007. First, Exchange no longer uses the SMTP protocol stack included
with Internet Information Services (IIS), as was the case with previous versions of
the product. Instead, the Exchange Product group has rewritten the SMTP
transport stack in managed code, resulting in a much more stable and secure
protocol stack.
The new SMTP transport stack is now known as the Microsoft Exchange
Transport service (MSExchangeTransport.exe), and because it’s no longer
dependent on IIS, it is not located within IIS Manager.
With Exchange Server 2007, the Exchange routing topology is no longer based on
separate Exchange routing groups. Instead Exchange 2007 takes advantage of the
existing site topology in Active Directory. Because Exchange 2007 is now
dependent on Active Directory sites—that is, Hub Transport servers use Active
Directory sites as well as the cost assigned to the Active Directory IP site link to
determine the least-cost routing path to other Hub Transport servers within the
www.syngress.com
312 Chapter 6 • Managing the Hub Transport Server Role
429_HTC_EXCC_06.qxd 2/8/07 3:52 PM Page 312