Microsoft Office Picture Manager pdf
Bạn đang xem bản rút gọn của tài liệu. Xem và tải ngay bản đầy đủ của tài liệu tại đây (3.51 MB, 17 trang )
Microsoft Office Picture Manager
Swheeler 1
IMT – Cholla Training Center
Microsoft Office Picture Manager
Note: This is not a definitive guide to Picture Manger. For additional information concerning this product, consult
the Picture Manger Help files or this web site.
Microsoft Office Picture Manager 2003 is a new component in Office 2003. While it is
primarily a file management tool, and not an editing tool, it does have some image
correction and editing features.
For a broad range of editing options when working with pictures, the best approach is to
work with a photo-editing program, such as Microsoft Digital Image Pro. (Note: PUSD
does not support or provide Digital Image Pro.)
Launching Microsoft Office Picture Manager
1. Click Start.
2. Select Microsoft Office.
3. Select Microsoft Office Tools.
4. Select Microsoft Office Picture
Manger.
Note: Your screen may differ
slightly in appearance.
Navigating Picture Manager
Microsoft Office Picture Manager
Swheeler 2
IMT – Cholla Training Center
Locating Pictures on the Computer
1. Click File
2. Select Locate Pictures…
3. Locate Pictures will display in
the Task Pane on the right
side of the screen.
4. Click the down arrow next to
the Look in field and choose
the hard drive Picture Manger
should search.
5. Click the OK button.
Note: Picture Manger will scan the
entire hard drive for images.
Microsoft Office Picture Manager
Swheeler 3
IMT – Cholla Training Center
6. Microsoft Office Picture
Manager will scan the hard
drive chosen in step 4.
7. Picture Manager will display
the images located during the
scan.
Microsoft Office Picture Manager
Swheeler 4
IMT – Cholla Training Center
Locating Pictures in a Directory
1. Click the Adding Picture
Shortcut… link in the Picture
Shortcuts… Task Pane on the
left side of the Picture Manger
window.
2. Locate and select the picture
or folder Picture Manger
should scan.
3. Click the Add button.
Note: In this example, the folder
being scanned is located on the
workstations desktop.
Microsoft Office Picture Manager
Swheeler 5
IMT – Cholla Training Center
4. The selected folder is now
indexed by Picture Manger.
Editing Pictures
While Picture Manger is primarily
a file management tool, and not
an editing tool, it does have
some image correction and
editing features. These include:
• Auto Correct
• Brightness and Contrast
• Color
• Crop
• Rotate and Flip
• Red Eye Removal
• Resize
• Compress Pictures
Microsoft Office Picture Manager
Swheeler 6
IMT – Cholla Training Center
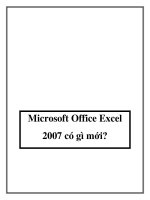
Auto Correct
In this example, the Auto Correct
button will be utilized.
1. Double click the image to be
corrected.
2. Click the Auto Correct button.
Before After While the adjustment is subtle, it
may be just what the picture
needs to go from a good picture,
to a great picture.
Brightness and Contrast
1. Select a picture to adjust
2. Click the Brightness and
Contrast link.
Microsoft Office Picture Manager
Swheeler 7
IMT – Cholla Training Center
Picture Manager allows several
options when adjusting
Brightness and Contrast.
3. The Auto Brightness button.
4. Brightness & Contrast sliders.
5. Midtones slider under the
Advanced Settings.
Color
Picture Manager allows several
options when adjusting Color.
1. Enhance Color button
a. For use in white
balancing
2. Hue and Saturation sliders
Before After In this example, the Enhance
Color button has been utilized.
Note: When using any software
tool, be certain to read all the
text on the screen. This
particular tool requires the user
to click on an area of the picture,
which should be white.
Microsoft Office Picture Manager
Swheeler 8
IMT – Cholla Training Center
Crop
Use the crop tool when it is
necessary to remove distracting
content from the picture subject.
Cropping tools include:
Aspect Ratio
Crop Handles (These can be drug
and dropped or moved pixel by
pixel.)
Crop Settings – Aspect Ratio
The aspect ratio allows the
image to be cropped to a
predetermined picture size.
1. Click the down arrow to the
right of Aspect ratio drop
box.
2. Select the desired size.
Note the new placement of
the crop handles.
3. Click the Ok button.
Microsoft Office Picture Manager
Swheeler 9
IMT – Cholla Training Center
4. Picture Manager will display
the cropped image.
5. Click the Save button to keep
the changes.
6. To keep the original picture
and the newly cropped
image, choose Save As from
the File menu.
7. Click the Undo button or
Undo under the Edit menu to
remove the changes.
Crop Handles
The crop handles will allow the
picture to be cropped to a
custom size determined by the
user.
These handles can be drug and
dropped or the up / down arrows
can be sued on the Left, Right,
Top and Bottom sides.
Microsoft Office Picture Manager
Swheeler 10
IMT – Cholla Training Center
In this example, the crop
handles will be drug and dropped
to the desired location.
8. Place the crop “T” over a flat
handle to adjust Top,
Bottom, Left and Right sides.
Place the crop “L” over the
desired corner.
Note: Cropping from the
corners will ensure the
picture remains proportional.
9. Click the Ok button.
10. Picture Manager will display
the cropped image.
11. Click the Save button to keep
the changes.
12. To keep the original picture
and the newly cropped
image, choose Save As from
the File menu.
13. Click the Undo button or
Undo under the Edit menu to
remove the changes.
Microsoft Office Picture Manager
Swheeler 11
IMT – Cholla Training Center
Rotate and Flip
Use Rotate and Flip if the picture
has been imported without
rotating to the correct layout.
i.e. Portrait or Landscape.
14. Click the Rotate Left or
Rotate Right as needed.
or…
Use the up / down arrows to
the right of “By degree” to
rotated the image by an
absolute degree.
15. Click the Save icon to keep
changes.
Microsoft Office Picture Manager
Swheeler 12
IMT – Cholla Training Center
Red Eye Removal
1. Select the picture that
contains “Red Eyes”.
2. Place the target over the
“Red Eyes” and click.
Microsoft Office Picture Manager
Swheeler 13
IMT – Cholla Training Center
3. Repeat this process for all red
eyes.
4. Click the Ok button.
5. The adjusted picture will now
be displayed in Picture
Manager.
16. Click the Save button to keep
the changes.
6. Click the Undo button or
Undo under the Edit menu to
remove the changes.
To mitigate red-eye before the fact:
Cure Comments
Red-eye
flash mode
If you're using your camera's onboard flash, remember to enable red-eye
flash mode, which uses one or more brief pre-flashes to stop down the
subject's pupils for the main flash and exposure. The hope here is to narrow
the reflex cone enough to miss the camera lens entirely. Partial successes
are common with this measure alone, and it may not work at all on
intoxicated subjects with dulled pupillary responses.
Increase
ambient
light
Arrange to shoot in brighter ambient light if you can, both to narrow your
subject's pupils and to allow use of a lower flash power setting to dim the
reflex.
Sobriety Shoot your subjects while they're still sober. Anything that further dilates
their pupils will aggravate red-eye. Inebriation isn't all that flattering,
anyway.
Averted
gaze
Having your subjects look away from the lens may help, but this cure may
be worse than the disease if overdone.
Microsoft Office Picture Manager
Swheeler 14
IMT – Cholla Training Center
Get closer
Get closer to your subject to widen the flash-subject-lens angle beyond the
width of the reflex cone and thereby evade the reflex. The longer the camera-
subject distance, the greater lens-flash distance must be to avoid red-eye.
External
flash
Better yet, use an external flash positioned at least 5° away from your camera
lens as seen by your subject to keep the reflex away from the lens.
Bounce Bounce your flash to redirect the reflex away from your lens.
Resize
Arguably, the most useful tool in
Picture Manager is the Resize
tool. Resizing the images not
only reduces the number of
pixels utilized in the image, it
also reduces the file size.
Picture Manager gives the user
several options when resizing an
image.
• Predefined width x height
• Custom width x height
• Percentage of original
width x height
Predefined width x height
1. Click the radio button to the
left of Predefined width x
height.
2. Click the Ok button.
Note the Original size and the
New size.
3. Click the Save icon to keep
changes.
Microsoft Office Picture Manager
Swheeler 15
IMT – Cholla Training Center
Custom width x height
1. Click the radio button to the
left of Custom width x height.
2. Click the Ok button.
Note the Original size and the
New size.
3. Click the Save icon to keep
changes.
Percentage of original width
x height
1. Click the radio button to the
left of Predefined width x
height.
2. Click the Ok button.
Note the Original size and the
New size.
3. Click the Save icon to keep
changes.
Microsoft Office Picture Manager
swheeler Page 16 of 17
IMT – Cholla Training Center
Image size versus file size
Resizing an image to a smaller pixel setting can dramatically reduce the size of a file.
The images below have been resized from 2048 x 1532 (This would make a nice
poster) to 640 x 480 (Nice web or PowerPoint size). The file size for these two
images changed from 1372 KB to 162 KB. In shorter terms, the larger image would
use all the capacity of one floppy disk.
162 Kilobytes
640 x 480
(Images shown are scaled for
effect.)
268 Kilobytes
800 x 600
(Images shown are scaled for
effect.)
435 Kilobytes
1024 x 768
(Images shown are scaled for
effect.)
818 Kilobytes
1600 x 1200
(Images shown are scaled for
effect.)
Microsoft Office Picture Manager
swheeler Page 17 of 17
IMT – Cholla Training Center
1372 Kilobytes
2048 x 1532
(Images shown are scaled for
effect.)