beginning drupal 7 phần 3 doc
Bạn đang xem bản rút gọn của tài liệu. Xem và tải ngay bản đầy đủ của tài liệu tại đây (10.43 MB, 33 trang )
CHAPTER 4 ■ TAXONOMY
48
Figure 4-13. Setting the URL alias for a taxonomy term
Hierarchical Terms
What if you need to define a hierarchical structure of taxonomy terms, say, for example “basketball.” You
need the ability to further categorize basketball content by:
• Basketball
• High School
• College
• Division 1
• Division 2
• Division 3
• NBA
• Eastern Conference
• Central Conference
• Western Conference
Fortunately, Drupal provides a simple mechanism for creating a hierarchical structure of taxonomy
terms. To update our example, return to the “Add term” link next to the vocabulary for “Types of Sports.”
CHAPTER 4 ■ TAXONOMY
49
Click on the Structure menu at the top of the page, and on the Structure page, click on the Taxonomy
link. Click on the “Add term” link next to the vocabulary where you wish to add a new term, which
reveals the term creation screen. Begin by adding the term for High School. Enter High School as the
term name and then click on the Relationships link at the bottom of the form. In the list of terms, select
Basketball as the parent term and then click Save. Continue the process by entering College and NBA,
also selecting Basketball as the parent term. To create the third level of the hierarchy, enter Division 1 as
the term name and, for the relationship selected, “College” as the parent. Continue the process until
you’ve created all of the terms listed above. The resulting structure should look something like the list
shown in Figure 4-14.
Figure 4-14. The resulting list
We now have the ability to assign taxonomy terms to content items at the child level as well as at the
parent level.
The resulting Page that is created using this method now shows the associated sport as “High
School.” Clicking on High School would render a list of all pages that are associated with the term “High
School” under “Basketball.”
This approach provides a finer level of granularity for categorizing content.
CHAPTER 4 ■ TAXONOMY
50
Assigning More Than One Vocabulary
There may come a time when categorizing content by a single vocabulary represents a constraint that
you must overcome to address a complex requirement for content categorization. Fortunately Drupal
does not constrain you on how many vocabularies you can assign to a content type. Simply follow the
steps we performed earlier in this chapter to add a second field to the content type. Simply select a
different vocabulary as the source for the values that you wish to present to the author.
Summary
Hopefully this chapter shed some light on the power and simplicity of taxonomy. I suggest that you start
using taxonomy on your first site, because the more you use it the more comfortable you will be with its
capabilities and the power that it brings to the content you deliver to your visitors. I will continue to
leverage taxonomy throughout the rest of this book as I cover other advanced Drupal features.
C H A P T E R 5
■ ■ ■
51
Creating Menus
Making it easy for visitors to find information on your website, and more important, making it easy for
visitors to find the information that you want them to find, is a key factor in defining the success or
failure of your new site. There are three basic mechanisms in Drupal to provide navigational capabilities
to your site:
• Text links embedded in content that direct the user to a new page.
• Images and buttons that direct the user to a new page when clicked.
• Menus, which are horizontal or vertical lists of text or image links.
In this chapter, you will learn how to use Drupal’s administrator’s interface for creating and
managing menus.
Ordering From the Menu
A menu, in its simplest form, is a horizontal or vertical list of links that direct a user to a new page. If you
examine the home page of your new website, you’ll see that there are at least six menus on that page
alone. See Figure 5-1.
CHAPTER 5 ■ CREATING MENUS
52
Figure 5-1. Menus on a site
From top to bottom, the menus are:
• the top black bar, starting with Content;
• the gray bar at the top of the page, starting with Add Content;
• the top site menu (top of the blue area), with Admin and Log out
• the secondary menu in the right column, starting with Home;
• the left hand column menu titled Management; and
• the menu that is embedded in the article on the page, starting with “Create
content.”
Menus help a visitor to a site understand (and access) the content, features, and functions that the
site provides.
On our example site that we’re creating in this book, the menus shown on the page are all text links.
Drupal also provides mechanisms for creating menus that are button and/or image based. I created a
dynamic image-based menu for the Bloomfield Township Public Library () that uses a
combination of buttons and images (images appear above the menu item that is being highlighted; for
example, the boy with the paint on his fingers in Figure 5-2 is the highlighted menu item).
CHAPTER 5 ■ CREATING MENUS
53
Figure 5-2. An example of an image-based menu
Creating menus is facilitated through a set of screens that are part of Drupal 7 core. There are three
basic activities for creating items on menus
• Adding an item to an existing menu. Drupal 7 comes with several menus already
created. All you need to do is to add items to those menus.
• Creating a new menu. If you need more than the two menus that come with
Drupal 7, you can create a new menu.
• Assigning the menu to a region of on a page. If you created a new menu, you’ll
need to assign it to a region on the page.
Adding an Item to a Menu
There are two general items that we can add to our page as menu items: a link to an existing element on
our site (a content item, a list of content associated with a taxonomy term, and so on), or a link to a page
that is external to our site.
Adding a Content Item to a Menu
There are two approaches for adding items to menus: you can use the menu administration form (see
figure 5-4) to create a new menu item, or you can create a menu link from the content item that you wish
to reference from within the form used to create or edit that content item. The best practice is to use the
CHAPTER 5 ■ CREATING MENUS
54
content creation form (see figure 5-3) or, as we will see later in the book, other element creation forms
such as a panel page or a view. The reason for using this approach is that when you delete that content
item, Drupal automatically removes the item from the menu to which it was assigned. If you use the
manual approach of creating a menu item using the menu administration form, you as the site owner
must remember to remove that item manually from the menu.
To create a new content item, click on any of the Create Content links that are available on the home
page of your website (assuming you are still logged in as the administrator), and select the “Basic page”
content type. As an example, enter a title and body for the new content type and then click on the
“Provide a menu” vertical tab at the bottom of the screen (see Figure 5-3). Check the “Provide a menu”
box, which reveals the fields for defining your menu. Enter the title for the item as you wish it to appear
on the menu, and select the main menu as the one where you want the item to appear. After entering the
values for your menu item, click on the Save button at the bottom of the page. Drupal then displays the
page that you just created, with the menu item associated with this page now appearing in the Main
menu at the top right of the darker blue area of the page.
Figure 5-3. Adding a content item to a menu
Clicking on that link will take you directly to the page we just created, regardless of where you are on
the website.
Adding a Menu Item for an External Page
You can add links to external sites by adding a menu item. To do so, click on the Structure menu item at
the top of the page. On the Structure page, click on the Menu link. On the Menu page, click on the “Add
item” link for the Main menu. You should now see the “Add menu item” form (see Figure 5-4). Enter a
title (in this example, I used Apress as the menu title), the path, which is the full URL to the external page
to which we want to link (in the example I used www.apress.com), ensure that the enabled check box is
checked, and for demonstration purposes, select the Main menu from the parent item drop down list.
CHAPTER 5 ■ CREATING MENUS
55
Figure 5-4. Adding a menu item for an external page
Once you’ve entered all the values, click on the Save button at the bottom of the page (you may need
to scroll down to see it). Drupal then displays the complete list of items that are assigned to the Main
menu, including the new item that we just created.
You should now see the new menu item that you just added. Clicking on that menu item will take
you to the external link that you entered when you created the menu item.
CHAPTER 5 ■ CREATING MENUS
56
Creating a New Menu
There may be situations where you need to create additional menus beyond what ships with Drupal 7.
As an example, when creating Drupal-based websites for public libraries, I am often asked to build
unique menus for each department in the library (a menu for adult services, youth services, teen
services, circulation, and so on). In such a case, the basic menus shipped with Drupal 7 are not enough
to fulfill the library’s requirements. To create a new menu, click on the Structure menu item at the top of
any page on your site. On the Structure page, click on Menus, and on the Menus page click on the Add
Menu link. The form for creating a new menu is displayed (see Figure 5-5). On the form for creating a
new menu, enter the title of the menu and a description (which is optional). Click the Save button, and
you now have a new menu ready to assign items to using the same methods as described earlier in this
chapter.
Figure 5-5. Creating a new menu
After saving the menu, you can now add items to it. As practice, create menu items for the following
external links, using the process described in the section “Adding a Menu Item for an External Page”:
apress.com, yahoo.com, google.com, and bing.com. When completed, your menu should look
something like that in Figure 5-6.
CHAPTER 5 ■ CREATING MENUS
57
Figure 5-6. Your menu with items
At this point the menu exists in Drupal, but it isn’t assigned to a region on a page and, therefore,
isn’t visible to site visitors. To make your new menu visible, click on the Structure link at the top of any
page, and on the Structure page click on the Blocks link. On the Blocks page, scroll down until you find
Special Features (see Figure 5-7). In the list to the right of Special Features, pick the left sidebar option
and then click on the Save Blocks button at the bottom of the page.
CHAPTER 5 ■ CREATING MENUS
58
Figure 5-7. Assigning menus to a block
Click on the home icon at the top left of the screen to return to the home page and voila! There’s
your new menu. You may now place your order.
Summary
In this chapter I covered the basics of adding links to a menu and creating a new menu. I explained the
process of adding content items to menus and adding links to external websites. I also covered how to
enable a new menu so that it appears on your site.
In the next chapter I explain how to completely change the look of your website by installing and
enabling a new theme. Be prepared to say “wow!”
C H A P T E R 6
■ ■ ■
59
Installing Themes
In this chapter I will explain the process of changing the overall look and feel of your site by installing a
new theme. I will walk you through the process of selecting, downloading, and enabling your selected
theme. You’ve added some neat things to your site in previous chapters, and we’ve seen some exciting
features of Drupal; but this chapter will have you going “wow!”
The visual layout and presentation of your new Drupal site is defined through a Drupal component
called a theme. A theme defines:
• The colors used on the page.
• The fonts used for text, headings, links, and other elements.
• The placement of images and graphics that are present on every page of the site
(images and graphics that are associated with the page itself rather than a content
item).
• The layout of the page (such as a menu at the top, a banner area, a secondary
menu below the banner, a column on the left, or a footer).
Drupal themes are designed and developed using HTML, cascading style sheets (CSS), and the PHP
programming language. Themes can be as simple as a plain white canvas or as complex and visually
energizing as your imagination can conjure up.
We have already worked with a Drupal theme; the basic Drupal 7 site that we installed as part of the
earlier chapters in this book used the Garland theme. Garland is a predominantly “blue” theme (see
Figure 6-1), with a relatively simple structure. There is a region (a rectangular area on the page where
content, menus, widgets, and so on can be assigned) for a header, a left sidebar, a right sidebar, the
general content area, and the footer.
CHAPTER 6 ■ INSTALLING THEMES
60
Figure 6-1. The Garland theme
You’ll find as you browse through various Drupal themes that many of them follow this same
generic layout, which for many people is a negative because it makes them believe that every Drupal site
looks nearly identical. The truth of the matter is that yes, many off-the-shelf themes follow this same
layout pattern. However, you have the ability to create a layout that significantly deviates from the
standard. Figure 6-2 demonstrates how I used the capabilities of Drupal’s theme engine to create a
Drupal site for the University of Oregon that is used by high school students to manage their electronic
portfolio of learning assets and track their progress toward graduation. The area at the top of the page
with the brown background is the header, the area in the middle of the page with the green background
is the content area, and the brown area at the bottom is the footer.
CHAPTER 6 ■ INSTALLING THEMES
61
Figure 6-2. A creative non-traditional Drupal theme
How a Drupal Theme Works
Understanding some of the basics behind how a Drupal theme works will help lay the foundation for
some topics that I will cover in later chapters. The fundamentals of how a theme works can be distilled
into a few basic concepts, which I explain here.
CHAPTER 6 ■ INSTALLING THEMES
62
As the administrator, you have the ability to pick which theme your site will use. You can either
download a stock theme from or you can purchase a commercial
theme from various providers that sell Drupal themes. It is likely that you will find something that
matches or closely matches what you want from a visual design perspective on the Drupal theme
download site. If you scan through the hundreds of themes and can’t find one you like, you can always
create your own. Pro Drupal Development, also published by Apress, covers many of the aspects of
creating a theme from scratch.
If you find a theme that you like, download it, expand the downloaded file (just like you did when
you downloaded Drupal), and copy the theme to your web server.
Once copied, you enable the theme through the administration features provided in Drupal 7, and
voila! Your site is now displayed using the theme.
Once the theme is enabled, Drupal loads it and its associated cascading style sheets and assembles
the content. Drupal then renders each page using the structure, style, colors, fonts, and images as you
have defined them in your theme.
Finding a New Theme
Drupal 7 ships with the Garland and Stark themes. Although Garland is a great theme, it’s likely one that
you won’t use on your production site (although browsing around the web you’ll often run into a site
that uses Garland as its production theme). Stark is an extremely plain theme. If you’re going for a very
clean and text heavy-theme, then Stark may be a good choice for you, but it’s likely that you’ll want to
pick from one of the hundreds of themes that you can freely download and use.
Before you begin your search for a new theme, you should sit down with a blank piece of paper and
sketch out the general layout of at least the homepage of your new site. Key concepts to focus on
include:
Will your site use horizontal menus and, if so, how many will you have and where will they be
placed?
Will your site have a header or banner area? If so, how tall will the header be, and will it span the
entire width of your page?
Does your design call for a left or right side bar? Or does your design call for two sidebars on the
right or two on the left?
Will your site have a footer and, if so, does the footer span the entire width of the page?
Will you have a fixed width (say, 960px wide), or will the width of the page expand and contract as
the visitor expands and contracts the width of their browser?
Answering these questions will help you narrow the choice of themes to only those that support
your general layout and design goals.
There are multiple ways to search for themes. The following are two common ways:
• Visit www.drupal.org/project/themes and browse through the descriptions of
themes that are available for download. See Figure 6-3.
• Visit and see each theme listed on Drupal.org in action.
Themegarden.org renders its entire site in each of the themes listed on Drupal.org,
so you can see how your site might look in each.
CHAPTER 6 ■ INSTALLING THEMES
63
Both methods work well. Many people browse through the list on Drupal.org and then visit
Themegarden.org to see that theme implemented on a live site. You may choose to use one or both of
the sites.
For demonstration purposes, let’s search the Drupal.org site for a Drupal 7 theme that matches our
intended layout and color scheme. On www.drupal.org/project/themes, in the right-hand column, there
is a capability for filtering forms based on the version of Drupal that you are using. You’ll want to filter
the results by Drupal 7, because themes for previous versions will not work on our site.
Drupal will redisplay the list of themes, only listing those that are compatible with Drupal 7. You can
also sort the results by title, creation date, last release, or recent activity. Clicking on “Last release” shows
all of the newly added themes (or updates to existing themes), which is a nice feature when you visit this
page often and want to see what the community has contributed. For this demonstration, let’s sort by
Title to list the Drupal 7 themes in alphabetical order.
Figure 6-3. Sort options for Drupal themes
Browse through the pages of themes to see the variety that is available. Most theme developers
provide a sample screenshot of their design so you can see the general layout and design of their theme.
As an example, select the Aberdeen theme ( because the visual
design and layout varies slightly from the standard layouts (such as Garland) and the colors are nice and
subtle. See Figure 6-4.
CHAPTER 6 ■ INSTALLING THEMES
64
Figure 6-4. The Aberdeen theme
Installing a Theme
The next step is to download the theme you want. A new feature in Drupal 7 makes downloading and
installing themes a simple task of copying the URL for the theme download file and pasting the URL into
a form. To get to this form, first click the Appearance link in the top menu. On the Appearance page,
click on the “Install new theme” link. See Figure 6-5.
CHAPTER 6 ■ INSTALLING THEMES
65
Figure 6-5. Installing a new theme
Clicking on the “Install new theme” link exposes the form that is used to upload and install a new
theme. See Figure 6-6.
Figure 6-6. The theme upload/download form
CHAPTER 6 ■ INSTALLING THEMES
66
On this form you will see two fields. In the first, you can type (or paste) the URL of the theme’s
distribution file that you wish to install. Let’s do that for this example. Open a new browser window (or a
tab) and navigate to the theme that you wish to install ( We’ll use
the Aberdeen theme for Drupal 7 (
Using your mouse, hover over the Download link and right-click on it. In the pop-up window that
appears, select the option that allows you to copy the links location (URL). Return to the theme
installation form. Right-click in the URL text box and select paste.
With the URL pasted in the text box, you’re now ready to click the Install button. Click the button
and Drupal downloads the files from the URL specified, copies the files the correct directory, expands
(uncompresses) the theme, and makes it available for you to enable.
After downloading, Drupal redisplays the list of themes available on your site, including Aberdeen in
the Disabled Themes section of the list. See Figure 6-7.
Figure 6-7. Disabled themes
To enable the theme and set it as the default for your site, simply click on the “Enable and set
default” link for the theme that you downloaded (we’ll use the standard Aberdeen theme, not the fluid
layout). At the bottom of the page, click the Save button. Once saved, click on the X in the top right-hand
of the Themes page. Return to the home page and click your browsers refresh button. You should now
see your site rendered in the new theme. See Figure 6-8.
CHAPTER 6 ■ INSTALLING THEMES
67
Figure 6-8. The site rendered in the new theme
The Administration Theme
Administration forms tend to be wide and long, sometimes not fitting too well within the confines of the
content area defined for a given theme. To address this problem, Drupal 7 lets you specify a theme that
should be used for administrative functions. You can try your new theme to see if it works for
administration screens, or you can pick a different theme to use whenever a site administrator is
performing site administration tasks. Typically, a simple clean theme that is at least 960px wide works
best as the admin theme. To change the administration theme, simply click on the Appearance menu
item at the top of the page and scroll to the bottom. You’ll see a section titled Administration Theme.
From the list of themes in the drop-down list, select a theme that you know will work with
administration forms. By default Drupal 7 enables Seven as the administration theme, because it
accommodates administration screens. You may also change the administration theme to any other
theme listed in the drop-down list. If you change the value, make sure you click the “Save configuration”
button.
CHAPTER 6 ■ INSTALLING THEMES
68
Configuration Options
Drupal 7 provides a set of configuration options that, when changed, updates certain aspects of what is
displayed within your theme. Depending on whether the theme author adhered to Drupal standards,
you can use this form to determine which elements are displayed on the page (Logo, Site Name, Site
Slogan, and so on), whether the theme should use its default logo, and whether the shortcut icon should
be used (the shortcut icon is also known as the favicon; it’s the little logo that appears to the left of your
browsers address bar). To get to this screen, simply click on the Appearance menu item in the top menu
and click on the Settings tab at the top of the Appearance page. See Figure 6-9.
Figure 6-9. Appearance configuration options
CHAPTER 6 ■ INSTALLING THEMES
69
■ Note A great site to visit to see what others have done with Drupal is Dries Buytaert’s personal page. On his
site, he lists many of the highest profile sites on the web that are deployed on Drupal. You can find the list at
Summary
In this chapter we stepped into the “wow!” part of building a Drupal-based site: themes. In a matter of
minutes, we changed the entire look and feel of our site through a few simple steps. Spend some time
browsing through the themes on Drupal.org. You’ll be amazed at the breadth of options that are literally
a few clicks away from changing the entire look of your site.
C H A P T E R 7
■ ■ ■
71
Drupal Blocks
In this chapter I focus on using blocks to assign content and what are called “widgets” (which include
the user login form, latest blog posts, a list of who is currently logged into your site, the current weather
conditions, and the like) to specific positions on a page. I will cover standard blocks that ship with
Drupal 7, blocks that come with contributed modules, and information on how to build a custom block
from scratch. At the end of the chapter you will have the ability to construct a page with some pretty
exciting features.
Blocks, Blocks, and More Blocks
A block is a generic term that is applied to any self-contained piece of content, menu, or code. There are
standard pre-built blocks that come with Drupal 7: the login block, the search block, the “who’s online”
block, the “who’s new” block, the latest blog postings block, and more. There are also blocks that come
with contributed modules, such as blocks that share the latest weather report, your recent Twitter posts,
or your current Facebook status. As a site administrator you can construct your own custom blocks, such
as a list of upcoming events.
Making Blocks Appear on Pages
In Chapter 6 I covered the structure of themes and how themes define “regions” on a page. Figure 6-1
showed how the theme was divided into left, center, right, and footer regions. I’ll now show you how to
assign anywhere from one to dozens of blocks to the various regions on your theme, and explain how
doing so increases visitor interest in your site by providing interesting and high-value features.
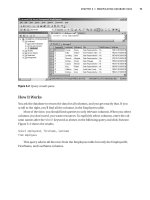
Figure 7-1 is an example of blocks that are assigned to various regions on a page. There are seven
blocks that appear on this page.
CHAPTER 7 ■ DRUPAL BLOCKS
72
Figure 7-1. See if you can spot the blocks
In this example are blocks that are menus (Navigation, Management, Special Features) as well as
interactive blocks (Search), and informational blocks (“Who’s new,” “Who’s online,” and “Powered by
Drupal”).
Let’s take a look at the blocks that come with Drupal 7 and assign a few of those blocks to regions on
your site. We’ll then install a module or two that provide cool blocks that you can add to your site, and
then we’ll create a custom block from scratch.
Finding the List of Available Blocks
To find the list of blocks that are available for you to use on your new web site, click on the Structure link
at the top of the page. This takes you to the Structure page. On the Structure page, click on the Blocks
link to reveal the Blocks page, which lists all the defined blocks on your system, including those that are
already assigned to regions and those that are not assigned to a region. See Figure 7-2.