Expert Spring MVC and Web Flow phần 4 pdf
Bạn đang xem bản rút gọn của tài liệu. Xem và tải ngay bản đầy đủ của tài liệu tại đây (346.69 KB, 42 trang )
Listing 5-39. MultipartHttpServletRequest Interface
package org.springframework.web.multipart;
public interface MultipartHttpServletRequest extends HttpServletRequest {
Iterator getFileNames();
MultipartFile getFile(String name);
Map getFileMap();
}
Before the end of the request life cycle and after the handling code has had a chance to
work with the uploaded files, the DispatcherServlet will then call cleanupMultipart(). This
removes any state left behind by the file upload implementation code, such as temporary files
on the file system. Therefore, it is important that any request handling code should work with
the uploaded files before request processing finishes.
So which library should you use, Commons’ FileUpload or COS? The choice is up to you,
as both have been around for years and are considered stable. However, keep in mind that
Commons’ FileUpload will probably receive more maintenance in the future. Of course, if
neither provides the features you require, you may implement a new MultipartResolver.
Example
Working with file uploads is actually quite simple, as most of the mechanisms are handled by
the DispatcherServlet and thus hidden from request handling code. For an example, we will
register a Jakarta Commons FileUpload MultipartResolver and create a Controller that saves
uploaded files to a temporary directory.
Listing 5-40 contains the configuration required for the CommonsMultipartResolver.
Listing 5-40. MultipartResolver ApplicationContext
<?xml version="1.0"?>
<!DOCTYPE beans PUBLIC
"-//SPRING//DTD BEAN//EN"
" /><beans>
<bean id="multipartResolver"
class="org.springframework.web.multipart.commons.CommonsMultipartResolver">
<property name="maxUploadSize" value="2000000" />
</bean>
<bean name="/handleUpload"
class="com.apress.expertspringmvc.chap4.HandleUploadController">
<property name="tempDirectory" value="/tmp" />
CHAPTER 5 ■ THE PROCESSING PIPELINE 109
584X_Ch05_FINAL 1/30/06 1:44 PM Page 109
</bean>
</beans>
Note that we declared the multipart resolver in the same ApplicationContext as our
Controller. We recommend grouping all web-related beans in the same context.
Next, we create the form for the file upload, as shown in Listing 5-41.
■Tip It’s very important to set the enctype attribute of the <form> element to multipart/form-data.
Listing 5-41. HTML File Upload Form
<?xml version="1.0" encoding="ISO-8859-1" ?>
<!DOCTYPE html PUBLIC "-//W3C//DTD XHTML 1.0 Transitional//EN"
" /><html xmlns=" /><head>
<meta http-equiv="Content-Type" content="text/html; charset=ISO-8859-1" />
<title>File Upload Form</title>
</head>
<body>
<form action="spring/handleUpload" method="post" enctype="multipart/form-data">
File: <input type="file" name="uploaded" />
<input type="submit" />
</form>
</body>
</html>
The Controller that handles the request is shown in Listing 5-42. Notice how it must cast
the request object to a MultipartHttpServletRequest before extracting the file. The utility class
FileCopyUtils, provided by Spring, contains convenience methods such as copying an input
stream to an output stream.
Listing 5-42. File Upload Controller
public class HandleUploadController extends AbstractController
implements InitializingBean {
private File destinationDir;
public void setDestinationDir(File destinationDir) {
this.destinationDir = destinationDir;
}
CHAPTER 5 ■ THE PROCESSING PIPELINE110
584X_Ch05_FINAL 1/30/06 1:44 PM Page 110
public void afterPropertiesSet() throws Exception {
if (destinationDir == null) {
throw new IllegalArgumentException("Must specify destinationDir");
} else if (!destinationDir.isDirectory() && !destinationDir.mkdir()) {
throw new IllegalArgumentException(destinationDir + " is not a " +
"directory, or it couldn't be created");
}
}
protected ModelAndView handleRequestInternal(HttpServletRequest req,
HttpServletResponse res) throws Exception {
res.setContentType("text/plain");
if (! (req instanceof MultipartHttpServletRequest)) {
res.sendError(HttpServletResponse.SC_BAD_REQUEST,
"Expected multipart request");
return null;
}
MultipartHttpServletRequest multipartRequest =
(MultipartHttpServletRequest) req;
MultipartFile file = multipartRequest.getFile("uploaded");
File destination = File.createTempFile("file", "uploaded",
destinationDir);
FileCopyUtils.copy(file.getInputStream(),
new FileOutputStream(destination));
res.getWriter().write("Success, wrote to " + destination);
res.flushBuffer();
return null;
}
}
If you are creating command beans (see BaseCommandController and SimpleFormController
in Chapter 6) to encapsulate the request parameters from forms, you can even populate a prop-
erty of your command object from the contents of the uploaded file. In other words, instead
of performing the manual operation of extracting the file from the MultipartFile instance (as
we did in the preceding example in Listing 5-42), Spring MVC can inject the contents of the
uploaded file (as a MultipartFile, byte[], or String) directly into a property on your command
bean. With this technique there is no need to cast the ServletRequest object or manually retrieve
the file contents.
CHAPTER 5 ■ THE PROCESSING PIPELINE 111
584X_Ch05_FINAL 1/30/06 1:44 PM Page 111
We’ll cover binding request parameters from forms in the next chapter, so we won’t
jump ahead here and confuse the topic at hand. But we will provide the hint required to
make the file contents transparently show up in your command bean: you must register
either ByteArrayMultipartFileEditor or StringMultipartFileEditor with your data binder
(for instance, inside the initBinder() method of your form controller). What does that mean?
Hang tight, or skip to Chapter 7.
As long as the contents of the uploaded file aren’t too large, we recommend the direct
property binding because it is less work for you and certainly more transparent.
ThemeResolver
Spring MVC supports a concept of themes, which are interchangeable looks and feels for
your web application. Often called skins, themes are a way to abstract a look and feel (color
scheme, logo, size of buttons, and so on) from the user interface. This is helpful to the user
interface implementer, because the skin information can be rendered at runtime, instead of
simply duplicating each page once for each look and feel. We will cover themes in greater
detail in the Chapter 7. For now, we will focus on how to choose and manipulate themes
for each user’s requests. You will find that the concepts here are very similar to the
LocaleResolver.
Listing 5-43 contains the ThemeResolver interface.
Listing 5-43. ThemeResolver Interface
package org.springframework.web.servlet;
public interface ThemeResolver {
String resolveThemeName(HttpServletRequest request);
void setThemeName(HttpServletRequest request, HttpServletResponse response,
String themeName);
}
As you can see, the ThemeResolver interface resembles the LocaleResolver interface very
closely. One major difference between the two is ThemeResolver returns strings instead of a
strongly typed objects. The resolution of the theme name to a org.springframework.ui.context.
Theme object is done via an org.springframework.ui.context.ThemeSource implementation.
The ThemeResolver interface has the same types of implementations as the
LocaleResolver interface. Out of the box, Spring MVC provides a FixedThemeResolver, a
CookieThemeResolver, and a SessionThemeResolver. Just like their LocaleResolver counter-
parts, both CookieThemeResolver and SessionThemeResolver support retrieving and changing
the theme, while FixedThemeResolver only supports a read-only theme.
CHAPTER 5 ■ THE PROCESSING PIPELINE112
584X_Ch05_FINAL 1/30/06 1:44 PM Page 112
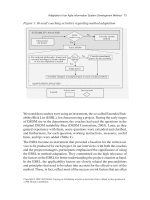
Figure 5-3 illustrates the class hierarchy for the ThemeResolver and its subclasses.
Figure 5-3. ThemeResolver class hierarchy
The DispatcherServlet does not support chaining of ThemeResolvers. It will simply attempt
to find a bean in the ApplicationContext with the name themeResolver. If no ThemeResolvers are
located, then the DispatcherServlet will create its own FixedThemeResolver configured only with
the defaults.
Working with the configured ThemeResolver is no different than working with the
LocaleResolver. The DispatcherServlet places the ThemeResolver into each request as an
HttpServletRequest attribute. You then access this object through the RequestContextUtils
utility class and its getThemeResolver() method.
Summary
A theme is a skin, or look and feel, for your web application that is easily changed by the user
or application. The ThemeResolver interface encapsulates the strategy for reading and setting
the theme for a user’s request. Similar to the LocaleResolver, the ThemeResolver supports a
fixed theme, or storing the theme in a cookie or in the HttpSession object.
The DispatcherServlet will look for a bean with the name themeResolver in
the ApplicationContext upon startup. If it does not find one, it will use the default
FixedThemeResolver.
We’ll discuss themes in detail in Chapter 7. For now, it’s important to know that
there is one for each DispatcherServlet and the default, if none are specified, is the
FixedThemeResolver.
AbstractThemeResolver
SessionThemeResolver
CookieThemeResolver
FixedThemeResolver
CookieGenerator
<<interface>>
ThemeResolver
CHAPTER 5 ■ THE PROCESSING PIPELINE 113
584X_Ch05_FINAL 1/30/06 1:44 PM Page 113
Summary
Spring MVC has a full-featured processing pipeline, but through the use of sensible
abstractions and extensions, it can be easily extended and customized to create powerful
applications. The key is the many interfaces and abstract base classes provided for nearly
every step along the request’s life cycle.
As a developer, you are encouraged to implement and extend the provided interfaces and
implementations to customize your users’ experiences. Don’t be constrained by the provided
implementations. If you don’t see something you need, chances are it’s very easy to create.
For more information on themes and views, including the ViewResolver, continue on to
Chapter 7. For more information on Controllers (Spring MVC’s default request handlers) and
interceptors, let’s now continue on to Chapter 6.
CHAPTER 5 ■ THE PROCESSING PIPELINE114
584X_Ch05_FINAL 1/30/06 1:44 PM Page 114
The Controller Menagerie
AController is the workhorse of Spring MVC, providing the glue between the core applica-
tion and the web. We’ve mentioned Controllers several times up to this point, and we will
now provide an in-depth review of the different available Controller implementations.
This chapter will also cover many of the details surrounding form submission, including
details on binding form data to POJOs. Related to data binding are simple validation and how
PropertyEditors help convert Strings to complex types. We’ll cover both in this chapter.
Introduction
It is important to note that a Controller in Spring MVC is not the same thing as a Front Con-
troller. Martin Fowler in Patterns of Enterprise Application Architecture (Addison Wesley, 2002)
defines a Front Controller as “a controller that handles all requests for a Web site.” By that defi-
nition, the DispatcherServlet serves the role of a Front Controller. A Spring MVC Controller
is really a Page Controller, which Fowler defines as “an object that handles a request for a spe-
cific page or action on a Web site.”
In Spring MVC there are two high-level types of Controllers: Controllers and
ThrowawayControllers. Controllers are (typically) singleton, multithreaded page controllers
fully aware of the Servlet API (e.g., HttpServletRequest, HttpServletResponse, and so on).
A ThrowawayController is an executable command object (providing an execute() method)
that is populated directly with request parameters and has no awareness of the Servlet API.
A ThrowawayController is not intended for multithreaded use, but instead for one-off execu-
tion (hence its name).
■Tip Admittedly the naming convention leads you to believe a ThrowawayController is a subclass of
Controller, but in fact a ThrowawayController works very differently than a Controller, and it is not
a subclass of
Controller.We will discuss both types in this section, but be aware that a Controller is
treated differently than a ThrowawayController.
115
CHAPTER 6
■ ■ ■
584X_Ch06_FINAL 1/30/06 1:40 PM Page 115
How do you choose which controller type to implement? We believe this decision has a lot
to do with you and how you think about how requests are processed. If you are comfortable with
how the standard servlet model works, then you will feel right at home with the Controller
interface. Controllers are typically implemented and deployed as singletons, therefore all
requests for the same resource (or page) are routed through the same instance. This design
forces you to keep all of the state for the request outside the Controller, instead in places such
as the HttpSession or stateful session beans. The advantage of this design is that it is very
familiar (Struts Actions follow this design, as well as standard servlets, for example) and very
scalable due to the stateless nature of the request processing and its minimal impact on
garbage collection.
If you prefer to think about the incoming request as a thing to be executed, then you might
find the ThrowawayController easier to work with (fans of WebWork (nsymphony.
com/webwork), I’m talking to you). With this controller type you are not restricted to writing state-
less controllers, as this controller encapsulates both state (parameters from the request) and
behavior (the execute() method). Although we still recommend that you delegate business logic
to the domain model, if you like programming to a model where the command is encapsulated
as first-class citizen, this controller is for you.
As with all things in Spring MVC, the choice is yours, and there is no intrinsic bias toward
one method or the other. Feel free to mix and match controller types in the same application
to give yourself ultimate flexibility. If you are unsure, fear not! We will cover both in detail in
this chapter. One thing to note, however, is that Spring MVC appears to favor Controllers over
ThrowawayControllers, simply by the number of implementations available for Controller.
The Controller Interface and Implementations
To review, the Controller interface (presented again in Listing 6-1) contains a simple, stateless
method that accepts an HttpServletRequest and an HttpServletResponse and optionally returns
a ModelAndView. In true Spring MVC style, there are many Controller implementations to choose
from, each building upon its superclass to extend its life cycle and work flow.
Listing 6-1. Controller Interface
public interface Controller {
ModelAndView handleRequest(HttpServletRequest request,
HttpServletResponse response) throws Exception;
}
A Look at Design
Before we begin our tour of the different Controllers, we will first discuss one of the important
design principles behind the class hierarchy. When studying the different Controllers, new
users encounter plenty of methods marked final. These are often encountered when a user
wishes to add functionality to a subclass of a Controller implementation but is prohibited
from doing so. These final methods can be frustrating, but they are there for an important
reason.
CHAPTER 6 ■ THE CONTROLLER MENAGERIE116
584X_Ch06_FINAL 1/30/06 1:40 PM Page 116
To understand the developers’ intentions, we must look at an important principle of
object-oriented design entitled the Open-Closed Principle. Quoting Bob Martin,
1
as he
paraphrases Bertrand Meyer,
2
this principle is defined as follows:
Software entities (classes, modules, functions, etc.) should be open for extension, but
closed for modification.
In other words, this principle states that a class should protect itself from alteration while
at the same time providing well-defined extension points. At first glance, these two objectives
seem contradictory, for isn’t implementing an extension point just another way to alter a class?
Good object-oriented design places a high premium on encapsulation, which is the hid-
ing of both data and implementation details. This principle states that a class should protect
itself from not only outside influence (something we are very familiar with, as we mark any
method as private), but also internal influence. Internal influence can be anything that might
have intimate knowledge of the class structure, such as subclasses (which are in a much more
powerful position to modify the behavior of a class). A well-designed class conforming to the
Open-Closed Principle considers even subclasses as potentially harmful, which is why you
will see so many methods marked as final.
So what type of harm is the class protecting itself from? Without the final modifier, a sub-
class is able to re-implement any non-private method of its superclass. This method overriding
is potentially very dangerous, as it might ignore or change the original implementation’s intents.
Any redefinition of a method would effectively break the contract the superclass has with the
rest of the system, leading to potentially unintended consequences.
But I hear you saying that your overriding method can simply call super.doMethod(),
ensuring that the original method’s logic is run (thus preserving the original method defini-
tion). This is the crux of the problem, as there is no way to force an overriding method to call
super.doMethod(). Also, does the subclass call the method before or after the overriding
method’s code? For libraries intended to be used across many different systems, this type of
uncertainly is not acceptable.
However, libraries intended for wide use must allow for customization, and this is where
“open for extension” comes in. Instead of allowing a class’s behavior to change, you should
allow a class to be extended. Extension happens via well-defined life cycle callback methods
(typically with method names such as onXxx() in the Spring Framework). These callback
methods are intended to be overridden, because they don’t define the core business logic of
the class. While the core business logic method is marked as final, it might call one or more
extension methods allowing a subclass to add in extra behavior.
To illustrate this principle in action, we will look at the high-level implementation of the
Controller interface, which is the org.springframework.web.servlet.mvc.AbstractController.
This first class in the Controller hierarchy remains fairly simple. However, it provides the first
good example of the Open-Closed Principle in action, plus it gives us a good starting point to
examine the Controller options.
CHAPTER 6 ■ THE CONTROLLER MENAGERIE 117
1. Bob Martin, The Open-Closed Principle, 1996.
2. Bertrand Meyer, Object Oriented Software Construction (Upper Saddle River, NJ: Prentice Hall, 1988) p 23.
584X_Ch06_FINAL 1/30/06 1:40 PM Page 117
AbstractController
This class provides the basic building blocks for all other Controllers. You shouldn’t have to
implement your own Controller class, as this class is built for subclassing.
The first thing to notice about this class is that it marks the handleRequest() method
(from the Controller interface) as final. At first glance, this seems to make the class useless
for subclasses. Looking closer, we see a protected method named handleRequestInternal(),
clearly intended for subclasses. Why not just allow overriding of the handleRequest() method?
The answer, in short, is because this class obeys the Open-Closed Principle.
Each Controller in the hierarchy defines a clear work flow and life cycle. For instance, the
AbstractController will
1. check whether the HTTP request method (GET, POST, etc) is supported by this
Controller;
2. check whether a session exists, if this Controller requires a session;
3. send cache control headers, if required;
4. synchronize around the session, if required;
5. run custom logic, via handleRequestInternal().
The first four steps are well defined, and each subclass relies on them to run in a well-known
manner. In other words, they should never change, because if they did, the very definition of
AbstractController changes. For this reason, the class marks the handleRequest() method as
final, to be closed for modification. This class’s work flow is now set in stone, so to speak.
Of course, if the class only performed the first four items, it wouldn’t be of much use. To
be open for extension, it defines a handleRequestInternal() method specifically for subclasses
to have a well-known extension point to place custom logic. This way, subclasses are free to
customize this class without the possibility of changing its well-defined work flow. This is a
perfect manifestation of the Open-Closed Principle, and you will see many examples of it
throughout the Controller hierarchy.
This example also illustrates the Template pattern, a popular design pattern also found
throughout the Spring Framework. The Template pattern is used to separate the variant
sections of an algorithm from the invariant sections to allow for easy customization and
substitution. In other words, a template of the algorithm is created, with the specifics
intended to be filled in later.
The AbstractController’s implementation of handleRequest() applies the Template pat-
tern, as it defines a well-known work flow (the algorithm) but provides an extension point for
specifics via the handleRequestInternal() method. This pattern is another perfect example of
the Open-Closed Principle, and you can find it across the Spring Framework from Spring MVC
to Spring JDBC.
AbstractController Functionality
By examining the work flow of AbstractController, we will see the common functionality that
is applied to all Controllers.
CHAPTER 6 ■ THE CONTROLLER MENAGERIE118
584X_Ch06_FINAL 1/30/06 1:40 PM Page 118
Enforcing HTTP Methods
By default, an AbstractController supports HEAD, GET, and POST methods. If an HTTP
method is used for the request that is not in that list, a RequestMethodNotSupportedException
will be thrown. Note that the AbstractController doesn’t define what should happen for each
type of request, but that other subclasses do make the distinction between different methods.
Setting the list of supported methods is often a good idea, enforcing the contract for a particu-
lar Controller. For example, some Controllers may display only read-only data, so setting its
supported methods to only GET enforces this usage.
■Note The HTTP RFC, defines each
method, its semantics, and its intended usage.
For example, you can set the supported methods via the bean definition (Listing 6-3) or
simply inside the Controller’s constructor (Listing 6-2).
■Tip Set the supported methods to only those that the Controller specifically supports. When a client
attempts a non-supported HTTP method, the correct error message and status will be generated, creating
helpful error messages. Plus, your
Controller will be protected against incorrect (and potentially damag-
ing) usage.
Listing 6-2. Setting Supported Methods via the Constructor
public SimpleController() {
setSupportedMethods(new String[]{"GET","POST"});
}
Listing 6-3. Setting Supported Methods via the Bean Definition
<bean>
<bean name="/sample"
class="com.apress.expertspringmvc.chap4.SimpleAbstractController">
<property name="supportedMethods" value="GET,POST" />
</bean>
</bean>
These two examples are identical, so choose the method that best works for you.
CHAPTER 6 ■ THE CONTROLLER MENAGERIE 119
584X_Ch06_FINAL 1/30/06 1:40 PM Page 119
■Tip We recommend that for configuration elements that will not change, such as the supported methods
for a
Controller, the constructor is the best place to set them. The XML bean definitions are excellent
places for configuration elements that will change or are external to the definition of the bean itself.
How did Spring convert the string "GET,POST" into an array of Strings? Spring used the
org.springframework.beans.propertyeditors.StringArrayPropertyEditor, automatically
registered for ApplicationContexts. Learn more about PropertyEditors later in this chapter.
Require Sessions
The AbstractController will also, if configured to do so, check for an existing HTTP
session in the request. If a session is not found, then the Controller will fail fast with a
SessionRequiredException. This may be useful when a Controller is part of a work flow that
requires a session to already exist, as it should fail in a consistent manner and with a semanti-
cally rich exception if no session exists.
To configure this behavior, simply set the requiresSession property to true. The default
behavior is to not require a session. Again, this can be done inside the constructor or in the
bean definition.
Cache Header Management
With a few simple configuration properties, the AbstractController will also manage the
sending of cache control headers in the response. These headers will instruct the client, and
any caches between the client and server, on how to cache the document returned by the
Controller. By default, the Controller will not send any cache headers with the response.
To send cache control headers, simply set the cacheSeconds property to a value greater
or equal to zero. With zero as the value, the Controller will tell the client that no caching is
allowed. If the value is greater than zero, the Controller will send the appropriate headers to
indicate the content shall be cached for that many seconds. Of course, the client is free to
ignore any or all of these headers, so treat them as hints.
■Tip HTTP caching is a large concept with many nuances. Begin your research with the HTTP RFC’s
section on caching (
Used
correctly, caching can save both bandwidth and system resources. At a minimum, enable caching for
read-only pages with static (or infrequently changing) content.
By default, both HTTP/1.0 and HTTP/1.1 cache manipulation headers will be sent by
AbstractController. Note that there are few clients out in the wild that speak only HTTP/1.0,
but sending both 1.0 and 1.1 headers is normally done to accommodate broken client imple-
mentations. For safety, and unless there is some other explicit reason, send both versions of
headers. To control sending of HTTP/1.0 headers, use the useExpiresHeader property. To
control sending of HTTP/1.1 headers, use the useCacheControlHeader property.
CHAPTER 6 ■ THE CONTROLLER MENAGERIE120
584X_Ch06_FINAL 1/30/06 1:40 PM Page 120
If you have set the property cacheSeconds to zero, the following headers will be sent:
• Pragma: No-cache (universal)
• Expires: n (where n = current system date + one second, as HTTP-formatted date)
(HTTP/1.0)
• Cache-Control: no-cache (HTTP/1.1)
• Cache-Control: no-store (HTTP/1.1, for Firefox)
If you wish to inform the client to cache the document, the following headers will be sent:
• Expires: n (where n = current system date + seconds, as HTTP-formatted date)
(HTTP/1.0)
• Cache-Control: max-age=s (where s = seconds documents should be cached for)
(HTTP/1.1)
There is one more element of caching your Controller can configure, but not through
setting properties. Your Controller implementation may also implement the interface
org.springframework.web.servlet.mvc.LastModified (shown in Listing 6-4) to indicate that
it provides a last modified time for the document. This interface contains one method.
Listing 6-4. LastModified Interface
package org.springframework.web.servlet.mvc;
public interface LastModified {
long getLastModified(HttpServletRequest request);
}
If your Controller implements this (which AbstractController does not by default), then
the cache control code can send an extra hint to the client via cache headers. By providing a last
modified date, the Cache-Control header will contain the value max-age=s, must-revalidate,
which instructs the client that it must revalidate the document once it has become stale in
the cache.
The most common way a client will revalidate the document is to issue a conditional request
using the Last-Modified header inside the HTTP request. When the client requests the document
again, it will send a Last-Modified header set to the date when it last received the document. The
document is considered valid if it has not been modified since this date.
■Tip For more on how a client may revalidate a resource, consult section 13.3 of the HTTP RFC,
/>As you can see, by implementing LastModified, your Controller will be able to accurately
tell the server when its contents last changed. Thus, AbstractController is able to incorporate
the must-revalidate instruction in its Cache-Control headers.
CHAPTER 6 ■ THE CONTROLLER MENAGERIE 121
584X_Ch06_FINAL 1/30/06 1:40 PM Page 121
To be clear, the AbstractController does not implement the LastModified interface. It is
up to you to provide this functionality, if your data supports it.
Cache control is a broad topic but, if implemented correctly, it can help to manage band-
width and CPU consumption considerably. For example, if the Controller’s main responsibility
is to pull static information from a database to be rendered in HTML, instructing clients to cache
the document will save repeated trips to the database, bandwidth, and processing load (always a
good thing).
Synchronized Session
The last bit of functionality the AbstractController will perform on behalf of subclasses
is optionally synchronizing the handling of the request around the session object. By
setting synchronizeOnSession to true, the Controller will synchronize every call to
handleRequestInternal() around the user’s HttpSession object. If there is no session,
then no synchronizing will take place no matter the value of synchronizeOnSession.
This is useful if the Controller must ensure multiple requests from the same client are to
be handled in a serialized and nonconcurrent manner. When would you have to do this? If it is
possible to directly modify state that is stored in the session, it’s useful to serialize access to
the session in order to ensure that multiple processes don’t interfere with each other.
As browsers become more sophisticated and pre-fetch more pages (the Google Web
Accelerator does this, for example), the chances of web requests being performed in the
background increase. Be aware that the client may be creating multiple concurrent requests
without the user’s involvement. You may want to investigate the synchronizeOnSession prop-
erty to protect your Controllers from such activity.
Summary
The AbstractController provides the basis for all Controller implementations in Spring MVC.
It adheres to the Open-Closed Principle to protect its work flow and life cycle methods, while
providing a well-known extension hook in the form of handleRequestInternal(). The
AbstractController handles session checking, HTTP method checking, cache control, and
synchronization, all configured by either the bean definition in the XML or through simple
setters called in the constructor.
For simple Controller implementations, subclass this class instead of merely implement-
ing Controller. For more robust work flows, we will now begin examining subclasses of
AbstractController.
BaseCommandController
While AbstractController is a good class for read-only web resources, an interactive web
application will require HTML forms support. Native servlet applications would require work-
ing directly with the HttpServletRequest and its getParameter() method to read submitted
form values. This method is error prone and cumbersome, as the developer needs to handle
missing values and potential type conversion. Modern web frameworks usually provide a
mechanism to automatically convert the raw request parameters into classes and properties,
so that the request handling code can interact with a strongly typed object instead of a collec-
tion of Strings.
CHAPTER 6 ■ THE CONTROLLER MENAGERIE122
584X_Ch06_FINAL 1/30/06 1:40 PM Page 122
The org.springframework.web.servlet.mvc.BaseCommandController class provides the
basic feature set for supporting form submits, including creating JavaBeans from the request,
and registering Validators. It does not support the notion of a page view work flow, nor does
it do anything with the JavaBean once created. This class is the parent for classes such as
SimpleFormController that build upon its functionality to bring coordinated page views to
the user.
■Tip If you are looking to handle form submits, look past the BaseCommandController to
SimpleFormController. BaseCommandController does not provide any work flows that you can
extend easily, but it does provide much of the base functionality.
BaseCommandController subclasses AbstractController and provides the concept of a
command object. A command, in this scenario, is a JavaBean whose properties are set from
HTTP request parameters.
■Note Do not confuse a command bean with the Gang of Four’s Command design pattern.The formal
Command pattern implies the object has a well-known execution interface (some sort of
execute()
method, for instance), encapsulating a callback. In contrast, the BaseCommandController does not call any
methods on its command object once it is created. Of course, you could extend
BaseCommandController
and implement the Command pattern (or simply use ThrowawayController), but know that there is no
such built-in callback work flow in this class.
One important note about BaseCommandController is that it does not, itself, define any
work flow. That is, while it provides functionality such as binding request parameters to beans
and life cycle methods for validation, it does not put them together to create anything mean-
ingful. Its subclasses, such as AbstractFormController and SimpleFormController, will add
the value.
Our interest in this class is to explain how Spring MVC converts, or binds, request param-
eters to JavaBean properties. This feature is not unique, as many web frameworks have been
doing this for years. Spring MVC’s benefit is that it does not force a particular type, or super-
class, for the command class. You are free to use any class that conforms to the JavaBeans
model, and this freedom can lead to significantly fewer classes in your system. This means
that you will be able to populate domain classes directly from requests, removing the need for
otherwise duplicate form classes.
Before we show you how to work with a freshly bound command object, we will first cover
the capabilities and limitations of populating beans from HTML form submits, also known as
data binding. Because the BaseCommandController doesn’t have any work flow, when we talk
about form processing, we will introduce the SimpleFormController. For now, we present data
binding for beans. Note that while Spring MVC takes advantage of data binding, the binding
framework is not web-specific and can be used with ease outside of the web framework.
CHAPTER 6 ■ THE CONTROLLER MENAGERIE 123
584X_Ch06_FINAL 1/30/06 1:40 PM Page 123
Binding a Form to a Bean
Spring MVC encourages the use of command beans with a wide variety of property types.
However, the Servlet API returns form parameters only as Strings. To fully take advantage of
richly typed command beans, Spring provides the ability to convert string form parameters
into nearly any other Java class. This technique, called data binding, is the act of taking a name-
value pair, such as name.firstName=joe, and converting it to getName().setFirstName("joe").
Spring MVC uses data binding to set form bean properties from request parameters. This
technique is similar to what is often called an expression language, such as the JSTL’s Expres-
sion Language (EL) or the Object Graph Navigation Language (OGNL). It is very useful as a
shorthand way to refer to bean properties, even deeply nested properties.
The binding functionality is achieved through the use of Spring’s org.springframework.
validation.DataBinder class and its subclass, org.springframework.web.bind.
ServletRequestDataBinder. As you can see from its package, the DataBinder class is not
specific to the web framework. This means the capabilities and facilities of data binding are
available to any type of application. The ServletRequestDataBinder merely makes it easy to
bind from Servlet request parameters.
The DataBinder will happily bind string values to properties of type String. Given
the previous example, the firstName property is a String, so setting the value joe to a String
is trivial. Of course, not every property on every object is a String, so the DataBinder
supports converting a String to some arbitrary type via PropertyEditors. We will see more of
PropertyEditors soon, but they are a standard JavaBean mechanism to covert Strings to other
types, such as integers, collections, or nearly any other class. Spring uses PropertyEditors
heavily, and we can take advantage of them as we populate command classes from HTTP
requests.
To be exact, the DataBinder merely coordinates these activities, delegating the actual
binding and PropertyEditor support to a BeanWrapper (which we will visit shortly). From
the point of view of a BaseCommandController and its subclasses, you will interact with the
DataBinder instead of BeanWrappers.
It’s best to simply jump in and discover what kind of functionality the DataBinder can
support. To begin with, we will create a simple bean that we will use for the command class.
We will want to take servlet request parameters and bind their values into an instance of a
Name class, shown in Listing 6-5.
Listing 6-5. Example Command Class
package com.apress.expertspringmvc.chap4.binding;
public class Name {
private String firstName;
private String lastName;
public String getFirstName() {
return firstName;
}
public void setFirstName(String firstName) {
this.firstName = firstName;
CHAPTER 6 ■ THE CONTROLLER MENAGERIE124
584X_Ch06_FINAL 1/30/06 1:40 PM Page 124
}
public String getLastName() {
return lastName;
}
public void setLastName(String lastName) {
this.lastName = lastName;
}
}
The Name class comes straight from a domain object model, as it is a simple plain old Java
object (POJO). We wish to create an instance of this class when a form is submitted and popu-
late it from form fields. Listing 6-6 contains the example HTML form with fields that
correspond to our Name POJO.
Listing 6-6. CommandBean HTML Form
<form>
<p>
First Name: <input type="text" name="firstName" />
</p>
<p>
Last Name: <input type="text" name="lastName" />
</p>
<p><input type="submit" /></p>
</form>
We see the first requirement when using the DataBinder framework here in the form.
The form field names match the property names of the Name class. More specifically, the form
field names match the JavaBean translation of the Name getters and setters. For example, the
method setFirstName() is converted via JavaBean semantics to “the setter for the firstName
property.” The DataBinder performs this conversion from getter and setter methods to prop-
erty names so that it can match the form fields from the HTTP request.
■Caution When using the DataBinder, the bean that you are binding to must have a public setter for the
property. If the bean is missing the setter or if it is spelled differently, no error is generated, and the property
will not be set. It is also important to have a public getter for the property, so that the field may be retrieved
by the view. The DataBinder cannot perform direct field access; it must go through setters or getters.
To demonstrate how simple the binding process is, we have created a JUnit TestCase
(contained in Listing 6-7) that binds the parameters of a HttpServletRequest to a JavaBean of
type Name. We are isolating the actual binding here, so that you may get a clear picture of how a
bean’s properties are populated. Know that this is all hidden from you when working with
BaseCommandController and its subclasses.
CHAPTER 6 ■ THE CONTROLLER MENAGERIE 125
584X_Ch06_FINAL 1/30/06 1:40 PM Page 125
We are using an org.springframework.mock.web.MockHttpServletRequest to simulate an
HttpServletRequest object. Spring provides a complete set of mock objects for the servlet
environment, making it easy to write tests for your Spring MVC components that will run out-
side of a container. We will cover testing of Spring MVC applications in a future chapter, but
for now it’s sufficient to know that these mock classes allow us to control and simulate the
external elements of a web request, such as an HttpServletRequest or HttpServletResponse.
Listing 6-7. Simple DataBinder TestCase
public class CommandBeanBindingTest extends TestCase {
private Name name;
private ServletRequestDataBinder binder;
private MockHttpServletRequest request;
public void setUp() throws Exception {
name = new Name();
binder = new ServletRequestDataBinder(name, "nameBean");
request = new MockHttpServletRequest();
}
public void testSimpleBind() {
// just like /servlet?firstName=Anya&lastName=Lala
request.addParameter("firstName", "Anya");
request.addParameter("lastName", "Lala");
binder.bind(request); // performed by BaseCommandController
// on submit so you don’t have to
assertEquals("Anya", name.getFirstName()); // true!
assertEquals("Lala", name.getLastName()); // true!
}
}
Note that when using the BaseCommandController or its subclasses, the actual bind() call
is performed automatically. By the time your code obtains the command bean, it will be cre-
ated and populated by request parameter values. We explicitly show it here so that you may
understand what is going on under the hood.
The ServletRequestDataBinder is initialized with the bean to be populated and the name
nameBean. This name is used when generating an Errors instance and error messages, in the case
of errors during binding. The name can be any String, though it is best to use names that are
easily compatible with properties files (which is where you typically define error messages). If
not provided the name will default to target. However, when this DataBinder is used in the MVC
framework, the default name of the JavaBean is command.
The unit test in Listing 6-7 creates a MockHttpServletRequest so we can illustrate how the
request is actually bound to the bean. We simulate a request submission by adding parame-
ters, being careful to match the parameter name to the name of the property on the bean. The
bind() method then delegates to a BeanWrapperImpl class to translate the string expressions,
CHAPTER 6 ■ THE CONTROLLER MENAGERIE126
584X_Ch06_FINAL 1/30/06 1:40 PM Page 126
such as firstName, into JavaBean setters, such as setFirstName(). After bind returns, the bean
is populated and ready to be used by the Controller.
If all domain object classes simply had strings for properties and never any child objects,
our discussion could be finished! However, Spring MVC supports and encourages a rich domain
model, and this means the DataBinder can support binding to deeply nested classes, primitives,
and even different types of collections and arrays.
Nested Properties
The real power of the DataBinder shows up when binding string values to nested object graphs.
The example in Listing 6-7 used two simple independent properties, a firstName and lastName.
A reasonable refactoring would move the name properties into a new Name class, as shown in
Listing 6-8.
Listing 6-8. NestedCommandBean Class
package com.apress.expertspringmvc.chap4.binding;
public class NestedCommandBean {
private Name name = new Name();
public Name getName() {
return name;
}
public void setName(Name name) {
this.name = name;
}
}
It’s important to see that we initialized the name reference to a non-null object. The
DataBinder is not able to set properties on nested objects that are null. Remember that a
string of name.firstName will convert to getName().setFirstName("value"). If getName()
returns null, we have a nasty NullPointerException on our hands. This is especially tricky
when it comes to collections, as we will see later. You do not need to initialize the nested
object in exactly the way we have shown (i.e., the same place as the declaration), but be
certain that the object is not null before any binding is to take place.
The firstName and lastName properties are now moved to a Name class, shown in Listing 6-9.
Listing 6-9. Name Class
package com.apress.expertspringmvc.chap4.binding;
public class Name {
private String firstName;
private String lastName;
CHAPTER 6 ■ THE CONTROLLER MENAGERIE 127
584X_Ch06_FINAL 1/30/06 1:40 PM Page 127
public String getFirstName() {
return firstName;
}
public void setFirstName(String firstName) {
this.firstName = firstName;
}
public String getLastName() {
return lastName;
}
public void setLastName(String lastName) {
this.lastName = lastName;
}
}
The DataBinder supports nested objects and properties with a simple dot notation, simi-
lar to the JSTL’s EL. An example, contained in Listing 6-10, best illustrates this nesting.
Listing 6-10. NestedCommandBeanTest
public void setUp() throws Exception {
bean = new NestedCommandBean();
binder = new ServletRequestDataBinder(bean, "beanName");
request = new MockHttpServletRequest();
}
public void testSimpleBind() {
// just like /servlet?name.firstName=Anya&name.lastName=Lala
// or name.firstName=Anya&name.lastName=Lala as the payload
// of a POST request
request.addParameter("name.firstName", "Anya");
request.addParameter("name.lastName", "Lala");
binder.bind(request);
assertEquals("Anya", bean.getName().getFirstName()); // true!
assertEquals("Lala", bean.getName().getLastName()); // true!
}
The property name name.firstName is converted to getName().setFirstName(). The root
bean, in this case a NestedCommandBean, is implicit, and thus it is not mentioned in the binding
string name.
There is no limit to the nesting of objects and properties. Just remember that any object
whose property you are trying to set cannot be null (including collections and objects inside
of collections). The property itself (in this case, firstName) can be null, however.
CHAPTER 6 ■ THE CONTROLLER MENAGERIE128
584X_Ch06_FINAL 1/30/06 1:40 PM Page 128
Binding to Collections
Along with nested classes, the DataBinder supports binding properties of objects inside collec-
tions. Your command bean class and its nested classes can contain Lists, Maps, and arrays.
Just like nested classes, the object in the collection that you are attempting to set a prop-
erty value on must not be null. This means that, before binding, you must not only initialize
the collection, but populate it with objects.
Binding to Lists
To begin, we will create a new command bean that contains a List of Name objects, as shown in
Listing 6-11.
Listing 6-11. NestedCollectionsCommandBean Class
public class NestedCollectionsCommandBean {
private List<Name> names = new ArrayList<Name>();
public NestedCollectionsCommandBean() {
names.add(new Name());
names.add(new Name());
}
public List<Name> getNames() {
return names;
}
public void setNames(List<Name> names) {
this.names = names;
}
}
Notice how we not only had to initialize the List, but also populate it. We added two Name
objects into the list in the constructor for convenience, but normally the objects will be added
as the result of some web request or business logic.
The DataBinder uses a familiar [index] notation to reference items in a List or array. For
instance, the string names[0].firstName is the same as getNames().get(0).setFirstName("value").
Listing 6-12 shows an example of binding to object properties inside collections.
Listing 6-12. NestedCollectionsCommandBeanTest
public void setUp() throws Exception {
bean = new NestedCollectionsCommandBean();
binder = new ServletRequestDataBinder(bean, "beanName");
request = new MockHttpServletRequest();
}
CHAPTER 6 ■ THE CONTROLLER MENAGERIE 129
584X_Ch06_FINAL 1/30/06 1:40 PM Page 129
public void testSimpleBind() {
// just like /servlet?names[0].firstName=Anya&names[0].lastName=Lala
request.addParameter("names[0].firstName", "Anya");
request.addParameter("names[0].lastName", "Lala");
binder.bind(request);
assertEquals("Anya", bean.getNames().get(0).getFirstName()); // true!
assertEquals("Lala", bean.getNames().get(0).getLastName()); // true!
}
Of course, you aren’t limited to binding to properties of objects inside Lists. You may also
reference a particular String inside a List just as easily as a String property of an object in the
List. To illustrate this, take the example command bean shown in Listing 6-13.
Listing 6-13. StringListCommandBean Class
public class StringListCommandBean {
private List<String> strings = new ArrayList<String>();
public List<String> getStrings() {
return strings;
}
public void setStrings(List<String> strings) {
this.strings = strings;
}
}
In this case, to reference the first String in the List, the property name would be strings[0].
When you are setting the values, it’s perfectly legal to refer to Strings in the List in random order,
such as strings[4] and then strings[2]. Of course, if you are trying to read the value of
strings[0] before setting it, you will receive a null value.
Listing 6-14 illustrates how binding directly to Strings inside a List is performed.
Listing 6-14. StringListCommandBean Unit Test
public void setUp() throws Exception {
bean = new StringListCommandBean();
binder = new ServletRequestDataBinder(bean, "beanName");
request = new MockHttpServletRequest();
}
public void testSimpleBind() {
// just like /servlet?strings[0]=Anya&strings[1]=Lala
request.addParameter("strings[0]", "Anya");
request.addParameter("strings[1]", "Lala");
CHAPTER 6 ■ THE CONTROLLER MENAGERIE130
584X_Ch06_FINAL 1/30/06 1:40 PM Page 130
binder.bind(request);
assertEquals("Anya", bean.getStrings().get(0)); // true!
assertEquals("Lala", bean.getStrings().get(1)); // true!
}
Binding to Arrays
Arrays work in an identical manner to Lists. The DataBinder expression for an array is the
same as for the List. Listing 6-15 changes a List of Name objects into an array.
Listing 6-15. NestedArrayCommandBean Class
public class NestedArrayCommandBean {
private Name[] names = new Name[]{new Name(), new Name()};
public Name[] getNames() {
return names;
}
public void setNames(Name[] names) {
this.names = names;
}
}
The unit test, contained in Listing 6-16, looks nearly identical, and the binding expres-
sions remain the same. As with Lists, when binding properties to objects in arrays, make sure
the object exists in the array first. The DataBinder won’t create a new instance of the object if it
is null; instead it will generate a NullPointerException.
Listing 6-16. NestedArrayCommandBeanTest
public void setUp() throws Exception {
bean = new NestedArrayCommandBean();
binder = new ServletRequestDataBinder(bean, "beanName");
request = new MockHttpServletRequest();
}
public void testSimpleBind() {
// just like /servlet?names[0].firstName=Anya&names[0].lastName=Lala
request.addParameter("names[0].firstName", "Anya");
request.addParameter("names[0].lastName", "Lala");
binder.bind(request);
assertEquals("Anya", bean.getNames()[0].getFirstName()); // true!
assertEquals("Lala", bean.getNames()[0].getLastName()); // true!
}
CHAPTER 6 ■ THE CONTROLLER MENAGERIE 131
584X_Ch06_FINAL 1/30/06 1:40 PM Page 131
Binding to Maps
Binding to properties inside objects inside Maps is similar to Lists. The brackets remain, but
instead of a numerical index, you will use the string value of the key inside the map. For
instance, we will modify the command bean to support a Map of Name objects, one for a nick-
name and one for a formal name. Thus, the string expression names['nickname'].firstName
translates to getNames().get("nickname").setFirstName("value") in Java code.
Just like Lists and arrays, you can also bind request parameters directly to objects inside
the Map, instead of properties of objects inside the Map. For instance, if you have a Map<String,
String> stringMap, then you can refer to elements inside the Map using the expression
stringMap['key'].
Listing 6-17 is an example of a Map and nested objects.
Listing 6-17. NestedMapCommandBean Class
public class NestedMapCommandBean {
private Map<String,Name> names = new HashMap<String,Name>();
public NestedMapCommandBean() {
names.put("nickname", new Name());
names.put("formal", new Name());
}
public Map<String, Name> getNames() {
return names;
}
public void setNames(Map<String, Name> names) {
this.names = names;
}
}
Listing 6-18 contains a unit test that illustrates how to use the expression language to refer
to elements in the Map.
Listing 6-18. NestedMapCommandBean Unit Test
public void setUp() throws Exception {
bean = new NestedMapCommandBean();
binder = new ServletRequestDataBinder(bean, "beanName");
request = new MockHttpServletRequest();
}
CHAPTER 6 ■ THE CONTROLLER MENAGERIE132
584X_Ch06_FINAL 1/30/06 1:40 PM Page 132
public void testSimpleBind() {
// just like /servlet?names['nickname'].firstName=Anya \
// &names['nickname'].lastName=Lala
request.addParameter("names['nickname'].firstName", "Anya");
request.addParameter("names['nickname'].lastName", "Lala");
binder.bind(request);
// true!
assertEquals("Anya", bean.getNames().get("nickname").getFirstName());
// true!
assertEquals("Lala", bean.getNames().get("nickname").getLastName());
}
The DataBinder can only refer to objects in a Map with keys of type String. This shouldn’t
be a concern, as the keys are HTTP request properties, which themselves are Strings.
Binding to Sets
Binding to properties of objects in Sets is possible, but is not as exact as working with Lists or
arrays. Sets in Java are unordered collections of unique objects, so referring to a single object
within the Set is not possible directly through the Set interface. Spring’s DataBinder works
around this limitation by iterating through the Set to find the object indicated by the index
specified. Obviously, which object resolves to the index is dependent on the Set implementa-
tion. If you will be using Sets with the DataBinder, you should use a LinkedHashSet or some
other implementation that has a predictable iteration order.
■Caution We strongly recommend against using Sets inside JavaBeans that will be used as command
objects. There is simply no way to replace or set a value into a
Set, which severely limits its usefulness in
this context.
In contrast, the DataBinder is not able to set the value of objects in a Set. While the
DataBinder is able to iterate through the Set to locate an object whose properties need to be
set, there is no way to set a particular object directly into a Set at some location. The following
two examples, illustrated in Listings 6-20 and 6-21, shows what is and isn’t possible when
working with Sets and the DataBinder. Listing 6-19 first sets
3
up a command bean with Sets as
properties.
CHAPTER 6 ■ THE CONTROLLER MENAGERIE 133
3. No pun intended.
584X_Ch06_FINAL 1/30/06 1:40 PM Page 133