Expert Spring MVC and Web Flow phần 10 potx
Bạn đang xem bản rút gọn của tài liệu. Xem và tải ngay bản đầy đủ của tài liệu tại đây (703.51 KB, 44 trang )
Table 12-9. FormAction Coarse-Grained Methods
Method Purpose Life Cycle
setupForm() Calls exposeFormObject, but Before the form is displayed.
also performs data binding
(if
bindOnSetupForm is true).
bindAndValidate() Performs binding and validation After the form has been submitted.
of the form object.
As mentioned in Chapter 11, you would typically require these methods to be executed
before and after a form view is displayed. Listing 12-21 shows how to do this.
Listing 12-21. Spring Web Flow Fragment Showing Entry and Exit Actions on a View
<view-state id="enterPurchaseInformation" view="purchaseForm">
<entry-actions>
<action bean="formAction" method="setupForm"/>
</entry-actions>
<transition on="submit" to="enterShippingInformation">
<action bean="formAction" method="bindAndValidate"/>
</transition>
<transition on="cancel" to="cancel"/>
</view-state>
As in Listing 12-19, you could break up each of the steps into distinct states. This is a little
more verbose, but more clearly demarcates the different steps. It also provides greater flexibil-
ity, allowing you to reenter a state definition from a different point within the flow. Listing 12-22
shows this approach.
Listing 12-22. Spring Web Flow Fragment Showing Form Management in Explicit States
<action-state id="setupForm">
<action bean="formAction" method="setupForm"/>
<transition on="success" to="enterPurchaseInformation"/>
</action-state>
<view-state id="enterPurchaseInformation" view="purchaseForm">
<transition on="submit" to="processPurchasePostback">
<transition on="cancel" to="cancel"/>
</view-state>
<action-state id="processPurchasePostback">
<action bean="formAction" method="bindAndValidate"/>
<transition on="success" to="enterShippingInformation"/>
</action-state>
CHAPTER 12 ■ ADVANCED SPRING WEB FLOW 361
584X_Ch12_FINAL 1/30/06 1:02 PM Page 361
POJO Actions
Chapter 11 defined the Action as the central construct for executing your application code
from within a flow definition. It also stated that every action bean had to implement the
org.springframework.webflow.Action interface. And this is true. Every Spring Web Flow
action bean does need to implement the Action interface, but Spring Web Flow will do a
bit of magic for you so you aren’t forced into writing custom action glue code just to invoke
methods on your business services.
When you reference a bean that doesn’t implement the Action interface (a plain old Java
object (POJO), Spring Web Flow
will create a new instance of org.springframework.webflow.action.LocalBeanInvokingAction
to automatically adapt a method on your class to the Action interface. The purpose of
LocalBeanInvokingAction is to be an adapter ( />pattern) between the Spring Web Flow Action interface and a method on your class. Let’s
look again at the XML fragment that declares the POJO bean that will be used as an action:
Listing 12-23. The placeOrder Action
<action-state id="placeOrder">
<action bean="orderClerk" method="placeOrder(${flowScope.purchase})"/>
<transition on="success" to="showCostConfirmation"/>
</action-state>
When Spring Web Flow encounters this fragment, it will construct an instance of
LocalBeanInvokingAction and pass it a reference to your bean (orderClerk), and the signature
of the method you want invoked (placeOrder(${flowScope.purchase}). When Spring Web
Flow executes the action bean (by calling LocalBeanInvokingAction.doExecute()), the method
you specified will be invoked on the bean you provided.
■Note Spring Web Flow delegates the actual execution of your method to an instance of org.spring
framework.binding.method.MethodInvoker
, part of the Spring Framework method binding
infrastructure.
In the XML fragment Spring Web Flow was instructed to pass in the value of the expres-
sion ${flowScope.purchase} (i.e., the object stored under the name purchase in flow scope) to
the placeOrder method.
The result of MethodInvoker.invoke() is a java.lang.Object. If your method signature was
void, this will be null; if your method returned a primitive it will be automatically converted to
the java.lang.Object equivalent (boolean to java.lang.Boolean and the like).
CHAPTER 12 ■ ADVANCED SPRING WEB FLOW362
584X_Ch12_FINAL 1/30/06 1:02 PM Page 362
Exposing POJO Method Return Values
If you wish to have the return value of an invoked method exposed in either flow scope or
request scope, you must set the property resultName to the name under which you want it
stored and the resultScope property to either flow or request (the default is request). If you
do not explicitly set the resultName property, the return value will not be stored in any scope.
Refer to Listing 12-24.
Listing 12-24. placeOrder Definition Exposing an orderConfirmation Return Value in Request Scope
<action-state id="placeOrder">
<action bean="orderClerk" method="placeOrder(${flowScope.purchase})"
➥
resultName="orderConfirmation"/>
<transition on="success" to="showCostConfirmation"/>
</action-state>
The preceding action-state definition reads: “When the placeOrder state is entered, invoke
the placeOrder method on the orderClerk bean, passing in the purchase object from flow
scope as input. Expose the method return value in request scope under the name
orderConfirmation. On success, transition to the showCostConfirmation state.”
Customizing View Selection with View States and End States
Recall from Chapter 11 that view states instruct Spring Web Flow to pause the execution of a
flow and render a view allowing the user to participate in the flow.
Spring Web Flow creates logical view selections (consisting of a view name and a set of
model data), but the resolution of those view selections to a renderable View is the responsibil-
ity of the calling web framework. That said, Spring Web Flow allows you full control over view
selection logic via the org.springframework.webflow.ViewSelector interface.
Listing 12-25. org.springframework.webflow.ViewSelector
public interface ViewSelector {
ViewSelection makeSelection(RequestContext context);
}
This interface allows you to customize how the view name is calculated and/or what
model data is available to the view.
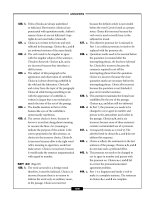
The ViewSelection returned by the ViewSelector is then converted into a renderable arti-
fact by the calling web framework (e.g., a Struts ActionForward or a Spring MVC ModelAndView).
This conversion is performed by the appropriate Front Controller (FlowAction for Struts or
FlowController for Spring MVC). Figure 12-3 illustrates this conversion.
CHAPTER 12 ■ ADVANCED SPRING WEB FLOW 363
584X_Ch12_FINAL 1/30/06 1:02 PM Page 363
Figure 12-3. Conversion of a ViewSelection to a View
There are two implementations of ViewSelector provided out of the box, shown in
Table 12-10.
Table 12-10. ViewSelector Implementations
Name Behavior Model Exposed
org.springframework.webflow. Represents a redirect view. Only exposes parameters
support.RedirectViewSelector explicitly specified in the
redirect Expression (e.g.,
redirect:/url.htm?param0=$
{flowScope.foo}¶m1=value1).
org.springframework. Refers to a static view name. Exposes all data in both
webflow.support. flow and request scope
SimpleViewSelector data in the model.
The FlowBuilder decides which ViewSelector to use based upon the value of the view
property. Table 12-11 describes the criteria Spring Web Flow uses to choose a ViewSelector.
Table 12-11.ViewSelector Selection
ViewSelector Criteria
RedirectViewSelector If the viewName contains a redirect: prefix.
YourViewSelector If the viewName is bean:YourViewSelector.
SimpleViewSelector If none of the other two conditions are met.
Indicating Transitions
When Spring Web Flow encounters a view state it will
1. render the view;
2. pause the flowExecution;
3. wait for a user-supplied eventId to resume.
Web Framework
(Servlet, JSF,
Portlet)
ViewSelection
Spring Web Flow Engine
FlowExecutionManager
CHAPTER 12 ■ ADVANCED SPRING WEB FLOW364
584X_Ch12_FINAL 1/30/06 1:02 PM Page 364
The view can submit the eventId in one of two ways. The first way is to submit a request para-
meter whose name is FlowExecutionManagerParameterExtractor.getEventIdParameterName()
(the default is _eventId) and whose value will be the actual user eventId (like submit).
■Note For the sake of brevity and readability, FlowExecutionManagerParameterExtractor may be
referred to as FEMPE.
Alternatively, the second way is to have the view submit a parameter whose name has the
format FEMPE.getEventIdParameterName()FEMPE.getParameterDelimiter()value (the default
value for FEMPE.getParameterDelimiter() is “_”). This form is primarily used with the name of
an HTML input button to support multiple buttons per form without JavaScript. In this case,
the eventId is derived fully from the parameter name, and the value of this parameter is
ignored.
To illustrate these two approaches, to signal the submit event you may provide either of
the following request parameters: _eventId=submit or _eventId_submit=ignored.
■Note FlowExecutionManagerParameterExtractor will also support image buttons that submit
parameters of type eventId.x or eventId.y.
Decision States
Although the example decision state in Chapter 11 defined a simple, single if/else expression,
decision states can do more. As well as supporting multiple if conditions, the decision state
can also delegate the criteria for the decision to Java application code.
If multiple if conditions are supplied, they are evaluated one by one. If none of the condi-
tions evaluates to true, then a NoMatchingTransitionException is thrown. You can implement
a chain of if conditions, but realize that any if condition that defines an else clause will by
definition evaluate to true, and none of the remaining if conditions will be evaluated. For
example, the fragment in Listing 12-26 will never evaluate the second condition.
Listing 12-26. Badly Defined Decision State
<decision-state>
<if test="${flowScope.object.booleanProperty}" then="stateA" else="stateB"/>
<if test="${this.will.never.be.called}" then="neverGetCalled"/>
</decision-state>
Listing 12-27 shows a chain of conditions that behaves as you would expect.
CHAPTER 12 ■ ADVANCED SPRING WEB FLOW 365
584X_Ch12_FINAL 1/30/06 1:02 PM Page 365
Listing 12-27. Correctly Defined Decision State
<decision-state>
<if test="${flowScope.object.booleanProperty}" then="stateA" />
<if test="${this is called if the above test evaluates to false}" then="stateB"/>
<if test="${this is called if the above test evaluates to false}" then="stateC"
➥
else ="stateD"/>
</decision-state>
■Caution It is generally wise to put an else branch on the last if; otherwise, you run the risk of Spring
Web Flow not being able to find a matching transition.
Finally, a decision state can be used to invoke a single action that is used as the basis for
the decision. In this case, the action’s result event becomes the primary basis for the transition
decision.
When combined with a POJO action, this allows you to call a method in application code
that returns a single value that can be used as the basis for a routing decision. The decision
state will automatically adapt the method return value to an appropriate action result event
identifier according to a set of rules.
The rules are simple: for example, one rule is if a method return value is a java.lang.Boolean
a yes or no result event will be returned. Table 12-12 details the exact behavior for adapting
method return values of different types.
Table 12-12. Behavior of POJO Return Values
Return Value Event Identifier
null null
true yes
false no
Enum The String representation of the Enum
This allows you to implement branching logic very conveniently. Assuming our backing
object (purchase) has a method boolean isTaxable(TaxationRule rule), in our web flow defi-
nition we can write the code shown in Listing 12-28.
Listing 12-28. Listing of a POJO to Be Used As an Action
<decision-state id="determineTaxable">
<action bean="orderClerk" method="isTaxable(${flowScope.taxationRule})"/>
<transition on="yes" to="enterTaxDetails"/>
<transition on="no" to="lucky"/>
</action-state>
CHAPTER 12 ■ ADVANCED SPRING WEB FLOW366
584X_Ch12_FINAL 1/30/06 1:02 PM Page 366
Exception Handling
Exceptions within Spring Web Flow are managed the same way that exceptions are handled
within the rest of the Spring Framework. Exceptions from which you cannot recover are
treated as unchecked exceptions.
Spring MVC provides org.springframework.web.servlet.HandlerExceptionResolver to
handle exceptions, but they are common for the entire web application. Given that web flows
are self-contained units of work, it would be inappropriate to allow web flow-specific excep-
tions to leak out of the web flow if the flow knows how to handle them.
Spring Web Flow defines a single interface, org.springframework.webflow.
StateExceptionHandler (Listing 12-29) for handling exceptions thrown by the execution
of a state.
Listing 12-29. org.springframework.webflow.StateExceptionHandler
public interface StateExceptionHandler {
boolean handles(StateException exception);
ViewSelection handle(
StateException exception,
FlowExecutionControlContext context);
}
■Note The exception handling within Spring Web Flow is for exceptions thrown by states within flows.
To register your own ExceptionHandler, simply define it within your web flow definition
<exception-handler bean="myCustomHandler"/>.
Upon encountering an exception thrown by a state, Spring Web Flow will traverse all reg-
istered implementations of org.springframework.webflow.StateExceptionHandler, and if one
can handle the exception, it will hand it off for processing.
■Caution This means that the order in which ExceptionHandlers are defined is important, Spring Web
Flow will stop as soon as it finds a StateExceptionHandler that can handle the specified exception.
Table 12-13 lists the common exceptions that might be thrown by Spring Web Flow during
normal runtime execution.
CHAPTER 12 ■ ADVANCED SPRING WEB FLOW 367
584X_Ch12_FINAL 1/30/06 1:02 PM Page 367
Table 12-13. Spring Web Flow State Exceptions
Class Description Thrown By
org.springframework. Common base class for This is a convenience
webflow.StateException all state exceptions. class and is not thrown.
org.springframework.webflow. Indicates an exception ActionExecutor.execute
ActionExecutionException (checked or runtime) was
thrown by an action. The
exception may be from
the action itself, or it may
be an exception thrown by
the target of the action (e.g.,
your business method).
org.springframework.webflow. Indicates that the requested FlowExecutionListener.
execution.EnterStateVetoException state cannot be entered sessionStarting and
because of a constraint FlowExecutionListener.
violation. stateEntering.
org.springframework.webflow. Thrown if there are no TransitionableState.
NoMatchingTransitionException matching transitions that getRequiredTransition.
match the signaled event
in the current state.
org.springframework.webflow. Thrown if a request to FlowExecutionRepository
execution.repository. resume an execution implementations when
NoSuchConversationException of a flow references a loading a conversation.
conversation that is
invalid (i.e., a nonexistent
conversation or an expired
conversation).
org.springframework.webflow. Thrown if a request to FlowExecutionRepository
execution.repository. resume an execution of a implementations when
InvalidConversationContinuationException flow references an invalid loading a continuation.
continuation (e.g., a
nonexistent continuation
or a continuation that
has expired).
The default behavior is for Spring Web Flow to allow unhandled exceptions to trickle out
of the flow and up the call stack, eventually to be handled by the calling web framework or
ultimately the application container.
Spring Web Flow provides a default implementation of StateExceptionHandler: org.
springframework.webflow.support.TransitionExecutingStateExceptionHandler, which
allows you to catch an occurrence of a type of Exception and execute a transition to a error
state. So for example, if you decided that you wanted to display a specific error page for
DuplicatePurchaseException exceptions, you would modify your web flow definition to
include <exception-handler class="purchase.domain.DuplicatePurchaseException"
state="error"/>.
Whenever purchase.domain.DuplicatePurchaseException is thrown, this definition
fragment instructs the flow to transition to the specified target state (error), which in this
case would result in an error view being displayed.
CHAPTER 12 ■ ADVANCED SPRING WEB FLOW368
584X_Ch12_FINAL 1/30/06 1:02 PM Page 368
State Scoped ExceptionHandlers
You may decide that you want exception handling to be implemented at a finer-grained level
than that of a flow. You can also define ExceptionHandlers at the state level against any state
type (action, decision, and so on). To achieve this, simply move the exception-handler decla-
ration to within the definition of the state. Listing 12-30 demonstrates how to scope the
ExceptionHandler.
Listing 12-30. Spring Web Flow Fragment Registering a State-Level ExceptionHandler
<action-state id="placeOrder">
<action bean="orderClerk" method="placeOrder(${flowScope.purchase})"/>
<transition on="success" to="showCostConfirmation"/>
<exception-handler bean="myCustomHandler"/>
</action-state>
Exception Handling Summary
Exception handling within Spring Web Flow is simple yet powerful. Any number of
state ExceptionHandlers can be registered at both the flow and state level. The default
ExceptionHandler implementation is sufficient for most scenarios, allowing you to catch
an exception and execute a recovery transition as part of the flow definition. Providing your
own implementation is also possible by implementing a custom state ExceptionHandler.
Summary
Spring Web Flow is a powerful framework for defining and executing reusable, self-contained
controller modules within a web application. However, no tool can cater for every possible
use case. We’ve shown you that Spring Web Flow provides a number of extension points and
implementations of key strategies that allow for customization. We’ve also shown how Spring
Web Flow drives the execution of your business logic without tying you to Web Flow APIs.
Finally, we’ve demonstrated how Spring Web Flow employs the concept of a continuation to
solve many issues facing web application developers.
CHAPTER 12 ■ ADVANCED SPRING WEB FLOW 369
584X_Ch12_FINAL 1/30/06 1:02 PM Page 369
584X_Ch12_FINAL 1/30/06 1:02 PM Page 370
Documenting Your
MVC Application
As your applications grow larger and more complex, the XML files used to define your beans
can become more difficult to maintain, especially in multidiscipline teams where different
people maintain the context files for different parts of the application. Documenting your
application is as important as documenting your source code, and with Spring applications,
that means documenting your context files.
BeanDoc
BeanDoc ( is an
official Spring subproject, and it can help by producing a similar kind of documentation for
your Spring beans that Javadoc produces for your Java classes. Beans that are wired together
are cross-linked, their class names can be linked to the relevant Javadoc pages, and many
disparate XML files can be managed and viewed as a logical application context. Beans are
documented with their descriptions and class names (linked to Javadoc locations) and linked
to their dependencies (references, parent-beans, lookup-methods). Best of all, in association
with the open-source tool Graphviz () you can visualize your appli-
cation contexts as graphs.
Although BeanDoc is still early release software (version 0.7.0 was current at the time of
writing) it should be stable enough for everyday use. It is highly configurable and skinnable in
terms of its output and designed for extensibility if the basic functionality doesn’t meet your
needs. BeanDoc can be operated from the command line, programmatically, or via its own
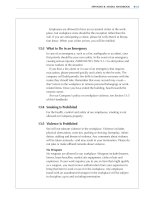
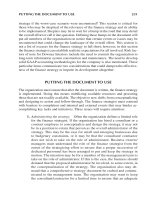
Ant task. Figure A-1 shows a sample of BeanDoc’s output (based on the Spring JPetStore sam-
ple application).
371
APPENDIX A
■ ■ ■
584X_Ch13_AppA_FINAL 1/30/06 1:13 PM Page 371
Figure A-1. BeanDoc output of the JPetStore sample
If your context consists of multiple XML files, as it usually will, BeanDoc will aggregate
them into a consolidated graph (as shown in Figure A-1) and provide links to the documenta-
tion for each individual context file. The individual documentation pages have graphs of just
the beans in that file. Clicking a graph will reveal it at full size, and each bean on the graph can
be clicked to link to the documentation fragment for that bean.
Installing and Building BeanDoc
BeanDoc is a source-only download, so you’ll have to compile and build it. For this, you will
need Ant (which you will doubtless already have if you are a Java developer who has not been
living on the moon for the last ten years) or Maven. From the main site for BeanDoc you can
download the latest version and extract it to your hard drive. Alternatively, if you’re comfort-
able with CVS, you can check out the sources from the main Spring repository at SourceForge
under the module name spring-beandoc.
Having acquired a release version or CVS snapshot, the next task is to build the JAR file.
BeanDoc is a small utility, so this doesn’t take long. Using Ant, simply run the dist target from
the root of the main spring-beandoc directory that you extracted the file to. If Maven is your
thing, run maven install:jar from the project root instead.
If you want to enable the graphs you will additionally need to download and install a
version of Graphviz suitable for your platform. Its website offers details, but this is a very
straightforward procedure.
APPENDIX A ■ DOCUMENTING YOUR MVC APPLICATION372
584X_Ch13_AppA_FINAL 1/30/06 1:13 PM Page 372
Running BeanDoc on Your Configuration Files
When you build BeanDoc, it places the spring-beandoc.jar file and all of its runtime depend-
encies in the target/dist directory under the project root. Whenever you use the tool, you
must ensure that all of the runtime dependencies are available. Two of those are Spring JAR
files, so if you already have a recent spring.jar file in your project, you probably don’t need to
duplicate them.
BeanDoc can be invoked from the command line, through Java code, or as an Ant task—
which is supplied with BeanDoc and is in the spring-beandoc.jar file. Since using Ant is the
most common way to interact with it, that’s what we’ll describe here. The Ant option is perfect
for this type of task, since you need to set it up only once and can make the beandoc target a
dependency of your main build target. That way, every time you build your code, the docu-
mentation and object graphs are up to date.
Listing A-1 shows a simple build.xml file defining the task and a target to run BeanDoc on
your application.
Listing A-1. build.xml File for BeanDoc
<project name="spring-beandoc-sample" basedir="." default="beandoc">
<! sets up BeanDoc classpath >
<path id="main-classpath">
<fileset dir="${lib.dir}">
<include name="**/*.jar"/>
</fileset>
</path>
<target name="init">
<taskdef name="beandoc"
classname="org.springframework.beandoc.client.AntTask">
<classpath refid="main-classpath"/>
</taskdef>
<mkdir dir="${output.dir}" />
</target>
<target name="beandoc" depends="init">
<beandoc outputDir="${output.dir}">
<fileset dir="${conf.dir}">
<include name="*Context.xml"/>
<include name="*-servlet.xml"/>
</fileset>
</beandoc>
</target>
</project>
APPENDIX A ■ DOCUMENTING YOUR MVC APPLICATION 373
584X_Ch13_AppA_FINAL 1/30/06 1:13 PM Page 373
The Ant syntax should be familiar enough, so we’ll concentrate on the key points. The
classpath that is set up initially is there to ensure that BeanDoc has access to those JAR files
we mentioned earlier. In this example, the runtime dependencies would all be located in
${lib.dir}. The BeanDoc task itself is declared in the init target (which the beandoc target
depends on, so it’s guaranteed to be ready for use). In the last section, we actually call the
BeanDoc task.
To run successfully, BeanDoc only needs to know which files make up your application
context and where you want to place the output. You can use one or more nested filesets to
choose the input resources.
Other Options
With the setup described, BeanDoc will happily function and maintain a nicely formatted set
of HTML documentation for your Spring project. But there are many ways in which you can
customize the output should you so wish. Following is a brief overview of some of the more
widely useful options. (For details of more advanced options, see the BeanDoc reference doc-
umentation linked from the main website.)
Most of BeanDoc’s customizable attributes are managed through a properties file that you
can locate anywhere. To tell the Ant task where to load them from, specify the beandocProps
attribute on the task itself, as shown in Listing A-2.
Listing A-2. Specifying beandoc Properties
<beandoc outputDir="${output.dir}"
beandocProps="/path/to/beandoc.properties">
<fileset dir="${conf.dir}">
<include name="*Context.xml"/>
<include name="*-servlet.xml"/>
</fileset>
</beandoc>
■Tip The samples directory of the BeanDoc distribution contains a well-commented beandoc.properties
file that will give you examples of most of the other properties you might be interested in.
Controlling the Output
Let’s briefly look at the two most common options you want to set in the properties file
to affect the documentation produced. First, if you’ve downloaded and installed Graphviz
(and we highly recommend that you do), then you need to specify where the executable file is.
Listing A-3 shows the relevant options. Modify your paths depending on where you chose to
install to, of course.
APPENDIX A ■ DOCUMENTING YOUR MVC APPLICATION374
584X_Ch13_AppA_FINAL 1/30/06 1:13 PM Page 374
Listing A-3. Graphviz Executable Location
# for Unix/Linux i.e.
compiler.dotExe=/usr/bin/dot
# OR for Windows
compiler.dotExe=C:/Program Files/ATT/GraphViz/bin/dot.exe
The next important option is choosing JavaDoc locations. BeanDoc will by default link
any classname attributes of your beans to their JavaDoc page for several well-known libraries.
These include the standard Java API for your platform, Spring classes, and many others. You
can override the locations for these (for example, if you have them installed locally) and add
your own by setting one or more properties similar to those shown in Listing A-4.
Listing A-4. Specifying JavaDoc Locations
javadoc.locations[com.mycompany]=ver/apidoc/
javadoc.locations[com.vendor]= />The format of each line is the same: In brackets after the javadoc.locations part you
place the prefix of the classnames that should link to the URL used as the property value.
In the listing above, a classname of com.mycompany.foo.Bar will be linked to
/>Summary
We’ve taken a brief look at BeanDoc and some of the basic options that you can take to cus-
tomize the way it works. In fact, the tool has many more options for controlling graph layouts
and colors that can be selected in beandoc.properties. It is quite extensible too, and you can
switch out the XSLT stylesheets or add new components to it if you require something a bit
out of the ordinary. BeanDoc’s reference documentation contains all the information you
need to delve beyond the basics.
APPENDIX A ■ DOCUMENTING YOUR MVC APPLICATION 375
584X_Ch13_AppA_FINAL 1/30/06 1:13 PM Page 375
584X_Ch13_AppA_FINAL 1/30/06 1:13 PM Page 376
Ajax and DWR
For a while, web application development has been a little stagnant. Developing for the
browser has offered the option of creating simple HTML interfaces that work on any browser or
operating system, or taking advantage of specific browser functionality to add more dynamic
behavior at the cost of vendor lock-in or non-portability. The former type of application was
more suited to an Internet audience and the latter more common in the intranet where organi-
zations typically control the desktop software.
But things are changing for a variety of reasons. For one, browsers of all types now have
more commonality in the standards that they implement than at any time in the past. Secondly,
XMLHttpRequest was adopted as standard. Combined, they make cross-platform dynamic
browser solutions a real possibility in the shape of Ajax: Asynchronous JavaScript and XML.
With Ajax, you retrieve from the server only the data that you actually need, and you don’t
have to load a whole page, much of which might be the same as was fetched before. That
means we can post and retrieve data to and from the server after the page has loaded.
In the last 6 to 12 months, loads of toolkits, frameworks, utilities, and applications have
sprung up, all based on Ajax. DWR ( which stands for Direct
Web Remoting, is one such toolkit. It provides a bunch of commonly used functions that your
web application will inevitably need anyway to be able to make use of Ajax, and therefore it
saves you from a lot of typing. For all self-respecting coders, this is never a bad thing, of
course.
Spring and DWR
What does this all have to do with Spring MVC, you might be wondering. Well, not a great deal
directly, but this is such a popular technology right now that we thought it would be interesting
to include a few pages on how you might enhance your Spring web applications through the use
of DWR. It would even be possible, if you really wanted to try, to replace the majority of MVC
functionality with Ajax/DWR, but we feel that a blend of the two offers the most promise.
DWR works, as the name suggests, by making server-side objects available to your client-
side JavaScript functions. That means you have the ability to call methods on those objects
from within your JavaScript functions and work with the results. DWR handles the conversion
of the server-side objects by dynamically creating JavaScript objects that implement the same
interface. When you call the methods on the JavaScript object, DWR proxies the call to the
server and converts the returned object (if any).
377
APPENDIX B
■ ■ ■
584X_Ch14_AppB_FINAL 1/30/06 12:55 PM Page 377
Hopefully you’re starting to see where this is leading now, and you’ve probably guessed
correctly that DWR can expose the objects from your Spring ApplicationContext directly to
the JavaScript functions in your web pages. In fact, DWR even has support for Spring built in—
making this task even easier and one of the reasons we choose to highlight it.
A Practical Example
Enough of the history and theory; let’s see some code! In order to demonstrate the concepts
and a couple of the gotchas, we’ve taken one of the Spring sample applications (PetClinic,
shipped with the Spring distribution) and enhanced it. We’ll step through those changes that
Ajax-enabled our application.
■Tip If you’d like to hack along or prefer to just dive in, you can download a WAR file of the modified
PetClinic application from the Spring wiki at
/>spring/x/Yws.
Configuration and Code Changes
First, we added dwr,jar from the DWR download to the WEB-INF/lib directory. We also
created a new file called WEB-INF/dwr.xml. Listing B-1 shows the complete dwr.xml file.
Listing B-1. WEB-INF/dwr.xml
<?xml version="1.0" encoding="UTF-8"?>
<!DOCTYPE dwr PUBLIC
"-//GetAhead Limited//DTD Direct Web Remoting 1.0//EN"
" /><dwr>
<allow>
<create creator="spring" javascript="Clinic" scope="session">
<param name="beanName" value="clinic"/>
</create>
<convert
converter="bean"
match="org.springframework.samples.petclinic.*"/>
<convert
converter="bean"
match="org.springframework.samples.petclinic.jdbc.*"/>
</allow>
</dwr>
APPENDIX B ■ AJAX AND DWR378
584X_Ch14_AppB_FINAL 1/30/06 12:55 PM Page 378
The dwr.xml file is where we configure which objects are going to be exposed to the
client-side scripts. In our example, we’re exposing the main business object from PetClinic’s
service layer. DWR has several different types of creators. As you can see in the preceding list-
ing, we’re using a Spring creator. This type of creator knows how to obtain a bean by name
from a BeanFactory or an ApplicationContext. Other types of creator that you might use are
scripted—as with a Bean Scripting Framework–supported script language—and new, where
the object is simply instantiated via reflection.
In the other half of the configuration file, you can see some convert elements too. Not
only does the service object need to be understood by DWR, but any objects that its methods
accept as parameters or objects that they return also have to be capable of conversion. For
Strings and primitives, this is a simple 1:1 mapping to JavaScript equivalents, but for other
objects this has to be specified in configuration. For the PetClinic demo, we simply allow all
of the model beans and the concrete implementation of the service bean to be converted.
■Note It would be a security risk to automatically allow conversion of any object for JavaScript use, and
that is the main reason you have to specifically allow conversion on a case-by-case basis in DWR.
DWR is servlet-based; it uses a servlet to dynamically generate much of the JavaScript
code that the client will use. The servlet code is already in dwr.jar, so we just need a declara-
tion and mapping in web.xml. Listing B-2 has the details.
Listing B-2. Changes to WEB-INF/web.xml
<servlet>
<servlet-name>dwr-invoker</servlet-name>
<display-name>DWR Servlet</display-name>
<servlet-class>uk.ltd.getahead.dwr.DWRServlet</servlet-class>
<init-param>
<param-name>debug</param-name>
<param-value>true</param-value>
</init-param>
</servlet>
<servlet-mapping>
<servlet-name>dwr-invoker</servlet-name>
<url-pattern>/dwr/*</url-pattern>
</servlet-mapping>
APPENDIX B ■ AJAX AND DWR 379
584X_Ch14_AppB_FINAL 1/30/06 12:55 PM Page 379
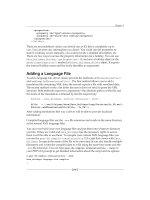
We left the debug parameter, which enables a nifty test page to be called for each service
object that you export. See Figure B-1 for an example.
Figure B-1. Test page for clinic service object
The only other change to the server side of the operation was a method name that needed
to be refactored. One of the DWR gotchas is that JavaScript is a little more picky about reserved
names being used as methods than Java is. A common one is the method delete(), which
would be illegal in JavaScript. In our case, we had to rename the isNew() method on the Entity
class, as shown in Listing B-3.
APPENDIX B ■ AJAX AND DWR380
584X_Ch14_AppB_FINAL 1/30/06 12:55 PM Page 380
Listing B-3. The Refactored Entity Class
package org.springframework.samples.petclinic;
public class Entity {
private Integer id;
public void setId(Integer id) {
this.id = id;
}
public Integer getId() {
return id;
}
public boolean isNewEntity() {
return (this.id == null);
}
}
Bean property names are converted to JavaScript properties by default, so isNew() would
become just new() on the JavaScript object, which is a reserved name. Using an IDE such as
Eclipse (with a little manual search and replace in the JSP files!), we were quickly able to man-
age all of the dependencies of such a change. That wraps it up for the configuration and code
changes—all in all, a fairly simple exercise to set the application up for DWR.
Presentation File Changes
Now for the interesting bit: We added two files to the root of the PetClinic web application—
index.html and local.js—which contain the application-specific functions to complement
the DWR-provided ones. In the <head> section of the HTML file, we add references to all of the
script libraries required, as shown in Listing B-4.
Listing B-4. Script Library References
<head>
<script type='text/javascript' <script type='text/javascript' src='/petclinic/dwr/engine.js'></script>
<script type='text/javascript' src='/petclinic/dwr/util.js'></script>
<script type='text/javascript' src='/petclinic/local.js'></script>
</head>
At the bottom is the file we code ourselves, which we’ll look at shortly. The other three
are supplied by DWR. engine.js and util.js are fairly static and contain the bulk of the DWR
functionality. clinic.js is the interesting one: the JavaScript representation of the service
object that we exported in our WEB-INF/dwr.xml file.
APPENDIX B ■ AJAX AND DWR 381
584X_Ch14_AppB_FINAL 1/30/06 12:55 PM Page 381
■Note Because all of the other JavaScript files have a /dwr/*-type URL, they will all be served up by the
DWR servlet according to the web.xml mapping we looked at in Listing B-2.
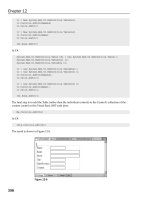
Let’s put all this together and show it in action (or at least as much as we can in the static
pages of a book). Figure B-2 shows the index.html page loaded in the browser. It contains a
couple of tables in the main area of the page that are hidden with CSS attributes.
Figure B-2. The DWR PetClinic home page
Listing B-5 shows one of the hidden tables in the left half of the blank area of the screen.
Note how the table body is given an id attribute, but is left empty.
APPENDIX B ■ AJAX AND DWR382
584X_Ch14_AppB_FINAL 1/30/06 12:55 PM Page 382
Listing B-5. Hidden Tables in index.html
<div id="leftPanel" style="width:58%; float: left">
<table id="vetlist" class="initHidden">
<thead>
<tr>
<th>first name</th>
<th>last name</th>
<th>specialties</th>
</tr>
</thead>
<tbody id="vets"/>
</table>
When we click the List Vets link in the page, a JavaScript function called getVets() is called.
It’s this function, and the one it delegates to, that do the work of populating the table of vets.
Both functions are in local.js and are shown in Listing B-6.
Listing B-6. local.js Functions for List Vets
function getVets() {
Clinic.getVets(showVets)
}
function showVets(vetData) {
document.getElementById("ownerlist").style.display = "none";
document.getElementById("ownerForm").style.display = "none";
document.getElementById("vetlist").style.display = "inline";
DWRUtil.removeAllRows("vets");
DWRUtil.addRows("vets", vetData, [ getFirstName, getLastName, getSpecialties ]);
}
Don’t worry if you can’t follow all the logic here. The key points are that the JavaScript ver-
sion of the Clinic object is invoked with Clinic.getVets(). DWR handles the translation of
the call to the real object in the ApplicationContext and marshals the returned Collection of
vets for us. This is passed to the showVets() function for display, based on the parameter sup-
plied to the getVets() method, where DWR utility methods are called to first clear and then
repopulate all of the table rows. The addRows() method takes three parameters:
• The id of the element to update (vets), which as we saw in Listing B-5 was the <tbody>
element.
• The collection of data to use (vetData). This was passed to the function by DWR and is
the returned value from the Clinic.getVets() method.
• An array of method names to call on each element of the vetData collection. Each of the
method names in the array will populate a column of the current table row.
APPENDIX B ■ AJAX AND DWR 383
584X_Ch14_AppB_FINAL 1/30/06 12:55 PM Page 383
There’s a lot going on in those two methods, and the result is shown in Figure B-3.
Figure B-3. Populated vet table
What we can’t easily demonstrate in the book is that the call to the server-side Clinic
object and the population of the table all took place asynchronously, without requiring a page
reload in the browser. If the server-side operation is long running, the browser will still remain
responsive for the user, but usually the page updates much faster than when reloading too.
POSTing Updates
We’ll complete the lightning tour of functionality with a look at form posts. In Figure B-4, we
see the same page again, this time after clicking the Find Owner button to bring up a table of
all owners and then clicking the “edit” link for one of them. Both operations are handled by
DWR and update the page very snappily (of course, you’ll have to download the application
and try it out for yourself to see).
The Submit button for the Edit Owner form is linked to another JavaScript function coded
in the file local.js. In turn, it relies on yet more DWR utility functions (did we mention how
much typing it saved you?). Listing B-7 shows the code for the form, and Listing B-8 describes
the relevant JavaScript functions.
APPENDIX B ■ AJAX AND DWR384
584X_Ch14_AppB_FINAL 1/30/06 12:55 PM Page 384
Figure B-4. Owners table and editing form
Listing B-7. Form for Editing Owners
<input type="hidden" id="id"/>
<table>
<tr style="border-width: 0px">
<td>first name: </td><td><input class="inp" type="text" id="firstName" /></td>
</tr>
<tr style="border-width: 0px">
<td>last name: </td><td><input class="inp" type="text" id="lastName" /></td>
</tr>
<tr style="border-width: 0px">
<td>address: </td><td><input class="inp" type="text" id="address" /></td>
</tr>
<tr style="border-width: 0px">
<td>city: </td><td><input class="inp" type="text" id="city" /></td>
</tr>
APPENDIX B ■ AJAX AND DWR 385
584X_Ch14_AppB_FINAL 1/30/06 12:55 PM Page 385