advanced Flex Application Development Building Rich Media X phần 7 pdf
Bạn đang xem bản rút gọn của tài liệu. Xem và tải ngay bản đầy đủ của tài liệu tại đây (12.44 MB, 51 trang )
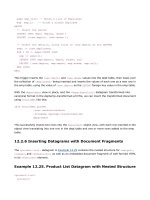
Figure 10-13. The HSlider is now on top of the ProgressBar,
because it’s wrapped in a Canvas.
With the HSlider now on top of the ProgressBar, it almost appears as though it were one component.
However, because you can see the track of the HSlider component, it is still clear there are two over-
laid components. To get rid of the track of the HSlider, I use CSS and an invisible image. Using
Fireworks, I create a 1
✕1 invisible PNG file (an empty 1✕1 PNG file exported with transparency on)
and put it in my
images folder in my Flex project. I embed the image as the trackSkin. The MXML
looks like this:
<mx:HSlider
trackSkin="@Embed(source='images/inv.png')"
The inv.png file is embedded using the Embed directive, and when I compile the component, looks as
if it were just one, as you can see in Figure 10-14.
The only difference between this example and the RMX is that the video player for the RMX also has
a skin applied to the thumb bar, using the
thumbDownSkin, thumbOverSkin, and thumbUpSkin
properties of the HSlider component
. I can assign images to those properties using the
Embed directive
like the example in the video player, or I can embed it in the ActionScript and bind a reference to the
class variable, as demonstrated in Chapter 5.
286
CHAPTER 10
8962CH10.qxd 11/7/07 2:04 PM Page 286
Figure 10-14. The thumb bar of the HSlider now appears as if its
track were the ProgressBar, making it appear as if it were a single
component.
Playlists
Now that I have all the controls for my video player, the next step is to add a playlist. Obviously, there
are many different ways to load a playlist into a Flex application, and I cannot cover them all, and in
any case, that is not the purpose of this section. The purpose is to show how to handle the
VideoDisplay component events so that I can play continuously off of any playlist. For the example,
I’ve chosen to load an XML file, which is one of the most common formats to consume data in.
Whether you’re working with an XML object, array object, or plain object, the fundamentals are the
same.
I’ve prepared a simple XML file to serve as the playlist. The
playlist.xml file looks like this:
<playlist>
<video title="First Video" file="video.flv"/>
<video title="Second Video" file="video.flv"/>
<video title="Third Video" file="video.flv"/>
</playlist>
The first edit to the existing code will be to remove the source property from the VideoDisplay com-
ponent
. I will be setting the
source property using ActionScript after I’ve loaded the playlist
, so I
simply delete the
source attribute from the VideoDisplay component.
287
WORKING WITH VIDEO
8962CH10.qxd 11/7/07 2:04 PM Page 287
Now that the video player is ready for dynamic video loading, I load the playlist XML file,
p
laylist.xml
,
using the
H
TTPService
c
lass. I load the XML in the
i
nit()
m
ethod by calling the new
l
oadPlaylist()
m
ethod. The result event handler for the playlist loading will play the first video. The
ActionScript file now looks like this:
// ActionScript file videoPlayer.as
import mx.events.VideoEvent;
import mx.formatters.DateFormatter;
import flash.events.MouseEvent;
import mx.rpc.http.mxml.HTTPService;
import mx.rpc.events.ResultEvent;
import mx.rpc.events.FaultEvent;
private var videoLength:String;
private var start:Date;
private var timeDisplayFormatter:DateFormatter;
private var seekTo:Number;
private var playlist:XMLList;
private var playlistCursor:uint;
[Bindable]
private var videoFileTotalBytes:Number;
private function init():void
{
start = new Date("1/1/2000");
timeDisplayFormatter = new DateFormatter();
myVideoDisplay.addEventListener(VideoEvent.READY, videoReady);
myVideoDisplay.addEventListener(VideoEvent.PLAYHEAD_UPDATE,
updateTimeDisplay);
btn_playToggle.addEventListener(MouseEvent.CLICK, togglePlayback);
btn_stop.addEventListener(MouseEvent.CLICK, stopPlayback);
loadPlaylist();
}
private function loadPlaylist():void
{
playlistCursor = 0;
var playlistService:HTTPService = new HTTPService();
playlistService.url = "playlist.xml";
playlistService.resultFormat = "xml";
playlistService.showBusyCursor = true;
288
CHAPTER 10
8962CH10.qxd 11/7/07 2:04 PM Page 288
playlistService.addEventListener(ResultEvent.RESULT,
onPlaylistResult);
playlistService.addEventListener(FaultEvent.FAULT,
onFault);
p
laylistService.send();
}
private function onPlaylistResult(event:ResultEvent):void
{
var resultXML:XML = new XML(event.result);
playlist = new XMLList(resultXML.video);
playVideo();
}
private function playVideo():void
{
this.myVideoDisplay.source = this.playlist[playlistCursor].@file;
}
private function onFault(event:FaultEvent):void
{
trace(event.fault);
}
I’ll begin my explanation of the new ActionScript I add by describing the imports and declared vari-
ables. The
HTTPService, ResultEvent, and FaultEvent classes are used for the loading of the playlist
XML file. I also declare a variable named
playlist, of type XMLList. I’ll use this array to go through
the playlist. The
playlistCursor variable will be used to store the current position in the playlist
that the video player is playing back.
The next change is in the
init() method. At the end I add a call to a new method called
loadPlaylist(). This method is where I load the XML file using the HTTPService class. Let’s go
through this method line by line.
In the first line, I initiate the
playlistCursor to 0 so that I can play the first video after the playlist has
loaded. In the next line, I declare a function variable,
playlistService, as an HTTPService object.
Then, I assign three properties of the
HTTPService object. The first is the url property, which is a
string path and file name to the XML file I want to load. Since the
playlist.xml file is in the same
directory
, I just enter the name of the file,
"playlist.xml". The second property is the resultFormat,
where I specify that I want XML as the result. The third property,
showBusyCursor, is set to true, so
that the service call displays a busy clock cursor while it loads the XML file. Once the basic properties
for the
HTTPService are set, there are two event listeners I add to the HTTPService object. One is for
the
ResultEvent of the HTTPService object
, and the second is for the
FaultEvent. For the result
event, I assign the
onPlaylistResult event handler, and for the fault event, I assign the onFault event
handler
. Hopefully, the fault event handler will not fire, but if it does, a trace will be received by the
console, alerting it to what the fault was. In the case of a successful load, the
onPlaylistResult()
event handler is fired.
289
WORKING WITH VIDEO
8962CH10.qxd 11/7/07 2:04 PM Page 289
In the first line of the onPlaylistResult()
method, I declare a function variable named
resultXML, of type XML object. The XML object
is initiated using the
result property of the
R
esultEvent
t
o start the XML object. In the
second line, I initiate the
playlist XMLList
object, using the resultXML variable, which is
equal to the root node of the
playlist.xml
file, <playlist/>. By sending resultXML.video
as the constructor argument for the XMLList
object, an array is created with all of the video
nodes to play back. The last line is a call to
another new method called
playVideo(). In
the
playVideo() method, I have a single line
where I set the source of the
VideoDisplay
object using the playlist XMLList that was
created. Using the
playlistCursor, I access the
first element in the array, and I use E4X to
access the
file attribute of the XML node.
Once the
source is set, the VideoDisplay auto-
matically plays the video once the video is
ready for playback. If I compile the example,
the video plays as usual, first loading the XML
and then assigning the source, as you see in
Figure 10-15.
Now that I have the first video playing, I need to get the video to play the next video once the current
video is done playing. For this, I will handle another event of the VideoDisplay component. The
changes now look like this:
// ActionScript file videoPlayer.as
private function init():void
{
start = new Date("1/1/2000");
timeDisplayFormatter = new DateFormatter();
myVideoDisplay.addEventListener(VideoEvent.READY, videoReady);
myVideoDisplay.addEventListener(VideoEvent.PLAYHEAD_UPDATE,
updateTimeDisplay);
myVideoDisplay.addEventListener(VideoEvent.COMPLETE, videoComplete);
btn_playToggle.addEventListener(MouseEvent.CLICK, togglePlayback);
btn_stop.addEventListener(MouseEvent.CLICK, stopPlayback);
loadPlaylist();
}
290
CHAPTER 10
Figure 10-15. The first video plays back as usual.
8962CH10.qxd 11/7/07 2:04 PM Page 290
private function videoComplete(event:VideoEvent):void
{
if (this.playlistCursor < this.playlist.length() - 1)
{
t
his.myVideoDisplay.playheadTime = 0;
this.playlistCursor++;
this.playVideo();
}
}
There are two basic changes I make to the ActionScript. First, in the init() method, I add a new event
listener for the video complete event of the VideoDisplay component. To handle this event, I assign
the
videoComplete event handler. In the event handler, an if statement checks whether the
playlistCursor is less than the length of the playlist, less one because the cursor is a zero-based
index. If the condition is true, I reset the
playheadTime of the VideoDisplay component to 0, incre-
ment the
playlistCursor by 1, and call the playVideo method once again to play the next video.
When the new code is compiled, the video player now loads the next video in the XML file when the
video has completed playing.
Adding playlist control buttons
Before adding the ActionScript to power the Next and Prev buttons, I must prepare the layout of the
buttons. In the control bar, I add the two buttons with spacers on the left and right of them so they
appear in the center of the empty area between the timer display and the buttons. The MXML now
looks like this:
<mx:ControlBar>
<mx:HBox width="100%">
<mx:Button label="Pause/Play" id="btn_playToggle"/>
<mx:Button label="Stop" id="btn_stop"/>
<mx:Spacer width="100%"/>
<mx:Button id="btn_previous" label="Prev"/>
<mx:Button id="btn_next" label="Next"/>
<mx:Spacer width="100%"/>
<mx:Label id="tf_playtimeDisplay"/>
<mx:VSlider id="volumeSlider" liveDragging="true" value=".75"
minimum="0" maximum="1" height="34"/>
</mx:HBox>
</mx:ControlBar>
</mx:Panel>
</mx:Application>
The MXML changes are within the ControlBar component
. To handle the functionality of the
Next and
Prev buttons, I declare a new event handler. The ActionScript looks like this:
// ActionScript file videoPlayer.as
private function init():void
{
291
WORKING WITH VIDEO
8962CH10.qxd 11/7/07 2:04 PM Page 291
start = new Date("1/1/2000");
timeDisplayFormatter = new DateFormatter();
myVideoDisplay.addEventListener(VideoEvent.READY, videoReady);
m
yVideoDisplay.addEventListener(VideoEvent.PLAYHEAD_UPDATE,
updateTimeDisplay);
myVideoDisplay.addEventListener(VideoEvent.COMPLETE,
videoComplete);
btn_next.addEventListener(MouseEvent.CLICK,
playlistControlsHandler);
btn_previous.addEventListener(MouseEvent.CLICK,
playlistControlsHandler);
btn_playToggle.addEventListener(MouseEvent.CLICK,
togglePlayback);
btn_stop.addEventListener(MouseEvent.CLICK,
stopPlayback);
loadPlaylist();
}
private function playlistControlsHandler(event:MouseEvent):void
{
switch (event.currentTarget.label)
{
case 'Next':
if (playlistCursor <playlist.length() - 1)
{
if (myVideoDisplay.playing) {myVideoDisplay.pause(); }
myVideoDisplay.playheadTime = 0;
playlistCursor++;
playVideo();
}
break;
case 'Prev':
if (playlistCursor - 1 >= 0)
{
if (myVideoDisplay.playing) {myVideoDisplay.pause(); }
myVideoDisplay.playheadTime = 0;
playlistCursor ;
playVideo();
}
break;
default :
break;
}
}
292
CHAPTER 10
8962CH10.qxd 11/7/07 2:04 PM Page 292
The changes to the ActionScript include the addition of two event listener assignments in the init()
method and a new method for navigating through the playlist. First, in the init() method, I add the
same event handler for both the
N
ext
and P
rev
buttons. At the bottom of the ActionScript, I declare
the
playlistControlsHandler() method, which is fired every time a user presses either the Next or
Prev b
uttons.
In the
playlistControlsHandler() method, there is a switch statement to check the label of the
Button control that fired the handler. If the
Next button is pressed, the code proceeds to an if
statement to check whether the cursor is less than the length of the playlist (again, less one because
of the zero-based index). If the condition is true, the code in the
if statement prepares the video
player to play the next video. To begin the
process of loading a new video, the code
checks whether the player is currently playing
a video, in which case the
pause() method is
triggered. Next, I reset the
playheadTime to 0
so the next video starts at the beginning, and
then increment the playlist cursor by one.
Finally, I call the
playVideo() method to play
the next video.
In the case for the
Prev button label, the if
statement checks whether decrementing the
playlistCursor by one is equal or greater
than zero; if so, the cursor is still within range
of the playlist. When the condition is met, the
first line again checks whether the video dis-
play is currently playing a video, and if so
pauses the display. Then the
playheadTime is
set back to
0 so the next video to play starts
from the beginning. Next the playlist cursor is
decremented by one, and finally the selected
video is played. If I compile the code, the
video player now has the
Prev and Next but-
tons, which can be used to navigate the
loaded playlist. You can see the controls in
Figure 10-16.
Restricting playlist controls during ad playback
Playing back ads can be handled in many different ways, depending on the ad service and delivery
method of the ads. The one thing that all these methods share in common is the fact that the video
controls should not be available during the playback of a paid advertisement. For this example,
assume that the video ads are received in the same call as the playlist
. To differentiate a regular video
from an advertisement, I make a change to the
playlist.xml file that gets loaded. In each of the
video nodes, I add a type attribute, which will be equal to
"ad" whenever a video is designated as an
advertisement. The changes to the XML look like this:
293
WORKING WITH VIDEO
Figure 10-16. The Prev and Next buttons appear in the center
because of the spacers on the left and right of the two buttons.
8962CH10.qxd 11/7/07 2:04 PM Page 293
<playlist>
<video title="First Video" file="video.flv"
type="video"/>
<video title="Second Video" file="xvideo.flv"
type="ad"/>
<video title="Third Video" file="_video.flv"
type="video"/>
<
/playlist>
With these changes to the XML, I can now tell the difference between a regular video and an adver-
tisement. Now I need to make the changes to the ActionScript so that the video player recognizes this
difference.
To make the video player recognize and disable the user interface, I need to create a method to tog-
gle the availability of the video controls, and I need to fire this method somewhere. The new method
will be fired every time a new video is played, so I will expand on the
playVideo() method. In that
method, I will fire the
toggleVideoControls() method. The ActionScript should now look like this:
// ActionScript file videoPlayer.as
private function playVideo():void
{
if (this.playlist[playlistCursor].@type == 'ad')
{
this.toggleVideoControls(false);
}
else
{
this.toggleVideoControls(true);
}
this.myVideoDisplay.source = this.playlist[playlistCursor].@file;
}
private function toggleVideoControls(enable:Boolean):void
{
this.btn_playToggle.enabled = enable;
this.btn_next.enabled = enable;
this.btn_previous.enabled = enable;
this.btn_stop.enabled = enable;
this.playbackProgress.enabled = enable;
}
At the bottom of the ActionScript file, I declare a new function that will enable and disable the user
interface. The method accepts a
Boolean argument, which is used to set all the user interface ele-
ments to either enabled or disabled. Then, in the
playVideo() method, I add a new if statement
,
which checks the
type attribute of each video node. If the type attribute is equal to "ad", the
toggleVideoControls() method is fired with a false as the argument
, disabling all controls.
Otherwise, it enables the controls. In Figure 10-17, you can see the controls disabled after the video
player has recognized the second video
as an advertisement
.
294
CHAPTER 10
8962CH10.qxd 11/7/07 2:04 PM Page 294
Figure 10-17. All controls except the volume slider have been
disabled, because this video is designated as an “ad” by the
type attribute in the playlist.xml.
Limitations of the VideoDisplay class
For the majority of video projects where a progressive download system will be used, the
VideoDisplay class is more than adequate enough to handle the job of delivering video. However,
because the VideoDisplay component encapsulates the
NetConnection and NetStream objects within
the class, those objects are not available to customize the handling of the events that they provide.
Aside from this barrier, it also makes it not possible to add new callbacks on the
client property of
those objects, something that some content distribution networks (CDNs) require in order to make a
successful connection to their Flash Media Servers.
To add to these limitations, I also encountered a very rare circumstance where the
VideoEvent.COM-
PLETE
event would not dispatch at the end of a video clip. This very rare occurrence would actually
halt the entire playback of a playlist
, because the playlist relies on that event being dispatched to
move on to the next video. A client for whom we implemented a video encoder was having issues
reported where the playlist was completely stopping at the end of a specific video. Upon further
investigation, I discovered that the actual length of the video was 3 milliseconds shorter than the
length being reported by the VideoDisplay component. This was in effect causing the player to reach
the end of the video, but it would not register the actual end of the video, which would cause the
event to never be dispatched.
To get around all of these hurdles, I wrote a new class called
VideoBitmapDisplay, which very closely
emulates the events and properties provided by the
VideoDisplay class—the benefit, of course, being
that I now have complete control over the
NetConnection and NetStream objects, I can write and
295
WORKING WITH VIDEO
8962CH10.qxd 11/7/07 2:04 PM Page 295
refine my own end-of-video detection code, and I can modify the class for any specific FMS require-
m
ents.
A
side from being able to customize the handling of the
N
etStream
a
nd
N
etConnection
o
bjects, I
added a new bindable property to the class called
bitmapData. Like the name suggests, it provides a
bitmapData object of the video stream being played back. I’ve used this object to bind it to a Bitmap
object, and then set that to the source of an Image object so that I can easily add effect filters to the
video or do any number of
bitmapData transformations to create video with weird effects and such. I
won’t go over the use of the class, as it is used exactly like the
VideoDisplay class described in this
chapter, with the addition of the
bitmapData property. Feel free to use and modify it as you please! I
currently have this working in a couple of projects, but if you decide to use it, you still must make sure
that you test it thoroughly to assure that it meets the needs of your project. You can get creative with
it! Head on over to the friends of ED Downloads page (
www.friendsofed.com/downloads.html) for
the source code to the
VideoBitmapDisplay class.
Summary
In this chapter, I aimed to provide a look into the types of coding techniques we used on the RMX to
execute the precise video playback requirements of the project. As well, I attempted to do so with as
little ActionScript as possible, highlighting ways the native characteristics of the framework can be
exploited to achieve much of the required behavior. I also covered some of the limitations of the
VideoDisplay component and provided a class for you to play with. R covered the ins and outs of
encoding video and preparing it for delivery. With the topics covered in this chapter, you should now
be ready to build your own video players with all of the expected functionality of a standard Flash
video player. Additionally, I included a class I built to customize the handling of the
NetStream and
NetConnection objects and added a bitmapData property to play with the video image and get cre-
ative with. Now, you’re ready to dive into the world of online advertising.
296
CHAPTER 10
8962CH10.qxd 11/7/07 2:04 PM Page 296
8962CH10.qxd 11/7/07 2:04 PM Page 297
8962CH11.qxd 11/7/07 10:27 AM Page 298
Advertising is a vital aspect of many Internet-based projects, and the RMX is no dif-
ferent. In this chapter, I will discuss some of the options available for banner and
instream (or video) advertising, explain the problems with using most mainstream
solutions inside of Flash-based applications, and show how we solved these issues for
our project—utilizing open source technologies.
Why advertising matters
The RMX is free. Free to members and visitors, that is. In reality, the RMX—and any
web-based application like it—costs real money, even when not accounting for our
own time spent developing and maintaining the application, and especially when
dealing with bandwidth- and storage-hogging video. But we, the owners, incur those
costs and do not pass them on directly to our community.
One of the ways we try to make back some of that cost, as with most any widely traf-
ficked site, is through advertising.
Although in the early days of the Internet, advertising failed to produce on the prom-
ises and expectations of many businesses and analysts, today advertising can make
you a decent amount of money. This is especially true when the community consists
of a highly specific and desirable market demographic—in this case, the Adobe user
communities.
299
ADVERTISING AND FLEX
By R Blank
Chapter 11
8962CH11.qxd 11/7/07 10:27 AM Page 299
The mechanics of online advertising are quite simple but also quite powerful and varied. Someone
w
ants to show an ad, so they buy space. Unlike television advertising, where space is based on chan-
n
el, time, and geography, online advertising can be based on a much more complex set of variables—
all entirely transparent to the user. You can deliver ads based on the content of a page (for instance,
an ad for guitars along with a blog post review of a new Ovation). You can deliver ads based on the
previous browsing history of the user (for instance, showing certain ads only to more frequent visitors
or to members who have previously posted job opportunities on the jobs board). Or you can deliver
ads based on reverse IP lookup (to get the geographical location of the visitor based on his IP address)
or gender (based on a user profile the user has filled out). Or you can use a combination of all of these
factors, and many more.
The goal is to deliver the most relevant ad that you can to that viewer at that point in time. This brings
the most value not only to the advertiser, but also to the viewer. That is, consumers derive real value,
and sometimes enjoyment, from exposure to more-relevant marketing messaging. And advertisers can
get much more detailed information about the track record and success of individual ads and adver-
tising campaigns—indeed, advertisers expect detailed metrics on their advertising. Any advertising
management system or network will offer this type of data; it’s one of the key reasons to use such a
system instead of just building your own from scratch. Because, after all, all you’re doing is loading
media into a web page, and we all know a thousand ways to do that.
You can either consume ads from an existing third-party advertising network or sell your own ads.
Using an existing network, while much easier, is frequently less lucrative and can provide less-relevant
messaging to your visitors. One of the simplest options is Google AdSense (
www.google.com/adsense),
which is free to implement and use. Google gives you some code to insert in your site, and based on
the words that Google sniffs in the pages in which that code is embedded, Google AdSense delivers
contextually relevant advertising. If users click those ads, you get some money.
If you want to sell your own ads, you need an ad management system. It will help you manage adver-
tising campaigns (with options like expiration dates and impression throttling, which ensures ads are
only shown a certain number of times) and provide you the tracking metrics your advertisers will
require. Many solutions are available on the market, from open source (read: free) to full custom ad
networks (read: definitely
not free).
To open source or not to open source?
As with most any similar decision, the verdict comes down to this: do you have money to spend, and
are the open source alternatives usable? In the case of advertising on the RMX, the answers were “Not
really, no
” and “Yes.” The paid ad management systems like Accipiter, 24/7, and DoubleClick (now
owned by Google) provide tremendous functionality and performance. At the same time, they can
cost a lot of money, anywhere from $1,000–10,000 a month and much more depending on your
traffic.
So, for this reason, we chose one of the preeminent open source advertising campaign managers,
OpenAds (
www.openads.com). OpenAds (formerly known as phpAdsNew) is a pretty powerful and
functional open source ad management system, well supported by its community with frequent
updates.
I’ll get into how we actually work with OpenAds in one moment. But first, I want to touch on a couple
of additional aspects of online advertising that are very relevant for Flex and Flash developers to
understand and consider when planning applications.
300
CHAPTER 11
8962CH11.qxd 11/7/07 10:27 AM Page 300
Flash and ads: Play nice, kids!
We all know that Flash has become an incredibly popular format for delivering online advertising. The
ads can be incredibly cool and engaging, even at really small file sizes. Of course, you can also have
v
ideo and audio seamlessly integrated with the advertising experience, with no additional plug-ins.
Your ad can even be dynamic, pulling from an RSS feed, for example. And, with options like Eyeblaster
(
www.eyeblaster.com) and PointRoll (www.pointroll.com), you can have user-initiated expandable
ads. These expandable ads, always constructed and delivered with Flash, actually grow out of the stan-
dard banner area on user interaction (say, a click) to reveal a much larger canvas with all the func-
tionality that Flash has to offer, including interactivity, animations, and even inline video. Expandables
are really micro-sites or mini-applications that allow the viewer to participate with the brand and mes-
sage in a meaningful and enjoyable way, without ever leaving the page he is viewing. This experience-
rich type of advertising exploits the tremendous power of Flash, and a lot of Flash developers make a
good living building these ads.
But, just because Flash is a great option for developing ads, it doesn’t mean actually consuming ads in
Flash is just as easy and popular. In fact, at Almer/Blank, we’ve had to chop up many an otherwise
beautiful Flex and Flash application, just to make space for the frames and layers to hold the ads.
Why? Because almost every ad on the Internet is invoked with JavaScript or PHP. When you sign up for
Google AdSense, you get JavaScript to paste into your pages. When you install and use OpenAds, you
get JavaScript code to insert into your pages. This code is called an
invocation code since the code
loads, or invokes, an ad. And, while Flash can communicate with JavaScript and PHP, Flash can’t
directly load and interpret JavaScript or PHP, so you cannot have your advertising invocation codes in
your Flash application.
Why not just utilize DIV layers to place the ads above the Flash? Unfortunately, that solution is unreli-
able cross-browser/cross-platform, since in some browsers, Flash will always render on top of all other
content, regardless of depth.
In fact, the only really robust out-of-the-box option for Flex and Flash developers to integrate seam-
less ads into any application or web site is DART Motif Flash-in-Flash from DoubleClick (
www.
doubleclick.com/us/products/dart_motif_for_flash_in_flash/
). But DoubleClick is the most
expensive of the paid options, so it’s totally out of consideration for all but the largest Internet
presences.
So, as I said, at Almer/Blank we’ve had to chop some client applications that would have been per-
fectly delivered as single SWFs into as many as eight or nine SWFs in a page, just to support the ads.
What about instream ads?
Instream ads are video ads. They are often referred to as preroll and postroll ads (depending on
whether they precede or follow the main video content). Any site planning distribution of significant
amounts of video—especially Flash video—will want to consider delivering instream advertising.
And while all of the major ad management networks (such as the ones I mentioned previously) offer
instream management and delivery, the problem with instream advertising is that the options for
delivery management are far fewer than for banners. Google (at least at the time of writing—it’s
bound to change in the near future) does not offer a free instream advertising network the way it
does with text banners with AdSense. Y
ou can get third-party instream advertising with a solution like
301
ADVERTISING AND FLEX
8962CH11.qxd 11/7/07 10:27 AM Page 301
Brightcove’s, but then you must use its player or API and host and deliver your content through that
c
ompany. And OpenAds doesn’t natively support the delivery of instream ads.
Our solution
When we started building the RMX, we had complete control of how the advertising would operate,
so we decided to find a way around these two challenges. That is, we wanted to use the free and rel-
atively powerful OpenAds, but we also wanted the flexibility to deliver ads to any part of the RMX,
whether the specific RMX interface consuming the ads was built as HTML or Flash, and we wanted the
same system that ran our banner delivery to also power our instream advertising.
So Daryl Bowden, one of our developers at Almer/Blank, came up with a solution to deliver ads (ban-
ner or FLV) from OpenAds into Flex and Flash applications. I want to share this with you in this chap-
ter because, again, OpenAds is a pretty good and totally free solution, and this technique allows any
Flex developer to offer a robust advertising solution along with his applications, pretty much out of
the box for no cost. What’s more, the same logic I’m about to explain can be used with most any ad
management system that does not natively support delivery to Flash! (But you will have to modify the
JavaScript and ActionScript for each case, because each system’s code is different and utilizes some-
what different data, structure, and logic.)
So, first I’ll show you how to set up OpenAds so that you have an ad management and delivery system
in place, and then I’ll demonstrate how to get into Flex to consume those ads. Let’s dive into the
details!
Setting up OpenAds
Before you get to the fancy code that powers our solution, you have to get set up to deliver the ads
for this walkthrough. To that end, you need to have an environment that will support an OpenAds
installation. Basically, you need a server that has PHP version 4.4.2 or higher installed, as well as
MySQL, preferably version 3.23.2 or higher.
Now that you have an adequate setup, you will need to point your favorite browser to
www.openads.
org
. When you get there, you will be greeted with a link on the right side of the page inviting you to
download the latest stable version of OpenAds (which, at the time of writing, is 2.0.11-pr1, as you see
in Figure 11-1). Go ahead and click that link, and your download will begin immediately
. Many people
have reported that the Max
Media Manager (the newest development version at the time of writing)
works incredibly well; however, I prefer to stick with the sure bet.
For a more in-depth list of requirements, you may visit />openads-2.0-guide/system-requirements.html
.
302
CHAPTER 11
8962CH11.qxd 11/7/07 10:27 AM Page 302
Figure 11-1. The OpenAds home page
Once the download has completed, you will need to extract the files onto your desktop. Then, open
your FTP client and connect with your server. On your server, you will need to create a new directory
to house your files; for this example, name it
/adserver, which will be located at the web root. Once
you have created this directory, copy all of the contents of the folder you downloaded into it. Now
that the files are on your box, go to the
/adserver folder on whichever domain you are using (such as
www.richmediax.com/adserver) and you will see that OpenAds does all the hard work for you.
With your folder installed, you need to set up your MySQL database. If you have access to a web host
control panel such as phpMyAdmin or Plesk, this will be a five-second job; if not, you’ll need to use
the command line. If you have trouble with this, you can find plenty of help at
www.mysql.com.
Once you have completed installing OpenAds, it’s time to get familiar with how it works. Almost any-
one reading this book will find the administrative control panel easy to use; however, for less-tech-
savvy folks, it can be a little difficult to get a grasp of exactly how it works. In either case, as with most
open source applications, there is a huge user base out there just ready to answer your questions and
give you whatever advice you may need.
T
o get into the guts of the application, simply point your browser once again to the
adserver folder
on your development domain, and you’ll see the login screen pictured in Figure 11-2.
Y
ou can find the OpenAds forums at
This is a great
source for anything you might need relating to OpenAds.
303
ADVERTISING AND FLEX
8962CH11.qxd 11/7/07 10:27 AM Page 303
Figure 11-2. The login screen you should see after a successful installation of OpenAds
Once logged in, you will be taken to the Inventory screen (see Figure 11-3), which is the main screen
for OpenAds and one that you will visit often. To get started, you first need to create a new advertiser.
To do this, simply click the
Add new advertiser link.
Figure 11-3. The OpenAds Inventory screen
On the Add new advertiser screen shown in Figure 11-4, you will assign your advertiser properties.
You’ll also notice that this advertiser can have its own login, which can be helpful if you would like
your advertisers to access and modify their accounts directly.
304
CHAPTER 11
8962CH11.qxd 11/7/07 10:27 AM Page 304
Figure 11-4. The Add new advertiser screen lets you specify properties for an advertiser.
Once you have filled in the requisite information, press the Next button to proceed to the next screen
(see Figure 11-5), which will allow you to create a campaign.
A
campaign includes a set of different ads along with the logic to deliver those ads, including start and
end dates, maximum impressions, and priority. This page allows you to set up the start and end dates
for the campaign (if there are any), as well as allows you to monitor the activity for this account (this
page is also visible after the account has been created).
Once you’re done here, click
Save Changes, and then click the tab labeled Banner overview. Here you
will stock your campaign with all the banners you need to get going.
305
ADVERTISING AND FLEX
8962CH11.qxd 11/7/07 10:27 AM Page 305
Figure 11-5. You can create a campaign and set its properties on this screen.
From the banner overview page, simply click Add new banner to take you to the Add new banner
screen (pictured in Figure 11-6), and you can start uploading your banners. As you upload each ban-
ner, you can enter the destination URL (which specifies the page the user will be taken to when he
clicks the banner) as well as the target (the browser target, just as in the
navigateToURL ActionScript
method: either
_top, _self, or _blank depending on the browser window in which you want the des-
tination URL to launch). When you upload a banner
, remember to give the banner a clear description,
as this will make it easier to differentiate later on when you may have hundreds of banners in your
database. Continue to upload banners until you have uploaded all the banners you would like to
include for this campaign.
That’s all you need to do within OpenAds for now, so next you can dig into the Flex side of this solution.
306
CHAPTER 11
8962CH11.qxd 11/7/07 10:27 AM Page 306
Figure 11-6. The Add new banner screen
Consuming OpenAds in Flex
As cool as this solution is, the Flex side of the equation is really rather simple. You need a little bit of
ActionScript, one line of MXML, and you’re done.
To get started, create a new Flex project. In your application file (I’ve called mine
openAds.mxml),
begin with the
ExternalInterface class. This class enables your SWF to talk to its wrapper so that it
can call a JavaScript function located on the HTML page in which your SWF is embedded. Not only
that
, but it also allows you to return data back to the SWF to be further manipulated by your Flex
code. In fact, this class also works the other way around: you can also use it to call Flex functions from
within the JavaScript.
307
ADVERTISING AND FLEX
8962CH11.qxd 11/7/07 10:27 AM Page 307
I will show you all the Flex code involved and then go through it step by step with you.
<
?xml version="1.0" encoding="utf-8"?>
<
mx:Application xmlns:mx=" />layout="absolute" creationComplete="callWrapperBanner()">
<mx:Script>
<![CDATA[
import flash.net.navigateToURL;
import mx.controls.Alert;
import mx.collections.XMLListCollection;
import flash.external.*;
[Bindable]
public var adReturn:*;
public var javascriptReturn:XML;
[Bindable]
public var imageSource:String;
[Bindable]
public var imageClick:String;
public function callWrapperBanner():void
{
//check to see if external interface is available
if(ExternalInterface.available)
{
//callOpenAds is the name of the JS function
//contained in the wrapper
var wrapperFunction:String = "callOpenAds";
//make the call to the wrapper and the JS function
adReturn = ExternalInterface.call(wrapperFunction);
} else{
Alert.show("Failed to initiate external connection");
}
//convert HTML to XML
var img:String = "<root>"+adReturn+"</root>";
//correct malformed HTML that comes back from OpenAds
img = img.replace("></A", "/></A");
img = img.replace("></DIV", "/></DIV");
//create new XML object and use that object to
//parse out the tags you need
javascriptReturn = new XML(img);
imageClick = ();
imageSource= ();
//add event listener so that click-through and link still works
// the way the user expects
adImage.addEventListener(MouseEvent.CLICK, adClick);
adImage.buttonMode = true;
}
308
CHAPTER 11
8962CH11.qxd 11/7/07 10:27 AM Page 308
private function adClick(event:MouseEvent):void
{
//set variable to contain destination path for ad
var ur:URLRequest = new URLRequest(imageClick);
/
/send user to link on click
navigateToURL(ur);
}]]>
</mx:Script>
<! Set source to the bindable variable imageSource which
contains the img src of the return from the JS >
<mx:Image source="{imageSource}" id="adImage" />
</mx:Application>
To begin, you declare a few variables. First, you declare two strings, imageSource and imageClick, and
both must be declared as
[Bindable] since you will use these as the data source for both your Image
component and your
click event. The other two variables are adReturn, which will hold the return
value from the JavaScript function in the HTML, and
javascriptReturn, the variable you will convert
to XML.
javascriptReturn does not need to be bindable, as you will not be using it outside of this
function.
You’ll note that this file only contains two functions: one to call the ad and another to enable the click.
The main function,
callWrapperbanner(), uses the ExternalInterface class that I referred to at the
start of this section. To set this up, you first set up a conditional statement to ensure that the
ExternalInterface is available (meaning that JavaScript is enabled in the viewer’s browser). Assuming
this tests true (meaning JavaScript is available, which it will be about 96% of the time), you can pro-
ceed. If JavaScript is unavailable, this solution won’t work—but in those cases, you wouldn’t have been
able to load ads into the web page anyway, regardless of whether the interface is Flash or HTML, since
the ad can never be invoked by the invocation code.
Knowing that JavaScript is available, you assign your variable
wrapperFunction the string
"callOpenAds". The naming of your variable is a very important step. The name that you give this vari-
able needs to be the same as the JavaScript function you are going to create on your wrapper page;
otherwise, the communication won’t work, and your ads will not render correctly. When done, your
conditional should look like this:
//check to see if external interface is available
If (ExternalInterface.available)
{
//callOpenAds is the name of the JS function
//contained in the wrapper
var wrapperFunction:String = "callOpenAds";
//make the call to the wrapper and the JS function
adReturn = ExternalInterface.call(wrapperFunction);
} else{
Alert.show("Failed to initiate external connection");
}
309
ADVERTISING AND FLEX
8962CH11.qxd 11/7/07 10:27 AM Page 309
Next, you parse through the information that is returned to you from the wrapper and contained in
t
he variable
a
dReturn
.
You will prepend it with
<
root>
,
append it with
<
/root>
,
and store it in the
l
ocal variable
i
mg
,
typed as a string. This will convert the HTML that was returned into valid XML, so
that your Flex code can access the relevant information.
This is where you run into the biggest issue with the OpenAds delivery system. The HTML it uses for
displaying images is malformed (shh . . . don’t tell anyone); the
<img> tag in the OpenAds-generated
HTML does not include a proper closure, and therefore it cannot be recognized as XML by Flex with-
out some modification. Fortunately, this failure (or “feature,” I suppose) is a consistent one, so to rem-
edy this, we use the
replace() method, which allows us to parse through a string and replace a
specified substring with another string value. When calling
replace(), you pass the substring you wish
to replace as the first parameter and the string to insert in its place as the second parameter. By look-
ing through the returned information, you’ll see that the
<img> tag should be closed right before the
<a> tag closes. Here, you can see the method with the proper syntax, as used in this example:
img = img.replace("></A", "/></A");
Now that you have corrected the form of your return, you can treat it as XML and parse through it.
Take the
javascriptReturn variable that you declared earlier and set it as a new XML object with the
local variable
img as the source. Now that you’ve converted the return value into valid XML, you can
grab the hyperlink from the
<a> tag in the return. To do this, assign your imageClick variable the value
of the link, like so:
javascriptReturn = new XML(img);
imageClick = ();
Here you grab the href attribute of the <a> node from our XML. Appending the call to toString()
converts the data to a string value so that you may use it as the destination for a navigateToURL call.
Next, you’ll perform the same operation on the
source attribute of the <img> tag to grab the media
source, like this:
imageSource= ();
Once you have the source for the banner, you’ll hop out of the ActionScript and into your MXML,
which consists of only one line:
<mx:Image source="{imageSource}" id="adImage" />
This is simply an <mx:Image/> tag, with an id of "adImage" and the source set to the bindable value of
the
imageSource variable. And now you’ve displayed your ad! And, if this were an instream ad, rather
than a banner
, your one line of code would look almost identical:
<mx:VideoDisplay source="{imageSource}" id="adImage" />
Next, you need to set up the click event that will allow the image to act as a user expects a banner
to act. To do that, you’ll jump back into the
callWrapperBanner() function and append these few
lines at the end:
adImage.addEventListener(MouseEvent.CLICK, adClick);
adImage.buttonMode = true;
310
CHAPTER 11
8962CH11.qxd 11/7/07 10:27 AM Page 310