beginning drupal 7 phần 10 pdf
Bạn đang xem bản rút gọn của tài liệu. Xem và tải ngay bản đầy đủ của tài liệu tại đây (10.48 MB, 39 trang )
APPENDIX C ■ SOCIAL NETWORKING
279
The Group details configuration options control whether groups appear in the groups directory,
whether the group appears on the group registration form, whether the groups that a user belongs to are
displayed on their profile, whether a user must select a group when creating a post, and the default view
used to create the homepage for that group. For demonstration purposes I’ll leave all of the settings at
their default values.
The Messaging and Notifications configuration options allow you to customize the content
generated when a message is sent to a user. There are several tokens that you can use to embed values
such as user name or group name into the body of a message. For demonstration purposes I’ll leave all
of the values set to their defaults.
Activating OG Blocks
The OG module provides a number of blocks that enable users and administrators to create, join, and
participate in groups. The standard blocks include:
New groups. This block provides a list of the groups that were recently created.
My groups. If the user is logged in, this block displays a list of groups to which
the user belongs.
Group details. This block provides the links for group members to create a
group post, invite a friend, manage their membership, see the number of
members, and the designated group manager.
Group search. This block provides the ability to search content within the
group.
Group notifications. This block enables the group feed options and is active
once the user enters the group.
Group admins. This block provides the same information as in group details,
but directed at the administrator of the group.
Group members. This block lists all of the members in a group.
Group files. This block lists all of the files associated with this group.
For demonstration purposes, I’ll assign every block to the right sidebar of my test site. You may
assign the blocks that make sense to your site to any region you desire.
Setting Up Access Configuration
The next step in the process is to set up the access configuration for OG. On the Configuration page, you
will find an option called “Organic groups access configuration. On the configuration page you will find
two options, one for setting the visibility of posts on your site and the second option defines how private
groups are handled. For the visibility of posts settings, you have the option of defining whether posts are
visible only within a specific group or across all groups, or whether you want the author to have the
ability to specify if the visibility of the post. I’ll leave the default option that specifies that the posts are
only visible within the designated group.
The second configuration option defines whether new groups are visible to the public. You can set
groups to automatically default to public or private, or you can allow the group administrator to set the
APPENDIX C ■ SOCIAL NETWORKING
280
visibility of the group. For demonstration purposes I’ll leave the default option set so that every new
group is automatically set to public.
Setting Up Permissions
There are several permissions that you will need to set before creating your first group. You will first
need to decide whether you will have a special role for users who will create and administer groups. If
you want any user on your site to have the ability to create a group, you can just use the authenticated
user role. If you want to restrict who can create new groups then you’ll need to create a specific role (e.g.,
group administrator) and assign that role to the users who will have the ability to create and manage
groups. For demonstration purposes I’ll set up my site so that any authenticated user can create and
administer their own groups.
The permissions that I’ll set to enabled for authenticated users are
create setup_organic_group content
create group_post content
delete own group_post content
edit own group_post content
edit own setup_organic_group content
og_notifications module - subscribe to content in groups
I’ll leave the “administer organic groups” permission unchecked, as I only want the site
administrator to have the ability to change global organic settings.
Creating Your First Group
At this point you have OG set up and ready to use. I’ll create a group to demonstrate how easy the OG
group module is to use. To create a group, click on the “Create content” link and select the “Set up an
organic group” content type. The key fields associated with the Set up an organic group content type
includes:
• Group name. Enter the name you wish to associate with the group. For
demonstration purposes I’ll create a group called Drupal 7 Fans.
• Description. Enter a brief description about the group. This value is used in the
group details block and the group directory. I’ll use “A group for fans of Drupal 7”
as the description.
• Membership requests. This field presents a list of options on how requests for
membership are handled. You can select “Open – all membership requests are
automatically approved,” “Moderated – all memberships must be approved by the
group administrator,” “Invite only – the group administrator sends invitations to
users,” or “Closed.” I’ll select open allowing any user to register without requiring
administrator approval.
APPENDIX C ■ SOCIAL NETWORKING
281
• Registration form. Specifies whether a request to join this group is displayed on
the user registration form. I would like my group to show on the user registration
form, so I’ll check the box.
• List groups in directory. Specifies whether this group is listed in the groups
directory. I want my group listed in the directory, so I’ll check the box.
• Private group. Hides the group from everyone who is not a member of the group.
I want my group to be publicly visible, so I’ll leave the box unchecked.
• Welcome message. A message that is displayed on the homepage of the group. I’ll
enter a paragraph or two that describes the purpose of the group.
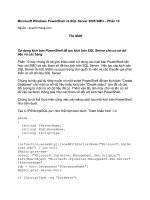
After saving the Set up an organic group content item the group homepage is displayed along with
the group being listed in the various OG blocks, as shown in Figure C-2.
Figure C-7. The new Drupal 7 Fans group homepage
Creating a Group Post
With the group set up I can now create a new Group post. Creating a post is as simple as clicking on the
Create Group Post link in the Drupal 7 Fans block (see the Drupal 7 Fans block in the right column in
Figure C-7). The form for creating a group post is a standard Drupal content creation form consisting of
APPENDIX C ■ SOCIAL NETWORKING
282
a title, body, an assign to group feature that allows the author to select which groups they wish to publish
their posting to. By default, OG automatically checks the box associated with the group where the user
clicked the “Create group post” link. If the user belongs to multiple groups, their other groups will be
listed as checkboxes allowing the user to post the same item to multiple groups.
After saving the post it automatically appears on the homepage for the assigned group(s), and with
commenting enabled, other members of the group can post comments against the post.
Expanding the Functionality of Your Organic Group Site
The functionality of a base Organics Group site is pretty impressive, but there are over 100 additional
contributed modules that expand on the base capabilities of the base OG module. For a complete list of
add-on modules visit and click on the Organic groups link in the
projects block in the right column.
Summary
Social networking represents a tremendous opportunity for expanding the reach of your website by
enticing visitors to participate, collaborate, and communicate. The value of offering social networking
capabilities is huge due to the viral nature of visitors telling friends about your site, and those friends
telling their friends. Deploying the capabilities outlined in this appendix could have a significant impact
on the overall success of your site. Roll up your sleeves and give social networking a chance to work its
magic on your site.
A P P E N D I X D
■ ■ ■
283
E-commerce
If you want to sell something on the web, Drupal may be the platform for you. If you are selling tangible
goods (like books), virtual goods (like downloadable music), event registrations, or subscriptions that
allow visitors to view pages on your site, then Drupal and either Ubercart or the e-Commerce
contributed modules are a perfect combination. Get your cash register ready: at the end of this appendix
you’ll have the information necessary to sell items on your Drupal site.
■ Warning Ubercart has not been ported to Drupal 7 yet, but is expected to be available soon after Drupal 7 is
released. This appendix was written using the Drupal 6 version of Ubercart. There may be differences in the Drupal
7 version.
E-commerce Options for Drupal
There are two general options for adding e-commerce capabilities to your Drupal website: the Ubercart
or e-Commerce contributed modules. The e-Commerce module was the first major solution for e-
commerce for Drupal. Ubercart came along at a later date when a group of developers decided to
improve upon the e-Commerce module. Both platforms offer similar features and functionality, and
selecting one over the other is often a matter of picking the platform with the features that best meet
your unique requirements. There are several comparison charts that compare and contrast the features
and functions of both platforms. One good chart can be found at
Another important consideration when selecting modules is to look at usage statistics. Every
module on Drupal.org includes a report of the number of Drupal sites that report that they are using any
given module. The current statistics for Ubercart lists approximately 20,000 sites, whereas the e-
Commerce module has approximately 950. More users typically means more features that address the
needs of a larger audience and a higher likelihood that new features and functions will be added.
In this appendix, I’ll focus on Ubercart, as it is the module that I use for all of my client sites that
require e-commerce capabilities.
APPENDIX D ■ E-COMMERCE
284
Ubercart Overview
Ubercart is a full feature web storefront offering key features that make it easy to list and sell physical
goods, virtual goods, subscriptions, and event registrations. Ubercart provides a simple-to-use interface
for creating product categories, product catalogs, and product listings. Ubercart manages the inventory
of the items you are selling, the orders that customers place on your site, the payments customers make,
and the shipment process when physical items are shipped from your organization to fulfill a customers
order.
Key features provided by Ubercart include:
Configurable product catalog. This includes catalog pages and a block to display
product categories. Visitors who click on a product category listed in the block are
taken to the catalog page that lists the items in that category.
Flexible product creation system. Ubercart ships with a standard product content
type. Using CCK, you can add new attributes to the product content type to address
the specific needs of your organization.
Flexible product attributes system. Ubercart provides the ability to define
selectable attributes for your products that update the base price, SKU/model,
and/or weight of items as the customer selects and adds items to their cart. You can
set default attribute/option sets for each product class to easily create similar
products.
Single page checkout. All checkout information is entered by the buyer on a single
screen. Ubercart provides the ability to configure the checkout page. You can extend
and customize the capabilities of the checkout process by implementing third-party-
contributed modules.
Automatic account generation (anonymous checkout). Ubercart automatically
creates user accounts for customers at checkout. Accounts are automatically
generated using the users email address. For return customers, previously used
addresses will be listed on the checkout page for easy access.
Simple order processing. Order processing screens are configurable and extensible,
offering the ability to modify the base screens to accommodate your specific
requirements.
Simple order creation and editing. Ubercart provides an easy-to-use interface for
manually creating orders for customers, including adding products, updating
shipping process, adding fees, discounts, and coupons.
Integrated payment system. Ubercart provides the ability to collect payments from
customers through several methods (check, credit card, COD, and so on) and
payment gateways (Cyber Source, Authorize.net, PayPal, and the like). The payment
process is configurable and provides an easy to use online credit card terminal.
Activity logging. Ubercart tracks all changes made to an order, including payment
processing.
XML import/export. Ubercart provides an interface that allows administrators to
import products, attributes, orders, and customers from your old store. Ubercart also
provides the ability to export products, attributes, orders, and customers from your
Ubercart store.
From library of Wow! eBook <www.wowebook.com>
APPENDIX D ■ E-COMMERCE
285
The Ubercart team provides an online demonstration of Ubercart’s capabilities at
. I would suggest that you check it out before installing Ubercart on your own
website.
Installing Ubercart
The process for installing Ubercart is identical to installing any other module on Drupal. You can find
the Ubercart module at When installing Ubercart you will also need
to install a number of modules that Ubercart depends on. Those modules are:
Token
CCK
FileField
ImageAPI
ImageCache
ImageField
Thickbox
Google Analytics
Views
Install Ubercart and the required modules following the steps outlined Chapter 8.
After installing Ubercart you must enable the Ubercart modules that you will need to operate your
storefront. For demonstration purposes I am going to enable all of the Ubercart modules. As you
become familiar with the platform, you may find that you do not need some of the features offered by
some of the modules. You can disable modules as you deem appropriate.
Setting Up Your Storefront
The first step in setting up your storefront is to create a role that will be assigned to users who will be
administering your site. Follow the directions covered in Chapter 3 if you need a refresher on creating
roles. I’ll create a role named Store Administrator. After creating it, I’ll set the permissions for that role.
There are several permissions to set, all starting with uc_. For my site, I’ll enable all permissions for the
Store Administrator role.
The next step in the process is to set the configuration options for various aspects of your site. I’ll
start with the store settings, which can be found by clicking on the Store Administration link at the top of
the page. The Store Administration page provides links to all of the configuration and management
options for Ubercart (see Figure D-1).
APPENDIX D ■ E-COMMERCE
286
Figure D-1. Ubercart’s Store Administration page
On the Store Administration page, click on the Configuration link. On the Configuration page, scroll
down to the Store settings and click on the link. On the Store settings page you will find three areas to set
configuration options: Contact settings, Display settings, and Format settings.
Click on the Contact settings and enter the details for your storefront.
Fields on this form include the store name, the owners name, the store’s e-mail
address, phone number, fax number, and address. After entering the values,
click on the “Save configuration” button.
Click on the Display settings link and update the display settings based on
your requirements. For my storefront I’ll use the default values.
Click on the Format settings link and update the settings based on the
requirements for your site. There are display settings for attributes such as
currency, weight, length, and dates. I’ll use the default settings.
Next, set the shipping quote options by returning to the Store Administration page and clicking on
the Configuration link. On the Configuration page, scroll down until you find the “Shipping quote” link.
Click on the link to set the Quote settings and the Quote methods.
On the Quote settings page, enter the default pickup address. Ubercart needs to
know where the products are being shipped from in order to accurately
calculate shipping costs.
APPENDIX D ■ E-COMMERCE
287
On the Quote methods page, you’ll need to select the shipping methods that
you intend to use (UPS, U.S. Postal Service, and so on) and the type of
packaging you’ll use (Parcel or Envelope). If you select UPS, you’ll need to click
on the UPS link to enter your UPS Online Tools XML access key, UPS Shipper
number, UPS.com User ID, and your password. You’ll also need to enter UPS
shipping methods you provide, as well as a few other configuration options.
Clicking on the USPS link shows the configuration options required for
shipping product via the US Postal service. You can also enter a flat rate
shipping quote by clicking on the “Flat rate” link and creating a flat rate
shipping method and cost.
Next, set the payments options for your site by returning to the Store Administration page (Figure
D-1) and clicking on the Configuration link. On the Configuration page, scroll down until you find the
Payment options link. Click on the Payment options link to view configuration pages.
Click on the “Payment methods” link to display the list of payment options that
are available to use on your site. Options include PayPal, COD, Check, Google
Checkout, Credit Card, 2Checkout, and Other. You may enable or disable any of
the payment options listed on the form. PayPal, Google Checkout, Credit card,
and 2Checkout require that you have credentials for those processing methods
and a SSL certificate for your site. For demonstration purposes I’ll accept COD
and Checks, as those options do not require that I set up a merchant account
with any of the other options.
If you are using PayPal, Google, Credit cards, or 2Checkout, you will also need
to click on the “Payment gateways” link and enter the appropriate credentials
information for the services that you are using.
The last configuration option that I will cover is tax rates. If your store operates in a state that
requires that you collect sales tax, you can use Ubercart’s “Tax rates and settings” configuration option
to set the tax rates associated with buying. To set tax rates and options for your site by return to the
Store Administration page and click on the Configuration link. On the Configuration page, scroll down
until you find the “Tax rates and options” link. Click on the link to view configuration pages.
To set a tax rate, click on the “Add a tax rate” link and enter the appropriate values for the options
listed on the form (for example,, should the tax be applied to shippable product, virtual products,
shipping, and son on).
With the basic configuration options set, I’m now ready to start setting up the products on my site.
Updating the Product Content Type
Ubercart’s default Product content type doesn’t ship with an image field, and the requirements for my
site call for an image for each product. Adding an image is a simple process of editing the Product
content type and adding an image field (see Chapter 10 for details on how to add a field to a content
type). After adding the image field, I’ll set the display options for the teaser and full node views of the
product, selecting the product_list image linked to node option for the teaser view and product_full
image linked to node option for the full node view. After creating the image field, I’ll return to the main
configuration page for the “Product content” type and will select the field I just created in the Ubercart
product settings configuration section in the Product Image field option.
While modifying the “Product content” type there are a two other options that I want to change.
First I don’t want visitors to have the ability to post comments against my products, so I’ll disable
APPENDIX D ■ E-COMMERCE
288
comments. I also don’t want the user name and date/time listed on the page when visitors are looking at
products. So I’ll click on the Display settings tab and will uncheck the Display author and date
information option.
Setting Up Products
With the general storefront parameters set, I’m ready to set up the products on my site. For my site I am
going to sell Drupal 7 coffee mugs and t-shirts. The first step in setting up products is to define the
product categories that you intend to use on your site. Ubercart uses Drupal’s taxonomy system to
categorize products, and automatically creates a vocabulary named Catalog. Following the steps
outlined in Chapter 4, I’ll add the new terms for coffee cups and t-shirts. When creating the new terms,
you’ll notice that Ubercart provides the ability to upload an image for taxonomy terms in this
vocabulary. It’s a good idea to upload images and Ubercart will use those images on various parts of your
site when it is referring to product categories.
The next step is to create the products you want to list on your site. I’ll create two products, a
Drupal 7 coffee cup and a Drupal 7 t-shirt. To create a product use the Create content link and select the
Product option. On the Product page enter the appropriate attributes for your products.
For my coffee cup product I’ll enter the following information:
Name: Drupal 7 Rocks Coffee Cup
Picture: I’ll upload a picture of the coffee cups I want to sell on the site
Description: A high quality ceramic coffee mug with the Drupal logo and
Drupal 7 Rocks
Catalog: Coffee Cups
SKU: 100000 (you can enter any value you deem appropriate, it must be unique
across your storefront)
List price: 12.99
Cost: 4.99
Sell price: 9.99
Product and its derivates are shippable: checked
Weight: 1 pound
Package quantity: 1
Default quantity to add to cart: 1
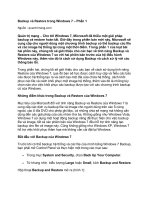
I’ll leave the default publishing options of publishing the new items to the homepage of my site. If
you don’t want the items to show up on the homepage uncheck the promote items to the homepage
option. After saving, the coffee cup the product is now displayed on the homepage of my site. See
Figure D-2.
APPENDIX D ■ E-COMMERCE
289
Figure D-2. My coffee cup product displayed on my site’s homepage
To demonstrate Ubercart’s product category features, I’ll create a second product, a Drupal 7 t-shirt.
I’ll follow the same steps listed previously for the coffee cup, using the appropriate values for my t-shirt.
After saving the t-shirt item and returning to the home page, I now see both products listed on the
homepage.
Managing Inventory
Ubercart provides the ability to manage the quantities you have for each of the products you sell. If you
enabled the Stock module when you installed and enabled Ubercart, the feature is ready to use. The first
step is to determine whether you want Ubercart to send e-mails to someone in your organization when
items fall below a specified stock level. It’s a great feature and simple to enable. On the Store
Administration page, click on the Configuration link. On the Configuration page, click on the Stock
settings link. On the Stock settings page, check the “Send e-mail notification when stock level reaches its
threshold” box and enter the e-mail addresses of the people who should receive the alerts in the Notify
recipients text box. You can optionally modify the content of the messages in the Subject and Message
text fields, or leave the default values.
To set the starting stock levels, edit the product nodes that you created as part of your store setup
process and click on the Stock link. On the Stock page, check the Active text box, enter the Stock level
(quantity of the items you have in stock) and the Threshold level that will trigger the e-mail notifying the
people responsible for that product (as set in the previous step) that its time to order new stock.
Ubercart will now decrement inventory every time an order is placed. When a new shipment is received
someone will need to add the quantity received to the previous inventory level.
Enabling Ubercart’s Blocks
There are two standard Ubercart blocks that I’ll enable for my site: the Catalog and the Shopping cart
blocks. The Catalog block lists the product categories that I created on my site (coffee cups and t-shirts),
and lists the number of items found in each of those categories. The Shopping cart block lists the
number of items a shopper has in their cart and the total cost of the items in their cart. I’ll follow the
APPENDIX D ■ E-COMMERCE
290
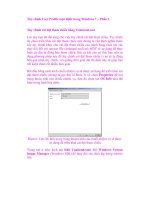
steps outlined in Chapter 7 to assign those blocks to the appropriate regions on my theme. After
assigning the blocks and returning to my homepage I now have categories, products, and shopping cart
summary information displayed on the homepage of my site (see figure D-3).
Figure D-3. Site updated with the Catalog and Shopping cart blocks
Catalog Views
By enabling the Catalog block, I now have the ability to display all of the products that are associated
with a specific category. If a user clicks on the Coffee Cups or T-shirts link, Drupal now renders a list of
just those products assigned to those categories, along with the title, description, and image associated
with that category. Clicking on the Coffee Cups link displays all of the products associated with the
coffee cup category (see figure D-4).
APPENDIX D ■ E-COMMERCE
291
Figure D-4. Products listed by product category page
The Add to Cart Process
When a shopper finds an item they want to purchase from your site, they simply click on the “Add to
cart” button. Clicking on that button updates the information displayed in the Shopping cart block and
takes the shopper to their shopping cart page. Figure D-5 demonstrates the results of clicking on the
“Add to cart” button for a coffee cup.
Illustration D-5. The updated Shopping cart block
At this point the shopper can continue shopping, update the cart (either by removing an item or
changing the quantity ordered), or check out.
APPENDIX D ■ E-COMMERCE
292
The Checkout Process
When the shopper is ready to check out all they have to do is click on the Checkout link in the Shopping
cart block, or the Checkout link on the Shopping cart page. Both links take the user to a page that asks for
delivery information (name of the person the item is being shipped to, their shipping address, and
phone number), billing information (name of the person the item is being billed to, their billing address,
and phone number), their credit card information (or optionally check or money order). Depending on
the shipping options you have enabled the user can select a shipping method.
After entering the details the user clicks the Review order button. Ubercart displays an order
confirmation page with all the information they entered. If the values are correct the user clicks the
Submit order button that completes the order process.
Managing Orders
With your store operational its time to start managing orders. On the Store administrators page click on
the Orders link. The Orders page displays a list of all orders on your site with the ability to filter orders by
status (see Illustration D-4).
Figure D-6. A list of orders on my test website
Standard Ubercart order statuses are:
Cancelled. The user cancelled the order.
In Checkout. The user is in the checkout process.
In Google Checkout. The user is in the process of paying via Google Checkout.
Pending. The order is pending payment approval. If you have enabled pay by
check or COD the order will remain in this state until you apply the check or
payment to the order.
Chargeable. The customer has completed the order and payment may be
charged to the selected payment method.
APPENDIX D ■ E-COMMERCE
293
PayPal Pending. PayPal payment is in process.
Payment Received. The customer successfully paid for their order using one of
the electronic payment methods.
Complete. The order has been shipped and is complete.
As you manage your store, you will need to process orders that are in Pending and Payment received
states, if the customer ordered a physical good that requires you to ship it. For my test store, order #4 is
in a pending state. The customer selected to pay by check, so I’ll need to update the order status
manually when I receive the check.
To apply payment to a order where the user did not pay by Google Checkout, PayPal, or Credit card
(those methods automatically set the order to payment received), click on the Edit icon. On the Order
page, click on the payment method and select the method the customer used to pay for the merchandise
(e.g., check) and enter the amount paid. Click Enter to apply the payment to the order.
With the payment applied, I am now ready ship the products. To ship an order, click on the
packages link and click on the Create packages link. You have the option of creating a single package, in
the case where all the items fit into one container, or create multiple packages. Once you have the items
associated with packages you are ready to ship the order. Click on the Shipments link and click on the
Make a new shipment link. Check the packages you want to ship and select the shipment method (e.g.,
ship manually). Click on the Ship packages button and on the Ship packages page enter the shipping
details. When complete click on the Save shipment button.
Congratulations you processed an order on your new Ubercart base storefront!
■ Note Ubercart is a rich and powerful e-commerce platform. For more information on configuring and managing
an Ubercart storefront visit www.ubercart.org/docs. You’ll find detailed information on how to set up payment
processing and shipping, as well as details on managing your storefront.
Reporting
Ubercart ships with a number of highly valuable reports, including details about Customers, Products,
Sales, Stock. For detailed description of standard reports visit
www.ubercart.org/docs/user/323/viewing_reports.
Summary
In this appendix I touched on the process of setting up and operating an e-commerce site on Drupal
using Ubercart. In the matter of a few minutes you could be up and selling products on the web by
following the directions outlined in this chapter. There are many more features and additional
capabilities in Ubercart. For more information visit the Ubercart project’s homepage at
www.ubercart.org.
295
Index
■ Special Characters
and Numbers
#columns ID, 209
#container ID, 209
#footer DIV ID, 210
#header attribute, 243
#header CSS definition, 205
#logo attribute, 243
#logo CSS id, 206
#site-name CSS id, 206
|Menu settings tab, 14
404 errors, 221
■ A
Aberdeen theme, 64, 66
About Us node, 186, 188
About Us pages, creating, 249
Above option, Labels select list, 148
Access attributes, Views edit page, 154
access configuration, setting up, 279–280
access control check box, 180
Access setting, Views, 156–157
Account Information page, 98
account settings configuration form, 225
Account Settings link
Configuration page, 26
People and Permissions options category, 225
Account settings page, 224–225, 227
accounts. See user accounts
activating blocks, 279
active status check box, Add user form, 33
activity logging, Ubercart, 284
Activity Stream module, 275
Add a New User link, phpmyadmin
administrator's page, 260
Add a tax rate link, 287
Add container form, Forums administration
page, 102
Add content link, 109, 134, 183, 190–191
Add Content Screen, 183
Add content to Top page, 183
Add content type link, Content types screen,
121–122
Add display button, Views configuration form,
172
Add existing node link, 196
Add feed link, 249
Add item link, Main menu, 54
Add menu item form, 54
Add Menu link, Menus page, 56
Add new content link, 5–6, 10, 98, 112
Add role button, 29
Add role link, People configuration page, 98
■ INDEX
296
Add schedule link, Backup and Migrate module
Schedules page, 216
Add tab, Views administration page, 152
Add terms link, Taxonomy page, 40, 49
Add to Any Share/Bookmark module, 272
Add to Any widget, 273
Add to cart process, 291
Add user form, 31–32
Add user link, People page, 31, 98
Add vocabulary link, Taxonomy page, 39
Address field, Create Webform configuration
page, 115
admin account, 31
admin screens, 93
administer organic groups permission, 280
administration, 215–227
backing up, 215–219
checking for updates, 223
checking log files, 219–222
Status report, 222
user account requests, 225
administration theme, 67
Administrative description field, 179
Administrative title field, 179, 192
administrator interface, 120
administrator page, 179
administrator's menu, 77, 81
Administrators Only option, Configuration
page, 27
advanced forum module, 108
Aggregator Feed, setting up, 249
Aggregator module, 244, 249
Alias URL, 94
a:link name, 206
<all> sort criteria option, 163
Allow comment title option, 125
Allowed field extensions field, 143
anonymous checkout, Ubercart, 284
Anonymous users, 25–26, 226, 236
Apache, MySQL, PHP, Python (XAMPP), 258–
260
Apache web server, 257–258
Appearance configuration options, 68
Appearance link menu item, 64, 67–68, 201, 213
Appearance page, 64, 68, 213, 243
arguments, 162
Article content item, 210
Article content types, 6, 10–12, 92, 119, 121, 246
article creation form, 10
Assign content link, gear pop-up menu, 182
assign to queue link, Nodequeues module, 93
assigning permissions, 29–30
Assistance field, Event content type, 141
Associated Sport field, 46
Attachment options, Views edit page, 154
Authenticated users, 25, 102, 157, 225
author filter option, 163
authoring information, content, 20
Authoring information menu item, 20
automatic backups, 216
a:visited name, 206
■ B
backing up site, 215–218, 269
Backup and Migrate administration page, 218
Backup and Migrate module, 94, 216, 218–222,
244, 269
backup directories, 218
Backup every field, 217
backup files, 218
Backup now button, Backup and Migrate
Backup page, 217
■ INDEX
297
Backup tab, Backup and Migrate configurations
page, 217
base themes, modifying, 203–207
Basic page content type, 6–7, 10, 45, 54, 119, 121
Basic page creation page, 45
Basic page link, 6
Basic page type, 246
Basic Settings section, Views edit page, 154
Block body field, 80–81
Block configuration page, 74–75
Block description field, 80
Block edit form, 81
block listing, 74
Block options, Views edit page, 154
Block title field, 75, 80
block.css file, 244
Blocked status, 35
blocks, 71–81, 212–213
activating, 279
configuring, 74–77
creating custom blocks, 79
finding list of available blocks, 72–73
making appear on pages, 71–72
overview, 71
re-arranging, 74
reassigning and deactivating, 74
Ubercart, enabling, 289–290
using from contributed modules, 77–79
Blocks Administration page, 74
Blocks administration page, 86
Blocks configuration page, 111
Blocks link, Structure page, 57, 72, 74, 81, 100,
111
Blocks page, 57, 72–74, 81, 100, 209–210
blocks.css file, 212–213
Blog content type, 121
Blog module, 89, 97–98, 100, 244
blogger role, 98
blogging
adding list of most recent blog entries, 100–
101
creating blog entry, 98–99
displaying blog entries, 99
enabling blogs, 97–98
overview, 97
body area, Article content type, 119
body field, 119, 122
body tag, 204
body text area, 6, 11
Breadcrumb links, 184
Browse button, 10
button-based menu, 52
buttons, 51–52
Buytaert, Dries, 2, 69, 229
■ C
Caching setting, Views, 158
calendar event, 9
Calendar module, 4
Cancelled status, 292
Cascading Style Sheets (CSS), 59, 62, 159–160,
188, 269
Catalog block, 289–290
Catalog views, 290
categories, authenticated users, 25
categorizing resources, 242
CCK (Content Construction Kit), 4, 92, 146, 151
Chaos Tools module, 179
Chaos Toolset module, 196
Chargeable status, 292
check boxes, 136, 139–141
Check for updates automatically check box, 265
Checkout link, 292
■ INDEX
298
Checkout process, 292
Choose file feature, 243
Chrome, Google, 213
Clear all caches button, 209
CMS (Content Management Systems). See
Content Management Systems (CMS)
Coffee Cups link, 290
color scheme, 63
command line interface, MySQL, 255
comment settings, content, 18–20
comments preferences, 19
Comments section, 20, 30
commercial theme, 62
company user check box, Add user form, 33
Company user role, 30
Complete status, 293
Configuration link, 26, 209, 213, 225, 286
configuration options
Blocks Administration page, 74
region, 194
Search module, 88
themes, 68
Configuration page, 26, 75, 249, 278, 286
configuration parameters, 263
configuration, setting up access, 279–280
Configure link, 74, 81, 88, 249
configuring
blocks, 74–77
Drupal, 262–265
modules, 84–88, 235
settings for user accounts, 26–28
Confirm password field
Add user form, 33
site configuration form, 265
Contact module, 244, 248–249
Contact settings, 286
contact us feature, setting up, 248–249
content
authoring information, 20
comment settings, 18–20
creating, 5
creating in Drupal, 10–12
deleting, 21–22
editing content, 12–14
finding, 22–23
identifying required, 240–241
menu settings, 14–15
overview, 9
publishing options, 20–21
revision information, 16–17
selecting taxonomy term when creating, 45–
47
URL path settings, 17–18
Content administration page, 112
Content Construction Kit (CCK), 4, 92, 146, 151
content creation form
Event content type, 134
page content type, 182
content creation screens, 42
content editing form, 14
content items, adding to menu, 53–54
Content link menu item, 22, 112
content listing page, 22
Content Management Systems (CMS), 1–5
content region, 178
content scheduling feature, 248
Content screen, 23
Content type creation form, 123
content type filter option, 163
Content type link, Structure page, 137, 146
Content type list, 128
Content Type page, 246
content types, 119–149
basic page and article, 119
■ INDEX
299
custom
creating, 121–135, 245–246
customizing forms, 128–135
defining, 120, 242
formatting output, 146
other field types
check boxes, 139–141
file uploads, 142–144
numeric fields, 146
overview, 136
radio buttons, 137–138
select lists, 142
text area, 144–145
setting up, 278
Content types link, Structure page, 42, 121, 148
Content types option, 278
Content types page, 147–148
Content types screen, 121
contexts check box, 180
contributed modules, 3–4, 83–84
downloading and installing, 244–245
using blocks from, 77–79
contributed themes, 199
Cook, Craig, 198
Core modules, 97, 235, 262
Core section, module administration page, 89
Create a blog entry form, 98
Create Blog entry page, 98
Create content link, 45, 54, 280, 288
Create group post link, 282
Create New Account button, Add user form, 33
Create new account link, 226
Create new account option, login form, 34
Create new Article content check box, 30
Create new Basic page content check box, 30
Create new database label, 260
Create new database text box, 260
Create new forum topics check box, 102
Create new revision check box, 16
Create new version checkbox, Content type
creation form, 124
Create Webform configuration page, 113
CSS (Cascading Style Sheets), 59, 62, 159–160,
188, 199, 208, 269
CSS class, 159, 211–212
Ctools module, 179
current weather conditions block, 77
custom blocks, 79
custom component, 196
Custom content option, 196
custom content type, 9, 232
custom content type administration screens,
121
Custom Content Type link, 136
custom content types
creating, 121–135, 245–246
customizing forms, 128–135
defining, 120, 242
formatting output, 146
custom field types, 136
custom themes, 199
■ D
database, Drupal, 260
Database for User field, 261
Database logging module, 244
Database name field, 262
database parameters, 263
Database password field, 262
Database username field, 262
Date module, 4, 244
deactivating blocks, 74
■ INDEX
300
decompressing Drupal installation package,
259
decompression utility, 259
Default country field, site configuration form,
265
Default option, 138, 148
Default time zone field, site configuration form,
265
Default value field, Create Webform
configuration page, 114
Default Value field, Manage Fields form, 131
default value, radio button field, 138
Defaults link, Views edit page, 154
Delete button, 22
Delete link, 23
Delete own Article content check box, 30
Delete own Basic page content check box, 30
Delete own forum topics check box, 102
deleting content, 21–22
Description field, 92, 114, 122, 129, 280
design elements, 234
design, visual, 243–244
designing example website, 239–241
Destinations tab
Backup and Migrate administration page,
218
Backup and Migrate module configuration
page, 216
Disable the account and keep all content
option, Configuration page, 27
Disabled check box, Create Webform
configuration page, 114
Disabled Themes section, 66, 201
disabling modules, 89
Display a specified number of items option,
Views edit page, 155
Display all items option, Views edit page, 155
display attributes, fields, 148
Display author and date information option,
288
Display height field, Create Webform
configuration page, 114
Display links option, Views configuration form,
159
Display node comments option, Views
configuration form, 159
Display options link, 246
Display settings, Content type creation form,
125
Display width field, Create Webform
configuration page, 114
Distinct setting, Views, 157
Distinct value, Views configuration form, 157
DIV structure, 207
DIV tags, 208
</div><!—header >, 207
documentation, resources, 267–268
Download link, 66, 77, 86
Download these updates button, Module
configuration page, 90
downloading
contributed modules, 244–245
Drupal, 259
modules, 84–87
Drupal
Content Management Systems (CMS), 2
creating social networking on, 275–278
E-commerce module options for, 283
installing, 243
integrating with Facebook, 273
integrating with Flickr, 274
integrating with Twitter, 274
overview, 1–8
Drupal for Facebook Module, 273
■ INDEX
301
■ E
E-commerce module
Add to cart process, 291
Catalog views, 290
Checkout process, 292
managing inventory, 289
managing orders, 292–293
options for Drupal, 283
overview, 283
reporting, 293
setting up products, 288–289
setting up storefront, 285–287
Ubercart
enabling blocks, 289–290
installing, 285
overview, 284–285
updating Product content type, 287–288
Edit link
content item, 17–18, 20, 22
People configuration page, 99
Views page, 170
edit mode, 13
Edit own Article content check box, 30
Edit own Basic page content check box, 30
Edit own comments check box, 30
Edit own forum topics check box, 102
Edit Panel link, 188
Edit permissions link, Roles page, 98
Edit tab, 47
editing content, 12–14
editing mode, 13
E-mail address field, site configuration form,
265
E-mails link, Webform configuration page, 115
Embedded Media module, 275
Employee content type, 162
Empty text option, Exposed form, 161
Enable and set default link, 66, 201
Enable display option, file upload parameters
form, 142
Enabled check boxes
Add menu item form, 54
module administration page, 89
module configuration page, 87
Modules panel, 78
enabling modules
disabling module, 89
uninstalling module, 91
upgrading module, 90
enabling Ubercart blocks, 289–290
End Date field, 92, 128, 133–134
End Time field, 92, 128, 133–134
Enter the title or NID of a node field, 185
Event content type, 123–124, 127–128, 133–134,
136–137, 141–142
event creation form, 135, 144
Event Description field, 128, 132, 134
Event field, 134
Event settings page, 140
event start date field, 130, 132
Event Title field, 128
Events content type, 152
example website
creating about us pages, 249
creating custom content types, 245–246
creating menu items, 249–250
creating taxonomy vocabulary and terms,
245
creating user accounts, 256
creating user roles and setting permissions,
245
creating views, 247–248
defining and designing, 239–241
■ INDEX
302
defining custom content types and
taxonomy structure, 242
defining navigational structure, 242
downloading and installing contributed
modules, 244–245
installing Drupal, 243
production, 254
setting up contact us feature, 248–249
setting up Feed aggregator, 249
setting up forums, 249
structure of, 241–242
testing, 251–254
visual design, 243–244
wrapping up pages, 250
Existing node link, 184, 191
exposed filter, 160
Exposed form, 160–161
external page, adding menu items for, 54–55
■ F
Facebook, integrating Drupal with, 273
Facebook Status Module, 273
Facebook Style Statuses module, 276
features, setting up, 248–249
Feed aggregator, setting up, 249
Feed configuration options, 173
Feed display, Views configuration form, 172
Feed link, Views configuration form, 172
Feed options, Views edit page, 154
Field key field, Create Webform configuration
page, 114
Field Row Style option, Views configuration
form, 161
field settings screen, 44
field type drop-down list, Manage Fields form,
129
field type option, manage fields page, 145
field types
check boxes, 139–141
file uploads, 142–144
numeric fields, 146
overview, 136
radio buttons, 137–138
select lists, 142
text area, 144–145
Field UI module, 244
Fields heading, Views configuration form, 170
Fields option, Views configuration form, 158–
159
file browser button, file upload field, 142
File displayed by default option, file upload
parameters form, 142
File module, 244
file system, backing up, 218–219
file upload parameters form, 143
file uploads, 142–144
Filter button, 23, 226
Filter by compatibility link, Drupal web site
modules page, 146
Filtered HTML option, Block edit form, 81
filters, used by Views, 163–164
finding content, 22–23
Firebug plug-in, Firefox, 213–214
Flat rate link, 287
Flexible Layout configuration page, 193
flexible layout option, 178, 192–196
flexible panel layout, 193
Flexible panel layout designer, 194
Flickr, integrating Drupal with, 274
Footer option, Exposed form, 161
footers, 210
form component, 113–114
form element option, manage fields page, 142
Format select list, 148
■ INDEX
303
Format settings link, 286
forms, customizing, 128, 135
Forum configuration page, 103
forum containers, 103
Forum link, Structure page, 102
Forum module, 102, 244
Forum Topic, 107–108, 121
forums, 101–108, 249
Forums administration page, 102
forums, Drupal.org web site, 268
Forums module, 101–102
Forums page, 104, 106
Full Node mode, 12, 159
Full Node version, 159
Full Node view, 124, 148, 158, 287
full nodes, 12
Full-page mode, 166–167
Full-page view, 168
functionality
identifying required, 240–241
of Organic Group site, expanding, 282
Fusion theme, 198
■ G
Galerie module, 274
Garland theme, 59, 62–63, 77, 175
gear icon, 182, 191
gear pop-up menu, 182
general parameters screen, 132
Generic page content type, 42
Genesis base theme, 201
Genesis directory, 198
Genesis logo, 213
Genesis theme, configuring, 200–202
genesis_mytheme directory, 203
genesis_mytheme.info file, 201, 203, 207
genesis_SUBTHEME directory, 201
genesis-1c layout, 204
genesis.info file, 199
Gilmore, W.J., 198
Global: Text area option, Views configuration
form, 160
Google Analytics service, 4
Google Chrome, 213
Grid style, Views configuration form, 158
Group admins block, 279
Group details block, 279
Group details option, 279
Group files block, 279
Group members block, 279
Group name field, 280
Group node option, 278
Group notifications block, 279
Group post, creating, 281–282
Group search block, 279
Groups field, Views configuration form, 163
■ H
Header option, Exposed form, 160
Header title field, Views configuration form,
160
heading type, 160–161
Heartbeat module, 277
Help link, 184
Help text field, Manage Fields form, 130, 143,
145
hidden files, 259
Hidden option, Labels select list, 148
Hide layout designer button, 196
hierarchical terms, search-engine-friendly lists,
48–49
horizontal menus, creating, 207–210