Dragonfly, version 2
Bạn đang xem bản rút gọn của tài liệu. Xem và tải ngay bản đầy đủ của tài liệu tại đây (56.62 KB, 7 trang )
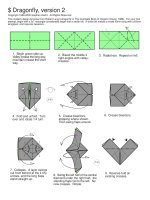
$ Dragonfly, version 2
Copyright 1998-2000 Stephen Hecht. All Rights Reserved
This model’s design borrows from Robert Lang’s dragonfly in The Complete Book of Origami (Dover, 1988). For your first
attempt, begin with a 3x7 rectangle considerably larger than a dollar bill. A dollar bill makes a model 45mm long with a 63mm
wingspan, and requires tweezers.
1. Begin green side up.
Valley-crease the long way,
mountain-crease the short
way.
2. Bisect the middle 4
right angles with valley-
creases.
3. Rabbit-ear. Repeat on left.
4. Fold and unfold. Turn
over and rotate 1/4 turn.
1/4
5. Crease bisectors,
stopping where shown.
Then swing flaps around.
6. Crease bisectors.
7. Collapse. A layer swings
out from behind at the 4 tiny
arrows, and the long flaps
stand straight up.
8. Swing the left half of the central
diamond under the right half; the
standing flaps fall to the left. No
new creases. Rotate.
1/4
9. Reverse-fold on
existing creases.
$ Dragonfly, v2 (continued)
Copyright 1998-2000 Stephen Hecht. All Rights Reserved
10. Flip one layer down,
incorporating a reverse-fold.
Unfold. Repeat on left, and
twice behind.
11. Lift bottom point,
opening paper completely.
12. The central diamond-shape
sticks up. The indicated points
are concave. Push them up
from behind to invert them.
A
13. Pinch together all the edges
in the range “A”, swinging them
under. Meanwhile, divide the
central diamond. Only the tiny
valley fold is a new crease.
14. Flip one flap to the right.
Repeat 13-14 on the left.
Turn over.
13-14
15. Reverse-fold, in-and-out.
Repeat on left.
16. Reverse-fold, 1 layer
over 2. Crease only the front
half sharply. See next
diagram for positioning.
17. Flip the rectangular
section behind and upwards.
This is a reverse-fold. Do
not crease sharply.
18. Reverse-fold, 1 layer
over 2. Crease only the rear
half sharply. Note bisected
angle.
$ Dragonfly, v2 (continued)
Copyright 1998-2000 Stephen Hecht. All Rights Reserved
19. Pull single-ply black triangle
to the left. This will drag the
single-ply rectanglular piece of
the upper wing downwards.
Don’t crease.
20. Reverse-fold, flipping over
the rectangular single-ply.
Press flat and sharpen all
creases.
16-20
21. Repeat 16-20 on left.
Turn over.
not to
corner
23. Bisect lower angle,
swiveling at the upper edge.
Release the stretched layer,
and flip the long flap back to
the right.
2
22. Flip 1 flap over, and pull
the next flap towards the left.
Model won’t lie flat.
22-23
24. Repeat 22-23 on left.
Turn over.
25. Fold top point to center.
Turn back over.
26. Valley fold,
creasing sharply.
not to tip
27. Bring one layer to
front (closed sink).
$ Dragonfly, v2 (continued)
Copyright 1998-2000 Stephen Hecht. All Rights Reserved
28. Valley-fold next flap over
on the sink line (stretching at
the wing). Unfold it.
29. Fold over again, spread-
sinking assymetrically. The
x-ray line is the other side of
the spread.
Note: bottom of
squashed triangle
crosses point
where wing meets
body.
30. Reverse-fold (symetrically) tip
of tiny hidden waterbomb base,
as far as possible. (Temporarily
unfold point from step 25.)
31. Tuck left edge into the
sink. Mountain-fold right edge
behind the edge under it
(creasing sharply).
32. Repeat 26-31 on left
side. Unfold point from
step 25.
26-31
33. Fold model in half.
Rotate 1/4 turn.
1/4
34. Reverse-fold twice. The
valley-fold is the crease from
step 25.
35. Note: front of head is
vertical. Unfold the crimp and
spread the 4 ridges along upper
edge of head.
36. Triple-crimp along
existing creases.
2-ply here
$ Dragonfly, v2 (continued)
Copyright 1998-2000 Stephen Hecht. All Rights Reserved
37. At wing, swivel. At head,
flip over a layer, incorporating
a reverse fold.
note: outermost
layer is “trapped”
follow edge
behind
38. Wrap swivelled layer
around (sort of a closed-sink).
39. Valley-fold along edge of
the wrap. Tuck under where it
overlaps the front of the wing.
not to
corner
40. Tuck back of wing into the
wrapped bit from step 38
(locking wing). Repeat 37-40
on other side.
37-40
41. Detail of head. Sink as
shown. If opened flat, this would
be a mountain-fold joining point
“A” with its counterpart.
A
42. Like so. Spread top
of head apart a bit.
43. Top-view of head. Push
down the crimp, unsinking
the front of the head, and
close back up.
44. Closed-sink along
existing crease.
45. Dent the top corner
of the head. Tuck in at
bottom. Head is now
locked.
Be careful of
tearing stress!
Optional: underneath the head,
twist the extra sunken material
towards the rear.