How to use, adapt and design sewing patterns
Bạn đang xem bản rút gọn của tài liệu. Xem và tải ngay bản đầy đủ của tài liệu tại đây (15.28 MB, 145 trang )
USP 001-007 corrections_.indd 1 11/17/09 12:50:52 PM
How to
Use,
Adapt
and
Design
Sewing
Patterns
USP 001-007 UK_.indd 1 11/18/09 1:11:33 AM
USP 001-007 corrections_.indd 2 11/17/09 12:51:09 PMUSP 001-007 UK_.indd 2 11/18/09 1:11:33 AM
USP 001-007 corrections_.indd 3 11/17/09 12:51:14 PM
Lee Hollahan
How to
Use,
Adapt
and
Design
Sewing
Patterns
USP 001-007 UK_.indd 3 11/18/09 1:11:33 AM
USP 001-007 corrections_.indd 4 11/17/09 12:51:18 PM
Published in 2010 by
A&C Black Publishers
36 Soho Square
London W1D 3QY
www.acblack.com
ISBN 978-1-4081-2000-2
Copyright © 2010 Quarto plc
All rights reserved. No part of this publication may
be reproduced in any form or by any means – graphic,
electronic or mechanical, including photocopying,
recording, taping, information storage and retrieval
systems – without the prior permission in writing of
the publisher.
A CIP record for this book is available from the British Library.
QUAR.USP
Conceived, designed and produced by:
Quarto Publishing plc
The Old Brewery
6 Blundell Street
London N7 9BH
Senior editor: Lindsay Kaubi
Additional text: Sandra Wilson
Copy editor: Liz Dalby
Art editor and designer: Susi Martin
Art director: Caroline Guest
Design assistant: Saffron Stocker
Photographer: Philip Wilkins
Illustrator: Sha Tahmasebi, Chris Taylor, Katie Buglass
Picture researcher: Sarah Bell
Creative director: Moira Clinch
Publisher: Paul Carslake
Colour separation by PICA Digital Pte Ltd in Singapore
Printed in Singapore by Star Standard Industries (PTE) Ltd
10 9 8 7 6 5 4 3 2 1
USP 001-007 UK_.indd 4 11/18/09 1:11:33 AM
USP 001-007 corrections_.indd 5 11/17/09 12:51:23 PM
Contents
About this book 6
Chapter 1: Tools and materials 8
Essential equipment 10
Choosing fabrics 14
Chapter 2: All about
commercial patterns 18
Why use a commercial pattern? 20
How to measure accurately 22
Buying a commercial pattern 26
Understanding your pattern 28
Preparing a commercial pattern 30
Preparing your fabric 34
Pinning, marking and cutting out 42
Chapter 3: Altering a pattern 46
Simple alterations for
commercial patterns 48
Simple bodice alterations 50
Simple sleeve alterations 56
Simple skirt alterations 57
Simple dress alterations 60
Simple trouser alterations 61
Chapter 4: Designing your
own patterns 62
Creating your own pattern 64
Using pattern blocks 66
Making and fitting a toile 68
Advanced pattern alterations 72
Designing patterns 80
Simple dart manipulation 84
Styling sleeves and cuffs 88
Styling skirts 93
Styling dresses 96
Collar styles 100
Facings and waistbands 105
Pocket styles 108
Chapter 5: The pattern blocks 110
UK SIZE 8 pattern blocks 112
UK SIZE 10 pattern blocks 114
UK SIZE 12 pattern blocks 116
UK SIZE 14 pattern blocks 118
UK SIZE 16 pattern blocks 120
UK SIZE 18 pattern blocks 122
UK SIZE 20 pattern blocks 124
Chapter 6: Core sewing techniques 126
Glossary 140
Index 142
Credits 144
USP 001-007 UK_.indd 5 11/18/09 1:11:34 AM
USP 008-017 corrections_.indd 14 11/16/09 6:43:24 PM
USP 008-017 corrections_.indd 15 11/24/09 12:31:06 PM
USP 018-061 B1 corrections_.indd 22 11/24/09 12:50:57 PM
7
6
3
5
1
16
2
4
9
10
11
12
13
14
15
8
17
USP 018-061 B1 corrections_.indd 23 11/24/09 3:27:49 PM
USP 018-061 B1 corrections_.indd 60 11/16/09 10:51:37 PM
USP 018-061 B1 corrections_.indd 61 11/16/09 10:52:32 PM
USP 001-007 corrections_.indd 6 11/24/09 3:47:31 PM
22 All about commercial patterns
Getting started
Start by asking for help from a
friend. It is virtually impossible to
take accurate measurements by
yourself. Use a dressmaker's
measuring tape. Remove all of
your outer clothing, but remain
in your undergarments while
measuring. Use the standard size
UK12/US8 measurements (left) to
compare with your own.
Use the diagrams provided
opposite as a guide to where to
take the measurements. These
measurement points are called
‘body landmarks’. Body landmarks
can be indicated on your body by
positioning sticky tape on your
undergarments. Stand with your
feet together while measuring.
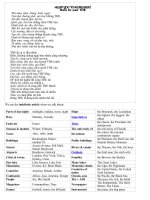
How to measure accurately
The essential body landmarks.
When taking body measurements, it is extremely important to be accurate.
A well-balanced, nicely-fitting garment could depend entirely on this. Keep
your tape measure flat to the body and do not pull it tight or twist it. Try to
keep all horizontal measurements level.
Tip
• Your working arm (depending
on whether you are right or left
handed) may have a greater
circumference: up to 2–3cm
(1 in) more! If so, always use the
larger measurement.
1 Bust 87cm (34
1
⁄4in)
2 Waist 68cm (26
3
⁄4in)
3 Hip 92cm (36
1
⁄4in)
4 CF neck to waist 32cm (12
1
⁄2in)
5 CF shoulder to waist 34.5cm (13
1
⁄2in)
6 Shoulder 9cm (3
1
⁄2in)
7 Neck 37cm (14
1
⁄2in)
8 C shoulder point to bust 23cm (9in)
9 CB neck to waist 40cm (15
3
⁄4in)
10 CB shoulder to waist 42cm (16
1
⁄2in)
11 Hip depth 20.5cm (8in)
12 CF waist to floor 103cm (40
1
⁄2in)
13 CF waist to knee 58.5cm (23in)
14 Back 23cm (9
1
⁄4in)
15 CB waist to floor 104cm (41in)
16 Upper arm 34cm (13
1
⁄2in)
17 Arm length 56.5cm (22
1
⁄4in)
Landmark Standard Personal
Size UK12/US8 Measurements
MEASUREMENT CHART
Photocopy this
Mark all your measurements down: remember to
re-measure if your body changes shape over time.
USP 018-061 UK_.indd 22 11/25/09 1:01:31 PM
23
When measuring
Get the help of a friend when taking your
body measurements. It’s not possible to
be accurate if you’re bending down and
twisting to manoeuvre the tape measure.
Body landmarks
Body circumference:
1 Bust• – fullest part of the
bust (keep level)
2 Waist• – 2.5cm (1in.) above
the navel
3 Hip• – fullest part of the body
Front bodice:
4 Centre front (CF) neck• – length from
front base of neck to waist
5 CF shoulder• – from base of
neck at shoulder point to
waist, over bust
6 Shoulder• – from base of
neck to tip of shoulder
7 Neck• – around base of neck
8 Centre shoulder to bust• – centre of the
shoulder to apex of the bust
Back bodice:
9 Centre back (CB) neck• – neck to waist;
find the large bone at the CB of your
neck down to the CB waist
10 CB shoulder• – from base of neck at
shoulder point to waist
Lower torso:
11 Hip depth• – from the CF waist point
to the fullest part of the body
12 CF waist to floor• – from the CF
waist to floor
13 CF waist to knee• – CF waist to
centre of knee
14 Back• – lower torso (bust line to waist)
15 CB waist to floor• – CB at waist to floor
Arm:
16 Upper arm• – circumference
of your upper arm
17 Arm length• – shoulder to wrist
measured with arm slightly bent
How to measure accurately
USP 018-061 UK_.indd 23 11/25/09 1:01:34 PM
60
Simple dress alterations
Lengthening or shortening a princess-line dress.
It is especially important to keep the CF and CB lines straight
when altering a large pattern such as this princess-line dress.
It is important to consider where you need the alteration on
the body, as this type of garment covers two alteration points:
above and below the waist.
1 Locate all the
pattern pieces
required for your
design and cut
them out to the
required size.
Shortening a princess-line dress
When shortening this pattern, use the CF, CB or
the grain line as a guide to align the pieces. This is
important in order to retain the garment’s shape.
2 Measure the amount to shorten the
dress by.
4 Make a crease, fold down the required
amount, and secure it with tape.
3 Draw a parallel pencil line.
Altering a pattern
Shortened dress
Dress before alteration
Lengthened dress
USP 018-061 UK_.indd 60 11/18/09 12:15:53 AM
61Simple dress alterations• Simple trouser alterations
1 Locate all the pattern pieces required for
your design and cut them out. To shorten
the trousers, follow the same method as for
shortening the sleeve (see page 56).
Lengthening a princess-
line dress
When lengthening this pattern,
use the CF, CB or the grain line
as a guide to align the pieces to.
This is important in order to
retain the original garment shape.
1 Locate all the pattern pieces
required for your design and cut
them out to the required size.
Locate the desired position for your
alteration and cut across the line.
Glue or tape on some paper to one
half of the pattern and measure out
the amount to be added.
2 Draw a pencil line.
3 Align the other pattern pieces to the
grain line, CF or CB, and secure them
with tape. Trim off the excess paper
on either side.
2 When lengthening trousers, ensure
you line up the grain lines to retain the
original trouser style and shape.
Trousers made longer
Trousers made shorter
Simple trouser
alterations
This is a simple alteration just
for the length of the leg.
Use the lengthen and shorten line as
before, remembering to alter the same
amount front and back.
Lengthening and shortening trousers
When altering trousers, align the pattern
alterations to the centre leg grain line.
By doing this, you will retain the original
trouser shape.
USP 018-061 UK_.indd 61 11/18/09 12:15:53 AM
14 Tools and materials
Choosing fabrics
A wide selection of fabrics in various textures and
colours is available.
When selecting a fabric for your project, it’s important to take the fabric’s
fibre content, texture (or ‘hand’), drape, colour, and in some instances, the
size of its print, or its horizontal stretch, into account. Once a piece of fabric
is cut, it cannot be returned, and mistakes can be costly.
Commercial patterns contain valuable suggestions regarding which fabric types suit a
garment’s particular design. Check the back of the pattern envelope. You’ll find a list of
appropriate fabrics, their widths and exactly how much fabric (what length) you will
need to buy. Cotton and linen fabrics are available in standard widths of 90cm (36in),
to 120cm (45in) and sometimes even 130cm (54in) and 150cm (60in). Woollens are most
often woven on wider looms and normally measure about 150cm (60in) wide. Knit
fabrics are usually available in widths from 140cm (56in) to 150cm (60in).
Don’t trust your ‘eye’ when selecting a fabric that must match the colour of another
garment. A shade of green, for example, can be difficult to visualize mentally. Green
hues undergo subtle tonal changes depending upon whether they tend more toward
the blue or the yellow in their composition. Bring the original garment with you to the
fabric shop, to be sure the colours are compatible.
Take time to decide on the perfect fabric for your needs. Lightweight corduroy, for
example, is perfect for children’s wear since it is very durable, and lightweight, silky
knits will drape beautifully in the flowing lines of a dress.
Finally, when bringing your fabric home, and certainly when storing, roll the fabric
instead of folding it. This will prevent creases that may be difficult to remove.
Attention to these details will ensure the success of your project, but coordinating a
beautiful fabric in a colour and texture that perfectly matches your garment’s design
will turn your project into a work of art.
Use weights instead of
pins when cutting denim.
Cotton poplin's
strength is derived
from its tight weave.
Woven fabrics
Generally, medium-weight, woven fabrics
are easy to handle and are the best
choice for beginners. Stiff and bulky
fabrics or those that are fine, with little
body are more difficult to sew with.
COTTONS
These fabrics were traditionally made
from 100% cotton but are often blended
or even replaced with man-made fibres
like polyester or rayon today.
Cotton A natural product of the cotton
plant, cotton readily accepts coloured
dyes. Cotton has a tendency to shrink, so
it’s a good idea to preshrink before
cutting out. Either pass over the fabric
with a steam iron or launder beforehand.
Cottons are usually cut on the grain for
stability, but can be cut and sewn on the
bias for ease of wear or design contrast.
Calico An inexpensive, roughly woven
cotton. The medium-weight variety is
often used to construct ‘dummy’ trousers,
or dress patterns, to check the fit before
constructing the final garment in an
expensive fabric. It is suitable for linings.
Calico cotton A lightweight, plain-weave
fabric, often with a printed pattern, this is
appropriate for both casual clothing and
children’s wear since it launders well.
Chino A medium-weight, twill-weave
cotton, with a slight sheen, most often
dyed beige and often used for slacks. A
heavier-weight chino, dyed in dark blue
or black, is appropriate for work clothes.
Cotton batiste A fine, lightweight and
sheer plain-weave cotton, this is ideal for
children’s wear, lingerie, handkerchiefs
Consider the stripes and
checks of gingham, and
ensure these match at
seams and openings.
USP 008-017 UK_.indd 14 11/18/09 1:18:37 AM
15Choosing fabrics
Microfibre drapes well, and
does not cling or crease.
The colour of dupion silk can
vary depending on how light
reflects on it, so cut all pieces
in the same direction.
and blouses. Cotton batiste is substantial
enough to support hand or machine
embroidery embellishments used in
heirloom sewing techniques.
Cotton broadcloth A medium weight
fabric with a fine rib, available in pure
cotton or a cotton-polyester blend.
Broadcloth is commonly used for tailored
blouses or shirts.
Cotton corduroy A cotton fabric, woven
with a pile that is then cut to produce
ribs. Available in different weights –
lightweight, needle cord is excellent for
children’s clothing, tailored jackets and
slacks; heavier, broad-wale corduroy is
warm enough for outdoor sportswear.
A variant, uncut corduroy, has a soft
nap similar to velvet.
Cotton lawn Another lightweight, plain-
weave cotton. Often quite sheer, this
fabric is strong enough to hold pin tucks
and smocking typical of children’s wear.
It’s a good choice for summer blouses
and dresses.
Cotton poplin A tightly woven cotton
with a distinctive horizontal rib, this
will withstand heavy wear and many
launderings, and is appropriate for
skirts, trousers and summer jackets.
Denim A heavyweight cotton usually dyed
blue and constructed in a twill weave
with white weft threads and blue warp
threads. Suitable for work clothing, jeans,
skirts, jackets and children’s clothes.
Gingham A medium-weight fabric
available in pure cotton and also in
cotton blends. The fabric’s fibres are
dyed beforehand and then woven to
form checks or stripes.
Linen A crisp fabric, woven since ancient
times from the natural fibres of the flax
plant. The flax makes the fabric strong
and absorbent, and also gives linen its
high natural sheen. Like cotton, this
natural fabric was traditionally used
alone, but is now mixed with other fibres
to alter its qualities. Spandex helps to
reduce the wrinkling nature of linen. Silk
and cotton may also be added.
Linen does wrinkle easily; however, this
is considered part of its charm, and
wrinkles are easily removed with a steam
iron. The fabric accepts dyes very well
and is available in a wide range of
fashion colours. Natural-fibre or undyed
linen is available in various weights and
shades ranging from pale ivory to tan.
‘Pure white’ linen is actually linen that has
been heavily bleached. Because of its
crispness, linen is ideal for tailored
clothing, from lightweight blouses to
heavyweight jackets.
MICROFIBRE FABRICS
These ‘miracle’ microfibre fabrics are a
modern invention. They are chemically
produced filaments made of nylon and
polyester. The microfibres that construct
the final fabrics are exceedingly thin
compared with conventional fabric
threads, and therefore the weave is
densely packed. The resulting fabrics
share the texture and draping quality of
natural fibres and are also lightweight,
yet durable. Although the very fine fibres
are ideal for emulating silk, they can be
adapted for many uses.
Microfibre fabrics tend to be wind
resistant as well as waterproof, so they
are excellent for warm outdoor wear and
impermeable rain gear. Microfibres are
washable, but there is one note of
caution: Because of their synthetic
chemical composition, they tend to
be heat sensitive, so care should be
taken when pressing them or having
them dry-cleaned.
Lightweight microfibre
Use this as an alternative to silk for
lingerie and lightweight blouses.
Medium-weight microfibre
Use this for shirts and skirts where a soft
draping quality is required, and for sports
clothes (running and cycling).
Heavier microfibre
Choose this for jackets and
waterproof clothing.
SILK
A natural fibre, discovered 5,000 years
ago by weavers in China who unwound
the thin outer casings of silkworm larvae
and used the thread to produce fabric
of exceptional beauty and sheen. This
can be emphasized with a satin weave
cloth of 100% silk that is lovely to work
with but cheaper, synthetic fibres are
often used to produce fabric of a similar
appearance that does not handle as
easily and can melt under the heat of
the iron. Silk dyes well and is available
in an array of vibrant colours, as well
as muted tones. It is ideal for tailored
blouses, bridal gowns and other formal
evening wear.
Crepe de Chine A lightweight, plain-
weave silk with a matt texture and muted
lustre. Polyester imitations of this fabric
are widely available. With a soft hand, it
is ideal for lingerie, as well as for blouses
and formal evening wear.
USP 008-017 UK_.indd 15 11/18/09 1:18:43 AM
6
Tools and materials
(pages 8–17)
Here you’ll find a useful guide to the essential pattern
cutter’s tools and materials and the different types of thread
available. There is also a directory of fabric types, with
comprehensive information on fabric qualities and uses.
All about commercial patterns (pages 18–45)
This section of the book is a guide to using commercial
sewing patterns. It discusses everything from getting
ready to buy a pattern based on your figure shape to
measuring yourself accurately, right down to how to
use the information on the pattern envelope. You’ll
also find out about preparing your fabric for use,
pinning, marking and cutting out.
Altering a commercial
pattern
(pages 46–61)
Once you’ve bought your
pattern, you might find that you
need to make some alterations
in order to get the perfect fit. In
this chapter, you’ll learn how to
make the most commonly used
alterations to commercial
patterns in order to improve
the fit of your garments.
About this book
Making your own clothes allows you
to get the perfect fi t, and once you
have perfected the fi t, you can
begin to add details of your own
design. This book guides you
through the process of using and
adapting commercial sewing
patterns to suit your body, and then
moves on to explain how to create
your own patterns using the pattern
blocks provided in chapter 5.
Use
Adapt
USP 001-007 UK_.indd 6 11/25/09 2:50:16 PM
USP B4 sewing techniques SS_.indd 128 11/17/09 2:36:49 AM
USP B4 sewing techniques SS_.indd 129 11/17/09 2:36:50 AM
-
-
-
-
-
USP US B3 112-125 corrections_.indd 116 11/25/09 2:11:26 PM
USP US B3 112-125 corrections_.indd 117 11/25/09 2:11:27 PM
USP 062-083 B2 A Layouts corrections_.indd 80 11/17/09 12:26:10 AM
USP 062-083 B2 A Layouts corrections_.indd 81 11/17/09 10:39:39 AM
USP 001-007 corrections_.indd 7 11/25/09 2:19:34 PM
116 The pattern blocks116
Grain line
Grain line • 20cm (8in)
Back bodice
Front bodice
Back skirt
Front skirt
Sleeve
A
B
C
D
E
F
G
H
I
J
K
L
M
N
O
P
Q
R
S
T
U
V
W
X
Y
Z
AA
BB
CC
DD
EE
FF
GG
HH
II
JJ
KK
LL
MM
NN
OO
PP
RR
SS
TT
1 2 3 4 5 6 7 8 9 10 11 12 13 14 15 16 17 18 19 20 21 22 23 24 25 26 27 28 29 30 31 32 33 34 35 36 37 38 39 40
1 2 3 4 5 6 7 8 9 10 11 12 13 14 15 16 17 18 19 20 21 22 23 24 25 26 27 28 29 30 31 32 33 34 35 36 37 38 39 40
USP B3 112-125 cm UK_.indd 116 11/25/09 2:39:28 PM
117UK SIZE 12 pattern blocks 117
UK SIZE 12
pattern blocks
See page 66 for instructions on how to
scale up the pattern blocks.
Grain line • 20cm (8in)
Grain line • 20cm (8in)
Grain line • 20cm (8in)
Scale: 1 square = 1 square cm
Fold line
A
B
C
D
E
F
G
H
I
J
K
L
M
N
O
P
Q
R
S
T
U
V
W
X
Y
Z
AA
BB
CC
DD
EE
FF
GG
HH
II
JJ
KK
LL
MM
NN
OO
PP
RR
SS
TT
41 42 43 44 45 46 47 48 49 50 51 52 53 54 55 56 57 58 59 60 61 62 63 64 65 66 67 68 69 70 71 72 73 74 75 76 77 78 79 80
41 42 43 44 45 46 47 48 49 50 51 52 53 54 55 56 57 58 59 60 61 62 63 64 65 66 67 68 69 70 71 72 73 74 75 76 77 78 79 80
USP B3 112-125 cm UK_.indd 117 11/25/09 2:39:29 PM
128 Core sewing techniques
1 Place the right sides
together, matching the
raw edges, and pin along
the sewing line.
2 Use a straight stitch
and sew along the sewing
line, removing the pins in
the process.
3 Press the seam open or
to one side and neaten
using a seam finish.
Plain seam
This is the simplest method of joining two pieces of fabric. Use it for straight or
curved seams and all materials.
French seam
A French seam encloses the raw edges, making
additional finishing unnecessary. It looks flat like a
plain seam from the front but appears like a tuck
on the reverse.
1 Place the wrong sides
of the fabric together,
with the edges matching.
Sew with a straight stitch
6mm (
1
⁄4in) from the edge.
2 Press the seam open
and trim the raw edges to
approximately half.
3 Fold the seam the
opposite way, so that the
right sides are now facing
and the seam is pressed
out to the edge.
4 Complete the seam
with a final row of
stitching 6mm (
1
⁄4in)
from the edge. This will
enclose all the raw edges.
Overlocking
Overlocking is a good way to finish raw edges, since the stitches are formed over
a newly trimmed edge to give a neat finish. A purpose-made machine is needed.
1 Make a seam with right
sides together and sew
a line of stitches 1.5cm
(
5
⁄8in) from the edge.
2 Thread the overlocker
with three threads and
skim each of the raw
edges of the seam
to finish.
3 Iron lightly over the
right side to press.
Zigzag finish
This is a form of overcasting using a machine stitch. Use a zigzag stitch or a
preprogrammed overcasting stitch to finish the raw edges.
1 Construct a plain
seam. This is normally
made with a 1.5cm (
5
⁄8in)
seam allowance.
2 Choose a zigzag
stitch or, if sewing a
built-in overcasting
machine stitch, use an
overcasting foot.
3 Sew the stitch along
the edge of the seam
allowance with the ‘bar’
of the overcasting foot
right on the edge.
Core sewing
techniques
Essential sewing skills.
In order to carry out the techniques
demonstrated in this book, you will need
to have mastered core sewing and
dressmaking skills. The following pages
are a refresher course in all the
techniques you will need to know.
USP 128_139 UK_.indd 128 11/17/09 11:06:50 PM
129Core sewing techniques
Flat-fell seam
A flat-fell seam is
popular for jeans and
for reversible garments
since it forms a strong
and neat join; all the
raw edges are tucked
away and enclosed
by a second line
of stitching.
1 Place the wrong sides
of the fabric together
and sew a line of straight
stitching 1.5cm (
5
⁄8in) from
the edge.
2 Press the raw edges
to one side and trim the
underlayer to 3mm (
1
⁄8in).
3 Fold the upper seam
allowance under and
place over the trimmed
allowance. Pin all layers
of fabric together.
4 Edge stitch the fold,
sewing through all
layers of fabric.
Bias binding
A bias binding gives a
neat and strong finish
to an edge. The bias
nature of the tape
allows it to curve over a
shaped edge without
wrinkling. Use it on
seams and hems, and
as a decorative finish.
1 Fold ready-made
double-fold bias-binding
tape in half to enclose the
fabric’s raw edges.
2 Place the folded tape
over each raw edge and
pin the layers together.
Baste too, if preferred.
3 Sew through all layers
with a straight stitch,
keeping close to the
binding edge.
4 Look at the reverse
side to check that the
tape is sewn down all
along the edge.
Spaced tucks
Spaced tucks are folds
of cloth sewn at regular
intervals to add texture
and interest to a
garment. Sew them in
groups and down the
full length of the tuck,
or leave them free at
one end. Use vertically
on a bodice or yoke, or
horizontally around the
bottom of a skirt.
1 Mark the position and
size of the tucks onto the
fabric’s surface.
2 Fold the fabric along
the lines with wrong sides
together, and press with
an iron.
3 With a straight stitch,
sew parallel to each of
the folded edges to form
the tucks.
4 When all the tucks
have been completed,
press them all in the
same direction.
USP 128_139 UK_.indd 129 11/17/09 11:06:50 PM
80 Designing your own patter ns
Designing patterns
Now that you have perfected your
basic blocks, you are ready to
attempt your fi rst designs.
To realize your design ideas, it helps to
understand proportion and where seam
lines look most flattering on the body.
Using yarn or tape to map out style lines on a
dress form is a good way to see your design three-
dimensionally. On the following pages, a standard UK
size 8 (US size 6) dress form is used. If you are not of a
standard size, you may need to adapt a dress form to
suit your own personal measurements.
You will need
• Dress form smaller than
your own body size
• Pins
• Tape measure
• Scissors
• Wadding
• Padded bra in your size
• Elastic
• Strong jersey fabric
Using the measurement chart
on page 22, compare your own
measurements to those of the
dress form, starting at the top
and working down, use
wadding to pad out the dress
form to match your size. Once
the dress form is padded, you
can pin elastic or yarn onto the
stand to indicate where the new
hip and bust lines will be.
Padding out a dress form to your own size
In the fashion industry, a common method for fitting garments
to individual sizes is to pad out a solid, linen-covered dress
form in a small size to fit your own measurements. In this way,
it is possible to completely recreate your own body shape.
Design analysis
Designers often put their
inspirations onto paper. The
designer’s sketch is this initial idea.
It is an interpretation of how a
garment is to look when it is
finished. It shows how the fabric
will behave, may include colour
and texture, and will evoke the
general feeling of the garment.
Working drawing
One of the first steps in realizing
your design is to make a working
drawing. A working drawing is a
simple line drawing of the garment
that highlights the details of its
construction – where to put the
seam lines, darts, gathers or
pleats, topstitching, buttonholes
and so on. Based on the designer’s
sketch, the working drawing
should be in proportion, with the
lines drawn exactly where you
wish them to appear on the body.
Drawing the design like this helps
you to focus and consider these
details, which are paramount at
this stage, as they will inform how
the pattern will be cut.
Details to consider
Before starting to construct the
pattern you should have an idea
of what fabric the garment is to be
made in. The blouse shown to the
right is to be made from a woven
cotton shirting fabric and is
therefore not stretchy. (Woven
fabric can sometimes contain a
small amount of stretch. The
amount of stretch is an important
consideration when choosing a
fabric, as the pattern will have to
be adapted for this.) The fit of this
garment is achieved through four
darts with gathering at the front
Put the padded bra onto
the form and stuff the
cups with wadding.
Measure to ensure you
are creating the correct
bust size.
Pad the waist with strips of
wadding. Start with narrow
strips, layering up the wadding,
and using wider strips each
time. Measure the waist to
check the proportions.
Pin a layer of stretch jersey over
the whole form to create a
smooth surface to work on.
USP 062-083 UK_.indd 80 11/25/09 1:19:21 PM
81
2
Trace off the appropriate block for the design onto
pattern tracing paper – in this case a torso block (see
page 96). You will use this flat block in correspondence
with the dress form – ensure they are both the same size.
Trace in red pen to indicate the original block pattern.
This sequence continues on the next page ³
Designing patterns
Translating a working
drawing into a pattern
Pinning the style lines on the dress
form can help you to see the
proportions of the garment on the
body more clearly. Basic blocks are
flat representations of a dress stand
or form. In these images, the model
is a standard size 8 (US size 6).
Visualizing the proportions in this
way means you can measure the
distances accurately and transfer
them straight onto the pattern paper.
You will need
Working drawing •
Dress form•
Yarn•
Pins•
Pattern tracing paper•
Red pen•
Pencil•
1 From your working drawing, map out the style lines on the
dress form using yarn and pins, front and back. Always stand
back from the dress form to look at and assess the proportion
and accuracy of the design.
and back yoke. The yoke does not
have a natural shoulder line seam.
The neckline is round and slightly
dropped at the CF neck.
Details such as the size of the
button are essential at this stage,
as this informs the width of the
button stand – one of the first steps
in cutting this pattern. Follow the
step-by-step instructions below to
translate your working drawing into
a pattern.
USP 062-083 UK_.indd 81 11/25/09 1:19:24 PM
7About this book
Designing your own patterns (pages 62–109)
In order to design your own clothes, you need to
create basic pattern blocks for all the components
that make up a garment. In this chapter, you’ll learn
not only how to create these basic components
using the pattern blocks provided with the book,
but also how to manipulate them to different
designs and styles that suit you. Find out about
toiling your designs as an essential part of the
making process, and how to transfer your
two-dimensional design ideas into the three-
dimensional reality of your own unique garments.
Core sewing techniques
(pages 126–139)
This refresher course on core
sewing techniques serves as a
useful guide for beginners or
as a handy reminder for those
already experienced in making
their own clothes.
The different pattern pieces are colour
coded, so that it’s easy for you to
scale up the specific piece you need.
The pattern blocks
(pages 110–125)
In this section you’ll find basic
pattern blocks for a skirt,
bodice, and sleeves in UK
sizes 8–20 (US 6–18). Scale
the blocks up using the
grid to make your own
personalized pattern blocks.
Tailor them to fit your figure
and use what you learned
in the previous chapter to
design your own patterns.
The numbered grid helps you to keep
track of where you are when transferring
your design to pattern paper.
The blocks
are laid out
on a grid with
squares that
represent 1cm
(
3
⁄8in), so that
you can easily
transfer the lines
of the pattern
pieces to pattern
tracing paper.
Design
USP 001-007 UK_.indd 7 11/25/09 2:50:24 PM
USP 008-017 corrections_.indd 8 11/16/09 6:38:13 PMUSP 008-017 UK_.indd 8 11/18/09 12:28:46 AM
USP 008-017 corrections_.indd 9 11/16/09 6:38:26 PM
Tools and
materials
In this chapter, you‘ll fi nd all the
information you need on the tools
and materials essential for sewing
and dressmaking. There is a guide
to useful equipment and a full
discussion on how to select the
right fabric for your project.
USP 008-017 UK_.indd 9 11/18/09 12:28:46 AM
USP 008-017 corrections_.indd 10 11/16/09 6:38:33 PM
10 Tools and materials
Essential equipment
To get the desired quality of fi nish in your sewing
projects, it’s important to have the right equipment.
Over the next few pages, you’ll find a guide
to the essential tools for dressmaking and
for designing and adjusting patterns. A guide
to the different types of fabric can be found
on pages 14–17.
Dressmaker’s fabric shears
The long, straight, sharp blades of
these shears give a smooth cut and
are ideal for cutting fabric quickly.
Often the handles are at an angle to
the blades, so the blades can sit parallel
to the cutting surface, ensuring the
fabric remains flat. They have moulded
handles, with a smaller hole for the
thumb and a larger one for the fingers,
and can be right- or left-handed.
They should be used only on fabric.
Serrated scissors
The fine, serrated edges of these
blades hold delicate, lightweight or
soft fabric in place. They are ideal for
fine fabrics, such as silk or satins.
Pinking shears
The blades of these shears have notched
teeth that leave a definite zigzag edge on the
cut fabric. This provides the ‘pinked’ cut that
neatens the raw edges on seams and makes
the fabric less likely to ravel.
Paper scissors
It’s essential to keep a pair of scissors
just for paper. Using fabric shears for
cutting paper patterns will cause the
blades to become blunt. Paper
scissors do not need sharp points, but
they must be able to cut paper cleanly.
Pattern tracing wheel
Used with dressmaker’s
carbon paper (also known as
dressmaker’s tracing paper), this
tool transfers the line markings to
both sides of the fabric at once.
The method is not suited for heavy
or textured fabric, on which the
marks would be hard to see.
Needlework/embroidery scissors
Small and with short blades and sharp
points, these scissors give greater control
in intricate areas and are ideal for
snipping notches, clipping curves
or trimming seam allowances.
USP 008-017 UK_.indd 10 11/18/09 12:28:46 AM
USP 008-017 corrections_.indd 11 11/24/09 12:27:09 PM
11Essential equipment
Needles
A selection of hand needles, in
different sizes, is essential for hand
sewing and for taking thread ends to
the back of your work after machine
stitching. For general machine sewing,
universal (multipurpose) machine
needles are available in different sizes
to suit different fabrics and threads.
For special purposes, such as sewing
silk or doing decorative stitching, use
specialist needles. Replace all needles
regularly – blunt ones can snag fabric.
Pattern awl
This handy little tool allows you to
hold and manipulate fabric when it
would otherwise be too awkward
for your fingers, for example, when
guiding a gathered edge under
the presser foot of a machine.
Fadeaway marker pens
Also known as evaporating
or air-soluble pens, these are an
alternative to tailor’s chalk and
wash-away markers. The ink
fades in 48 hours, but test on a
scrap of your chosen fabric first.
Wash-away marker pens
These can be used to transfer
pattern marks to fabric. The ink
from wash-away marker pens
can be sponged or washed
away afterward, but check that
this does not damage the fabric.
Dressmaking pins
These general-purpose pins
are used to hold pieces of
fabric together before sewing.
They are suitable for medium-
weight fabrics. They are
especially useful for working
on paper patterns and when
pattern drafting.
Tape measure
Choose a good-quality tape
measure that will neither ravel nor
stretch. It should be at least 150 cm
(60 in) long, with measurements
marked accurately from the very
start of the tape.
Tailor’s chalk
Tailor’s chalk is a traditional material
used for marking cloth and can be
easily brushed away when finished.
It comes in triangular pieces, rollers
and pencils of various colours. Keep
the edges or points sharp, mark on
the wrong side of the fabric, and use
a colour that shows up well against
the fabric you are using.
Pin cushion
It is a good idea to keep
your hand needles and
pins safely organized in
a pin cushion, so that
they are both out of
harm’s way and readily
available when you
need them.
USP 008-017 UK_.indd 11 11/25/09 12:27:34 PM
USP 008-017 corrections_.indd 12 11/24/09 12:27:41 PM
12
1
3
2
Tools and materials
Plain cotton fabric (1)
Inexpensive unbleached calico, sheeting
or other plain cotton fabric is used for
making toiles – test versions of a
garment made to check the pattern
(see pages 68–71).
Dress forms
These allow you to try out toiles (see pages 68–71)
and to adjust garments for a better fit before final
sewing. Adjustable dress forms are ideal models
to start with. The dimensions can be easily adjusted
to match your own or a friend’s measurements.
Solid, linen-covered dress forms are the fashion-
industry standard. The clear seam lines help to
achieve accurate pattern cutting, but they are only
available in standard dress sizes and aren’t
adjustable (see ‘Padding out the dress form to
your own size’, page 80).
Dressmaker’s pattern
paper (3)
Marked with a grid to help you to
create and adapt patterns, this can
be bought ready-made or you can
make your own.
Pattern master/skirt curves
These templates, made of plastic, wood or
metal and available in a variety of shapes,
act as guides when drawing curves on a
paper pattern, for example to shape hips
on trousers and skirts (see above and
right). A 5 x 30cm (2 x 12in) clear pattern
master, with a 0.5cm (
1
⁄4in) grid, like the
one above, is especially useful.
Sewing machine needles
Multipurpose machine needles
are suitable for regular machine
sewing. These are available in
sizes to suit the fabric and thread
being stitched. European sizes
range from 60–120 and
American sizes from 9–20.
Needle packets are usually
numbered with the relevant size.
The larger the number, the larger
and stronger the needle.
Dressmaker’s tracing
paper (2)
Used with a tracing wheel
to mark fabric by transferring
dots of colour onto its surface
(see page 44).
USP 008-017 UK_.indd 12 11/25/09 12:27:42 PM
USP 008-017 corrections_.indd 13 11/16/09 6:43:11 PM
13Essential equipment
Sewing machine
A sewing machine is essential for anyone wanting
to sew strong seams and give garments a tidy,
professional finish. Machines work by interlocking
an upper and a lower thread to stitch fabric layers
together. The tension and the length of the stitches
can be adjusted to suit the fabric. Modern
machines offer a selection of different stitches
for different tasks.
Iron and ironing board
An iron and ironing board
are essential for ironing
fabrics, and are also useful
for smoothing out pattern
pieces. Also useful is a
tailor’s ham; used for
pressing curved areas of
clothing, such as cuffs,
waistlines and collars.
Thread
The choice of thread will depend
on whether it is for hand stitching
or machine sewing. Choose a
good quality thread in a fibre
similar to the fabric being used,
for example, cotton thread for
cotton; polyester for synthetic
cloth etc. Choose colours similar
to that of the fabric so it blends in,
or select a contrasting thread
for decorative finishes. A good
quality thread is essential
when sewing.
General-purpose
Spun from polyester or
mercerized cotton, or with
a cotton core covered with
polyester, these types of threads
are suitable for using on the
sewing machine. They are
also available in large cones,
which make them suitable for
overlocker sewing.
Silk thread
Silk threads are ideal for sewing
both silk and wool fabric, and for
sewing by hand as they are soft
and gentle to handle, and tend
not to knot.
Machine embroidery floss
This is made from polyester or
rayon, and has a high sheen
that reflects the light. It is also
available in cotton and even
wool; these give a matt finish.
Metallic thread
This can be used for hand
sewing and machining. If using
a sewing machine, a special
needle with a large eye is
required to prevent the thread
from breaking or shredding.
Woolly nylon
This is a soft, strong, thick thread
that is used in the loopers of
a overlocker. It is ideal for
flatlocking and hemming as the
loosely spun thread gives better
coverage of the seam or edge.
It is too thick to be used in
overlocker needles.
Hand embroidery silks
These include twisted pearl
cotton, loosely wound stranded
threads that can be split and
used as needed, soft embroidery
silks and tapestry yarns. These
threads are too thick to go
through machine needles, but
they can be used in the loopers
of overlockers for decorative
flatlocking and rolled hemming.
Bobbin fill
A fine thread, normally available
in black or white and used in
the bobbin of a sewing machine
for machine embroidery, this
thread reduces the bulk in an
embroidered design. It can also
be bought in pre-wound bobbins.
Tacking thread
This soft cotton thread is
weaker than general-purpose
thread. It’s therefore ideal for
temporary hand sewing as it
will break and not damage
fabric when removed.
Topstitch thread
This is a stronger, thicker thread
that gives a bolder finish. Use it
for topstitching seams, hand
sewing buttonholes and for
sewing on buttons. It should be
used with a topstitch needle as it
has a larger eye to carry the
thread, and with general-purpose
thread wound onto the bobbin.
USP 008-017 UK_.indd 13 11/25/09 12:27:45 PM
USP 008-017 corrections_.indd 14 11/16/09 6:43:24 PM
14 Tools and materials
Choosing fabrics
A wide selection of fabrics in various textures and
colours is available.
When selecting a fabric for your project, it’s important to take the fabric’s
fibre content, texture (or ‘hand’), drape, colour, and in some instances, the
size of its print, or its horizontal stretch, into account. Once a piece of fabric
is cut, it cannot be returned, and mistakes can be costly.
Commercial patterns contain valuable suggestions regarding which fabric types suit a
garment’s particular design. Check the back of the pattern envelope. You’ll find a list of
appropriate fabrics, their widths and exactly how much fabric (what length) you will
need to buy. Cotton and linen fabrics are available in standard widths of 90cm (36in),
to 120cm (45in) and sometimes even 130cm (54in) and 150cm (60in). Woollens are most
often woven on wider looms and normally measure about 150cm (60in) wide. Knit
fabrics are usually available in widths from 140cm (56in) to 150cm (60in).
Don’t trust your ‘eye’ when selecting a fabric that must match the colour of another
garment. A shade of green, for example, can be difficult to visualize mentally. Green
hues undergo subtle tonal changes depending upon whether they tend more toward
the blue or the yellow in their composition. Bring the original garment with you to the
fabric shop, to be sure the colours are compatible.
Take time to decide on the perfect fabric for your needs. Lightweight corduroy, for
example, is perfect for children’s wear since it is very durable, and lightweight, silky
knits will drape beautifully in the flowing lines of a dress.
Finally, when bringing your fabric home, and certainly when storing, roll the fabric
instead of folding it. This will prevent creases that may be difficult to remove.
Attention to these details will ensure the success of your project, but coordinating a
beautiful fabric in a colour and texture that perfectly matches your garment’s design
will turn your project into a work of art.
Use weights instead of
pins when cutting denim.
Cotton poplin's
strength is derived
from its tight weave.
Woven fabrics
Generally, medium-weight, woven fabrics
are easy to handle and are the best
choice for beginners. Stiff and bulky
fabrics or those that are fine, with little
body are more difficult to sew with.
COTTONS
These fabrics were traditionally made
from 100% cotton but are often blended
or even replaced with man-made fibres
like polyester or rayon today.
Cotton A natural product of the cotton
plant, cotton readily accepts coloured
dyes. Cotton has a tendency to shrink, so
it’s a good idea to preshrink before
cutting out. Either pass over the fabric
with a steam iron or launder beforehand.
Cottons are usually cut on the grain for
stability, but can be cut and sewn on the
bias for ease of wear or design contrast.
Calico An inexpensive, roughly woven
cotton. The medium-weight variety is
often used to construct ‘dummy’ trousers,
or dress patterns, to check the fit before
constructing the final garment in an
expensive fabric. It is suitable for linings.
Calico cotton A lightweight, plain-weave
fabric, often with a printed pattern, this is
appropriate for both casual clothing and
children’s wear since it launders well.
Chino A medium-weight, twill-weave
cotton, with a slight sheen, most often
dyed beige and often used for slacks. A
heavier-weight chino, dyed in dark blue
or black, is appropriate for work clothes.
Cotton batiste A fine, lightweight and
sheer plain-weave cotton, this is ideal for
children’s wear, lingerie, handkerchiefs
Consider the stripes and
checks of gingham, and
ensure these match at
seams and openings.
USP 008-017 UK_.indd 14 11/18/09 1:18:37 AM
USP 008-017 corrections_.indd 15 11/16/09 6:43:40 PM
15Choosing fabrics
Microfibre drapes well, and
does not cling or crease.
The colour of dupion silk can
vary depending on how light
reflects on it, so cut all pieces
in the same direction.
and blouses. Cotton batiste is substantial
enough to support hand or machine
embroidery embellishments used in
heirloom sewing techniques.
Cotton broadcloth A medium weight
fabric with a fine rib, available in pure
cotton or a cotton-polyester blend.
Broadcloth is commonly used for tailored
blouses or shirts.
Cotton corduroy A cotton fabric, woven
with a pile that is then cut to produce
ribs. Available in different weights –
lightweight, needle cord is excellent for
children’s clothing, tailored jackets and
slacks; heavier, broad-wale corduroy is
warm enough for outdoor sportswear.
A variant, uncut corduroy, has a soft
nap similar to velvet.
Cotton lawn Another lightweight, plain-
weave cotton. Often quite sheer, this
fabric is strong enough to hold pin tucks
and smocking typical of children’s wear.
It’s a good choice for summer blouses
and dresses.
Cotton poplin A tightly woven cotton
with a distinctive horizontal rib, this
will withstand heavy wear and many
launderings, and is appropriate for
skirts, trousers and summer jackets.
Denim A heavyweight cotton usually dyed
blue and constructed in a twill weave
with white weft threads and blue warp
threads. Suitable for work clothing, jeans,
skirts, jackets and children’s clothes.
Gingham A medium-weight fabric
available in pure cotton and also in
cotton blends. The fabric’s fibres are
dyed beforehand and then woven to
form checks or stripes.
Linen A crisp fabric, woven since ancient
times from the natural fibres of the flax
plant. The flax makes the fabric strong
and absorbent, and also gives linen its
high natural sheen. Like cotton, this
natural fabric was traditionally used
alone, but is now mixed with other fibres
to alter its qualities. Spandex helps to
reduce the wrinkling nature of linen. Silk
and cotton may also be added.
Linen does wrinkle easily; however, this
is considered part of its charm, and
wrinkles are easily removed with a steam
iron. The fabric accepts dyes very well
and is available in a wide range of
fashion colours. Natural-fibre or undyed
linen is available in various weights and
shades ranging from pale ivory to tan.
‘Pure white’ linen is actually linen that has
been heavily bleached. Because of its
crispness, linen is ideal for tailored
clothing, from lightweight blouses to
heavyweight jackets.
MICROFIBRE FABRICS
These ‘miracle’ microfibre fabrics are a
modern invention. They are chemically
produced filaments made of nylon and
polyester. The microfibres that construct
the final fabrics are exceedingly thin
compared with conventional fabric
threads, and therefore the weave is
densely packed. The resulting fabrics
share the texture and draping quality of
natural fibres and are also lightweight,
yet durable. Although the very fine fibres
are ideal for emulating silk, they can be
adapted for many uses.
Microfibre fabrics tend to be wind
resistant as well as waterproof, so they
are excellent for warm outdoor wear and
impermeable rain gear. Microfibres are
washable, but there is one note of
caution: Because of their synthetic
chemical composition, they tend to
be heat sensitive, so care should be
taken when pressing them or having
them dry-cleaned.
Lightweight microfibre
Use this as an alternative to silk for
lingerie and lightweight blouses.
Medium-weight microfibre
Use this for shirts and skirts where a soft
draping quality is required, and for sports
clothes (running and cycling).
Heavier microfibre
Choose this for jackets and
waterproof clothing.
SILK
A natural fibre, discovered 5,000 years
ago by weavers in China who unwound
the thin outer casings of silkworm larvae
and used the thread to produce fabric
of exceptional beauty and sheen. This
can be emphasized with a satin weave
cloth of 100% silk that is lovely to work
with but cheaper, synthetic fibres are
often used to produce fabric of a similar
appearance that does not handle as
easily and can melt under the heat of
the iron. Silk dyes well and is available
in an array of vibrant colours, as well
as muted tones. It is ideal for tailored
blouses, bridal gowns and other formal
evening wear.
Crepe de Chine A lightweight, plain-
weave silk with a matt texture and muted
lustre. Polyester imitations of this fabric
are widely available. With a soft hand, it
is ideal for lingerie, as well as for blouses
and formal evening wear.
USP 008-017 UK_.indd 15 11/18/09 1:18:43 AM
USP 008-017 corrections_.indd 16 11/24/09 12:31:26 PM
16
Dupion silk (also known as doupioni silk)
A luxurious, heavyweight silk, made from
weft threads spun from two cocoons,
which produces irregular horizontal
slubs. It is ideal for formal wear and
bridal gowns.
Habotai silk (also called ‘China silk’) A less
expensive, lightweight, glossy silk variety.
Habotai makes up the fine linings in
coats and jackets, and can be printed
with colourful patterns. It is a beautiful
fabric for lightweight scarves.
Silk organza A sheer silk fabric, with
highly twisted threads that make it very
strong. Crisp, and with a sheen, it is used
for bridal veils and gowns and other
formal wear. Because of its fine weight,
it is difficult to handle; one solution for
achieving a perfect hemline is to roll
and hand sew the hem. It is ideal as an
underlining, as it is both thin and strong.
WOOL
A natural fibre processed from the fleece
shorn from animals, mainly sheep. ‘Pure
wool’ is 100% wool; woollen blends, if so
labelled, must contain at least 55% pure
wool, which is then blended with other
fibres, often silk. Woven wool textures
tend to have bulk, enabling them to retain
body heat. Conversely, wool also acts as
insulation against heat and is a common
fibre in clothing worn in desert areas. It is
also naturally stain and wrinkle resistant.
Wool fabrics vary enormously, depending
on the breed from which the fibres come,
whether they are used alone or mixed
with other fibres, and how the fabric is
constructed, making it possible to use
woollen fabric for smart trousers, coats or
chunky knitted sweaters.
Camel hair A fabric made of wool
blended with natural hair fibres obtained
from the camel’s soft inner coat. Camel
hair is a luxury fabric with a very soft
hand that is ideal for overcoats. ‘Camel
hair’ often refers to the distinctive tan
colour of the natural hair.
Cashmere Another luxury fabric made
from a blend of fine, undercoat hairs of
the Kashmir goat. Soft and plush,
cashmere is used for sweaters and other
knitwear. Woven cashmere is ideal for
overcoats and jackets.
Wool tartan A woollen, twill-weave fabric
in multicoloured check designs. Ancient
Scottish clans designated particular tartan
checks within their own unique choice of
colours. Wool tartan is ideal for forming
and holding the pleated folds of kilts.
Not all wool checks are ‘even checks’,
with a symmetrical balance of coloured
threads. Coloured-thread lines in other
check designs may not be equally
balanced, so it is important to take care
when placing pattern pieces before you
cut out sections of garments.
Worsted wool A more expensive woollen
fabric, with a distinctive smooth surface.
This fine wool responds well to steam
pressing often required in couture
tailoring techniques; it will also fall in
softly draped lines.
Woven wool A plain weave, and a soft
and warm fabric, woven wool is ideal for
winter coats and jackets. Lightweight
woollen blends are suitable for tailored
suits and trousers.
KNIT FABRICS
Knit fabrics are constructed with loops
rather than warp and weft threads being
woven together. The fibres used to make
the threads/yarns for knit fabric may be
natural wool, cotton or synthetic, or
various blends of these, allowing the
creation of a multitude of knit fabrics.
Double knit A fabric in which the weave is
the same on both sides. Available in
cotton, cotton blends, wool and other
fibres, double-knit fabrics have moderate
stretch. This should be taken into account
when choosing a knit fabric for a
garment. Medium-weight double knits
are fine for trousers and jackets; they will
hold their shape but still have enough
‘give’ for ease of movement. Lightweight
double knits are good for dresses,
since they will hold their shape and
still drape well.
Interlock knit A fine, stable, single-
knit fabric, normally manufactured
in cotton or cotton-polyester blends.
It is excellent for T-shirts, casual
outerwear and underwear.
Spandex A highly stretchable fibre, not
used on its own, but blended with other
knitted fibres to provide comfort and
stretch. Formerly used only in lingerie and
swimwear, spandex now finds its way
into cotton and cotton-polyester blends
for use in casual wear.
Sweatsuit fabric This heavyweight
knit is warm and comfortable to wear,
with a great deal of stretch, making
it suitable for loose-fitting garments
and sports clothing.
Tricot A delicate, warp-knit fabric,
usually of nylon, with a crosswise stretch
and no vertical stretch. Soft, smooth and
with good draping ability, it is excellent
for lingerie.
Tartan yarns are dyed
and then woven into the
cloth in bands of colour,
creating checks.
Spandex is added to suiting
fabrics to help garments
retain their shape.
Tools and materials
USP 008-017 UK_.indd 16 11/25/09 12:27:48 PM
USP 008-017 corrections_.indd 17 11/16/09 6:44:08 PM
17Choosing fabrics
Leather is suitable for jackets,
bags, belts and upholstery.
Bouclé has an interesting
surface texture.
ANIMAL FABRICS
Either animal skin in origin or
faux alternatives.
Faux fur Specially produced fabrics that
imitate expensive animal fur. Because of
the expertise in constructing these fabrics,
many are difficult to distinguish from the
‘real thing’, at least at first glance. Their
value lies in that they offer a viable
alternative to real fur. Constructing jackets
and coats of faux fur requires special
sewing techniques.
Faux suede A synthetic fabric, this is
washable, durable and ideal for jackets
and tailored blazers. Since this fabric is
an imitation of genuine leather suede, it
will be necessary to use the same special
sewing techniques required when
handling genuine leather.
Leather Animal skins, or hides, that are
suitable for clothing. Full-grain leather is
now available in fashion colours. The
availability of some skins may be
restricted, however, because of animal-
welfare laws. Leather requires special
sewing techniques, and it may be
necessary to purchase leather for a
sewing project by the whole hide, rather
than in specific yardage amounts.
SPECIAL FABRICS
Special-occasion wear makes use of the
most luxurious and expensive fabrics.
Fibres from all sources are constructed in
a variety of ways to create special fabrics
and garments.
Bouclé A wool or wool-blend fabric, and
also a wool yarn, formed by a special
process that makes loops. The woven
bouclé wool surface has a nubby overall
effect and is ideal for Chanel-type tailored
jackets. Bouclé yarn is also suitable for
knitted sweaters.
Chiffon An ultralight, sheer fabric, usually
produced with silk threads. Reduced-cost
versions are made from polyester. Chiffon
has a fine draping quality and is greatly
used in formal wear. This fabric can be
difficult to handle. The usual voluminous
hems found in evening dresses are best
sewn by hand or with an overlocker.
Lace A fine, open cloth with a pattern,
commonly used for evening and bridal
wear, lingerie and nightgowns, and as
an edging for trimming garments. Lace is
made with threads of silk, cotton or
synthetic fibres. Some laces are hand
crocheted, and others are embroidered
threads or cords on a net background.
Satin A fabric woven in silk, cotton and
synthetic fibres that has a shiny surface.
Duchesse satin is a heavyweight,
expensive variety and is used mostly for
bridal dresses and formal evening wear.
Taffeta A plain-weave, silk fabric that is
also produced in polyester and acetate.
It is a crisp fabric, famous for the rustling
sound it makes when worn in motion.
Inexpensive versions are wonderful for
children’s ‘fancy dress’ wear. It is usually
dry-clean only.
Tulle A fine net, often of nylon, with a stiff
feel. Tulle is most often used to make
underskirts designed to support full-
skirted bridal gowns or evening wear.
Velvet A tufted fabric, ideally woven in silk
threads, but also manufactured from
cotton, rayon and synthetic fibres. The
short thread loops are cut to form a
dense pile, which lies in one direction.
Rays of light cast on the slant of the pile
are reflected from the fabric in varying
shades of colour, so care must be taken
when cutting out pattern pieces. All of
them have to be laid out in the same
direction, so the garment will have a
uniform colour. Velvet also requires
special pressing techniques.
INTERNAL FABRICS
Some specially created materials are
designed for the internal construction of
clothing and are not visible on the
outside. These are essential in producing
a perfect finish.
Interfacings fabrics Used to line and
support the shape of garments. Haircloth
interfacing is made from cotton blended
with natural horse hair or synthetic fibres
and is used mostly in professional
tailoring techniques. Fusible interfacing,
woven or bonded, and backed with a
heat-fusing film, is available in various
weights. Fusible fabrics are used to help
shape and support garment details such
as collars and necklines.
Stabilizers A wide variety of stabilizing
materials is available. They are used to
support fashion fabrics while those
fabrics are being embellished. Choose a
type to suit the project and fabric being
used – tear-away, cut-away and wash-
away are all available in varying weights.
USP 008-017 UK_.indd 17 11/18/09 12:28:47 AM
USP 018-061 B1 corrections_.indd 18 11/16/09 10:16:05 PMUSP 018-061 UK_.indd 18 11/18/09 12:15:47 AM
USP 018-061 B1 corrections_.indd 19 11/16/09 10:16:16 PM
All about
commercial
patterns
Commercial patterns were created to enable people to
construct their own clothing at home. Produced in a range
of sizes, they can be easily adapted to fi t different fi gure
shapes. With a vast range of designs available, from
simple styles to fully tailored outfi ts, make your choice
according to your level of sewing skills.
USP 018-061 UK_.indd 19 11/18/09 12:15:48 AM
USP 018-061 B1 corrections_.indd 20 11/16/09 10:16:29 PM
Why use a
commercial pattern?
Commercial patterns provide an easy
way to cut and make a garment that’s
just right for you.
Buying a shop-bought pattern has many benefits. It contains
information on everything you will need to know to construct
your chosen design. The pattern will often include several
different sizes, and you can combine elements from these to
perfect your garment’s fit. The outside of the envelope will
provide you with a detailed guide about the fastenings and
trimmings required, fabric suitability and how much to
purchase, linings and interfacings. Further details of
construction can be found inside on the information sheet.
Commercial patterns
There are many popular names
in the field of commercial patterns:
Vogue, McCall’s, Butterick,
Simplicity, New Look, Burda
and Kwik Sew. The simplicity or
complexity of available designs
varies, ranging from a very simple
dress for the beginner to a
sophisticated couture design for
the more experienced sewer.
The first patterns
The quality of commercial patterns
has vastly improved since their
introduction in the 1830s in
England and France. Included in
weekly or monthly magazines, the
patterns were already cut out but
had no printing on them and were
made from poor-quality tissue
paper. It wasn’t until 1910 that
detailed instruction sheets were
included along with the pattern.
There was little technical
information provided to help
cut and make the clothing – any
information was printed in the
magazine itself. The nineteenth-
century home dressmaker needed
a very high level of skills to
interpret these early designs.
Selecting the correct
size pattern
You may already have decided
which pattern design you would
like to make, but before you buy it,
you will need to know which size to
purchase. In order to do this, you
will need to take some of your own
basic measurements. Do not use
your standard dress size (the one
you use when you are shopping
for clothes). Retail dress sizes and
commercial pattern sizes are
different: a shop size 12 may be a
pattern size 14; however, most
pattern companies do use the
same body measurements (if you
are a size 16 in Vogue, then you
will be a 16 in McCall’s). Pages
22–23 will explain how to measure
yourself accurately. The main
measurements to go by when
buying a pattern are the bust and
hip. Use the hip measurement
when buying a skirt pattern and
the bust for a top, a dress or a
garment that includes both
measurements.
USP 018-061 UK_.indd 20 11/18/09 12:15:48 AM
USP 018-061 B1 corrections_.indd 21 11/24/09 12:50:53 PM
21Why use a commercial pattern?
Body shape
An advantage of making your own
clothes is that you can tailor them to your
own body measurements; however, it’s
also important to select clothing styles
that will work for you. When buying
sewing patterns, think about your body
shape and which clothing styles will
complement it. Here, some general
shapes are outlined which will help you
to find the best look for your silhouette.
Top-heavy triangle
Choose smooth, clean lines above the
waist to minimize the width across the
shoulders and bust. Careful choice of
collar and neckline, avoiding fussy
details, is advisable. Plain fabrics or small
prints and light textures are suitable.
Avoid cap sleeves, puff sleeves and
epaulettes. Keep sleeve designs simple.
High-waist styles or those with a yoke
should be avoided, as well as gathered
waists and frills.
Circle (apple)
Choose tops, jackets and dresses with
pretty necklines that will draw the eye
up and away from the waist. Scarves,
jewellery and shoes will also achieve this
distraction. Choose tops and jackets in
soft fabrics that layer over the waist.
Avoid tops and dresses that cling to the
body. Do not draw attention to the waist
with belts or styles that are obviously
waist-focused. Keep clear of bright
colours, especially in the middle of the
body, and avoid cropped tops.
Oval
Choose styles that draw attention away
from the centre of the body and do not
cut through the waist with a belt, band or
seam. Dresses or tunics are suitable, and
skirts and trousers worn with longer-
length tops look good. Chunky necklaces
and earrings draw attention away from
the waist too.
Avoid figure-hugging T-shirts and styles
that accentuate the waist, such as those
with belts, and fitted or elasticized
waistbands. Never tuck a shirt into a skirt
or trousers.
Tall, narrow rectangle or column
Choose styles with detail at the bust and
hip to create the illusion of shape.
Choose fabrics with texture and pattern,
such as chunky knitwear, fine wools, silks
and satins.
Avoid close-fitting pencil skirts, slim-
shape straight trousers and figure-
hugging T-shirts, which accentuate
the long and narrow nature of this
figure type.
Hourglass
Choose soft styles that drape over the
body rather than tailored styles that may
appear too large. Flowing fabrics in
jersey knits or bias-cut styles will enhance
an hourglass figure. Plain fabrics or fine
patterns will be suitable.
Avoid crisp fabrics and boxy jackets,
which are too angular for a curvy
shape. Straight, shapeless dresses
will do nothing for an hourglass shape.
Large patterns, heavy textures and
checks add width to the body shape,
so should be avoided.
Bottom-heavy triangle (pear)
Choose tops and jackets with details
such as pockets, frills and embroidery
that will add interest and draw the eye
up and away from the hip area. Careful
attention to length is important, and
horizontal lines should not cut across the
hip, as this accentuates the problem.
Avoid halter neck and high-neck bodices,
which emphasize narrow shoulders and
a flat chest. Narrow, tapered-to-the-ankle
trousers and leggings are unflattering,
especially when worn with baggy tops
that make the silhouette appear larger
and heavier.
Top-heavy triangle OvalCircle Narrow rectangle Hourglass Bottom-heavy triangle
USP 018-061 UK_.indd 21 11/25/09 1:01:27 PM
USP 018-061 B1 corrections_.indd 22 11/24/09 4:43:18 PM
22 All about commercial patterns
Getting started
Start by asking for help from a
friend. It is virtually impossible to
take accurate measurements by
yourself. Use a dressmaker's
measuring tape. Remove all of
your outer clothing, but remain
in your undergarments while
measuring. Use the standard size
UK12/US8 measurements (left) to
compare with your own.
Use the diagrams provided
opposite as a guide to where to
take the measurements. These
measurement points are called
‘body landmarks’. Body landmarks
can be indicated on your body by
positioning sticky tape on your
undergarments. Stand with your
feet together while measuring.
How to measure accurately
The essential body landmarks.
When taking body measurements, it is extremely important to be accurate.
A well-balanced, nicely-fitting garment could depend entirely on this. Keep
your tape measure flat to the body and do not pull it tight or twist it. Try to
keep all horizontal measurements level.
Tip
• Your working arm (depending
on whether you are right or left
handed) may have a greater
circumference: up to 2–3cm
(1 in) more! If so, always use the
larger measurement.
1 Bust 87cm (34
1
⁄4in)
2 Waist 68cm (26
3
⁄4in)
3 Hip 92cm (36
1
⁄4in)
4 CF neck to waist 32cm (12
1
⁄2in)
5 CF shoulder to waist 34.5cm (13
1
⁄2in)
6 Shoulder 9cm (3
1
⁄2in)
7 Neck 37cm (14
1
⁄2in)
8 C shoulder point to bust 23cm (9in)
9 CB neck to waist 40cm (15
3
⁄4in)
10 CB shoulder to waist 42cm (16
1
⁄2in)
11 Hip depth 20.5cm (8in)
12 CF waist to floor 103cm (40
1
⁄2in)
13 CF waist to knee 58.5cm (23in)
14 Back 23cm (9
1
⁄4in)
15 CB waist to floor 104cm (41in)
16 Upper arm 34cm (13
1
⁄2in)
17 Arm length 56.5cm (22
1
⁄4in)
Landmark Standard Personal
Size UK12/US8 Measurements
MEASUREMENT CHART
Photocopy this
Mark all your measurements down: remember to
re-measure if your body changes shape over time.
USP 018-061 UK_.indd 22 11/25/09 1:01:31 PM
7
6
3
5
1
16
2
4
9
10
11
12
13
14
15
8
17
USP 018-061 B1 corrections_.indd 23 11/24/09 3:27:49 PM
23
When measuring
Get the help of a friend when taking your
body measurements. It’s not possible to
be accurate if you’re bending down and
twisting to manoeuvre the tape measure.
Body landmarks
Body circumference:
1 Bust• – fullest part of the
bust (keep level)
2 Waist• – 2.5cm (1in.) above
the navel
3 Hip• – fullest part of the body
Front bodice:
4 Centre front (CF) neck• – length from
front base of neck to waist
5 CF shoulder• – from base of
neck at shoulder point to
waist, over bust
6 Shoulder• – from base of
neck to tip of shoulder
7 Neck• – around base of neck
8 Centre shoulder to bust• – centre of the
shoulder to apex of the bust
Back bodice:
9 Centre back (CB) neck• – neck to waist;
find the large bone at the CB of your
neck down to the CB waist
10 CB shoulder• – from base of neck at
shoulder point to waist
Lower torso:
11 Hip depth• – from the CF waist point
to the fullest part of the body
12 CF waist to floor• – from the CF
waist to floor
13 CF waist to knee• – CF waist to
centre of knee
14 Back• – lower torso (bust line to waist)
15 CB waist to floor• – CB at waist to floor
Arm:
16 Upper arm• – circumference
of your upper arm
17 Arm length• – shoulder to wrist
measured with arm slightly bent
How to measure accurately
USP 018-061 UK_.indd 23 11/25/09 1:01:34 PM
6
7
1
4
12
9
8
5
2
3
11
10
USP 018-061 B1 corrections_.indd 24 11/24/09 12:51:01 PM
24
Children
Follow the same method of measuring accurately for a
child as for an adult. Have the child remove any outer
clothing. Again, remember you are measuring the body,
not the clothes.
Tie a piece of elastic or cord around the waist. Have the
child bend sideways – the elastic will settle at the waist.
Children’s clothing is quicker and easier to construct
than adults’, mainly because the designs are often
simpler to allow for unrestricted movement and growth,
and to help younger children dress themselves. The
patterns are generally flat in construction, not needing any
dart shaping until the child reaches puberty (about 10 for
girls and 12 for boys), when the bust or chest, waist and
hips become more defined.
Children’s ‘body landmarks’
and where they are found
Below are the ‘body landmarks’, where you should take
measurements on the child’s body. The chest, waist and
hip measurements are the most important. Measurements
marked with a * are needed to purchase a pattern.
1 • *Breast or chest
2 • *Waist
3 • *Hips
4• *Centre back (neck to waist)
5 • *Height
6 • Shoulder
7 • Crotch depth
8 • Inside leg
9 • Outside leg
10 • CB (waist to floor)
11 • CB (waist to knee)
12 • Arm length
•
All about commercial patterns
Measuring a child
Below right: Tie elastic around the waist
and ask the child to bend sideways.
Where the elastic settles is the natural
waist. Below left: With the elastic still
around the waist, sit the child on a flat
surface. This will allow you to take the
crotch depth measurement.
Crotch
depth
USP 018-061 UK_.indd 24 11/25/09 1:01:37 PM