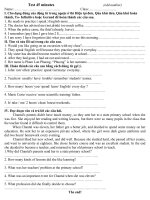
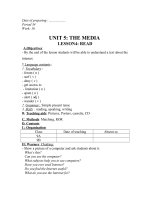
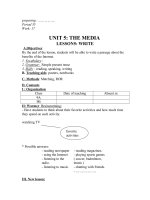
Tài Liệu Tiếng Anh Ngành May - Các Bước Thực Hiện Một Sản Phẩm May - Steps to Garment Making
Bạn đang xem bản rút gọn của tài liệu. Xem và tải ngay bản đầy đủ của tài liệu tại đây (262.1 KB, 11 trang )
STEPS TO GARMENT MAKING
1st Step
Prepare the fabric booking : After approval of fit sample & received the final PO sheet from buyer,
pattern/cutting section will make a correct pattern set of all the sizes. In middle class factory normally
merchandiser do the consumption with the help of cutting master after placed the pattern of
on marker paper. In this regards please always remember one thing if the orders qty is with size wise
ratio then you must consider it during the making marker with pattern. I will discuss more details
regarding the marker in near future. After get the consumption & dia confirmations merchandiser will
booked the fabric and hand over the color & construction wise fabric break up sheet to fabric
department. During this merchandiser should provide them all the lab dip approval with other
instructions. Please also booked the collar & cuff.
2nd Step
Prepare the Accessories booking: In same time of booking the fabric merchandiser also should booked
the accessories. Merchandiser should ensue that, the store will receive all the sewing
accessories before in house of the the fabric. Sewing accessories means - Sewing thread, main/size label,
care label, tape etc. Merchandiser should always follow up the sewing production because when a
minimum qty will be output he should try to book the finishing accessories like as - Poly, Carton etc.
Before booked the poly & back board he must confirm the folding way with buyer. Also merchandiser
should take approval of shipping mark, sticker & carton quality from his buyer. Some others accessories
like as - hang tag, hang tag string, thinner, spot lifter, inter lining, he must booked these at the same
time of fabric booking. After received these trims he should make a trim card and distribute to all the
sections. Store department should count & check the quality of all the accessories before start sewing
production and also provide a inventory report to merchandiser.
3rd Step
Production planning: After placing all the booking he should discuss with the planning for a production
planning. Maximum middle class factory do not follow this procedure.
4th Step
Quality check of fabric: After receive the fabric from dyeing the fabric Q.C department will check the
color shade, Gsm, dia, shrinkage, twisting etc and acknowledged the merchandiser accordingly. The
fabric q.c team will also check the count the collar & check the others quality. A middle class factory
need a strong quality team for fabric because normally they do the dyeing in others factory.
5th Step
Fabric Cutting: After receive the green signal from fabric q.c team and merchandiser, cutting section will
be start trial cutting at first. At the same time cutting section will check the consumption again in real
fabric. They will confirm to the merchandiser that how pcs they can be able to cut from the received
fabric. It is very important because some time we need extra fabric due to the increased of fabric GSM.
Merchandiser should re booked the short qty fabric if needed.
6th Step
Size set & PP sample: After received the bulk fabric production section will make size set sample and
check the measurement & shrinkage of fabric. After checking the size set sample they will adjust the
pattern and will be make a pre production sample for buyer approval. During the size set sample
production department will setup the line layout. Step 5th & 6th will be done at the same time.
7th Step
Sewing Section: As in our following this style has no print & embroidery so the cut fabric will be go to
input section directly. Merchandiser should sit for a PP meeting with production department with the
approved trim card, PP sample, Accessories in house report. Production department should discuss with
planning department for production target.
a) Placket Making: Production supervisor will made the placket by the help of sewing operator. At first
they will fused the fabric with interlining in fusing machine. After that, they will cut the fabric by use of
the pattern of placket. After that, they will marked the placket fabric & stitch with a plain machine.
b) Pocket Joint: In between of the placket making we will attached the pocket with body by use of a
plain machine. Regarding the pocket please be careful about placement of pocket. Sometimes sewing
operator sew it slanted & wrong position.
c) Placket Make & Joint : After making the placket & joint the pocket with body, the body has goes to
next plain machine operator to attached the placket with body. Here normally we used two plain
machine.
d) Shoulder Joint: After the placket joint we joint the shoulder (front & back part) by use of a over lock
machine.
e) Shoulder Top Stitch: After shoulder joint we put a top stitch over the shoulder by use of another plain
machine.
f) Collar tack & Joint : After the shoulder top stitch at first we tack the collar by use a plain machine then
we join the collar with body by use of a over lock machine.
g) Back tape joint: After collar joint we joint the back tape in the flat lock machine by used of folder.
h) Placket Top stitch: After back tap joint we put placket top stitch by use two plain machine.
i) Placket Box: After the top stitch of placket we make the placket box by use of plain machine.
j) Main/size label attachment: After the placket box making we attached the main/size label inside the
back tape by use of plain machine.
k) Sleeve rolling/ sleeve hem: In the mean time we roll the or hem the sleeve with flat lock machine.
l) Sleeve joint: Now we will joint the sleeve with body by use of over lock machine.
m) Side seam joint: After these operations we joint the both side seam of body & sleeve by use of over
lock machine. We also attached the care label in between this operations.
n) Bottom hem: After the side seam joint we hem the bottom by use of a flat lock machine.
o) Sleeve (opening)Tack: After these process we put a tack in sleeve opening.
p) Button Hole: Then we make hole on the placket by use of button hole machine. In this regards please
note that button hole will be little bit smaller then the button dia (ligne). Also be noted top button hole
will be horizontal where as the others button hole will be vertical. However, you should confirmed it
with your buyer.
q) Button Stitch: After button hole we will be attached the button with placket by use of button stitch
machine. Please note that, many time buyer asked for extra button. If needed then we will also stitched
a button with the body.
Machine Wise Sewing Operation (knit Items)
Learn Apparel Merchandising, Learn Fashion Design.
Some Common Machine wise Sewing Operations.
From my this post you will got a common list of sewing operations based on knitted items.
Plain Machine
1. Placket Rolling
2. Placket Box
3. Nose Tack
4. Neck Tack
5. Sleeve Tack
6. Neck Rib Tack
7. Collar Top Stitch
8. Neck Top Stitch
9. Pocket Join
10. Side Band Top Stitch
11. Label Join.
Over Lcok Machine
1. Shoulder Join
2. Sleeve Join
3. Side Seam
4. Neck Join
Flat Lcok Machine
1. Shoulder Top Stitch
2. Armhole Top Stitch
3. Neck Top Stitch
4. Sleeve Rolling
5. Bottom Hemming
Please be informed that, the above list is not a complete list.
Trims: During the making and exporting process of a garment we use many kinds of items other then
Fabric, Print & Embroidery. We called these items as trims. Trims cover all the items used in the garment
except the basic fabric. There are hundreds of items used to manufacture the garments, Proper
selection of trims and its quality are very important for styling, otherwise the garment may be rejected
or returned by the customers.
Please find below a short list that covers some names of the trims:
1. Sewing thread: The main & most common trims are sewing thread. Normally buyer asked the
matching color sewing thread. In garments production normally we used 100% spun polyester thread,
100% cotton thread, Filament thread etc. The polyester thread shade is color fastness. Tensile strength.
Elasticity, Shrinkage, Moisture Regain, abrasion, Resistance etc these are some quality of sewing thread.
50/2 is the most common count sewing thread normally we use it in T-shirt. 40/2 & 40/3 count sewing
thread is also available in market. Normally we use these thicker thread in heavy garment like as sweat
shirt, jacket, trouser etc. The price of 40/2 yarn is higher than 50/2.
2. Zipper: From the zipper factory we can get various kind of zipper. We can categorize the zipper by
following points as mentioned below
a) Teeth: Nylon teeth, Vislone teeth, Metal teeth etc.
b) Color: Tape color, Teeth color.
c) Size: #3, #5 & #8 etc.
d) Function: Auto lock, Semi auto lock, Hidden zipper, reversible, Open end (O/E), Close End (C/E) etc.
e) Length: As per requirement 18 cm, 66 cm etc.
3. LABELS: Main, Size, Care (Polyester care label & Nylon or paper care label), Content, price, patch etc
4. BUTTON : Pearl plastic button, 02 hole button, 03 hole button, 04 hole button, custom button shape,
Horn button, Shang button, Metal button, logo button, non logo button etc.
5. ELASTIC : Cotton elastic, Polyester elastic, 400 denier, 700 denier, 1 cm width, 1.5 cm width, 3 cm
width etc.
6. EYELET : Antique, Matching color, Matt silver, Antique Silver, 22 mm dia, with logo or w/o logo,
emboss logo, engraved logo etc.
7. SNAP BUTTON: Snap button, press button, 4 part snap button, male part of snap button, female part
of snap button, antic color, Silver color, matching color.
8. VELCRO : Hook & Pile, Matching color.
9. STRING/CORD : Cotton, Polyester etc.
10. PLASTIC CLIP
11. Tag pin: Clr – White, black, transparent, 3 cm, 6 cm, 8 cm, 12 cm etc.
12. TAGS : Price tag, Hand Tag, Brand Tag etc.
13. STICKER : Hook & Pile etc.
14. HANGER: BDS hanger, t-hanger, 28 cm, 34 cm, Transparent, Semi transparent, Solid color etc.
15. Hanger size ring: Size ring of hanger, Size print etc.
16. POLYBAG (0.80 mm) : Strength : Chemical Mixture. Thickness (micron/mm: 1mm = 1000 micron)
Elasticity Transparent, LDPE (Low Density Poly Ethylene), PP (Poly Propylene), Adhesive, with hole,
warning, size, recycle logo etc.
17. BLISTER BAG (.05 mm): Loaded capacity is higher than polybag
18. SCOTCH TAPE
19. GUMTAPE: With logo print, none logo, Khaki color, transparent color.
20. CARTON: 3ply, 5ply, Size (L,W. H), gum pasting, PP belt, metal stitching, divider, bottom, shipping
mark etc.
21. Interlining : Crash lining, soft lining, Hard lining etc.
22. Silica: For controlling the moisture in the carton.
23. Shoulder tape: Cotton, Polyester etc.
Above list just for a Idea not a complete list.
How to Make Line Loading Plan for Garment Production?
33
Home > Production Planning
In “Line loading plan” planner decides on which date a style to be loaded and how many lines to be
considered for the style to meet the production completion date. Line loading plan is an important task
for a production planner. Planner needs to do backward and forward planning based on lead time. In
this article I will explain how to make line loading plan and what things are important during making a
loading plan. Explanation is given step by step in the following with examples. There is lot of
mathematical calculation. So, I will suggest you to use spreed sheet for the making the plan.
Step 1: Make a list of current orders with details such as order no., order quantity, style description, and
production completion date. Refer to the Table-1. Suppose order has been received on the month
March and production completion date on May from 4
th
to 21
st
.
Table- 1: Order list
Order No. Garment
Description
Order Quantity
(pieces)
Production
completion date
OCS101 Dress 200010
th
May
OCS102 Blouse 300012
th
May
OCS103 Trouser 500015
th
May
GAP104 Long sleeve Tee 300017
th
May
GAP105 Skirt 300021
st
May
GAP106 Dress 150021
st
May
GAP107 Long sleeve Tee 1000010
th
May
GAP108 Skirt 120004
th
May
Total 28,000
Step 2: Suppose a factory has 5 production lines. Calculate available capacity of the line using capacity
calculation formula considering absenteeism (10%) and line efficiency %. You should have knowledge
about line wise production efficiency to calculate actual capacity of a line. Or calculate it prior to line
loading plan.
Available capacity in hours = {(No. of operators/machines x working days in a month x daily work hours
x 60) – absenteeism %} x Efficiency %
Line wise available capacity has been shown in the Table-2. It is considered that each line is equipped
with 25-32 machines (operators), factory’s normal shift time is 8 hours (480 minutes) and line efficiency
is in the range of 39% to 55%.
Table- 2: Available capacity calculation
Line
No.
No. of
Operator
Minutes/Day
(Daily working
Hrs. X 60)
Line
Efficiency
Absenteeism % Capacity
available
Line
1
30 480 40% 10%
5184.0
Line
2
28 480 50% 10%
6048.0
Line
3
32 480 55% 10%
7603.2
Line
4
32 480 45% 10%
6220.8
Line
5
25 480 39% 10%
4212.0
Step 3: Next, calculate required capacity for each order (style) in minutes and in days. Assume that
above 8 styles to be run in 5 lines and styles will be loaded only in single line. Consider that all lines
blank and you have no issue with starting date. In this stage you have to also decide which line to be
chosen for the styles. Allocate order to the line according to product category and line set up (machines
laid). In Table-3 line number has been mentioned against the order number. Use the following formula
for the calculation.
Capacity required in minutes = Order Quantity X Style SMV
Capacity required in days = Capacity required in minutes / Capacity available per day.
Refer to the table-3 for calculated minutes and days required for each style.
Table-3: Required capacity calculation
Order
No.
Loaded
to Line
No.
Order
Quantity
Style
SMV
Capacity
Required
(Minutes)
Capacity
available
per day
Capacity
Required
(Days)
OCS101 Line-1 2000 28
56000 5184 11
OCS102 Line-2 3000 25
75000 6048 12
OCS103 Line-3 5000 20
100000 7603.2 13
GAP104 Line-4 3000 10 30000 6220.8 5
GAP105 Line-5 3000 18
54000 4212 13
GAP106 Line-1 1500 28
42000 5184 8
GAP107 Line-4 10000 10
100000 6220.8 16
GAP108 Line-5 1200 18
21600 4212 5
Step 4: Now do backward calculation to find the date for style loading. Days needed to complete
production on due date, Sundays and holidays must be excluded in day count. And add one to two days
initially for line setting according to style requirement. If required, you can add buffer for one to two
days. To make it easy in calculating the loading dates considering above points use spreadsheet based
planning board. For example refer to the following image-1. I have made loading plan on the planning
board for theses styles. Light blue colored columns represent Sunday (weekly off days). Finally make
another table (Table-4) representing loading date against orders.
Image-1: Planning Board
Table-4: Order loading date
Order
No.
Garment
Description
Loaded
to Line #
Production
completion
date
Capacity
Required
(Days)
Loading
date
Comments
OCS101 Dress Line-1 10
th
May
1126
th
April
OCS102 Blouse Line-2 12
th
May
1227
th
April
OCS103 Trouser Line-3 15
th
May
1328
th
April
GAP104 Long sleeve
Tee
Line-4 17
th
May
511
th
May
GAP105 Skirt Line-5 21
st
May
135
th
May
GAP106 Dress Line-1 21
st
May
811
th
May
GAP107 Long sleeve
Tee
Line-4 10
th
May
1621
st
April
GAP108 Skirt Line-5 04
th
May
528
th
April
Step 5: Once you gone through this article, practice this with some of your real styles. I wish you can
make it. If you feel you need further assistance then write us.