AN1476 combining the CLC and NCO to implement a high resolution PWM
Bạn đang xem bản rút gọn của tài liệu. Xem và tải ngay bản đầy đủ của tài liệu tại đây (730.24 KB, 10 trang )
AN1476
Combining the CLC and NCO to Implement
a High Resolution PWM
Author:
Cobus Van Eeden
Microchip Technology Inc.
INTRODUCTION
Although many applications can function with PWM
resolutions of less than 8 bits, there is a range of
applications, such as dimming of lamps, where higher
resolution is required due to the sensitivity of the
human eye.
FIGURE 1:
BACKGROUND
A conventional PWM uses a timer to produce a regular
switching frequency (TPWM), and then uses a ripple
counter to determine how many clocks the output is
held high before the pulse ends.
The output pulse width is adjusted as indicated in
Figure 1 to produce, in this case, a PWM with five
possible duty cycle settings (0%, 25%, 50%, 75% or
100%).
CONVENTIONAL PWM
The effective resolution (measured in bits) of a PWM
can be calculated by taking the base-2 logarithm of the
number of pulse width settings (N) possible.
EQUATION 1:
Resolution = log 2 N
For a device running at 16 MHz, the smallest duty cycle
adjustment increment would be 62.5 ns (one system
clock). If the PWM is configured to run at a switching
frequency of 200 kHz (switching period of 5 us), 100%
duty cycle will be achieved when the duty cycle register
is set to 80 clocks (80 x 62.5 ns = 5 us). This would
make the effective PWM resolution only slightly more
than 6 bits, as we have 80 steps to choose from. This
is because one system clock divides into one period 80
times.
Knowing that we have 80 possible duty cycle steps, a
precise value for the resolution of the PWM can be
calculated as follows (Equation 2):
2012 Microchip Technology Inc.
EQUATION 2:
log2 80 = 6.32 bits
A PWM running from a 16 MHz clock, which has a
10-bit duty cycle register, will start losing resolution due
to this limitation at a 15.6 kHz switching frequency. For
higher PWM switching frequencies, the duty cycle will
reach 100% before all of the steps in the 10-bit duty
cycle register have been used, and for all the remaining
values the output will simply remain at 100% duty
cycle.
The frequency at which this point is reached can be
calculated as follows (Equation 3):
EQUATION 3:
Fosc
16 000 000
16MHz
---------------- = -----------------= ------------------------------ = 15.6 kHz
10
#Steps
1024
2
DS01476A-page 1
AN1476
In most PWM applications, the PWM is switched at a
much higher frequency than the output can ever
change. By filtering this PWM signal using a low-pass
filter, the desired output is obtained. The filter removes
the high frequency switching components of the PWM
by essentially calculating the average value of the
PWM signal, and presents this as the output. For
example, if we are constructing a switching power
supply, the output voltage will be directly proportional to
the duty cycle. The consequence of this relationship is
that the smaller the adjustment we can make to the
PWM duty cycle, the smaller the resulting change to
the output will be resulting in more precise control of
the output.
FIGURE 2:
From a control systems point of view, being able to
make small adjustments to the output effectively lowers
the quantization gain introduced by the PWM. In control
systems, this lowering of the gain is important to ensure
stability of the system.
DESIGN
PWM Construction
In principal, a PWM is created by the combination of
two parameters. The first being a repeating trigger,
which determines how often we pulse (the switching
period or switching frequency), and the second being a
single pulse generator, which determines how wide the
pulse is (the duty cycle). This is illustrated in Figure 2.
PWM CONSTRUCTION
Switching Period Source
Trigger
Repeating Pulses = PWM
Pulse Generator
In order to achieve an increase in the effective PWM
resolution, we will be using the NCO peripheral on the
PIC® device to create a monostable circuit (a circuit
that gives a single pulse of fixed duration when
triggered).
FIGURE 3:
DS01476A-page 2
We will use the ability of the NCO to generate a signal
that varies between two values in a defined proportion,
creating an average pulse width, which is somewhere
in between two system clocks, as illustrated in
Figure 3. The PWM signal pulse width will vary
(jitter/dither) by one clock period, with the
proportion/ratio of the variation precisely determined by
the NCO configuration.
NCO BASED PWM OPERATION
2012 Microchip Technology Inc.
AN1476
In any application where the output is producing an
average value (e.g., average power transfer to the load
in SMPS or lighting applications), the variation in pulse
width will be perfectly acceptable, because the average
pulse width is accurately controlled.
By itself, the NCO peripheral cannot produce a PWM
signal, but we will change its behavior by adding some
logic using the CLC to produce a PWM output.
FIGURE 4:
We will achieve this by using the conventional PWM as
a clock source to trigger the PWM period, and use the
NCO to determine the pulse width. Any number of clock
sources could be used (e.g., Timers or even external
signals), and in some applications we may even desire
using an external trigger to start the pulses, such as a
zero current detection circuit, if we are building a power
supply. A simplified block diagram of how this will work
is shown in Figure 4.
NCO BASED PWM PRINCIPLE OF OPERATION
The control logic in the CLC is used to set an output
when the switching clock indicates that it is time for the
next pulse, and clear this output to complete the pulse
once the NCO overflows.
2012 Microchip Technology Inc.
DS01476A-page 3
AN1476
IMPLEMENTATION USING CLC AND NCO
4.
An implementation of this design using the NCO and
CLC is shown in Figure 5. For this design, the NCO is
placed in Pulse Frequency mode. In this mode of
operation, a short pulse is produced when the NCO
overflows.
5.
The operation of the circuit can be described as
follows:
1.
2.
3.
The flip-flop will clock on the positive edge of the
timing signal. This will cause the Q output to go
high and the PWM pulse to start.
As the output goes high, the AND gate U3 combines this output signal with a high-speed clock
which is fed into the NCO clock pin via U5. At
this point, the NCO output is low and U4 is not
producing any output.
When the NCO overflows, the NCO output goes
high, which resets the flip-flop, forcing the Q output of the flip-flop to go low. U3 is now inactive
due one of the two inputs of the gate being low.
FIGURE 5:
U4 is used to get the NCO back to a stable state,
as it needs an additional clock to return the NCO
output to low. Once the NCO output returns to
low, U4 will also produce no clock output and the
system will be in a stable state with the output
low.
When the next positive edge from the timing
source is received the process is repeated from
step 1 above. The amount of time it takes the
NCO to overflow will depend on the remainder
left in the accumulator after the last overflow, as
well as the increment register. Due to the
accumulation of remainders the pulse will sometimes be one system clock shorter than usual.
By controlling how often this happens (setting
the increment register), we can control exactly
what the average pulse width will be.
PWM IMPLEMENTATION USING CLC AND NCO
CALCULATIONS
The calculation of the pulse width will be according to
the NCO overflow frequency calculation, as listed in the
data sheet.
EQUATION 4:
Table 1 below shows the pulse width, which this circuit
will produce using a 16 MHz clock connected directly to
the NCO clock input (FNCO), given various increment
register values. Note that, for high increment values, a
single increment of the register will change the pulse
width by a mere 15 ps.
Increment
F OUT = FNCO -------------------------n
2
The average overflow frequency of the NCO will
determine the average output pulse width (TPULSE)
produced.
EQUATION 5:
1
T PULSE = ------------F OUT
DS01476A-page 4
2012 Microchip Technology Inc.
AN1476
TABLE 1:
CALCULATED PWM PULSE WIDTH FOR DIFFERENT INCREMENT REGISTER
VALUES
Increment Value
NCO FOUT (Hz)
Average Pulse Width (ns)
65000
991,821
1,008.246
65001
991,837
1,008.231
20000
305,176
3,276.800
20001
305,191
3,276.636
100
1,526
655,360.000
101
1,541
648,871.287
CHARACTERISTICS
It is important to note that the NCO is designed to give
linear control over frequency. The control over pulse
width is subsequently not linear. As can be seen from
the equation for calculating TPULSE above (Equation 5),
the pulse width will vary with the inverse of the
frequency (1/x).
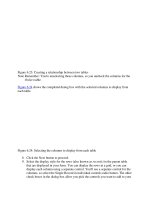
FIGURE 6:
The result is that the effective resolution of the PWM is
not constant over the entire range from 0% to 100%
duty cycle.
For every duty cycle setting, we can calculate the
effective resolution at this particular point, and plot this
on a graphic. This curve will look different depending
on what the switching frequency is, because we are
adjusting the pulse width independently from the
switching frequency. For a FSW = 3 kHz and a 16 MHz
clock, the graphic will look as follows (Figure 6).
HIGH RES PWM RESOLUTION PLOTTED AGAINST DUTY CYCLE
(CLOCK = 16 MHz, FSW = 3 kHz)
23
21
19
17
15
13
11
9
7
Although we have an equivalent 21 bits of resolution
close to 0% duty cycle, this deteriorates to only 7.5 bits
of resolution at 100% duty cycle, at which point the conventional PWM would outperform our High-Resolution
implementation.
2012 Microchip Technology Inc.
Interestingly, and perhaps counter-intuitively, we can
improve the resolution by decreasing the NCO input
clock frequency. Reducing this clock to 1 MHz will have
the result shown below (Figure 7).
DS01476A-page 5
AN1476
FIGURE 7:
HIGH RES PWM RESOLUTION PLOTTED AGAINST DUTY CYCLE
(CLOCK = 1 MHz, FSW = 3 kHz)
21
19
17
15
13
11
9
7
There is, of course, a limitation, as can be seen, close
to 0% duty cycle, where the increment register maximum value is reached and smaller pulses cannot be
generated any more, but the resolution now never
reduces to less than 11 bits.
FIGURE 8:
One way to improve the performance would be to invert
the PWM signal when we exceed 50% duty cycle. By
doing this we can effectively mirror the performance
under 50% duty cycle to the region above it, with the
higher resolution. We still have the option to use the
original curve where the limits of the increment are
reached. This results in the following graphic (Figure 8)
for the same conditions as the graphic above.
RESOLUTION VS DUTY CYCLE WITH SIGNAL INVERSION AT 50% DUTY CYCLE
(CLOCK = 1 MHz, FSW = 3 kHz)
22
20
18
16
14
12
10
8
DS01476A-page 6
2012 Microchip Technology Inc.
AN1476
When it is our intention to achieve both the highest possible switching frequency, and the highest resolution
using this technique, we will use a configuration as
shown below (Figure 9). This graphic shows the
achievable resolution when using a 16 MHz clock at a
switching frequency of 500 kHz.
FIGURE 9:
HIGH RES PWM RESOLUTION PLOTTED AGAINST DUTY CYCLE WITH
INVERSION AT 50% (CLOCK = 16 MHz, FSW = 500 kHz)
18
17
16
15
14
13
12
11
10
9
8
SUMMARY
Conventional PWM’s start losing effective resolution at
relatively low switching frequencies. For applications
where the switching frequencies have to be fairly high,
and having as much PWM resolution as possible at
these frequencies is necessary, the NCO can be used
in conjunction with the CLC to create a very high
resolution PWM output.
Even if the requirement is not primarily high resolution,
this solution may still be attractive for a number of applications, adding an additional PWM to the capability of
the device, or having a constant on/off-time variable
frequency PWM, where the pulse is triggered externally
as required, when doing zero current switching in high
efficiency power converters.
The smallest incremental change in pulse width achievable by a conventional PWM with a 16 MHz system
clock speed would be 62.5 ns. If the fastest available
PWM clock is FOSC/4, then this increases to 250 ns.
On the same device, a PWM with an incremental pulse
width change of as little as 15 ps can be constructed
using the technique described in this application note.
2012 Microchip Technology Inc.
DS01476A-page 7
AN1476
NOTES:
DS01476A-page 8
2012 Microchip Technology Inc.
Note the following details of the code protection feature on Microchip devices:
•
Microchip products meet the specification contained in their particular Microchip Data Sheet.
•
Microchip believes that its family of products is one of the most secure families of its kind on the market today, when used in the
intended manner and under normal conditions.
•
There are dishonest and possibly illegal methods used to breach the code protection feature. All of these methods, to our
knowledge, require using the Microchip products in a manner outside the operating specifications contained in Microchip’s Data
Sheets. Most likely, the person doing so is engaged in theft of intellectual property.
•
Microchip is willing to work with the customer who is concerned about the integrity of their code.
•
Neither Microchip nor any other semiconductor manufacturer can guarantee the security of their code. Code protection does not
mean that we are guaranteeing the product as “unbreakable.”
Code protection is constantly evolving. We at Microchip are committed to continuously improving the code protection features of our
products. Attempts to break Microchip’s code protection feature may be a violation of the Digital Millennium Copyright Act. If such acts
allow unauthorized access to your software or other copyrighted work, you may have a right to sue for relief under that Act.
Information contained in this publication regarding device
applications and the like is provided only for your convenience
and may be superseded by updates. It is your responsibility to
ensure that your application meets with your specifications.
MICROCHIP MAKES NO REPRESENTATIONS OR
WARRANTIES OF ANY KIND WHETHER EXPRESS OR
IMPLIED, WRITTEN OR ORAL, STATUTORY OR
OTHERWISE, RELATED TO THE INFORMATION,
INCLUDING BUT NOT LIMITED TO ITS CONDITION,
QUALITY, PERFORMANCE, MERCHANTABILITY OR
FITNESS FOR PURPOSE. Microchip disclaims all liability
arising from this information and its use. Use of Microchip
devices in life support and/or safety applications is entirely at
the buyer’s risk, and the buyer agrees to defend, indemnify and
hold harmless Microchip from any and all damages, claims,
suits, or expenses resulting from such use. No licenses are
conveyed, implicitly or otherwise, under any Microchip
intellectual property rights.
Trademarks
The Microchip name and logo, the Microchip logo, dsPIC,
FlashFlex, KEELOQ, KEELOQ logo, MPLAB, PIC, PICmicro,
PICSTART, PIC32 logo, rfPIC, SST, SST Logo, SuperFlash
and UNI/O are registered trademarks of Microchip Technology
Incorporated in the U.S.A. and other countries.
FilterLab, Hampshire, HI-TECH C, Linear Active Thermistor,
MTP, SEEVAL and The Embedded Control Solutions
Company are registered trademarks of Microchip Technology
Incorporated in the U.S.A.
Silicon Storage Technology is a registered trademark of
Microchip Technology Inc. in other countries.
Analog-for-the-Digital Age, Application Maestro, BodyCom,
chipKIT, chipKIT logo, CodeGuard, dsPICDEM,
dsPICDEM.net, dsPICworks, dsSPEAK, ECAN,
ECONOMONITOR, FanSense, HI-TIDE, In-Circuit Serial
Programming, ICSP, Mindi, MiWi, MPASM, MPF, MPLAB
Certified logo, MPLIB, MPLINK, mTouch, Omniscient Code
Generation, PICC, PICC-18, PICDEM, PICDEM.net, PICkit,
PICtail, REAL ICE, rfLAB, Select Mode, SQI, Serial Quad I/O,
Total Endurance, TSHARC, UniWinDriver, WiperLock, ZENA
and Z-Scale are trademarks of Microchip Technology
Incorporated in the U.S.A. and other countries.
SQTP is a service mark of Microchip Technology Incorporated
in the U.S.A.
GestIC and ULPP are registered trademarks of Microchip
Technology Germany II GmbH & Co. & KG, a subsidiary of
Microchip Technology Inc., in other countries.
All other trademarks mentioned herein are property of their
respective companies.
© 2012, Microchip Technology Incorporated, Printed in the
U.S.A., All Rights Reserved.
Printed on recycled paper.
ISBN: 9781620766583
QUALITY MANAGEMENT SYSTEM
CERTIFIED BY DNV
== ISO/TS 16949 ==
2012 Microchip Technology Inc.
Microchip received ISO/TS-16949:2009 certification for its worldwide
headquarters, design and wafer fabrication facilities in Chandler and
Tempe, Arizona; Gresham, Oregon and design centers in California
and India. The Company’s quality system processes and procedures
are for its PIC® MCUs and dsPIC® DSCs, KEELOQ® code hopping
devices, Serial EEPROMs, microperipherals, nonvolatile memory and
analog products. In addition, Microchip’s quality system for the design
and manufacture of development systems is ISO 9001:2000 certified.
DS01476A-page 9
Worldwide Sales and Service
AMERICAS
ASIA/PACIFIC
ASIA/PACIFIC
EUROPE
Corporate Office
2355 West Chandler Blvd.
Chandler, AZ 85224-6199
Tel: 480-792-7200
Fax: 480-792-7277
Technical Support:
/>support
Web Address:
www.microchip.com
Asia Pacific Office
Suites 3707-14, 37th Floor
Tower 6, The Gateway
Harbour City, Kowloon
Hong Kong
Tel: 852-2401-1200
Fax: 852-2401-3431
India - Bangalore
Tel: 91-80-3090-4444
Fax: 91-80-3090-4123
India - New Delhi
Tel: 91-11-4160-8631
Fax: 91-11-4160-8632
Austria - Wels
Tel: 43-7242-2244-39
Fax: 43-7242-2244-393
Denmark - Copenhagen
Tel: 45-4450-2828
Fax: 45-4485-2829
India - Pune
Tel: 91-20-2566-1512
Fax: 91-20-2566-1513
France - Paris
Tel: 33-1-69-53-63-20
Fax: 33-1-69-30-90-79
Japan - Osaka
Tel: 81-66-152-7160
Fax: 81-66-152-9310
Germany - Munich
Tel: 49-89-627-144-0
Fax: 49-89-627-144-44
Atlanta
Duluth, GA
Tel: 678-957-9614
Fax: 678-957-1455
Boston
Westborough, MA
Tel: 774-760-0087
Fax: 774-760-0088
Chicago
Itasca, IL
Tel: 630-285-0071
Fax: 630-285-0075
Cleveland
Independence, OH
Tel: 216-447-0464
Fax: 216-447-0643
Dallas
Addison, TX
Tel: 972-818-7423
Fax: 972-818-2924
Detroit
Farmington Hills, MI
Tel: 248-538-2250
Fax: 248-538-2260
Indianapolis
Noblesville, IN
Tel: 317-773-8323
Fax: 317-773-5453
Los Angeles
Mission Viejo, CA
Tel: 949-462-9523
Fax: 949-462-9608
Santa Clara
Santa Clara, CA
Tel: 408-961-6444
Fax: 408-961-6445
Toronto
Mississauga, Ontario,
Canada
Tel: 905-673-0699
Fax: 905-673-6509
Australia - Sydney
Tel: 61-2-9868-6733
Fax: 61-2-9868-6755
China - Beijing
Tel: 86-10-8569-7000
Fax: 86-10-8528-2104
China - Chengdu
Tel: 86-28-8665-5511
Fax: 86-28-8665-7889
China - Chongqing
Tel: 86-23-8980-9588
Fax: 86-23-8980-9500
Korea - Daegu
Tel: 82-53-744-4301
Fax: 82-53-744-4302
China - Hangzhou
Tel: 86-571-2819-3187
Fax: 86-571-2819-3189
Korea - Seoul
Tel: 82-2-554-7200
Fax: 82-2-558-5932 or
82-2-558-5934
China - Hong Kong SAR
Tel: 852-2401-1200
Fax: 852-2401-3431
Malaysia - Kuala Lumpur
Tel: 60-3-6201-9857
Fax: 60-3-6201-9859
China - Nanjing
Tel: 86-25-8473-2460
Fax: 86-25-8473-2470
Malaysia - Penang
Tel: 60-4-227-8870
Fax: 60-4-227-4068
China - Qingdao
Tel: 86-532-8502-7355
Fax: 86-532-8502-7205
Philippines - Manila
Tel: 63-2-634-9065
Fax: 63-2-634-9069
China - Shanghai
Tel: 86-21-5407-5533
Fax: 86-21-5407-5066
Singapore
Tel: 65-6334-8870
Fax: 65-6334-8850
China - Shenyang
Tel: 86-24-2334-2829
Fax: 86-24-2334-2393
Taiwan - Hsin Chu
Tel: 886-3-5778-366
Fax: 886-3-5770-955
China - Shenzhen
Tel: 86-755-8203-2660
Fax: 86-755-8203-1760
Taiwan - Kaohsiung
Tel: 886-7-213-7828
Fax: 886-7-330-9305
China - Wuhan
Tel: 86-27-5980-5300
Fax: 86-27-5980-5118
Taiwan - Taipei
Tel: 886-2-2508-8600
Fax: 886-2-2508-0102
China - Xian
Tel: 86-29-8833-7252
Fax: 86-29-8833-7256
Thailand - Bangkok
Tel: 66-2-694-1351
Fax: 66-2-694-1350
Italy - Milan
Tel: 39-0331-742611
Fax: 39-0331-466781
Netherlands - Drunen
Tel: 31-416-690399
Fax: 31-416-690340
Spain - Madrid
Tel: 34-91-708-08-90
Fax: 34-91-708-08-91
UK - Wokingham
Tel: 44-118-921-5869
Fax: 44-118-921-5820
China - Xiamen
Tel: 86-592-2388138
Fax: 86-592-2388130
China - Zhuhai
Tel: 86-756-3210040
Fax: 86-756-3210049
DS01476A-page 10
Japan - Yokohama
Tel: 81-45-471- 6166
Fax: 81-45-471-6122
10/26/12
2012 Microchip Technology Inc.