Tài liệu Using the Data Form Wizard to Create a Windows Form phần 2 doc
Bạn đang xem bản rút gọn của tài liệu. Xem và tải ngay bản đầy đủ của tài liệu tại đây (42.06 KB, 7 trang )
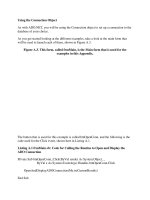
Figure 6.23: Creating a relationship between two tables
Note Remember: You're unselecting these columns, so you uncheck the columns for the
Orders table.
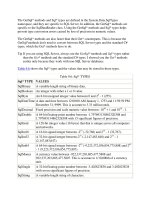
Figure 6.24
shows the completed dialog box with the selected columns to display from
each table.
Figure 6.24: Selecting the columns to display from each table
8. Click the Next button to proceed.
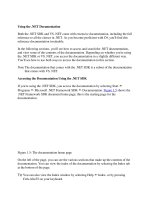
9. Select the display style for the rows (also known as records) in the parent table
that are displayed in your form. You can display the rows in a grid, or you can
display each column using a separate control. You'll use a separate control for the
columns, so select the Single Record in individual controls radio button. The other
check boxes in the dialog box allow you pick the controls you want to add to your
form. These controls affect the rows in the master table, and you can add the
following controls to your form:
Note In this example, the parent table is the Customers table, and the child table is
the Orders table. The rows for the child table are displayed in a DataGrid
control.
o
Cancel All The Cancel All button allows you to undo any changes you've
made to the current row.
o
Add The Add button allows you to add a new row.
o
Delete The Delete button allows you to delete the current row.
o
Cancel The Cancel button allows you to cancel a change made to the
current row.
o
Navigation Controls The Navigation controls consist of four buttons that
allow you to move to first row, the previous row, the next row, and the last
row. An indicator is also displayed to show the current row.
Figure 6.25
shows the completed dialog box.
Figure 6.25: Choosing the display style
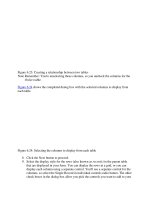
10. You've now completed all the steps in the Data Form Wizard. Click the Finish
button to create your form. VS .NET will now display the new form, as shown in
Figure 6.26
.
Figure 6.26: The completed form
The managed provider objects in your form use the OLE DB classes contained in the
System.Data.OleDb namespace-even though a SQL Server database is used. These
objects work with any OLE DB-compliant database. The code would be more efficient if
the managed provider classes in the System.Data.SqlClient namespace were used instead;
these classes are specifically for use with a SQL Server database. This is the price of
having the VS .NET wizard generate the code for you.
In the next section
, you'll learn how the text-box controls in your form access the
columns in the Customers table.
Data Binding
Each text-box control in the upper part of your form is bound to a column in the
Customers table using a process known as data binding. When a control is bound to a
column in a DataSet object, the value for that column is displayed in the control through
the Text property in the DataBindings group. The Text property in the DataBindings
group sets the text displayed in a control. To examine or set the data binding for a
control, you select the control in the form designer and expand the DataBindings
properties in the Properties window. You'll see these properties in the Data area of the
Properties window.
Next, you'll see how the text box for the Customer ID is set. Select the text box to the
right of the CustomerID label in your form; this text box is named editCustomerID. Make
sure the DataBindings properties are expanded in the Properties window. Finally, click
the drop-down list for the Text property to view the current column to which the text box
is bound. As you can see from Figure 6.27
, editCustomerID is bound to the CustomerID
column of the Customers table. This means that when you run the form and load data
from the database, the CustomerID column value will be displayed in the editCustomerID
text box.
Figure 6.27: The editCustomerID text box is bound to the CustomerID column
In the next section
, you'll add a label and a text-box control to display the City column in
your form.
Adding Controls to the Form
When you ran the Data Form Wizard earlier to create your form, you'll recall that I told
you to unselect the City column of the Customers table so that it didn't appear on your
form. I asked you to do this so that you can now see how to manually add a control and
bind it to the City column. That way, you can see how to build your own forms that
access the database.
Follow these steps to add a label and a text box to your form:
1. Add a label below the Address label in your form. Set the Name property for your
new label to lblCity.
2. Set the Text property for your label to City.
3. Next, add a text box below the editAddress text box.
4. Set the Name property for your new text box to editCity.
5. Remove the current text from the Text property so that no default text is shown in
the control.
Next, you need to bind editCity to the City column of the Customers table. To do this,
you open the DataBindings properties and set the text property by selecting City from the
Customers table, as shown in Figure 6.28
.
Figure 6.28: Binding the City column to the editCity text box
In the next section
, you'll add a Main() method to the code of your form.
Adding the Main() Method
As you know, all programs must have a Main() method. The Main() method is executed
when you run your program. In this section, you'll add a Main() method to your form. To
do this, select View ➣ Code, and add the following Main() method inside your
MyDataForm class (a good place to add Main() would be at the start of your
MyDataForm class after the open curled bracket {):
public class MyDataForm : System.Windows.Forms.Form
{
public static void Main()
{
Application.Run(new MyDataForm());
}
...
This code creates a new object of the MyDataForm class, causing your form to be
displayed on the screen.
Setting the Password
Before you can run your form, you need to set the password for the database user in the
ConnectionString property of the data connection object. This object was automatically
created by VS .NET when you ran the Data Form Wizard, and the object has the default
name oleDbConnection1.