drawing manga weapons vehicles and accessories
Bạn đang xem bản rút gọn của tài liệu. Xem và tải ngay bản đầy đủ của tài liệu tại đây (10.83 MB, 82 trang )
ISBN 978-1-4488-4801-0
NEW YORK
This edition published in 2012 by:
The Rosen Publishing Group, Inc.
29 East 21st Street
New York, NY 10010
Additional end matter copyright © 2012 by The Rosen Publishing Group, Inc.
All rights reserved. No part of this book may be reproduced in any form without
permission in writing from the publisher, except by a reviewer.
Library of Congress Cataloging-in-Publication Data
Southgate, Anna.
Drawing manga weapons, vehicles, and accessories / Anna Southgate, Keith
Sparrow.—1st ed.
p. cm.—(Manga magic)
Includes bibliographical references and index.
ISBN 978-1-4488-4801-0 (library binding)
ISBN 978-1-4488-4805-8 (pbk.)
ISBN 978-1-4488-4809-6 (6-pack)
1. Comic books, strips, etc.—Japan—Technique—Juvenile literature. 2.
Cartooning—Technique—Juvenile literature. I. Sparrow, Keith. II. Title. III. Series.
NC1764.5.J3S68 2011
741.5'1—dc22
2011010682
Manufactured in the United States of America
CPSIA Compliance Information: Batch #S11YA: For further information, contact Rosen Publishing, New York, New York, at 1-800-237-9932.
All other content copyright © 2007 Axis Publishing Limited, London.
CONTENTS
Introduction 4
Materials and Equipment 6
Accessories 10
Weapons 42
Vehicles 58
Glossary 70
For More Information 73
For Further Reading 76
Index 78
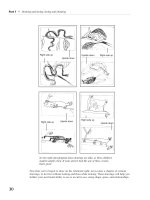
Y
INTRODUCTION
ou’ve drawn the perfect manga magical princess. She has
bright blue eyes and bright blue hair to match and a royal
stance. You’ve even tailored the perfect dress, leggings,
and boots for a dimension-traveling princess. But something’s still missing: the accessories! Give your princess a magic
scepter and tiara adorned with a glowing crystal, and you’ve now
taken a good manga character and transformed her into a great
character, unique and detailed.
Drawing cool accessories for your manga creations gives
your creations more depth and sets them apart from other
characters. These accessories can be gadgets and gear, eye
patches, scarves, or even tails. Knowing how to draw tools and
weapons may also be essential to your storytelling. After all,
what kind of ninja doesn’t have throwing stars? Helmets and
headgear, bracelets, earrings, and other jewelry, gloves and
gauntlets, and glasses and goggles are just some of the objects
to inspire you as you learn to draw.
With manga vehicles, the sky’s the limit. If you can imagine it,
you can draw it, because the technical details aren’t as important
when you are drawing. In real life, your airship might never get off
the ground, but follow these tips and it’ll look like it’s ready to
take on an armada of space pirates, no problem! The step-by-step
instructions in this book will show you the way to crafting weaponry, accessories, and vehicles.
4
5
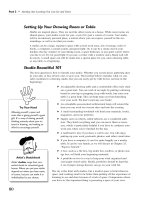
MATERIALS AND EQUIPMENT
You do not need to spend a fortune to get started drawing and coloring good
manga art. You do, however, need to choose your materials with some care to get
the best results from your work. Start with a few basics and add to your kit as your
style develops and you figure out what you like working with.
Artists have their preferences when it comes to equipment, but regardless of
personal favorites, you will need a basic set of materials that will enable you to
sketch, ink, and color your manga art. The items discussed here are only a guide—
don’t be afraid to experiment to find out what works best for you.
paper
You will need two types of paper—one for creating sketches, the other for producing
finished color artwork.
For quickly jotting down ideas, almost any piece of scrap paper will do. For more
developed sketching, though, use tracing paper. Tracing paper provides a smooth surface, helping you to sketch freely. It is also forgiving—any mistakes can easily be erased
several times over. Typically, tracing paper comes in pads. Choose a pad that is around
24 pounds (90 grams per square meter) in weight for best results—lighter tracing
paper may buckle and heavier paper is not suitable for sketching.
Once you have finished sketching out ideas, you will need to transfer them to
the paper you want to produce your finished colored art on. To do this, you will
have to trace over your pencil sketch, so the
Graphite pencils are
paper you choose cannot be too opaque or
ideal for getting your
ideas down on paper
heavy—otherwise you will not be able to
and producing your inisee the sketch underneath. Choose a paper
tial drawing. The pencil
around 16 lb (60 gsm) for this.
drawing is probably the
The type of paper you use is also impormost important stage in
creating your artwork.
tant. If you are going to color using marker
Choose an HB and a 2B
pens, use marker or layout paper. Both of
to start with.
these types are very good at holding the
ink found in markers. Other paper of the
same weight can cause the marker ink to
bleed, that is, the ink soaks beyond the
inked lines of your drawing and produces
fuzzy edges. This does not look good.
You may wish to color your art using
other materials, such as colored pencils
or watercolors. Drawing paper is good for
graphite pencil and inked-only art (such as
6
MATERIALS AND EQUIPMENT
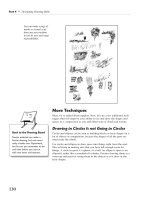
Working freehand
allows great freedom of expression
and is ideal when
you are working out
a sketch, but you will
find times when precision is necessary.
Use compasses or a
circle guide for circles
and ellipses to keep
your work sharp.
Choose compasses
that can be adjusted
to hold both pencils
and pens.
that found in the majority of manga comic books), while heavyweight watercolor
paper holds wet paint and colored inks and comes in a variety of surface textures.
Again, don’t be afraid to experiment: you can buy many types of paper in single
sheets until you find the ones that suit your artwork best.
pencils
The next step is to choose some pencils for your sketches. Pencil sketching is probably the most important stage, and always comes first when producing manga art
(you cannot skip ahead to the inking stage), so make sure you choose pencils that
feel good in your hand and allow you to express your ideas freely.
Pencils are manufactured in a range of hard and soft leads. Hard leads are designated by the letter H and soft leads by the letter B. Both come in six levels—6H
is the hardest lead and 6B is the softest. In the middle is HB, a halfway mark between
the two ranges. Generally, an HB and a 2B lead will serve most sketching purposes,
with the softer lead being especially useful for loose, “idea” sketches, and the harder
lead for more final lines.
Alternatively, you can opt for mechanical pencils. Also called self-propelling pencils,
these come in a variety of lead grades and widths, and never lose their points, making
sharpening traditional wood-cased pencils a thing of the past. Whether you use one is
entirely up to you—it is possible to get excellent results whichever model you choose.
sharpeners and erasers
If you use wooden pencils, you will need to get a quality sharpener; this is a small
but essential piece of equipment. Electric sharpeners work very well and are also
7
DRAWING MANGA WEAPONS, VEHICLES, AND ACCESSORIES
Felt-tip pens
are the ideal
way to ink
your sketches.
A fineliner,
medium-tip pen
and sign pen
should meet all
of your needs,
whatever your
style and preferred subjects.
A few colored
felt-tip pens can
be a good addition to your kit,
allowing you to
introduce color
at the inking
stage.
very fast; they last a long time, too. Otherwise, a handheld sharpener is
fine. One that comes with a couple of spare blades can be a worthwhile
investment, to ensure that your pencils are always sharp.
Along with a sharpener, you will need an eraser for removing any
visible pencil lines from your inked sketches prior to coloring. Choose a
high-quality eraser that does not smudge the pencil lead, scuff the paper,
or leave dirty fragments all over your work. A soft putty eraser works best,
since it absorbs pencil lead rather than just rubbing it away. For this reason,
putty erasers do become dirty with use. Keep yours clean by trimming it
carefully with scissors every now and then.
inking pens
The range of inking pens can be bewildering, but some basic rules will help
you select the pens you need. Inked lines in most types of manga tend to
be quite bold, so buy a thin-nibbed pen, about 0.5 mm (.02 inches) and a
medium-size nib, about 0.8 mm (.03 inches). Make sure that the ink in the
pens is waterproof; this ink won’t smudge or run. Next,
you will need a medium-tip felt pen. Although you won’t
need to use this pen very often to ink the outlines of your
characters, it is still useful for filling in small detailed areas
of solid black. The Pentel sign pen does this job well.
Last, consider a pen that can create different line widths
according to the amount of pressure you put on the tip.
These pens replicate brushes and allow you to create
flowing lines such as those seen on hair and clothing. The
Pentel brush pen does this very well, delivering a steady
supply of ink to the tip from a replaceable cartridge.
Test-drive a few pens at your art store to see
which ones suit you best. All pens should produce
clean, sharp lines with a deep black pigment.
markers and coloring aids
Many artists use markers, rather than paint, to color their
artwork, because markers are easy to use and come
in a huge variety of colors and shades. Good-quality
markers, such as those made by Chartpak, Letraset, or
Copic, produce excellent, vibrant results, allowing you to
build up multiple layers of color so you can create rich,
detailed work and precise areas of shading. Make sure
8
MATERIALS AND EQUIPMENT
Markers come in a
wide variety of colors, which allows
you to achieve
subtle variations
in tone. In addition to a thick nib
for broad areas of
color, the Copic
markers shown
here feature a thin
nib for fine detail.
that you use your markers with marker or layout paper to avoid bleeding. Markers
are often refillable, so they last a long time. The downside is that they are expensive,
so choose a limited number of colors to start with, and add as your needs evolve. As
always, test out a few markers in your art store before buying any.
However, markers are not the only coloring media. Paints and gouache also produce excellent results, and can give your work a distinctive look. Add white gouache,
which comes in a tube, to your work to create highlights and sparkles of light. Apply
it in small quantities with a good-quality watercolor brush.
It is also possible to color your artwork on a computer. This is quick to do,
although obviously there is a high initial cost. It also tends to produce flatter color
than markers or paints.
drawing aids
Most of your sketching will be done freehand,
but there are situations, especially with manmade objects such as the edges of buildings or
the wheels of a car, when your line work needs
to be crisp and sharp to create the right look.
Rulers, circle guides, and compasses all provide
this accuracy. Rulers are either metal or plastic;
in most cases, plastic ones work best, though
metal ones tend to last longer. For circles, use a
circle guide, which is a plastic sheet with a wide
variety of different-sized holes stamped out of
it. If the circle you want to draw is too big for
the circle guide, use a compass that can hold a
pencil and inking pen.
A selection of warm and cool grays is
a useful addition to your marker colors and most ranges feature several
different shades. These are ideal for
shading on faces, hair, and clothes.
9
ACCESSORIES
10
ACCESSORIES
You can have a lot of fun with
accessories and gadgets, and
it is worth practicing drawing
them. A simple touch such as a
helmet or belt can really make
a character stand out, and give
him or her (or it!) a unique
identity. Use the examples
here as starting points: there is
no limit to your imagination in
devising accessories.
11
DRAWING MANGA WEAPONS, VEHICLES, AND ACCESSORIES
BASEBALL CAP
The baseball cap is one of the most common forms of headgear, and is easy to draw.
Hats can be a useful accessory to individualize a character. This one is a standard
shape, with a curving peak and a vent at the back. The panels of the cap alternate
between yellow and white, and there is a white button on top.
12
Start with a basic head
shape, and establish an
eye line.
Sketch in positions for
the eyes, nose, and
mouth, then draw a
line circling the head
just above the eyeline.
Ink the lines you established in pencil using a
medium nib, then with
a thinner nib outline
stitching lines on the
crown.
Establish two areas of
yellow, leaving two white.
Create a gray shadow on
the button, with a deeper
gray under the peak.
Then establish the lines of
the cap’s peak: these consist of two curves and two
horizontals. Add in the
vent detail, and the button
on the crown.
ACCESSORIES
HEADPHONES
Headgear isn’t just about hats. This character wears large, old-fashioned headphones with cushioned earpieces. He could be a music-loving teen, a helicopter
pilot, or somebody on surveillance duty at a stake-out.
Create a basic oval head,
adding a curving line on
the right to get the eyeline
on that side of the face.
This helps you to get the
lines of the pad later.
Ink the main lines you have
established, varying the
thickness of the nib for
the different areas of the
headphones and pads.
Add basic features of
eyes and brows, nose,
and mouth. Then
create the ovals of the
pads on both sides of
the head.
The phones and pads are
constructed from circles and
ovals in perspective. Add
the lines of the headpiece,
and a curly electrical
cord. Finally sketch in
some hair.
Leaving white highlights, color
the pads gray. Use brown for the
headpiece, headphones, and
electrical cord, with red for the
detailing.
13
DRAWING MANGA WEAPONS, VEHICLES, AND ACCESSORIES
tech specs
Eyewear is another good accessory for your manga characters. These are seriouslooking glasses with a tinted visor, and a heavy, metallic frame that looks like it could
contain some electronic hardware. Note how the tint on the lens is a gradient,
which gives it extra realism.
Draw a basic head
shape using a circle and
curving lines down to
the chin, and indicate
two vertical lines for
the neck.
Ink the lines of the eyes,
and then all the main
lines of the frame, earpieces, and lenses.
14
Sketch in the eyes, ears,
nose and mouth, then
draw a curving horizontal band across the top
of the eye level.
From here, add the lines
of the lenses, which are
essentially half circles.
Create the large joints for
the earpieces, then give the
character some spiky hair.
Leaving white highlights
to suggest reflections,
color the lenses brown.
Then use a mauve gray for
details on the crosspieces
and earpiece, with ice blue
above the nose.
ACCESSORIES
spy goggles
Goggles are another form of eyewear. They could be night-vision or infrared. The
straps sit across the top of the head to give a firm fit, and the dials on either side of
the goggles may be used for focus or mode switching. The lenses are large, cameralike pieces for a powerful look.
Start with a circular shape
for the head, then draw
two curving lines down to
a pointed chin. Add two
short verticals for the neck.
Ink all the lines, using two thicknesses of nib. Then use black
ink to color the lenses, leaving
three white highlights in each.
Draw a horizontal for
the eye and ear line, with
a vertical center line.
Position the nose and
mouth, then draw two
circles for the goggles’
lenses.
Add more detail of the
frames with two larger
circles, then create the
shape of the frame. Add
earpieces, then work some
details into the head.
Introduce color into
the headpieces and
around the lenses,
frame, and earpieces.
Then use gray for
shadow areas around the lenses
and under the eyepieces.
15
DRAWING MANGA WEAPONS, VEHICLES, AND ACCESSORIES
HEADBAND
This scarlet sash tied around the head can give your character a touch of drama and
bravery. It can be a good accessory for a warrior or street fighter, or just someone
with a devil-may-care attitude to life. Note how the shading with horizontal lines
gives the fabric a realistic look.
Draw a circle for the
head, with two curving
lines down to a pointed
chin. Add a horizontal
for the neck.
Now add horizontals to
help position the eyes and
eyebrows, and two more
for the top and bottom of
the headband. Add a nose
and a mouth.
Ink the folds and creases of the
headband, creating some thick
lines to give it some texture.
16
Create the ear, using the
eyeline as a guide to position. Then give the character
thick spikes of hair on top of
the head. Finally, create the
rounded lines of the headband.
Finally, color
the headband
bright red.
ACCESSORIES
ninja-style headwrap
A more austere look is this all-over head-and-neck wrap, in the style of a ninja
warrior. Ninjas usually favor dark colors such as black, dark blue, and dark red,
but can also wear white and other colors. Usually the lower half of the face is
also covered, but here the look is open-faced. Note the white highlights across the
forehead, which give a full, rounded look.
Start with a circle, then
draw two lines down to a
pointed chin. Create the
profile of the chin, then
add lines for the neck.
Use a medium-nibbed pen to
ink the main lines of the profile
of the headpiece, and then add
some ink lines to suggest folds
and creases in the fabric.
Add a horizontal eyeline,
then position eyes, eyebrows, nose, and mouth.
Refine the jawline, then
add the horizontal for the
bottom of the headpiece.
Create the profile of the
headpiece by sharpening
the line of the crown, and
creating two verticals for
the sidepiece. Then add
its line under the chin.
Leave some
areas of white
highlight on top
of the head to
help with modeling, then color the
headpiece dark
blue. Add darker
color down the sides
and under the chin.
17
DRAWING MANGA WEAPONS, VEHICLES, AND ACCESSORIES
fingerless fighting gloves
These studded leather gloves are good for a tough, streetwise character who may
be a gang member or otherwise involved in violent activities. The knuckles are
studded with short metallic spikes and the fingers are left open for extra flexibility.
Draw a hand from basic shapes,
with four simple rounded rectangles for fingers.
Ink over all the lines to outline the
shape of the glove. Ink the knuckle
detail, then suggest some creasing
around the wristline and the bottom
of the fingers.
18
Create the shape of the fingerless glove. Draw the
line of the cuff with a stud detail. Add circles for
the knuckles and for the glove details.
Color the glove
purple-gray, then add
darker grays for shadows
and texture. Use a pale
blue to add a hint of steel to
the studs on the knuckle line.
ACCESSORIES
exotic rings
This colorful collection of rings could be ideal for a fantasy story with a wizard or
sorcerer of some kind. Each ring looks magical in its own way, and the ring on the
little finger has a skull-like motif to convey an air of danger. The brightly colored
centerpieces on the other rings have multiple white highlights to show reflections.
Draw a basic fist using right
angles for the fingers. Add
the joints of the closest finger, and outline the thumb.
Ink the major lines
of the rings, outlining all the details you
worked up in pencil.
Add a fantasy ring to each
finger, diminishing in size
from the first finger down to
the little finger.
Color your rings using a
variety of colors. Leave white
highlights. Finally, work up
some gray shadows to suggest
that the rings are metallic.
19
DRAWING MANGA WEAPONS, VEHICLES, AND ACCESSORIES
gallery
bracelet
below This bracelet has a
decorative, traditional look,
but it could also be turned
into a futuristic weapon.
cute pet
gauntlet
below This looks
like a weapon. The
dull gray color gives
a no-nonsense, functional look.
above If all else fails, nothing
works better than a sidekick.
A colorful pet such as this
provides a confidant for the
character, and offers plenty
of opportunities for laughs.
necklace
above This necklace could grace
a tribal queen in official dress. The
gold gives an air of wealth, but
the curved spikes look like teeth
from a jungle beast.
20
ACCESSORIES
winged hat
below The owner of
this baseball cap with its
quirky twist could be a
fun-loving teen.
belt
above This belt has a colorful,
military-style buckle, and could
be part of a uniform.
strap
right A big leather
strap and buckle is
great for a swashbuckler or a pirate.
earrings
goggles
above These look like they
are serious night-vision hardware. Goggles can add a great
deal to any street character.
right Earrings such as
this one have a rebellious, nonconformist feel,
especially when they are
added to a pointy ear.
21
DRAWING MANGA WEAPONS, VEHICLES, AND ACCESSORIES
WRISTBAND
Here is a weighty-looking wristband or bracelet. The extra-thick shape has a series
of what appear to be carved grooves, which give a suggestion of technology, but the
texture and color look almost stonelike and primitive. It could be an alien artifact,
or a relic discovered on an archaeological dig. The fist implies it is a weapon of some
kind, though.
Start with
a basic
Draw
a basic
head,fist,
created
from
angled
with
eyes,
nose,
lines. Add
sausagemouth,
anda ear.
Then
shapedspiky
thumb
across
create
bangs
the fingers.
across
the face to the
ear.
Ink the wristband, including the details. Then ink
around the wrist to establish the inner profile of the
wristband.
22
Nowacreate
wristband
Add
slightlythe
off-outline of a chunky
Outline
a dramatic
from circular
lines.from
Make one tight jagged
aroundarea
the of highlight
center
part, and,
wrist,
and two
more
to give it a profile.
Add
the
crown,
work
down
close to
the part on
chevron
and some circle both
details.
into
shortpatterns
spikes on
sides.
both sides. Add a
couple of spikes below
ear level on both sides.
Color the wristband yellow,
then work up the details
in a more golden shade.
Create brown shadows
under the wristband.
ACCESSORIES
CLAWS
Give your manga character a feral, animal look with these dangerous-looking claws.
They extend in long curves out from each fingernail, and are colored shiny black for
extra menace. The fingers here are slender and feminine, which suggests a catlike
attitude.
Start with a basic open
hand with four fingers and
a thumb.
Outline the areas of
fingernail using black ink.
Nowthe
draw
superlong
from a highAdd
crown,
with pointed fingernails
Next outline
all
the
fingers
and
the
thumb,
starting
from
a suggestion of a part,
light acrossthe
the head,
rounded
cuticles.
and add hair down to
behind the bangs, and
below chin level, creatcontinue it to the edge
ing spiky ends.
of the hair on the right.
Leaving areas of white
highlight on each nail, color
them shiny black.
23
DRAWING MANGA WEAPONS, VEHICLES, AND ACCESSORIES
POWER GAUNTLET
This is a heavyweight piece of hardware, with a hefty metallic gauntlet studded with
what could be lasers or projectile launchers. The fingertips are open to enable a
more delicate control, and the back of the hand appears to have a main firing button.
Draw a hand using basic
shapes. making the back, wrist,
fingers, and thumb.
Ink over all the detailed lines you
worked in pencil, including the
fine lines at the ends of the fingers
of the glove. Then ink the shields
on the joints and back of the hand,
and the jewel.
24
Now create the outline of the gauntlet. Take the
fingers up to the first joints, work some detailing
around the base of the fingers, and add a shield
shape to the back of the hand.
Keep the color
minimal. Color the
jewel setting ice
blue, and use blue
for the line details
and finger studs.
Then use mauve to
get some rounded
modeling into the
hand and fingers, and onto
the thumb. Finally add gray shading around the wrist.