Automotive mechanics (volume i)(part 1, chapter4) measuring and checking
Bạn đang xem bản rút gọn của tài liệu. Xem và tải ngay bản đầy đủ của tài liệu tại đây (1.73 MB, 16 trang )
053-068_May_chap 04
12/9/06
9:43 AM
Page 53
53
Chapter 4
Measuring and checking
Measuring instruments
Micrometers
Reading micrometers
Accuracy and care of micrometers
Vernier calipers
Dial gauge and its use
Depth gauges
Marking and checking
Tools for marking and checking
Other gauges and instruments
Electrical test instruments
Technical terms
Review questions
053-068_May_chap 04
54
12/9/06
9:43 AM
Page 54
part one introduction to motor vehicles
Measuring and checking are two important procedures
that are performed in an automotive workshop, and
they must be done accurately. In many types
of mechanical service or repair, some type of measurement has to be taken or a check made of the size, fit,
clearance, pressure or other specification. With
electrical work, measurements are taken of voltage,
amperage or resistance.
Specifications for components are provided in
service manuals. These can include the type, size,
capacity or dimensions of a component, or the
clearance or setting of an adjustment. Specifications
can also state the wear limits for parts.
Checking a part against its specifications will
determine whether it is serviceable and suitable for
further use, or whether it is unserviceable and should
be renewed.
Measuring instruments
There are a number of measuring and checking
instruments. Some are relatively simple measuring
tools, and these are accurate enough for most general
measurements. Others are precision instruments which
are used to take accurate measurements.
Some basic measuring tools are now described.
Steel rule
A steel rule is the basic measuring instrument. It is
used for general measurements where great accuracy is
not required. Steel rules are usually 150 mm or
300 mm long, and are graduated in millimetres and
half-millimetres. When used on edge, a steel rule can
be used as a straightedge to check the flatness of a
surface.
Feeler gauges
Feeler gauges are strips or blades of hardened steel that
are ground or rolled to an accurate thickness. They are
usually supplied in sets with a number of blades
(Figure 4.1). Each blade is marked with its thickness in
millimetres. They can be used singly, or two or more
blades can be used together to obtain the required
thickness.
Feeler gauges are used to measure small clearances,
such as tappet clearances (see Figure 2.4). With the
correct clearance, the feeler gauge should slide
between the two parts with a slight resistance.
When used with a steel straightedge, feeler gauges
can be used to check the flatness of a part, such as a
figure 4.1
A set of metric feeler gauges ranging from
0.05 mm to 0.60 mm
cylinder head. Feeler gauges can also be used with a
surface plate to check flat surfaces (see Figures 4.25
and 4.27).
Wire feeler gauges are similar to flat feeler gauges
except that they are round. They can be used for
checking spark plugs and in other places where a flat
gauge would not fit or where a flat gauge would give
an incorrect reading.
Outside calipers
Figure 4.2 illustrates the use of outside calipers to
measure the diameter of a shaft. The calipers should be
adjusted to slip over the shaft with a slight resistance.
They should not be forced because this would spring
the legs and prevent an accurate reading.
When the calipers have been adjusted to size, they
are held against a steel rule to read the measurement as
shown in Figure 4.3.
Calipers can also be used to compare the sizes of
two parts. For example, if set to the diameter of one
shaft, they can then be used to check whether another
shaft has the same diameter. If the shafts are the same
size, both would have the same resistance to the
calipers’ setting.
figure 4.2
Using outside calipers to check the diameter
of a shaft
053-068_May_chap 04
12/9/06
9:43 AM
Page 55
chapter four measuring and checking
55
(a)
figure 4.3
Measuring the caliper setting with a steel
rule
Inside calipers
Inside calipers are used to measure internal dimensions. Figure 4.4 shows inside calipers being used to
check the diameter of a large hole.
The calipers are entered into the hole at an angle, as
shown by the dotted lines in Figure 4.4(a), and then
straightened slowly so that they are across the diameter
of the hole. The calipers should be adjusted until they
enter the hole in the manner shown, with only a slight
drag. The dimension can be read from a steel rule as
shown in Figure 4.4(b).
(b)
figure 4.4
Inside calipers
(a) measuring the diameter of a hole (b) checking the measurement against a steel rule
■ Micrometers are precision instruments. They must
be treated properly to maintain their accuracy and
to prevent them from being damaged.
Outside micrometers
Micrometers
These are a special type of instrument designed to take
accurate measurements to one-hundredth of a millimetre
(0.01 mm), or in the case of a vernier micrometer, to
one-thousandth of a millimetre (0.001 mm).
There are a number of designs. The ones in general
use are outside micrometers, which are used for
external measurements, and inside micrometers, which
are used for internal measurements. There are also
depth micrometers and micrometers designed for
special purposes.
figure 4.5
Construction of an outside micrometer
Figure 4.5 shows the construction of an outside
micrometer. It is a screw-type instrument, consisting of
a frame with an anvil and a threaded sleeve which
carries the spindle. Turning the knurled part of the
thimble screws the spindle in or out in relation to the
anvil.
To use the micrometer, the thimble is turned until
both the spindle and the anvil are lightly in contact
with the object being measured. The size is then read
from scales which are marked on the sleeve and the
thimble (see later section ‘Reading micrometers’).
053-068_May_chap 04
56
12/9/06
9:43 AM
Page 56
part one introduction to motor vehicles
Small objects that are being measured can be
supported as shown in Figure 4.6(a). For accuracy,
make sure that the anvil and spindle are lightly in
contact with the object and that the micrometer is held
squarely against the surface. For larger objects, or parts
to be measured in place, the micrometer is placed over
the part as shown in Figure 4.6(b).
figure 4.7
Three sizes of micrometers
(a) 0–25 mm (b) 25–50 mm (c) 25–100 mm
fitted with its shortest anvil, but it also has three other
anvils of different lengths. It has four setting bars.
■ The setting bars are gauges that have been made to
an accurate length.
Inside micrometers
figure 4.6
Measuring with an outside micrometer
(a) small object held in the hand (b) object in
place
Sizes of outside micrometers
Outside micrometers are available in different sizes.
Three of these are shown in Figure 4.7. They are
identified by their range of measurement: Figure 4.7(a)
is a 0–25 mm micrometer, and Figure 4.7(b) is a
25–50 mm micrometer.
The third micrometer Figure 4.7(c) is an adjustable
micrometer. It has replaceable anvils of different
lengths, which gives the instrument a range of
25–100 mm, in steps of 25 mm. The end of the anvil is
threaded and fits through a hole in the frame. It is held
in place by a knurled nut which allows it to be
removed and replaced.
When an anvil is changed, the micrometer is
checked and, if necessary, adjusted for accuracy. This
is done by means of a threaded stop on the anvil and a
fixed-length setting bar between the anvil and the
spindle. The micrometer shown in Figure 4.7(c) is
An inside micrometer is shown in Figure 4.8. It
consists of a micrometer head and replaceable
spindles. It is read in a similar manner to an outside
micrometer, using scales on the thimble and on the
sleeve of the micrometer head.
While the micrometer head will measure over a
small range only, the instrument shown is capable of
taking a range of measurements by using spindles
of different lengths. The short spindle fitted to the lefthand side of the micrometer head can be removed and
the sleeve shown at the top of the illustration can be
inserted over it to provide an extension. By changing
spindles and using the sleeve, the micrometer can be
used to measure a wide range of inside dimensions.
To use an inside micrometer, for example to
measure a cylinder bore, fit the appropriate spindle
(and the sleeve if necessary) to the micrometer head.
Place the micrometer in the bore and carefully expand
figure 4.8
An inside micrometer and extension spindles
053-068_May_chap 04
12/9/06
9:43 AM
Page 57
chapter four measuring and checking
it until the anvil and the spindle are both lightly in
contact with the cylinder walls. Move the micrometer
up and down slightly and also from side to side as
shown in Figure 4.9 to obtain an accurate measurement, but do not overtighten it in the bore.
Metric micrometer
With a metric micrometer (Figure 4.10), the main scale
on the sleeve has 1-millimetre (1.00 mm) and halfmillimetre (0.50 mm) divisions. The millimetre divisions
are above the datum line and each fifth division is
numbered (0, 5, 10 etc). The half-millimetre divisions
are below the datum line and are not numbered.
The scale which is marked around the thimble, has
fifty divisions, each representing 0.01 mm. Therefore,
one full turn of the thimble represents 0.50 mm (50 ¥
0.01 mm).
The micrometer screw has a pitch of 0.50 mm, so
one full turn of the thimble moves its edge 0.50 mm
along the main scale, which is one of its halfmillimetre divisions.
figure 4.10
Measuring a cylinder bore with a micrometer –
while adjusting to size
(a) move it slightly up and down (b) move it from side to side
57
The divisions of a standard metric micrometer
figure 4.9
Reading micrometers
A micrometer has two scales which provide the
measurement – one on the sleeve and the other on the
thimble. The sleeve of an outside micrometer is
attached to the frame, it has the main scale and also a
datum line.
The thimble is attached to the spindle and has a
scale marked around its edge. The thimble rotates the
spindle as the micrometer is being adjusted to take a
measurement and this also advances the thimble along
the main scale on the sleeve. Also, as the thimble is
rotated, its scale moves around the sleeve in relation to
the datum line.
■ When reading a micrometer, the main scale is read
first and then the thimble is added to obtain the
actual measurement.
Reading a metric micrometer
To read a micrometer, the main scale is read to the
edge of the thimble and the thimble reading is added.
The procedure is as follows:
1. From the sleeve, read the number of wholemillimetre divisions which are visible on the main
scale above the datum line.
2. Add to this a half-millimetre division if one is
visible on the main scale below the datum line.
3. From the thimble, note the division that coincides with
the datum line and add this to the previous readings.
Example 1
For the micrometer shown in Figure 4.10, the readings
taken in order are:
9 whole millimetres = 9.00 mm
1 half-millimetre = 0.50 mm
48 thimble divisions of 0.01 = 0.48 mm
9.98 mm
053-068_May_chap 04
58
12/9/06
9:43 AM
Page 58
part one introduction to motor vehicles
Example 2
The scales of the micrometer in Figure 4.11 show the
readings of:
main scale 1.00 mm divisions: 10.00 mm
main scale 0.50 mm division: 0.50 mm
thimble divisions: 0.16 mm
10.66 mm
figure 4.11
Metric micrometer scales – the reading
shown is 10.66 mm
Vernier micrometer
A vernier micrometer has an additional scale on the
sleeve, called the vernier scale, with division lines
parallel to the datum line. This allows measurements to
an additional decimal place (Figure 4.12).
The vernier scale has five divisions, which start
from zero on the datum line and are marked 2, 4, 6, 8
and 0 (10). Each division represents 0.002 mm and is
read in conjunction with the scale on the thimble. The
readings are made to two decimal places, as for a
standard micrometer, and then the vernier reading is
added. This is the vernier division which lines up with
a division on the thimble.
main scale 1.00 mm divisions:
main scale 0.50 mm division:
thimble divisions:
vernier divisions:
10.00 mm
0.50 mm
0.16 mm
0.006 mm
10.666 mm
Principle of a vernier
The principle of a vernier is to have two similar scales
of the same overall length, but with one scale having
one less division than the other.
With a vernier micrometer, the vernier scale on the
sleeve has ten divisions which are equal in length to
nine divisions on the thimble scale. With this arrangement, the vernier scale can read parts of a division of
the thimble scale.
The scales operate as a vernier in the following
manner:
1. Each thimble division represents 0.01 mm, so that
the nine thimble divisions represent a total of
0.09 mm.
2. Because the ten vernier divisions are equal in
length to nine thimble divisions (0.09 mm), each
vernier division represents one-tenth of 0.09 mm,
which is 0.009 mm.
3. The difference between a thimble division
(0.010 mm) and a vernier division (0.009 mm) is
0.001.
4. Therefore each vernier division is equivalent to
0.001 mm, and the reading is found by the vernier
division that lines up exactly with one of the
thimble divisions.
■ In Figure 4.12, only each second vernier division
is marked on the sleeve (numbered 2, 4, 6 etc).
Therefore, this micrometer will read in steps of
0.002 mm.
figure 4.12
Vernier scale of metric micrometer – the
vernier scale consists of ten divisions, but
only each second graduation is shown by the figures 2, 4, 6,
8 and 0
Example 3
The vernier scale of the micrometer shown in
Figure 4.12 has the same setting as Example 2 above,
but with the addition of the vernier scale. The ‘6’
division of the vernier is the one that lines up with
a division on the thimble to give a vernier reading of
0.006 mm.
The readings of the scales in the figure are:
Inch micrometer
The scales of an inch micrometer are shown in
Figure 4.13. The main scale on the sleeve of the
micrometer has divisions of 0.025 inch. The thimble
has twenty-five divisions around its circumference,
each representing 0.001 inch.
The micrometer screw has 40 threads per inch, so
that each turn of the thimble moves it one-fortieth of
an inch (0.025 inch) along the sleeve, which is one
division of the main scale. Each turn of the thimble
also moves it through its twenty-five divisions, this
being 0.025 inch (25 ¥ 0.001 inch).
053-068_May_chap 04
12/9/06
9:43 AM
Page 59
chapter four measuring and checking
figure 4.13
Sleeve and thimble markings on an inch
micrometer
To understand the scales, read the main scale first
and then the thimble scale as follows:
1. Read the divisions on the main scale commencing
from zero: the first division below the datum line is
0.025 inch, the second 0.050 inch, the third
0.075 inch and the fourth 0.100 inch. This division
is marked with the figure ‘1’.
2. Continue along the scale, the first division beyond
‘1’ is 0.125 inch, the next 0.150 inch, then
0.175 inch and 0.200 inch (which is marked with
the figure ‘2’), and so on to a maximum of
1.000 inch.
3. The thimble has twenty-five equal divisions, each
of 0.001 inch. The thimble reading is added to the
main-scale reading.
59
checked with an outside micrometer. Set the inside
micrometer to a convenient reading and then check the
measurement with an accurate outside micrometer,
used in the usual way.
Micrometers should be handled carefully and stored
correctly to preserve their accuracy. They should be
kept clean and should not be overtightened or strained
when being used.
■ Outside micrometers should always be left with a gap
between the spindle and the anvil when not in use.
Vernier calipers
Vernier calipers are precision instruments which give
readings in steps of 0.05 mm or, in some instruments,
0.02 mm. They consist of a graduated bar with a fixed
jaw and a sliding jaw. The bar has the main scale and
the sliding jaw has the vernier scale.
The object to be measured is placed between the
two jaws, and the sliding jaw is carefully adjusted until
both jaws are in contact with the object (Figure 4.14).
The measurement can then be read directly from the
scales of the instrument.
Example 4
The readings of the scales in Figure 4.13 are:
main scale divisions: 0.200 inch
main scale divisions: 0.025 inch
thimble scale divisions: 0.024 inch
0.249 inch
Accuracy and care of micrometers
An outside micrometer can be checked for accuracy by
testing for zero error.
Turn the thimble until the end of the spindle is in
light contact with the anvil. If the micrometer is
accurate, the zero division on the thimble will line
up exactly with the datum line on the sleeve. If these
marks are not in line, then the micrometer can be
carefully adjusted. Otherwise, an allowance must
be made by adding or subtracting the zero error from
the reading whenever any measurement is taken.
In the case of larger micrometers, which have
replaceable anvils, or extension bars, the accuracy is
checked against a setting bar. The adjustment on the
anvil can be altered to correct any error.
The accuracy of an inside micrometer can be
figure 4.14
Using vernier calipers to measure the length
of a valve spring
Both external and internal measurements can be
taken. For internal measuring, the ends of the jaws are
shaped to suit. Some calipers have scales for both
external and internal measurements.
Reading the scales
Figure 4.15 shows the main scale and the vernier scale
of vernier calipers that read in steps of 0.05 mm. The
main scale is graduated in millimetres, with each
10 mm (1 centimetre) division numbered 1, 2, 3 etc.
The vernier scale has twenty divisions, these being
numbered (2, 4, 6, 8, 10).
053-068_May_chap 04
60
12/9/06
9:43 AM
Page 60
part one introduction to motor vehicles
figure 4.15
Scale of vernier
A – main scale, each division is 1 mm;
B – vernier scale, each division is 0.05 mm;
the reading shown is 13.40 mm
The twenty divisions of the vernier scale are
equal in length to nineteen 1.00 mm divisions on
the main scale. Each division of the vernier is therefore nineteen-twentieth of a millimetre, which is
0.95 mm.
The difference between a main scale division of
1.00 mm and a vernier scale division of 0.95 mm is
0.05 mm, which is the reading of each vernier division.
Each second graduation is therefore 0.10 mm and these
are shown as longer lines on the scale with each
second long line marked: 2, 4, 6, 8 and 10.
To read the scales, first read the main scale to the
left of the ‘0’ mark on the vernier and then add the
vernier reading, which is the division line that
coincides with a line on the main scale.
Example
For Figure 4.15, this is:
main-scale divisions: 13.00 mm
vernier divisions: 0.40 mm
13.40 mm
around the dial to indicate the reading. A smaller pointer
on the face of the dial gauge counts the number of full
rotations of the large pointer in 1 mm divisions.
The instrument is clamped or supported so that the
plunger can be set against the part being checked. The
bezel (ring) on the edge of the dial is then turned to set
it to zero, that is, the ‘0’ on the dial is set in line with
the pointer.
A dial gauge does not take direct measurements, but
shows variations from the zero setting. These variations
are transferred from the plunger to the pointer.
■ The pointer will show a plus reading on one side of
zero and a minus reading on the other.
A dial gauge has many applications. It can be
mounted on a housing to check the end-play of a shaft,
or against a gear to check its clearance. Mounted against
the face of a flywheel as shown in Figure 4.16, the dial
gauge will check runout. Mounted on a base, it can be
used with a surface plate to check the flatness of a
surface, or it can be used to check the straightness of
a shaft resting in vee blocks or mounted between centres.
Figure 4.17(a) and (b) show a dial gauge and accessories which enable it to be supported in various ways
while readings are taken. When used with a magnetic
base, it can be easily attached to iron and steel parts.
The dial gauge Figure 4.17(c) has a long extension
and is used for checking cylinder bores. Movement of
the plunger at the lower end of the gauge is transferred
up through the extension to the dial gauge at the top.
Plungers of different lengths can be fitted to suit
different-sized cylinder bores. These are in a box
Figure 4.17(d) that contains the gauge and accessories.
It can be seen that the ‘4’ division line of the vernier
is the only one that aligns with a division on the main
scale. If the instrument is gradually opened a little
wider, the next graduation will align to give a vernier
reading of 0.45 mm, and so on in steps of 0.05 mm.
Vernier calipers capable of reading in steps of
0.02 mm have a vernier scale divided into fifty
divisions against a main scale of forty-nine divisions.
The difference between a division on the main scale
and one on the vernier scale is therefore one-fiftieth of
a millimetre, which is 0.002 mm.
dial gauge
engine
flywheel
Dial gauge and its use
This is an instrument which, as its name suggests, has a
face or dial. The dial is marked with divisions of
0.01 mm, and a pointer, operated by a plunger, is moved
figure 4.16
A dial gauge being used to check flywheel
runout
053-068_May_chap 04
12/9/06
9:43 AM
Page 61
chapter four measuring and checking
61
micrometer head which is read in the same way as an
outside or inside micrometer.
Figure 4.19 shows one type of application for a
micrometer depth gauge. This is being used to check
the dimension between the surface of a cylinder head
and the head of a valve. Comparing this to the
manufacturer’s specifications will help to determine
the type of reconditioning that will be carried out.
micrometer
depth gauge
cylinder head
figure 4.17
Types of dial gauges
(a) and (b) Universal dial gauge (c) and
(d) cylinder-bore gauge DIS
figure 4.19
Using a micrometer depth gauge on a
cylinder head and valve DAIHATSU
Depth gauges
Two types of depth gauges are shown in Figure 4.18.
These are used to measure the depth of holes or
recesses, and also the height of parts.
The depth gauge Figure 4.18(a) is used by placing
it on the surface from which the measurement is to be
taken and then sliding the thin steel scale to the depth
of the hole being measured. The depth is then taken
directly from the scale.
For more accurate readings, a micrometer depth
gauge Figure 4.18(b) can be used. This is fitted with a
Marking and checking
When carrying out repairs to motor vehicles, it is
sometimes necessary to use hand tools to fit one part to
another, to mark off a dimension to locate and then
drill a hole, or to carry out some similar modification
to a component. At times, it may be necessary to make
a small part such as a plate, bracket, tool or holding
fixture.
Making such articles requires the use of hand tools,
first to mark out the shape wanted, then to cut and
form the metal to shape. Tools are also needed to
check and measure for accuracy as the work proceeds,
so that the finished article is true to shape and size.
Marking out
figure 4.18
Depth gauges
(a) Depth gauge (b) micrometer depth gauge
This is the process of placing lines on the surface of
the metal to show how it will be worked. The location
of these is normally obtained from a sketch or drawing
of the article to be made or repaired. If the surface of
the work is flat, it can be coated with a marking
material so that the lines will be seen. For a piece of
black mild steel, chalk can be rubbed over the surface.
For bright steel, copper sulphate solution or blue
marking dye can be used.
Measurements are made with a steel rule and marks
053-068_May_chap 04
62
12/9/06
9:43 AM
Page 62
part one introduction to motor vehicles
are made with a steel scriber. A centre punch is used to
mark the location of holes.
Tools for marking and checking
Various tools are used to mark out and transfer
measurements to the surface of the work. Following
are the tools that are commonly used.
Rules and tapes
Steel rules are usually 150 mm or 300 mm long, and
are graduated in millimetres and half-millimetres.
They are used for all normal workshop measurements.
For longer measurements, such as the track or
wheelbase of a vehicle, a steel tape is used. Steel tapes,
being flexible, can also be used to measure curved
surfaces or larger round objects.
figure 4.20
Dividers being used to mark a circle
Scriber and prick punch
A scriber is a piece of round hard steel about 3 mm
diameter with a long sharp point. It is used to draw
lines or marks on the surface of the work. It is used
along the edge of a steel rule or a try square.
A prick punch is similar to a centre punch, but it is
ground to a much sharper point. Prick-punch marks
are small punch marks which are spaced along a
scribed line. They are permanent marks, compared
to scribed lines which are liable to rub off. When
marking, light prick-punch marks should accurately
split the scribed line.
Dividers and jenny calipers
Dividers are used for marking dimensions, stepping
out distances, transferring measurements and scribing
circles (Figure 4.20). A small punch mark at the centre
will locate the leg of the dividers when scribing circles.
Jennie calipers (often called jennies) are a
combination of calipers and dividers. They can be
used to scribe lines parallel to the edge of the work.
They are set to size by placing the caliper leg against
the end of a steel rule and setting the divider leg to the
required graduation on the rule. The caliper leg is
then placed against the edge of the work and the
divider leg is drawn across the work to scribe a line
parallel to the edge (Figure 4.21(a)).
Jennie calipers can be used to find the centre of a
round bar. Apply a coating of chalk or marking
compound to the end of the bar and set the jennies a
little shorter than the bar radius. Using the caliper leg
against the edge, scribe four lines about 90º apart, as
figure 4.21
Using jennie calipers
(a) scribing a line parallel to the edge of the
work (b) locating the centre of a round bar
shown in Figure 4.21(b). The centre of the space
between the scribed lines is the centre of the bar.
■ Jennie calipers are sometimes referred to as odd
leg calipers because they have one caliper leg and
one divider leg.
Steel try square
A steel try square has a stock with a blade at 90º. It is
used when a line is to be scribed at right angles to the
edge of the work. It is also used for checking internal
and external right angles (Figure 4.22).
To check an external angle, the inside of the stock
of the try square is held firmly against one finished
surface, with the blade slightly clear of the work. The
work is held up to the light, and the blade of the square
brought slowly down to contact the surface being
checked as shown in Figure 4.22(a). An internal angle
is checked in a similar manner with the outside of the
square as shown in illustration Figure 4.22(b).
053-068_May_chap 04
12/9/06
9:43 AM
Page 63
chapter four measuring and checking
63
(b) scribe a line along the edge of the blade (this is
the diameter of the circular end).
A second line scribed approximately at right
angles will intersect the first line at the centre of the
circle.
3. Protractor. The protractor head has a scale
graduated in degrees so that the blade can be set at
any angle to the head. Angles can be marked out or
checked by using the protractor in a similar manner
to a try square.
figure 4.22
Try square
(a) checking two edges at right angles
(b) checking an internal right angle
An application of the square head of a combination
set is shown in Figure 4.24. It is being used to check a
valve spring to see that it is straight. The protractor can
be used in a similar way to check a part that has a
specified angle.
■ If the two surfaces being checked are square, light
will be excluded under the blade of the square.
Combination set
A combination set (Figure 4.23) has three separate
heads, each of which can be fitted to a graduated steel
blade, to form a combination square, a centre square,
or a protractor.
1. Combination square. The square head, when fitted
to the blade, can be used to mark out or check
angles of 90º and 45º. The head can be moved
along the blade and so used as a depth gauge, with
the measured depth shown directly on the blade.
2. Centre square. This head is V-shaped and, when
fitted to the blade, the ‘V’ is bisected by the edge of
the blade. To locate the centre of a round bar or
disc:
(a) place the blade flat on the end of the bar with
the V-head in contact with the bar
figure 4.24
Using a square to check a valve spring
The square head also has a small spirit level which
can be used to check horizontals and verticals.
A bubble of air in liquid in a small glass tube in the
level is used to show whether a surface is horizontal.
When used with the blade, the level can also be used to
check vertical surfaces.
Straightedge
figure 4.23
Combination set – three heads fitted to the
steel blade (upper illustration) are used
separately; from left to right, these are: centre square,
protractor and square
A straightedge is used for checking the flatness of a
surface. For a small surface, a steel rule or the blade of
a try square may be used. The clearance between the
steel rule and the work is checked against the light.
For larger surfaces, a long steel straightedge is
used. This is placed on its edge and a feeler gauge used
to measure any irregularities between the straightedge
and the surface.
053-068_May_chap 04
64
12/9/06
9:43 AM
Page 64
part one introduction to motor vehicles
Surfaces such as the face of a cylinder head are
checked along their length and also diagonally in this
way (Figure 4.25).
cylinder head
straightedge
The flatness of a surface is checked as follows: The
surface plate is lightly coated with Prussian blue (a
blue oil-paint pigment), and the surface of the part
being checked is rubbed across the surface plate. High
spots will be indicated by the transference of blue to
the surface being checked.
Figure 4.27 shows how a surface plate and feeler
gauges can be used to check the flatness of a larger
surface. If the surface has warped, the feeler gauge will
slide under without resistance. Different thicknesses of
feeler gauges can be used to determine the amount
of warp.
surface plate
figure 4.25
Using a straightedge and feeler gauges to
check the flatness of a cylinder head
Surface plate
A surface plate is a flat cast-iron plate with ribs cast on
the underside to prevent warping (Figure 4.26). The
top is machine finished and then hand scraped to
produce a smooth surface, which must be treated with
care. When not in use, the surface should be lightly
oiled and covered for protection.
A surface plate can be used to check the flatness of
other surfaces, or as a flat base on which to use
marking or measuring instruments such as a square,
protractor, or surface gauge.
figure 4.26
Surface plate construction
(a) Surface plate (b) the underside is ribbed
for stiffness
feeler gauge
figure 4.27
manifold
Checking a manifold for flatness on a surface
plate DAIHATSU
Vee blocks
Vee blocks are rectangular cast-iron blocks with a
V-shaped groove. They are used on the surface plate to
support round articles for checking or marking. For
longer work and shafts, a pair of vee blocks is used,
one to support each end of the shaft (Figure 4.28).
Some vee blocks have clamps that hold round work
securely in the vee. They are particularly useful when
drilling holes in the cylindrical surface of the work, as
the clamp stops the work from rolling. This makes sure
figure 4.28
Shaft resting on vee blocks
053-068_May_chap 04
12/9/06
9:43 AM
Page 65
chapter four measuring and checking
65
that the hole is drilled in the correct place and also
protects the drill from possible breakage.
Surface gauge
A surface gauge or scribing block has a heavy base
with a vertical spindle. The spindle is clamped to the
base and a scriber is clamped to the spindle
(Figure 4.29). The spindle and scriber can be adjusted
so that the end of the scriber can be set to any height
above the base.
A surface gauge can be used from any flat base and,
in conjunction with a surface plate, can be used for
checking or marking out.
figure 4.30
Plumb bob
3. Trammels. A pair of trammels is shown in
Figure 4.31. These are clamped to a metal bar or
wooden rod and used to check larger dimensions.
As an example, the wheelbase, which is the
distance between the centre of the front wheels and
centre of the rear wheels, can be checked with
trammels.
figure 4.29
A scribing block is being used to mark a shaft
resting on a vee block
Other checking tools
1. Plumb bob. This is a conical-shaped piece of
steel or brass which is suspended on a cord
(Figure 4.30). When hung from any point, the
plumb bob will come to rest directly beneath that
point, and the cord will be vertical.
2. Cord line. A cord line held tightly between two
points gives a straight line which can be used to
check the straightness of a long shaft or similar
part. It can also check the alignment of a number
of points which are too widely spaced for checking
with a straightedge.
A cord line coated with chalk can be used to
strike a line on a suitable surface as follows:
(a) hold the chalk-coated cord tightly between two
points
(b) draw the cord away from the surface and then
allow it to flick back.
The coating of chalk will leave a straight line.
figure 4.31
Trammels are used for checking long
dimensions
Other gauges and instruments
The gauges and instruments already covered are those
for general use in automotive and engineering
workshops. Other instruments and gauges are designed
specially for automotive use and are used for testing,
diagnosis, tune-up and electrical work. Some of these
will be mentioned here, although they are covered in
detail in other parts of the book where they are related
to the subject.
Pressure gauges
Pressure gauges are used to measure air pressure and
hydraulic pressure.
053-068_May_chap 04
66
12/9/06
9:43 AM
Page 66
part one introduction to motor vehicles
bearing
Air pressure gauges are used to measure the pressure
in a compressed-air tank and in tyres. There are other
applications, such as a cylinder pressure gauge, referred
to as a compression tester, which is used to check the
pressures of the cylinders of an engine.
An oil pressure gauge connected to the engine’s
lubricating system will register the oil pressure, and when
connected to an automatic transmission can be used to
check the hydraulic pressure of the system (Figure 4.32).
scale
bearing cap
plastigage
figure 4.33
Plastigage being used to check the clearance
of a bearing HYUNDAI
Electrical test instruments
line pressure
figure 4.32
A pressure gauge connected to an automatic
transaxle to check the hydraulic pressure
Vacuum gauge
A vacuum gauge is similar to a pressure gauge, but it
registers pressures below atmospheric pressure. These
pressures are commonly referred to as vacuums,
although a true vacuum has zero pressure.
■ Pressures below atmospheric are also referred to
as negative pressures to distinguish them from
normal pressures, which are above atmospheric
pressure.
Plastigage
Figure 4.33 shows a cap that has been removed from a
crankshaft bearing. It has a flattened strip of plastigage
that is being checked against a scale.
Plastigage is a plastic material that is used to check
the clearance of engine bearings without using
measuring instruments.
The bearing cap is removed and a strip of plastigage
is placed between the shaft and the bearing. When the
cap is refitted, the plastigage is flattened. The width of
the flattened plastigage shows the bearing clearance. It
is a method of determining the clearance without
dismantling and measuring the shaft and bearing.
1. The three basic electrical instruments are the
ammeter, the voltmeter and the ohmmeter. These
are used for testing and adjusting electrical circuits
and components. They can be separate instruments,
but are usually combined to form a multimeter:
(a) An ammeter is connected into a circuit and
used to measure the flow of electrical current.
This is registered in amps.
(b) A voltmeter is used to check the voltage of a
battery or the voltage of an alternator. It is also
used to check the voltage in various parts of a
vehicle’s electrical circuits.
(c) An ohmmeter is an instrument for measuring
the resistance of electrical circuits or
components. It is used for testing and locating
faults.
2. A tachometer is an electrical instrument that
registers revolutions per minute. It is used when
adjusting the engine idle speed and in other
instances where engine speeds need to be checked.
Testing and tune-up equipment
Various types of testing and diagnosis equipment are
used in automotive workshops. Smaller items, such as
those described above, are hand-held, but larger items
are sometimes built into the consoles of engine
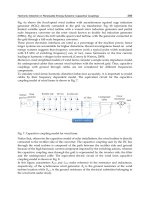
analysers (Figure 4.34). These combine a number of
instruments and gauges which enable them to perform
a variety of checks and tests on engines and their
systems.
Diesel engines require different testing equipment
to petrol engines. Special facilities are needed for
053-068_May_chap 04
12/9/06
9:43 AM
Page 67
chapter four measuring and checking
67
DLC adaptor
DLC
DLC cable
Tech 2
figure 4.34
An engine analyser combines a number of
testing and tune-up instruments
testing and adjusting the fuel system components, and
these are often located in specialist workshops.
Electronic testing equipment
Modern vehicles are equipped with a range of
electronic components and controls. These are used
for various functions related to the operation of the
engine, the transmission and body components. These
systems are designed with a self-diagnosis function
which enables them to identify their own operating
faults. Faults are stored in the vehicle’s computer as
codes for later recall by the technician.
Fault codes can be recalled by using special test
equipment supplied by various manufacturers
(Figure 4.35) or displayed on the instrument panel
using the engine check light. A data plug for both
methods is provided in a convenient location, either
in the engine compartment or under the dash in most
vehicles (Figure 4.36).
test harness
multipin
connector
figure 4.36
The scan tool can be connected directly into
the car’s data link HOLDEN
Bridging two terminals in the data plug will allow
the engine check light to display the codes as a series
of on/off signals. Two short flashes followed by a short
pause then one short flash is a code 21. The workshop
manual is required to determine the correct terminals
to bridge in the data plug and interpret the codes.
Technical terms
Specifications, clearance, wear limit, feeler gauge,
calipers, tappet, internal dimension, vernier,
micrometer, thimble, knurl, setting bar, scale,
spindle, datum, zero, division, dimension, dial
gauge, bezel, end-float, end-play, runout, scribe,
marking out, prick punch, horizontal, vertical,
alignment, trammels, track, wheelbase, pressure,
atmospheric pressure, vacuum, negative pressure,
ammeter, voltmeter, tachometer, revolution, selfdiagnosis, fault code.
Review questions
battery
cable
multi-use
tester
figure 4.35
Type of instrument used for testing electronic systems HYUNDAI
1.
What are feeler gauges?
2.
Where would (a) inside calipers (b) outside
calipers, be used?
3.
What is meant by zero error of a micrometer?
4.
What are the graduations on the sleeve of a
metric micrometer?
053-068_May_chap 04
68
12/9/06
9:43 AM
Page 68
part one introduction to motor vehicles
5.
Give examples of where an outside micrometer
would be used.
13.
What is a straightedge used for?
14.
How would you check a small surface for
flatness on a surface plate?
6.
Give an example of where a measurement would
be taken with an inside micrometer.
15.
What is a level?
7.
What is a dial gauge?
16.
What are vee blocks?
8.
Where are dial gauges used?
17.
How is a chalk line used?
9.
What are depth gauges used for?
18.
Where would a pressure gauge be used?
10.
What is meant by marking out?
19.
11.
How would you find the centre of the end of a
round bar?
What instrument is used to measure engine
revolutions per minute?
20.
Name the common electrical instruments.
12.
How is a try square used?