webpages.sdsmt.edu djensen IENG%20486 Materials Lab02.doc
Bạn đang xem bản rút gọn của tài liệu. Xem và tải ngay bản đầy đủ của tài liệu tại đây (87.33 KB, 7 trang )
IE 355 QUALITY AND APPLIED STATISTICS I
LAB ASSIGNMENT 2
DISTRIBUTION OF SAMPLE MEANS
AND CENTRAL LIMIT THEOREM
This lab discusses how to use a histogram and a normal probability plot to
determine if a set of data is normally distributed. Also, this lab shows the properties of
sampling from a normal population and the properties of the Central Limit Theorem.
Histogram and Normal Probability Plots
The vast majority of statistical quality control procedures assume that the
process is normally distributed. If the process is not normally distributed control limits
for control charts may be entirely inappropriate. 1 In general, the x chart is fairly robust
while the R chart is much more sensitive to departures from normality. If the process is
not normally distributed, there are alternate methods for deriving control limits that
employ techniques such as transforming the data or deriving the underlying distribution.
These procedures are beyond the scope of this course, but it is important to be able to
recognize whether data from a process is normal.
Two graphical tools in particular are used for assessing normality. These are the
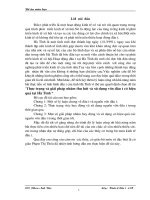
histogram and the normal probability plot. An example of a histogram is shown in
Figure 1. This histogram was created from 100 randomly generated values from a
standard normal distribution. The horizontal axis is divided into intervals. These
intervals are the width of each bar. The height of each bar is the number of values that
fall into the corresponding interval.
1
Montgomery, D. C., (1997), Introduction to Statistical Quality Control, p 205, 226.
Histogram for X
30
frequency
25
20
15
10
5
0
-3.4
-2.4
-1.4
-0.4
0.6
1.6
2.6
X
Figure 1. Example histogram from 100 randomly generated values from a Norm(0, 1)
distribution
The histogram is a visual display of the data in which one may see the following
three properties:
1. Shape
2. Location or central tendency (average)
3. Scatter or spread (variance)
In Figure 1, we see that the distribution is roughly symmetric and unimodal (one
peak) as a normal distribution should be. Also, we see that the central tendency is
approximately 0 and the spread of the histogram is approximately ±3σ (recall σ = 1
for standard normal) from 0 as values from a standard normal should be. A histogram
works best to assess normality with larger datasets, e.g., n ≥ 50 .
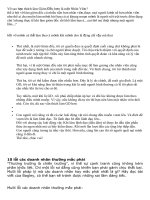
Another graphical tool to test for normality is the normal probability plot (NPP).
Figure 2 shows the NPP for the same 100 randomly generated standard normal values.
A NPP is a graph of the ranked data versus the sample cumulated frequency on special
paper with the vertical scale chosen so that the cumulative normal distribution is a
straight line. So, if the data is normally distributed it should approximately lie on the
straight line. A rule of thumb for determining if the data lies on the line is the “fat pen
test”. For a NPP plotted on letter sized paper, if a fat pen can cover most of the points,
we can probably assume that the data is normally distributed.
2
Normal Probability Plot for X
percentage
99.9
99
95
80
50
20
5
1
0.1
-3.1
-2.1
-1.1
-0.1
0.9
1.9
2.9
X
Figure 2. Normal probability plot of 100 randomly generated standard normal values
Part 1: Sampling Distribution of Average from a Normal Distribution
Consider random variables X 1 , X 2 ,K , X n that are independent and normally
distributed with mean µ and standard deviation σ . The average of the random
variables will also be normally distributed with mean µ but will have a standard
deviation σ
n.
Create a data file in StatGraphics which includes the following variables (columns
of values):
N1, N2, N3, and N4, each of which is a sample of 100 normally distributed random
variables with mean 10 and standard deviation 2. (Note: See section below on
generating random normal variates with StatGraphics)
Create a new column called AVG which is a function of the first four columns,
specifically, AVG is the average of the first four columns, i.e., AVG =
(N1+N2+N3+N4)/4.
•
Use StatGraphics to find the sample mean and standard deviation for N1, N2, N3,
N4 and AVG. (Hint: Do a One-Variable Analysis). Summarize the findings in the
tables below. For the random variable AVG, the mean is 10. What is the theoretical
standard deviation of the random variable AVG?
3
N1
N2 N3
N4
Sample Mean
Sample Std Dev
10
2
AVG
Sample Mean
Sample Std Dev
•
THEORY
THEORY
10
Create histograms of the data in N1 and in AVG such that you see the data and the
fitted normal distribution. Display both histograms on the same page. Explain what
you see as far as differences between the histograms.
•
Hand-in tables and the page of histograms
Statgraphics Notes: Generating random normal variates (random values):
Here are the steps to create values for N1. Repeat for N2, N3, and N4.
CLICK
RCLICK
CLICK
Col_1. The first column becomes shaded.
Anywhere on worksheet.
Modify Column…. Change Name to N1. Select data type as Fixed
CLICK
RCLICK
CLICK
Decimal with appropriate decimal places.
N1. It becomes shaded.
Anywhere on worksheet.
Generate Data…. From the <Operators:> box, scroll down and select
RNORMAL(?,?,?) by DCLICKing it. Put in 100, 10, and 2 as parameters
for the expression. They are number of observations, mean, and standard
CLICK
deviation, respectively.
OK. C1 now contains 100 normally distributed variables with mean of 10
and standard deviation of 2.
Changing Histogram Options: If you don’t like how the histogram looks, you can
change the properties of the histogram such as the number of intervals or the look of the
graph. To access the options RCLICK on the histogram, select pane options to change
intervals, etc. or select graphical options to change the fill options, etc.
4
Part 2: Central Limit Theorem
The central limit theorem (CLT) states that if random variables X 1 , X 2 ,K , X n
are independent and identically distributed from any distribution with mean µ and
standard deviation σ , then the distribution of the sample mean, i.e.,
approximately normal with mean µ and standard deviation σ
1 n
∑ X i is
n i =1
n as n approaches
infinity.
So the most amazing thing about the CLT is that no matter what distribution
you start out with (as long as all the X’s are from the same distribution), the sample
mean will be approximately normally distributed as long as n is big enough. This is a
good thing in practice because even if a process is not normally distributed, an x chart
can probably be expected to perform decently because the x chart is based on the
distribution of x , which we just learned is always approximately normally distributed
(as long as n is big enough).
So, this exercise will tell us the answer to the aching question: How big does n
have to be?
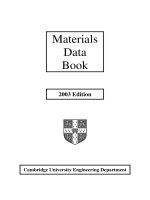
f(x)
Sampling from a uniform distribution
0.10
2
4
6
8
10
X
5
Figure 3. Uniform probability density function on the interval (1, 10]
Figure 2.1 shows the probability density function of a uniform distribution on
the interval (0, 10]. Notice, it doesn’t look anything like our familiar bell curve shape
for the normal distribution. For the uniform distribution, there is equal probability that
the random variable X takes on any value between 0 and 10.
You are to generate sets of random variables from this distribution; calculate the
sample averages from this data set, and create graphical displays for various choices of
sample sizes, n . Determine how large the sample size needs to be before the sample
averages appear to be normally distributed.
1. Generate 10 columns of variables. Each column will contain 100 randomly
generated values from the uniform distribution on the interval (0, 10]. Use the
operator RUNIFORM(?,?,?) to generate your data. Enter 100, 0, and 10, as
parameters for number of variables, lower bound, and upper bound for the uniform
distribution. Using the graphical tools (or any others you may already be familiar
with), test to see if column 1 is normally distributed. Explain what you see.
2. Create another column, i.e., column 11, which is the sample average of columns 1 &
2, i.e., n = 2 . Give it an appropriate name, e.g. AVG_N2. Test to see if the values in
column 11 are normally distributed.
3. If you think column 11 is not normally distributed, create another column that is the
average of the first three columns, i.e., now n = 3 . Test to see if these averages are
normally distributed.
4. Continue with n = 4,5,K , etc. until you can justify that the averages are
approximately normal.
5. Once you have determined how big n needs to be so that the sample averages
appear to be normally distributed, hand in two sets of plots; one set for the averages
of the ( n − 1) columns and another for n , i.e., the averages of the ( n − 1) columns
6
should NOT appear normal to you and the averages of the n columns should.
Explain what you see and justify your selection of n .
6. Observe the distributions of the sample averages for each n = 1, 2,3,K from the
graphical displays. What happens to the spread of the distribution as n increases?
How does the value of n change the likely accuracy of using a sample average to
estimate population mean?
7