Tài liệu sửa chữa xe tải hyundai HD120
Bạn đang xem bản rút gọn của tài liệu. Xem và tải ngay bản đầy đủ của tài liệu tại đây (8.9 MB, 680 trang )
BODY
ELECTRICAL
GENERAL .............................................................................. BE - 2
SPECIFICATION .................................................................... BE - 7
TROUBLE SHOOTING .......................................................... BE - 10
INSPECTION AND ADJUSTMENT........................................ BE - 22
BE-2
BODY ELECTRICAL
GENERAL
1. When replacing or repairing electrical system, disconnect negative battery terminal to prevent any damage due to the short.
CAUTION
•
When negative battery terminal is disconnected, starter
switch and lighting switch must be turned off to work
on.
FRV91-001
2. Be careful in handling sensor and relays because they are prone
to shock and heat. Do not uncover or paint the ECU.
FRV91-002
3. When removing connector, pull the connector by pulling harness at the starter lock position. When removing locking type
connector, remove it by pressing to arrow direction. To connect
the locking type connector, insert it until it ticks.
FRV91-003
4. In washing a car, perform waterproof treatment on electrical
parts. (Cover them with plastic). Especially keep harness connector or sensors off the water. If they are dipped into water, take
them out quickly.
FRV91-004
5. In performing electric welding, electrical parts connected to the
battery directly may be damaged since the electricity of welding
machine passes through earth unit. Even the parts pass through
switch may be damaged if the switch is not turned off. So please
do as shown in the figure below.
A : Welding machine
B : Earth the welding machine near to welding parts
C : Remove the earth wire between cap and chassis.
FRV91-005
GENERAL
BE-3
6. Disconnect the negative battery terminal. Disconnect the connector of body harness to chassis harness.
FRV.OM117
7. In checking a voltage, positive and negative terminals should
not exceed specified voltages when voltage is applied from 0
voltage. Sensors voltage should not exceed 24 voltages.
FRV91-007
8. In continuity test, be careful so that the test bar does not touch
any other terminal but to be tested.
FRV91-008
Measurement in connectors
Checked when connector is connected (circuit continuity state)
1. Waterproof connector
C
Prepare the testing harness and connector (A) and connect
them between the connectors to be tested. Test it with the test
bar at the testing connector. Do not insert the test bar at the
harness side of the waterproof connector, because the water-
B
B
A
B
Insert (A) between
connectors
proof capacity is deteriorated and rusted.
FRV91-009
2. Non-waterproof connector.
Test bar should be inserted at the harness side. Do not apply
excessive force when test bar cannot be inserted to control unit
or others whose connector is small.
Test bar
FRV91-010
BE-4
BODY ELECTRICAL
When checking by disconnecting the connectors.
1. When checked by mess pin.
Insert the test bar into terminals. But do not apply excessive
force because it may cause the poor connection.
FRV91-011
2. When checking by oath pin.
Check the test bar directly with the pin.
CAUTION
• Be careful so as the test bar not to be short. If short,
there is a risk of internal circuit damage of sensors.
FRV91-012
GENERAL
BE-5
Connector check
1. Eye check.
1) Poor connection, consent defective.
FRV91-013
2) Pull out the harness and check whether harness is short at
the terminal.
FRV91-014
3) Connection pressure drop between oath terminal and mess
terminal.
Check poor connection due to the rust or residual sub
stances of terminals by pulling out connector pin.
FRV91-015
2. Check by pulling out the connector pin.
When pin can be pulled out because pin stopper of fuse
connector is damaged and terminal (oath, mess pin) is incompletely connected so that the connector body can be connected,
pull the harness one by one easily and check out whether pin is
removed from the connector.
FRV91-016
BE-6
BODY ELECTRICAL
3. Check in case of blown fuse.
Remove the fuse and measure the resistance between load and
earth of fuse. Put every switch of circuits connected in this fuse
in continuity state. If the resistance is almost 0, there is a short
place between switch and load. If the resistance is 0, it is blown
now. So consider whether fuse is blown due to the temporary
disconnection. Following are the major causes for the circuit
short.
1) Paper jammed in harness
2) Harness cover is damaged due to frictional forces.
3) Electricity cannot be flown into circuit at the connector parts.
4) Artificial causes (Circuit is short by mistake)
A) Battery
B) Fuse
C) Load switch
D) Load
E) Short
FRV91-001
4. In case of temporary fault
Since the temporary fault usually happens under specific
conditions, we can easily estimate the causes for the faults. To
know the conditions of the temporary fault, ask customers in
detail about driving condition, weather, frequency and symptom
and then reconstruct the fault symptoms. Next, depending on
the faulty condition, check causes for the fault whether it is from
vibration, temperature or any other causes. If the cause is
vibration, check the followings on connector unit whether the
fault happens again.
1) Touch the connector lightly up and down and right and left.
2) Touch the wiring harness lightly up and down and right and
left.
3) Touch the sensors and equipments lightly
4) Touch the wiring harness lightly at the operation parts like
suspension
What we check here are fault diagnosis code displayed and
improper causes estimated, and parts or connector while
checking.
FRV91-001
SPECIFICATIONS
BE-7
SPECIFICATIONS
ITEM
Wiring system
Battery
SPECIFICATIONS
Type
Single wiring or Wiring harness type
Ground
Negative ground type
Rated Voltage
24V
Voltage
12V x 2ea
Gravity(normal temperature 25°C). 1.280
Lightings
Head lamp
Semi shield beam (75/ 70W)
Turn signal lamp (Hazard lamp)
10W
Side lamp
8W
Fog lamp
70W
Stop/ Tail lamp
21/ 5W
Back up lamp
21W
License plate lamp
12W
Bed lamp
10W
Room lamp
12W, 5W
Fluorescent lamp
20W
Step lamp
12W
Start switch
Type
Rotary type
Cold start switch
Type
2-position locking type
Rated road
24V 0.8A
Assist starting switch Type
Meter and Gauge
Speedometer
Odometer
Push type
Type
Coil type
Revolution ratio
Propeller shaft 637rev = 1km
Type
Coil type
Revelation ratio
Propeller shaft 637rev = 1km
BE-8
BODY ELECTRICAL
ITEM
Meter and gauge
Tachometer
SPECIFICATIONS
Type
Cross coil type
Sensor type
Induction coil type
Coolant temp
Type
Cross coil type
gauge
Unit type
Thermister
Standard
Temp.(°C)
Fuel gauge
Air gauge
50
85
105
115
123
Resistance( ) 135.9
38
23.4
-
15.6
Pointer angle
-45°
-4°
-4°
25°
45°
Clearance
±9°
+5°,-3° +5°,-3° +3°,-7°
±5°
Type
Cross coil (Variable resistor)
Standard
Pointer position
E
1/2
F
Resistance( )
135
50
4
Pointer angle
-45°
0°
45°
Clearance
±3°
±5°
±3°
Type
(BOURDON tube type)
Standard
pressure(kg/cm²)
Clearance
Indicator and Warning lamp
1.2W (24V)
Low air pressure switch
Diaphram type
Oil bypass alarm switch
Valve spring type
Oil pressure switch
Diaphram type
Over heat unit
Bi-metal type
Coolant level sensor
Magnetic type
0
3
5.3
6
±0.5 ±0.3 ±0.5
9
12
±0.3
±1.0
SPECIFICATIONS
BE-9
ITEM
Wiper and Washer
Wiper motor
SPECIFICATIONS
Type
Ferite magnetic
Low speed
42±5rpm (10kg /cm²)
High speed
60±7rpm (10kg /cm²)
Washer motor
Motor type
Ferite magnetic
and pump
Pump type
Centrifugul type
Capacity
1200 cc/min over
Wiper
Rated load
100mA (L-terminal)
controller
Operating interval
2±0.5 ~ 11±2sec
Washer nozzle Diameter
Horn
Audio
Quantity
2 x 2 ea
Washer tank
Capacity
4
Electric horn
Type
Flat Type
Frequency
High : 420 ± 20
Volume
100 ~112dB
Rated voltage
24V
Speaker impedonce
4 x 2(24V)
Output
15 x 2W
Speaker impedonce
8 x 4(24V)
Output
25 x 2W
H630
H818
Cigar lighter
2.5mm
Type
Bi-metal Type
Rated voltage
24V, 5A
Return time
13±5 sec
Low : 360 ± 20
BE-10
BODY ELECTRICAL
TROUBLE SHOOTING
CHARGING SYSTEM (BATTERY AND ALTERNATOR)
Excessive discharge though
pop out.
Cigar lighter doesn’t
Alternator discharges excessively
though alternator is normal.
battery is normal.
Cigar lighter is not
Charging lamp doesn’t turn on
when engine stopped and starter
switch is on.
High battery temperature
Probable Cause
Fast reduction of battery liquid
Symptoms
Remarks
Poor connection of harness
Weak tension of V-belt.
V-belt damage
Wiring defective of high current fuse
Battery defective
Stator coil disconnection
Alternator
Stator coil and core are short
Field coil defective
Rectifier defective
Regulator defective
Wiring defective
Meter cluster defective
CIGAR LIGHTER
Fuse Blown
Cigar lighter defective
Tail lamp relay defective
Illumination lamp doesn’t
Poor connector connection, blown harness, Poor earth
turn on
Probable Cause
heated
Symptoms
Remarks
TROUBLE SHOOTING
BE-11
AUDIO
Only one speaker works.
Poor sound
Noisy (Accessory noise)
Probable Cause
Noisy (except radio reception)
No sound at the specific
range of frequency.
Tape makes no sound
Poor radio reception
Radio make no sound
Symptoms
Poor connector connection, blown harness
Poor earth
Fuse Blown
Poor connection of antenna or antenna wire.
Partly malfunction of radio amp
Radio tuner malfunction
Malfunction of tape deck or pinch roller
Speaker malfunction
System
Accessory
Noise
Source Alternator
Beeping noise
of
accessory
noise Water temperature Scratching noise
Description
High squealing noise, when accelerator pedal is depressed suddenly.
(It stops immediately after engine stop.
It happens while engine is running.
gauge
(It continues just for a while after engine stop.)
Oil pressure switch Sounds “dulkung”
It happens by engine rpm.(It does not happen while idling.)
Fuel level sensor
When turned at high speed, driving on a rugged road, or starter switch
Scratching noise
is at "ON" position.
Flasher unit
Sounds “dulkung”
It happens when turn signal is operating.
Horn
Sounds "sheet"
It happens when horn button is depressed or released.
Wiper motor
Whistle noise
It happens depending on the speed of front glass wiper.
Washer motor
Whistle noise
It happens when front glass washer is operating.
BE-12
BODY ELECTRICAL
STARTING SYSTEM (STARTER AND SUB STARTER)
Starter
Magnet switch defective
Motor defective
Over running clutch defective
Insufficient voltage of switch terminal of magnet switch
Worn out or damage of pinion
Starter relay defective
Insufficient voltage of switch terminal of starter relay
Glow relay defective
Starter switch defective
Worn out or damage of flywheel ring gear
Transmission is not in neutral position.
Starter switch is not in ACC nor ON position
Fuse blown
Poor connection of sub starter switch
Transmission neutral switch defective
Safety relay defective
Engine does not start at sub starter
ON position
Battery defective or poor capacity
Pinion touches ring gear
but doesn’t work
Poor connector connection, blown harness, Poor earth
Engine doesn’t start
though starter works.
Pinion doesn’t touch ring gear
Probable Cause
Starter doesn’t work
Symptoms
Remarks
TROUBLE SHOOTING
BE-13
PRE HEATING
Probable Cause
Engine start is not good though cold
start works (Pre-heating is not enough)
Unable to pre-heat
Symptoms
Remarks
Poor connector connection, blown harness, Poor earth
Cold start switch defective
Glow plug defective
Glow relay defective
Water temperature sensor defective
High capacity fuse of glow relay is blown
Exhaust brake system defective
Poor connection of connecting plate
ENGINE STOP
Poor connector connection, blown harness, Poor earth
Fuse blown
Starter switch defective
Engine stop relay defective
Fuel cut motor defective
Engine does not start
Probable Cause
Engine does not stop
Symptoms
Remarks
BE-14
BODY ELECTRICAL
GENERAL INFORMATION ON LAMPS
Lamp is not bright enough
Lamp does not turn on
Lamp does not turn on (Hi-beam)
Probable Cause
Lamp does not turn on
Symptoms
Remarks
Bulb defective
Battery discharged
Switch defective
Poor connector connection, poor earth
Harness blown, connectors are misaligned.
Alternator defective (charging function defective)
Fuse blown
HEAD LAMP
Probable Cause
Lighting switch defective
Dimmer switch defective
Head lamp relay defective
Lamp does not turn on (Low-beam)
Symptoms
Remarks
TROUBLE SHOOTING
BE-15
FOG LAMP
Probable Cause
Fog lamp does not turn on
Symptoms
Remarks
Fog lamp switch defective
Fog lamp relay defective
Fuse blown
TAIL LAMP, LICENSE PLATE LAMP AND POSITION LAMP
Meter cluster defective
Tail lamp defective
Position lamp does not turn on
Overhead warning indicator defective
License number plate lamp does not
turn on
Stop lamp, tail lamp sensor defective
Master caution indicator does not turn on
when tail lamp bulb is blown
Lighting switch defective
Warning lamp doesn’t turn on
when tail lamp is blown
Probable Cause
Tail lamp does not turn on
Symptoms
Remarks
BE-16
BODY ELECTRICAL
STOP LAMP
Warning lamp does not turn on
when bulb is blown
Not blinking
Lamp is on all the time.
Master caution indicator does
not turn on when bulb is blown
Lamp doesn’t turn on
Symptoms
Remarks
Probable Cause
Stop lamp switch defective
Stop lamp, tail lamp sensor defective
Stop lamp relay defective
Overhead warning, indicator defective
Meter cluster defective
TURN SIGNAL LAMP, HAZARD LAMP
Flasher relay defective
Bulb watt is smaller than the spec.
Bulb watt is bigger than the spec.
Unstable blinking interval
Turn signal lamp, hazard lamp switch defective
Fast blinking
Probable Cause
Slow blinking
Symptoms
Remarks
TROUBLE SHOOTING
BE-17
ROOM LAMP, SPOT LAMP, STEP LAMP, MAP LAMP AND FLUORESCENT LAMP
Fade-out function of room lamp does not work.
Fluorescent lamp does not turn on.
Map lamp does not turn on
Step lamp does not turn on.
Probable Cause
Room lamp and spot lamp do not turn on
Symptoms
Room lamp and spot lamp switch defective
Door switch defective
Map lamp switch defective
Starter switch defective
Oil pressure switch defective
BACK-UP LAMP
Remarks
Illumination does not working
Probable Cause
Lamp does not turn on.
Symptoms
Remarks
Back-up lamp switch defective
Power harness blown.
METER ILLUMINATION
Symptoms
Probable Cause
Tail lamp relay defective
Remarks
BE-18
BODY ELECTRICAL
SPEEDOMETER AND TACHO GRAPH
Big indication error
Unstable indicator movement
Big indication error
Odometer is not working
Unstable indicator movement
Indicator does not work
Abnormal sound
Indicator does not work
Symptoms
Remarks
Probable Cause
Poor connector connection, poor earth
Harness blown, connectors misalignment
Vehicle speed sensor defective
Improper sized tires
Speedometer defective
TACHOMETER
Symptoms
Probable Cause
Poor connector connection, poor earth
Harness blown, connectors misalignment
Tachometer sensor defective
Engine RPM output circuit of meter cluster is defective
Tachometer defective
Remarks
TROUBLE SHOOTING
BE-19
FUEL SYSTEM
Fuel remaining warning lamp does not
Fuel remaining warning lamp does not
turn on (Fuel gauge position is above E)
Probable Cause
Unstable movement or big error of indicator
turn on (Fuel gauge positionis E)
Indicator does not move
Symptoms
Poor connector connection, poor earth
Harness blown, misaligned connectors
Fuel gauge unit defective
Fuel gauge defective
COOLANT TEMPERATURE GAUGE
Harness blown, misaligned connectors
Coolant temperature sensor defective
Coolant temperature gauge defective
Unstable movement or big error of indicator
Poor connector connection, poor earth
turn on (Fuel gauge positionis E)
Probable Cause
Indicator does not move
Symptoms
Remarks
Remarks
BE-20
BODY ELECTRICAL
PARKING BRAKE INDICATOR LAMP
Buzzer never stops though the parking
brake is on.
Indicator lamp does not turn off.
Probable Cause
Indicator lamp does not turn on when
parking brake is on
Symptoms
Remarks
Poor connector connection, poor earth, blown harness
Harness blown
Parking brake switch defective (sensor parking brake)
Parking brake air switch defective (wheel parking brake)
Parking brake release air switch defective (wheel parking brake)
Meter cluster defective
HORN
Blown harness, misaligned connectors
Fuse blown
Horn switch defective
Horn relay defective
Excessive battery discharging
Installation defective
Horn sound is weak
Poor connector connection, poor earth
Horn does not stop
Probable Cause
Horn does not work
Symptoms
Remarks
TROUBLE SHOOTING
BE-21
Wiper blade defective
Wiper arm defective
Washer hose distorted
Poor connection of washer hose
Washer nozzle clogged
Washer liquid is low
Washer level warning lamp defective
Washer level warning lamp does not turn off
Poor connection of wiper link and wiper arm
Washer level warning lamp does not turn on.
Poor position set of wiper motor crank arm
Wiper does not work with washer liquid
Wire blown or poor connection
Washer liquid is not injecting
Fuse blown or fuse blink blown
Washer injection is not enough
Wiper relay defective
Window washer motor does not work
ETACS defective
Wiper operation makes strange noise
Washer level sensor defective
Wiper cleaning is poor
Window washer switch defective
Wiper blade stop position is not good.
Washer motor defective
Wiper does not work sometimes
Wiper motor defective
Wiper does not stop operating
Probable Cause
Wiper does not work
Symptoms
BE-22
BODY ELECTRICAL
INSPECTION AND ADJUSTMENT
BATTERY
NOTE
• Since battery contains the combustible hydrogen gas, do
not short the positive terminal of the battery with negative
terminal and keep the spark or cigarette away from the
•
battery.
Since the battery contains corrosive thin sulfuric acid, wear
safety glasses and gloves to protect eyes and hands in
handling battery.
•
Do not attach metals around arms and do not crouch on the
battery.
REMOVAL
NOTE
• Remove the cable from the negative terminal first.
•
B
A
C
Be careful, as the disassembled battery cable does not
touch battery terminal not to be short.
A : Negative battery cable
B : Cover
C : Set bolt
D : Angle frame
D
FRV91-019
ASSEMBLY
NOTE
• Before installing battery cable, make sure every switch of the
vehicle electrical system is off. Connect the positive cable first
and then connect negative at last.
CHECK
1. Eye check
1) When battery box is corroded, clean with wire brush and
apply anti-acid paint. And replace the battery in case of
serious corrosion or deformation.
2) If terminal is corroded, clean it with wire brush. If battery is
cracked or damaged, replace it because there is a risk of
leakage.
NOTE
•
Take care positive terminal, which is easily corroded.
FRV.OM206
INSPECTION AND ADJUSTMENT
BE-23
3) If the air-breathing hole of vent plug is clogged, clean it out.
JMS90-004
2. Battery liquid level check
Check whether battery liquid level lies between upper and lower
marks. When battery liquid level is low, uncover the cap and
Cap
refill it to the upper position with distilled water or battery
refill liquid.
FRV91-021
3. Gravity check
Check the gravity of the battery and charge it if it is below the
limit.
NOTE
•
Battery gravity varies with the temperature of the liquid.
So calculate the gravity at 20°C with the following
formula and then judge the condition.
S20 = St x 0.0007x(t-20)
S20 : Standard Gravity of liquid at 20°C
St : Actual gravity measured at t°C
t : temperature of electrolyte
FRV91-022
BE-24
BODY ELECTRICAL
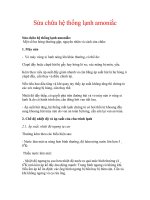
4. Charging
Though battery is to be charged one by one in principle, charge
the battery after stopping the engine and disconnecting the earth
terminal when the battery is installed on the vehicle.
Charge the battery after removing the vent plug. Charge it
referring to the following table. Be careful not to over charge.
Charge the battery referring to the charging time and current
shown on the table below
Normal
charging
Rapid
Charging current(A) Charging time Liquid(H) temperature(°C)
Charging capaDischarged
city for 5 hours
amount
Charging
current(A)
Charging capacity for 5 hours
charging
Discharged amount B (Ah) = 5 hour rate capacity (Ah) x
discharged amount (%) / 100
In addition, discharged amount B can be obtained from the
graph on the left side. Battery liquid is mixed sulfuric acid with
purified water or distilled water. The gravity of battery liquid is 1,
280 at 20°C in fully charged state.
A ; gravity of battery liquid
B : Discharging amount
C : Good
D : needs charging
NOTE
•
In charging, be careful of the battery liquid because it
may overflow.
•
Since the battery may explode, keep the fire away while
charging.
•
Be especially careful not to make any spark or any other
dangerous causes while charging.
•
Cover the vent plug and clean it with the water and dry
the battery after charging.
FRV91-023
INSPECTION AND ADJUSTMENT
BE-25
FUSE
NOTE
• In case blown fuse, replace the fuse after checking out the
•
causes and repairing the fault thoroughly.
Use only the designated fuse after repair.
1. Check of high capacity fuse
NOTE
•
Before removing high capacity fuse, remove the battery cable terminal first. If no continuity is confirmed
with eye check or continuity check, replace the fuse.
FRV91-024
2. Fuse check of relay and fuse box
NOTE
•
If no continuity is confirmed with eye check or continuity
check, replace the fuse.
FRV.OM223
START SWITCH AND COLD START SWITCH
General information
1. Start switch
Start switch is used to start or stop the engine or to supply
electricity to various electrical parts from battery.
1) Lock
When key is off, handle is locked.
2) ACC
Radio and cigar lighter operate in this position. Sub start
operates.
3) ON
Intake air heater, meter and gauge operate that were not
operating in ACC position.
4) START
Start circuit is connected, which is not operating in ON
position.
2. Cold start switch
Cold start switch is used to pre-heat the engine in cold weather.
This switch operates intake air heater unit and exhaust brake
unit to reduce the engine warming up time.
FNT91-026