microsoft visual basic 2015 chapter 06
Bạn đang xem bản rút gọn của tài liệu. Xem và tải ngay bản đầy đủ của tài liệu tại đây (1.95 MB, 61 trang )
Microsoft Visual Basic 2015
CHAPTER SIX
Loop Structures
6
Objectives
►Add a MenuStrip object
►Use the InputBox function
►Display data using the ListBox object
►Add a Background Image
►Understand the use of counters and accumulators
►Understand the use of compound operators
Chapter 6: Loop Structures
© 2016 Cengage Learning®. May not be scanned, copied or duplicated, or posted to a
publicly accessible website, in whole or in part.
2
6
Objectives
►Repeat a process using a For…Next loop
►Repeat a process using a Do loop
►Avoid infinite loops
►Prime a loop
►Validate data
Chapter 6: Loop Structures
© 2016 Cengage Learning®. May not be scanned, copied or duplicated, or posted to a
publicly accessible website, in whole or in part.
3
6
Objectives
►Create a nested loop
►Select the best type of loop
►Debug using DataTips at breakpoints
►Publish a finished application using ClickOnce technology
Chapter 6: Loop Structures
© 2016 Cengage Learning®. May not be scanned, copied or duplicated, or posted to a
publicly accessible website, in whole or in part.
4
6
Introduction
► A fundamental process in a computer program is to repeat a series of instructions either while a
condition is true (or not true) or until a condition is true (or not true)
► The process of repeating a set of instructions while a condition is true or until a condition is true is
called looping
•
Another term for looping is iteration
Chapter 6: Loop Structures
© 2016 Cengage Learning®. May not be scanned, copied or duplicated, or posted to a
publicly accessible website, in whole or in part.
5
6
User Interface Design
►A menu bar is a strip across the top of a window that contains one or more
menu names
►A menu is a group of
commands, or items,
presented in a list
Chapter 6: Loop Structures
© 2016 Cengage Learning®. May not be scanned, copied or duplicated, or posted to a
publicly accessible website, in whole or in part.
6
6
User Interface Design
► With a Windows Form object open in the Visual Studio window, scroll in the Toolbox to display the
Menus & Toolbars category. If the category is not open, tap or click the expand icon (the rightpointing triangle) next to the Menus & Toolbars category name. Drag the MenuStrip .NET
component to the Windows Form object
► Release the object
► With the MenuStrip object selected, scroll in the Properties window until the (Name) property is
visible. Change the MenuStrip object name to mnuFitness
► Tap or click the Type Here box on the menu bar. Type &File
to identify the File menu, and then
press the ENTER key
Chapter 6: Loop Structures
© 2016 Cengage Learning®. May not be scanned, copied or duplicated, or posted to a
publicly accessible website, in whole or in part.
7
6
User Interface Design
► Tap or click File in the MenuStrip object to select it, scroll in the Properties window to the (Name)
property, and then change the name to mnuFile
► To add a menu item to the File menu, tap or click the Type Here box below the File menu name.
Type &Clear and then press ENTER to create a new menu item named Clear with C as the hot key
► On the File menu, tap or click Clear to select it, scroll in the Properties window until the (Name)
property is visible, and then change the name to mnuClear
Chapter 6: Loop Structures
© 2016 Cengage Learning®. May not be scanned, copied or duplicated, or posted to a
publicly accessible website, in whole or in part.
8
6
User Interface Design
Chapter 6: Loop Structures
© 2016 Cengage Learning®. May not be scanned, copied or duplicated, or posted to a publicly accessible website, in whole or in
part.
9
6
Event Handlers for Menu Items
►In Design view, double-tap or double-click the Exit menu item to open the code
window
►Using IntelliSense, enter the Close procedure call to close the window and terminate
the application
Chapter 6: Loop Structures
© 2016 Cengage Learning®. May not be scanned, copied or duplicated, or posted to a
publicly accessible website, in whole or in part.
10
6
►
Inserting Standard Items for a Menu
Visual Basic 2015 contains an Action Tag that allows you to create a full standard menu bar commonly provided in
Windows programs
►
►
Action tags provide a way for you to specify a set of actions, called smart actions, for an object as you design a form
With a new Windows Form object open, drag the MenuStrip .NET component onto the Windows Form object. Tap or
click the Action Tag on the MenuStrip object
►
►
Tap or click Insert Standard Items on the MenuStrip Tasks menu
Tap or click File on the menu bar to view the individual menu items, their associated icons, and their shortcut keys
Chapter 6: Loop Structures
© 2016 Cengage Learning®. May not be scanned, copied or duplicated, or posted to a
publicly accessible website, in whole or in part.
11
6
Inserting Standard Items for a Menu
Chapter 6: Loop Structures
© 2016 Cengage Learning®. May not be scanned, copied or duplicated, or posted to a publicly accessible website, in whole
or in part.
12
6
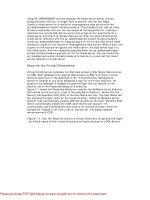
InputBox Function
►The InputBox function displays a dialog box that consists of a message asking for
input, an input area, a title, an OK button, and a Cancel button
►When the user enters the text and taps or clicks the OK button, the InputBox function
returns this text as a string
►If the user taps or clicks the Cancel button, the function returns a null string ("")
Chapter 6: Loop Structures
© 2016 Cengage Learning®. May not be scanned, copied or duplicated, or posted to a
publicly accessible website, in whole or in part.
13
6
InputBox Function
Chapter 6: Loop Structures
© 2016 Cengage Learning®. May not be scanned, copied or duplicated, or posted to a
publicly accessible website, in whole or in part.
14
6
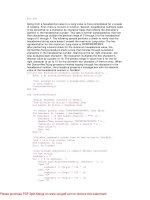
Creating the InputBox Object for Fitness Challenge Application
Chapter 6: Loop Structures
© 2016 Cengage Learning®. May not be scanned, copied or duplicated, or posted to a
publicly accessible website, in whole or in part.
15
6
Displaying Data Using the ListBox Object
►Drag the ListBox object from the Toolbox to where you want to place the ListBox
object on the Windows Form object. When the pointer is in the correct location,
release the objects
►With the ListBox object
selected, scroll in the Properties
window to the (Name) property.
Name the ListBox object
lstWeightLoss
Chapter 6: Loop Structures
© 2016 Cengage Learning®. May not be scanned, copied or duplicated, or posted to a
publicly accessible website, in whole or in part.
16
6
Displaying Data Using the ListBox Object
Chapter 6: Loop Structures
© 2016 Cengage Learning®. May not be scanned, copied or duplicated, or posted to a publicly accessible website, in whole
or in part.
17
6
Adding ListBox Items During Design
► Assume the lstStores ListBox object already has been placed and named on the Windows Form
object. Select the ListBox object on the Windows Form object and then tap or click the Items
property in the Properties window
► Tap or click the ellipsis button in the right column of the Items property
► Tap or click in the String Collection Editor window. Type the following items to represent popular
retail stores, pressing ENTER at the end of each line:
Abercrombie & Fitch
Anthropologie
Express
H&M
Urban Outfitters
► Tap or click the OK button
Chapter 6: Loop Structures
© 2016 Cengage Learning®. May not be scanned, copied or duplicated, or posted to a
publicly accessible website, in whole or in part.
18
6
Adding ListBox Items During Design
Chapter 6: Loop Structures
© 2016 Cengage Learning®. May not be scanned, copied or duplicated, or posted to a publicly accessible website, in whole
or in part.
19
6
SelectedItem Property
Chapter 6: Loop Structures
© 2016 Cengage Learning®. May not be scanned, copied or duplicated, or posted to a publicly accessible website, in whole or in
part.
20
6
Adding a Background Image
► The BackgroundImage property of the Form object can set the background image to an imported
image
► The Background ImageLayout property can be used to control the appearance of the image on the
form
► Tap or click the Form object. In the Properties window, tap or click the ellipsis button of the
BackgroundImage property. Tap or click the Import button and open the file location of the Scale
image file. Tap or click Scale.jpg and tap or click the Open button
► Tap or click the OKButton
Chapter 6: Loop Structures
© 2016 Cengage Learning®. May not be scanned, copied or duplicated, or posted to a publicly accessible website, in whole
or in part.
21
6
Adding a Background Image
Chapter 6: Loop Structures
© 2016 Cengage Learning®. May not be scanned, copied or duplicated, or posted to a publicly accessible website, in whole
or in part.
22
6
Accumulators, Counters,
and Compound Operators
►A variable that contains an accumulated value such as the total of all the weight loss
values is called an accumulator
►A variable that always is incremented by a constant value is called a counter
Chapter 6: Loop Structures
© 2016 Cengage Learning®. May not be scanned, copied or duplicated, or posted to a
publicly accessible website, in whole or in part.
23
6
Accumulators, Counters,
and Compound Operators
►A compound operator allows you to add, subtract, multiply, divide, use modulus or
exponents, or concatenate strings, storing the result in the same variable
Chapter 6: Loop Structures
© 2016 Cengage Learning®. May not be scanned, copied or duplicated, or posted to a
publicly accessible website, in whole or in part.
24
6
Accumulators, Counters,
and Compound Operators
Chapter 6: Loop Structures
© 2016 Cengage Learning®. May not be scanned, copied or duplicated, or posted to a publicly accessible website, in whole
or in part.
25