microsoft visual basic 2015 chapter 07
Bạn đang xem bản rút gọn của tài liệu. Xem và tải ngay bản đầy đủ của tài liệu tại đây (1.69 MB, 43 trang )
Microsoft Visual Basic 2015
CHAPTER SEVEN
Using Procedures
and Exception Handling
7
Objectives
►Create a splash screen
►Pause the splash screen
►Add a ComboBox object to a Windows Form
►Write Code for a SelectedIndexChanged event
►Understand procedures
►Code a Sub procedure
Chapter 7: Using Procedures and Exception Handling
© 2016 Cengage Learning®. May not be scanned, copied or duplicated, or
posted to a publicly accessible website, in whole or in part.
2
7
Objectives
►Pass an argument to a procedure by value
►Pass an argument to a procedure by reference
►Code a Function procedure to return a value
►Create a class-level variable
►Catch an exception using a Try-Catch block
►Determine the order of exceptions in a Try-Catch
block
Chapter 7: Using Procedures and Exception Handling
© 2016 Cengage Learning®. May not be scanned, copied or duplicated, or
posted to a publicly accessible website, in whole or in part.
3
7
Introduction
►As an application grows, it is important to divide
each facet of a problem into separate sections of
code called procedures
►Try-Catch blocks can check for any error a user
might commit
►One way to make your programs more
professional is to display a splash screen while
the full program loads
Chapter 7: Using Procedures and Exception Handling
© 2016 Cengage Learning®. May not be scanned, copied or
duplicated, or posted to a publicly accessible website, in whole or in
part.
4
7
Creating a Splash Screen
► Create a Windows Desktop application named Mystery
Escape. Name the form frmEscape. Tap or click Project
on the menu bar and then tap or click Add New Item on
the Project menu. Scroll down to view Splash Screen
► In the Add New Item dialog box, select Splash Screen in
the center pane
► Tap or click the Add button in the Add New Item dialog box
► Tap or click the left side of the splash screen form to
select it. To set the application to display the splash
screen first, press and hold or right-click Mystery Escape
in the Solution Explorer
► Tap or click Properties on the shortcut menu
Chapter 7: Using Procedures and Exception Handling
© 2016 Cengage Learning®. May not be scanned, copied or
duplicated, or posted to a publicly accessible website, in whole or in
part.
5
7
Creating a Splash Screen
►In the Windows application framework properties
section, tap or click the Splash screen list arrow,
and then tap or click SplashScreen1 to select it as
the splash screen used for the project
►Tap or click the Assembly Information Button on
the Project Designer to open the Assembly
Information dialog box
►To customize the splash screen, change the
copyright to the present year. The numbers in the
File version boxes can be changed as you update
the application
Chapter 7: Using Procedures and Exception Handling
© 2016 Cengage Learning®. May not be scanned, copied or
duplicated, or posted to a publicly accessible website, in whole or in
part.
6
7
Creating a Splash Screen
► Tap or click the OK button on the Assembly Information dialog box.
Close the Mystery Escape* Project Designer window. To change the
predefined image, first make sure you have the Escape.jpg picture
(available on CengageBrain.com) and that you stored the image in a
location you remember. Then, tap or click the SplashScreen1.vb
[Design] tab. Tap or click the left side of the splash screen, making
sure to select the entire splash screen form. The Properties window
should identify MainLayoutPanel if you have selected the entire
splash screen form. Tap or click to the right of the BackgroundImage
property in the Properties window, and then tap or click the ellipsis
button. In the Select Resource dialog box, tap or click the Project
resource file radio button, if necessary. Import the Escape.jpg picture
by tapping or clicking the Import button in the Select Resource dialog
box and selecting the Escape. jpg image from the location where you
stored it. Tap or click the OK button in the Select Resource dialog box
► Run the application by tapping or clicking the Start Debugging button
on the Standard toolbar
© 2016 Cengage Learning®. May not be scanned, copied or
Chapter 7: Using Procedures and Exception Handling
duplicated, or posted to a publicly accessible website, in whole or in
part.
7
7
Creating a Splash Screen
Chapter 7: Using Procedures and Exception Handling
© 2016 Cengage Learning®. May not be scanned, copied or
duplicated, or posted to a publicly accessible website, in whole or in
part.
8
7
Pausing the Splash Screen
► After the splash screen loads, the application executes
any code in the form load event handler. To display the
splash screen for five seconds, you insert code that calls
the Sleep procedure in the form load event handler. To
open the code window and the form load event handler,
double-tap or double-click the background of the
frmEscape Windows Form object in the Design window
► Tap or click inside the frmEscape_Load event handler.
Type Threading. to have IntelliSense display a list of
possible entries. If necessary, type T to select Thread from
the IntelliSense list. Type .S to select Sleep from the
IntelliSense list. Type (5000)
Chapter 7: Using Procedures and Exception Handling
© 2016 Cengage Learning®. May not be scanned, copied or
duplicated, or posted to a publicly accessible website, in whole or in
part.
9
7
Pausing the Splash Screen
Chapter 7: Using Procedures and Exception Handling
© 2016 Cengage Learning®. May not be scanned, copied or
duplicated, or posted to a publicly accessible website, in whole or in
part.
10
7
Adding a ComboBox Object
► Drag the ComboBox .NET component from the Common
Controls category of the Toolbox to the approximate
location where you want to place the ComboBox object
► With the ComboBox object selected, scroll in the
Properties window to the (Name) property. Double-tap or
double-click in the right column of the (Name) property
and then enter the name cboCity
► In the Properties window, scroll to the Text property. Tap or
click to the right of the Text property and enter Select
City Location: to specify the text that appears in the
combo box. Change the text size to 14. Resize the
ComboBox object as needed to display the data in the box
Chapter 7: Using Procedures and Exception Handling
© 2016 Cengage Learning®. May not be scanned, copied or
duplicated, or posted to a publicly accessible website, in whole or in
part.
11
7
Adding a ComboBox Object
► In the Properties window, scroll to the Items property, and
then tap or click to the right of the Items property on the
word (Collection). Tap or click the ellipsis button. The
String Collection Editor dialog box opens. Enter the
mystery game locations Dallas (press ENTER), Paris
(press ENTER), and Singapore
► In the String Collection Editor dialog box, tap or click the
OK button. Tap or click the Start Debugging button on the
Standard toolbar to run the application. Tap or click the list
arrow on the right of the ComboBox object to view the
contents. You can select a choice from the list
Chapter 7: Using Procedures and Exception Handling
© 2016 Cengage Learning®. May not be scanned, copied or
duplicated, or posted to a publicly accessible website, in whole or in
part.
12
7
Adding a ComboBox Object
Chapter 7: Using Procedures and Exception Handling
© 2016 Cengage Learning®. May not be scanned, copied or
duplicated, or posted to a publicly accessible website, in whole or in
part.
13
7
Determining the ComboBox Selected Index
Chapter 7: Using Procedures and Exception Handling
© 2016 Cengage Learning®. May not be scanned, copied or
duplicated, or posted to a publicly accessible website, in whole or
in part.
14
7
Handling SelectedIndexChanged Events
►Select the ComboBox object named cboCity on
the Windows Form object
►Double-tap or double-click the ComboBox object,
and then close the Toolbox
Chapter 7: Using Procedures and Exception Handling
© 2016 Cengage Learning®. May not be scanned, copied or
duplicated, or posted to a publicly accessible website, in whole or in
part.
15
7
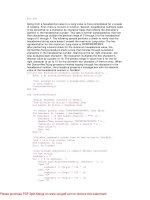
Procedures
► When a program is broken into manageable parts, each
part is called a procedure
• A procedure is a named set of code that performs a
given task
► A Sub procedure is a procedure that completes its task
but does not return any data to the calling procedure
► A Sub procedure is the series of Visual Basic statements
enclosed by the Sub and End Sub statements
► A Sub procedure is called with a statement consisting of
the procedure name and a set of parentheses in the form
of a procedure call
Chapter 7: Using Procedures and Exception Handling
© 2016 Cengage Learning®. May not be scanned, copied or
duplicated, or posted to a publicly accessible website, in whole or in
part.
16
7
Coding a Sub Procedure
Chapter 7: Using Procedures and Exception Handling
© 2016 Cengage Learning®. May not be scanned, copied or
duplicated, or posted to a publicly accessible website, in whole or in
part.
17
7
Coding a Sub Procedure
Chapter 7: Using Procedures and Exception Handling
© 2016 Cengage Learning®. May not be scanned, copied or
duplicated, or posted to a publicly accessible website, in whole or in
part.
18
7
Passing Arguments
Chapter 7: Using Procedures and Exception Handling
© 2016 Cengage Learning®. May not be scanned, copied or
duplicated, or posted to a publicly accessible website, in whole or in
part.
19
7
Passing Arguments by Value (ByVal)
►When an argument is passed ByVal, it means the
Sub procedure has access to the value of the
passed argument, but does not actually reference
the variable declared in the calling procedure
►The value is copied into a variable whose name is
specified in the Sub procedure declaration
statement
Chapter 7: Using Procedures and Exception Handling
© 2016 Cengage Learning®. May not be scanned, copied or
duplicated, or posted to a publicly accessible website, in whole or in
part.
20
7
Passing Arguments by Value (ByVal)
Chapter 7: Using Procedures and Exception Handling
© 2016 Cengage Learning®. May not be scanned, copied or
duplicated, or posted to a publicly accessible website, in whole or in
part.
21
7
Passing Arguments by Reference
(ByRef)
► Passing a value by reference allows code in the Sub
procedure to modify the contents of the variable that is
being passed because when you use ByRef, you are
passing a reference to the variable that holds the value
instead of the value itself, as when you use ByVal
► If a Sub procedure changes the value of a variable passed
ByRef, the original variable in the calling procedure is
changed
► You should select the option to pass a variable by
reference if you intend to change the original value when
it is passed to the Sub procedure
Chapter 7: Using Procedures and Exception Handling
© 2016 Cengage Learning®. May not be scanned, copied or
duplicated, or posted to a publicly accessible website, in whole or in
part.
22
7
Passing Arguments by Reference
(ByRef)
Chapter 7: Using Procedures and Exception Handling
© 2016 Cengage Learning®. May not be scanned, copied or
duplicated, or posted to a publicly accessible website, in whole or in
part.
23
7
Passing Multiple Arguments
►You can pass as many arguments as needed to a
Sub procedure
►If you have more than one argument, the
variables are passed in the same order in which
they appear in the procedure call statement
Chapter 7: Using Procedures and Exception Handling
© 2016 Cengage Learning®. May not be scanned, copied or
duplicated, or posted to a publicly accessible website, in whole or in
part.
24
7
Function Procedures
►A Function procedure is similar to a Sub
procedure except that a Function procedure
returns a single value to the calling procedure
Chapter 7: Using Procedures and Exception Handling
© 2016 Cengage Learning®. May not be scanned, copied or
duplicated, or posted to a publicly accessible website, in whole or in
part.
25