Hướng dẫn cài đặt Proxmox Mail Gateway 5.0
Bạn đang xem bản rút gọn của tài liệu. Xem và tải ngay bản đầy đủ của tài liệu tại đây (526.92 KB, 7 trang )
Email Gateway
Installation
Proxmox Mail Gateway is based on Debian and comes with an installation CD-ROM which includes a complete Debian ("stretch" for version 5.x) system as well as all necessary Proxmox Mail Gateway packages.
The installer just asks you a few questions, then partitions the local disk(s), installs all required packages,
and configures the system including a basic network setup. You can get a fully functional system within a
few minutes. This is the preferred and recommended installation method.
Alternatively, Proxmox Mail Gateway can be installed on top of an existing Debian system. This option is only
recommended for advanced users since it requires more detailed knowledge about Proxmox Mail Gateway
and Debian.
3.1
Using the Proxmox Mail Gateway Installation CD-ROM
You can download the ISO from . It includes the following:
• Complete operating system (Debian Linux, 64-bit)
• The Proxmox Mail Gateway installer, which partitions the hard drive(s) with ext4, ext3, xfs or ZFS and
installs the operating system.
• Linux kernel
• Postfix MTA, ClamAV, Spamassassin and the Proxmox Mail Gateway toolset
• Web based management interface for using the toolset
Please burn the downloaded ISO image to a CD or create a bootable USB stick Section 3.2.
Then insert the installation CD-ROM on the physical host where you want to install Proxmox Mail Gateway
and boot from that drive. Immediately afterwards you can choose the following menu options:
Install Proxmox Mail Gateway
Start normal installation.
Install Proxmox Mail Gateway (Debug mode)
Start installation in debug mode. It opens a shell console at several installation steps, so that you
can debug things if something goes wrong. Please press CTRL-D to exit those debug consoles and
continue installation. This option is mostly for developers and not meant for general use.
Rescue Boot
This option allows you to boot an existing installation. It searches all attached hard disks and, if it finds
an existing installation, boots directly into that disk using the existing Linux kernel. This can be useful
if there are problems with the boot block (grub), or the BIOS is unable to read the boot block from the
disk.
Test Memory
Runs memtest86+. This is useful to check if your memory is functional and error free.
You normally select Install Proxmox Mail Gateway to start the installation.
First step ist to read our EULA (End User License Agreement). After that you get prompted to select the
target hard disk(s).
Note
By default, the complete server is used and all existing data is removed.
The Options button lets you select the target file system, which defaults to ext4. The installer uses LVM
if you select ext3, ext4 or xfs as file system, and offers additional option to restrict LVM space (see
below)
If you have more than one disk, you can also use ZFS as file system. ZFS supports several software RAID
levels, so this is specially useful if you do not have a hardware RAID controller. The Options button lets
you select the ZFS RAID level, and you can choose disks there.
The next page just ask for basic configuration options like your location, the time zone and keyboard layout.
The location is used to select a download server near you to speedup updates. The installer is usually able
to auto detect those setting, so you only need to change them in rare situations when auto detection fails, or
when you want to use some special keyboard layout not commonly used in your country.
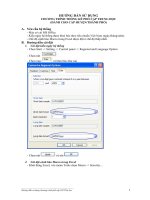
You then need to specify an email address and the superuser (root) password. The password must have at
least 5 characters, but we highly recommend to use stronger passwords - here are some guidelines:
• Use a minimum password length of 12 to 14 characters.
• Include lowercase and uppercase alphabetic characters, numbers and symbols.
• Avoid character repetition, keyboard patterns, dictionary words, letter or number sequences, usernames,
relative or pet names, romantic links (current or past) and biographical information (e.g., ID numbers,
ancestors’ names or dates).
It is sometimes necessary to send notification to the system administrator, for example:
• Information about available package updates.
• Error messages from periodic CRON jobs.
All those notification mails will be sent to the specified email address.
The last step is the network configuration. Please note that you can use either IPv4 or IPv6 here, but not
both. If you want to configure a dual stack node, you can easily do that after installation.
If you press Next now, installation starts to format disks, and copies packages to the target.
Copying packages usually takes a few minutes. Please wait until that is finished, then reboot the server.
Further configuration is done via the Proxmox web interface. Just point your browser to the IP address given
during installation (https://youripaddress:8006).
1. Login and upload subscription key.
Note
Default login is "root" and the root password is defined during the installation process.
2. Check the IP configuration and hostname.
3. Check and save the Time Zone.