Acoustic and MIDI orchestration for the contemporary composer
Bạn đang xem bản rút gọn của tài liệu. Xem và tải ngay bản đầy đủ của tài liệu tại đây (13.01 MB, 308 trang )
Acoustic and MIDI Orchestration for
the Contemporary Composer
This page intentionally left blank
Acoustic and MIDI
Orchestration for
the Contemporary
Composer
Andrea Pejrolo and Richard DeRosa
AMSTERDAM • BOSTON • HEIDELBERG • LONDON • NEW YORK • OXFORD
PARIS • SAN DIEGO • SAN FRANCISCO • SINGAPORE • SYDNEY • TOKYO
Focal Press is an imprint of Elsevier
Focal Press
An imprint of Elsevier
Linacre House, Jordan Hill, Oxford OX2 8DP, UK
30 Corporate Drive, Suite 400, Burlington, MA 01803, USA
First edition 2007
Copyright © 2007, Andrea Pejrolo and Richard DeRosa. Published by Elsevier Ltd.
All rights reserved
The right of Andrea Pejrolo and Richard DeRosa to be identified as the authors of this
work has been asserted in accordance with the Copyright, Designs and Patents Act 1988
No part of this publication may be reproduced, stored in a retrieval system or transmitted
in any form or by any means electronic, mechanical, photocopying, recording or otherwise
without the prior written permission of the publisher
Permissions may be sought directly from Elsevier’s Science & Technology Rights
Department in Oxford, UK: phone (ϩ44) (0) 1865 843830; fax (ϩ44) (0) 1865 853333;
email: Alternatively you can submit your request online by
visiting the Elsevier web site at and selecting
Obtaining permission to use Elsevier material
Notice
No responsibility is assumed by the publisher for any injury and/or damage to persons or
property as a matter of products liability, negligence or otherwise, or from any use or
operation of any methods, products, instructions or ideas contained in the material herein.
Because of rapid advances in the medical sciences, in particular, independent verification
of diagnoses and drug dosages should be made
British Library Cataloguing in Publication Data
A catalogue record for this book is available from the British Library
Library of Congress Cataloging-in-Publication Data
A catalog record for this book is available from the Library of Congress
ISBN: 978-0-240-52021-6
For information on all Focal Press publications visit
our website at: www.focalpress.com
Typeset by Charon Tec Ltd (A Macmillan Company), Chennai, India
www.charontec.com
Printed and bound in Great Britain
07 08 09 10 11
10 9 8 7 6 5 4 3 2 1
Contents
Foreword
xi
Acknowledgments
xv
Chapter 1 – Basic Concepts for the MIDI Composer, Arranger, and Orchestrator
1.1 Introduction to MIDI and audio sequencing
1.2 Review of the MIDI standard
1.3 MIDI messages and their practical applications
1.3.1
Channel voice messages
1.3.2
Most commonly used control changes
1.3.3
Extended controllers
1.3.4
Coarse versus fine
1.3.5
Control your sounds
1.3.6
Registered and non-registered parameters
1.3.7
Channel mode messages
1.3.8
System real-time messages
1.3.9
System common messages
1.3.10 System exclusive messages (SysEx)
1.4 Principles of orchestration
1.4.1
Composition
1.4.2
Range
1.4.3
Register and the overtone series
1.4.4
Transposition
1.4.5
Concert instruments
1.4.6
Transposing instruments
1.4.7
Weight, balance, and intensity
1.4.8
Hazards of writing at the piano
1.5 Final considerations
1.6 Summary
1.7 Exercises
1
1
2
5
5
10
10
12
12
14
15
16
18
19
19
19
20
21
23
23
23
24
24
26
27
28
Chapter 2 – Writing and Sequencing for the Rhythm Section
2.1 Introduction: general characteristics
2.2 The components of the rhythm section
2.3 The role of the essential instruments
2.3.1 The bass
2.3.2 The drumset (and auxiliary percussion)
2.3.3 Keyboards and guitars
32
32
32
33
34
34
35
v
vi
Contents
2.4
2.5
2.6
2.7
2.8
2.9
2.10
2.11
2.12
2.13
2.14
2.15
Color and style
2.4.1 Basses
2.4.2 Guitars
2.4.3 Keyboards
2.4.4 Mallet percussion
2.4.5 Drumset
2.4.6 Auxiliary percussion
Writing parts for the rhythm section
2.5.1 Bass parts
2.5.2 Drumset parts
2.5.3 Guitar parts
2.5.4 Keyboard parts
2.5.5 Mallet parts
Sample scores for the rhythm section
Sequencing the rhythm section: an introduction
2.7.1 The keyboard
2.7.2 The acoustic piano
2.7.3 Sequencing and mixing techniques for the
acoustic piano
2.7.4 The alternate keyboards: electric pianos and organs
The synthesizer
2.8.1 Hardware and software synthesizers
2.8.2 Synthesis techniques
2.8.3 Analog subtractive synthesis
2.8.4 Additive synthesis
2.8.5 Frequency modulation synthesis
2.8.6 Wavetable synthesis
2.8.7 Sampling
2.8.8 Physical modeling synthesis
2.8.9 Granular synthesis
Sequencing for the guitar: overview
2.9.1 Sequencing techniques for the guitar
2.9.2 Mixing the virtual guitar
Sequencing for the bass: overview
2.10.1 Sequencing techniques for the bass
2.10.2 Mixing the virtual bass
Sequencing for drums and percussion: overview
2.11.1 Sequencing techniques for drums and percussion
2.11.2 Quantization for drums and percussion
2.11.3 Groove quantization
2.11.4 Performance controllers for drums and percussion
2.11.5 Final touches
Mixing the virtual drums and percussion
Final considerations on sequencing for the rhythm section:
tempo changes
Summary
Exercises
36
36
36
36
37
38
39
40
40
40
41
43
43
43
45
45
46
49
50
53
53
55
55
57
58
58
59
60
62
63
64
68
70
70
73
75
77
79
84
85
86
87
91
93
96
Contents
Chapter 3 – Writing and Sequencing for the String Orchestra
3.1
Introduction: general characteristics
3.2
Creating sound
3.2.1 “Open” string versus “stopped” string
3.2.2 Bowings
3.3
Performance techniques for greater expression
3.3.1 Portamento
3.3.2 Pizzicato
3.3.3 Harmonics
3.3.4 Mutes
3.4
The specific instruments
3.4.1 The violin
3.4.2 Functions of the violins in an orchestration
3.4.3 The viola
3.4.4 Functions of the violas in an orchestration
3.4.5 The violoncello
3.4.6 Functions of the cellos in an orchestration
3.4.7 The double bass
3.4.8 Functions of the basses in an orchestration
3.5
Orchestration examples
3.6
The harp
3.6.1 Spelling matters
3.6.2 Mass edit
3.6.3 Pedal charts
3.6.4 Pedal changes
3.6.5 The harp glissando
3.6.6 Ensemble context
3.7
Sequencing for the string orchestra
3.7.1 Synthesis techniques and library options
3.7.2 Multi-layer patches
3.7.3 Key-switching libraries
3.7.4 Advanced layering techniques for strings
3.8
MIDI sequencing techniques for strings
3.8.1 Attack and release control
3.8.2 Performance controllers
3.8.3 Extended performance controllers
3.9
Hardware MIDI controllers for string sequencing
3.9.1 Special sequencing techniques for strings
3.9.2 Legato, staccato, and détaché
3.9.3 Sul tasto, sul ponticello, and mute
3.9.4 Trills and tremolos
3.9.5 Detuning techniques
3.10 Sequencing for the harp
3.11 Mixing the string section
3.11.1 Panning the string orchestra
3.11.2 Equalization for the string orchestra
3.11.3 Reverberation
vii
98
98
99
100
100
102
104
104
105
106
106
106
108
108
110
110
112
112
114
114
115
116
117
117
118
118
118
119
119
121
123
125
126
127
131
132
135
139
139
139
140
142
144
146
146
147
148
viii
Contents
3.12
3.13
3.14
The final touches
Summary and final considerations on writing and sequencing for
the string orchestra
Exercises
Chapter 4 – Writing and Sequencing for the Woodwind Section
4.1
General characteristics
4.2
The woodwind section
4.2.1 “Doubling”
4.3
Creating sound
4.3.1 Tonguing (articulation)
4.3.2 The slur
4.3.3 The trill
4.3.4 Grace notes
4.4
The specific instruments
4.4.1 The flute (in C)
4.4.2 The piccolo flute (in C)
4.4.3 The alto flute (in G)
4.4.4 The oboe (in C)
4.4.5 The English horn (in F)
4.4.6 The clarinet (in B )
4.4.7 The clarinet (in A)
4.4.8 The bass clarinet (in B )
4.4.9 The bassoon (in C)
4.5
The saxophones
4.5.1 Saxophone tone quality
4.5.2 Saxophone range
4.5.3 Saxophone transposition
4.6
Concerns regarding orchestration
4.7
Sequencing for the woodwind section: an introduction
4.8
Synthesis techniques and library options
4.9
Sequencing techniques for the woodwind section:
input controllers
4.10 Use of MIDI control changes and editing techniques
4.10.1 Attack and release control
4.10.2 Filter and timbre control
4.11 Performance controllers
4.12 Performance extended controllers
4.13 Special sequencing techniques for woodwind:
the saxophone section
4.13.1 Blending acoustic and MIDI
4.14 Final touches
4.14.1 Performance noises
4.15 Mixing the woodwind section
4.15.1 Panning the woodwind instruments
4.15.2 Equalization for the woodwind instruments
4.15.3 Reverberation
150
151
154
156
156
156
157
158
159
159
160
160
161
161
162
162
164
164
165
166
167
168
169
169
169
170
171
174
174
178
180
180
185
186
187
189
191
191
193
194
194
195
198
Contents
4.16
4.17
ix
Summary
Exercises
Chapter 5 – Writing and Sequencing for the Brass Section
5.1
General characteristics
5.2
The brass section in the orchestra
5.3
The brass section in the jazz band
5.4
Creating sound
5.4.1 Tonguing
5.4.2 Slurs
5.4.3 The glissando
5.4.4 Articulation markings and effects
5.5
The specific instruments
5.5.1 The French horn
5.5.2 The trumpets
5.5.3 The piccolo trumpet
5.5.4 The flugelhorn
5.5.5 The tenor trombone
5.5.6 The bass trombone
5.5.7 The tuba
5.5.8 The euphonium
5.6
Mutes
5.6.1 Mute preparation
5.7
Orchestrating the brass
5.7.1 Orchestrating brass and woodwinds
5.8
Sequencing for the brass section: an introduction
5.8.1 Synthesis techniques and library options
5.8.2 What to look for
5.9
MIDI controllers for sequencing the brass section
5.10 Sequencing techniques for the brass instruments
5.10.1 Micro-level automation
5.10.2 Quantization
5.11 Performance controllers for the brass
5.11.1 Breath controller
5.11.2 Portamento
5.11.3 Aftertouch and soft pedal
5.12 Extended performance controllers: attack and brightness
5.12.1 Attack control
5.12.2 Brightness control
5.13 Advanced sequencing techniques for the brass: detuning
5.13.1 Solo instrument detuning
5.13.2 Section detuning
5.13.3 Velocity-to-pitch
5.14 Addition of real instruments
5.15 The final touch: performance noises
5.16 Mixing the brass section
5.16.1 Panning the brass instruments
199
201
203
203
203
204
204
205
205
205
206
206
206
208
209
210
211
212
213
214
215
216
216
218
218
218
220
223
225
228
229
232
232
232
234
235
236
236
237
237
238
238
240
240
241
241
x
Contents
5.17
5.18
5.16.2 Equalization for the brass instruments
5.16.3 Reverberation for the brass instruments
Summary
Exercises
244
244
247
249
Appendix A: Music Scores
251
DVD Audio Examples List
277
Index
283
Foreword
This book is written to address concerns encountered by the twenty-first century music
composer, arranger, and producer. Developments in electronic music over the last 25 years
have created a whole new world of possibilities for the consumer of commercial music and,
as a result, a multitude of considerations for the modern musician and composer.
Since the history in this area is still relatively young, the music industry consists of several
types of music creators. There are traditionalists (usually the more seasoned ones) who had
to learn the conventional methods of orchestration and how to function within the conventional means of recording. There are technology experts (most commonly the youngest
members of our musical world) who most likely never had the chance to experience what
it is like to arrange and hear a piece for live instruments. Some may have bypassed any formal musical education, utilizing instead their natural talents with computers and musical
sound to create “unwritten” works. Finally, there are the ones who have blended both
approaches successfully, creating musical art through whatever means necessary with the
highest respect for the art’s esthetic as well as the client’s budget.
As musicians who utilize both approaches in their creation of music, it is the objective of
the authors to provide a concise and thoughtful method in each area in order to provide
the reader with the knowledge necessary to function as a music creator in the twenty-first
century.
Since 1983, the world of MIDI has continued to develop and redefine the possibilities
within the process of creating music. The advent of digital audio sequencers and
recorders/editors in the late 1990s has increased even further the possibilities that are
available to the modern composer. These technological developments have created the
need to adapt in accordance with the expectations and convenience of the consumer.
Today’s commercial composer most likely will need to incorporate the use of electronic
instruments in the form of samplers and/or synthesizers to create commercial soundtracks for several reasons:
●
The consumer has come to expect a “finished” demo that gives the truest representation of the final product. In earlier days, prior to the 1980s, the composer might have
played at the piano a minimal representation of the larger scale work. It took great imagination and trust on the part of the client and great inspiration on the part of the composer to convince the consumer that the endeavor was worthy of the money about to
be invested.
xi
xii
●
●
●
Foreword
There is no question that the sound and impact of a recorded orchestra of musicians is
greater than the sound generated from computers and, in a perfect world, most would
choose that approach, but many times the budget or time constraints will not allow us
to pursue that desire.
A MIDI demo can be quite effective when working with vocalists. Each vocalist has a
unique instrument that must be presented within its proper range. As a result, it is the
composer’s (or arranger’s) job to find the right key for the singer to deliver the melody
most comfortably. Of course, this can be done by playing at a piano, but the intensity
and scope of the sound may not match the reality of the final orchestration. An electronic rendition will provide a truer sense of the energy required by the vocalist and will
ultimately be a better indicator regarding the appropriateness of the key. It would be
most unfortunate to have completed an orchestration (let alone the recording of it) only
to find that the vocalist now has reservations about the key.
Many electronic sounds are unique in timbre and cannot be created or simulated as
effectively through conventional acoustic instruments.
Now that the scope of this book has been explained, it must be mentioned that, because
of the breadth of these topics, the information within each area is designed to be as
informative as possible within the space allowed. Specifically, regarding orchestration, the
instruments discussed will be ones that are most commonly found within today’s commercial and contemporary scoring situations. For this reason we suggest that readers who
want to study traditional orchestration further refer also to texts that are dedicated solely
to that endeavor.
So, if you’re ready, turn the page to begin your transformation from traditionalist or technology expert to a fully functional twenty-first century music composer!
Notes for the “Acoustic and MIDI Orchestration DVD”
Welcome to the exciting world of “Acoustic and MIDI Orchestration for the Contemporary
Composer”.
With this book you will find a special DVD-Rom full of additional music examples, images,
original scores and free and demo software from IK–Multimedia, Arturia and BandMateLoops.
We recommend keeping the DVD handy when reading and studying the concepts of the
book since each acoustic and MIDI orchestration technique is explained and demonstrated
through a series of scores and music examples especially written and recorded for this
manual.
In this DVD you can find the following files and folders:
●
●
Images and Scores Folder: here you will find a digital version in JPG format of all the
Figures and Scores that are used in the book. For teaching purposes I find that having a
digital version of the Figures is of great help since you can easily project them from a
computer on the screen in the classroom.
Music Examples Folder: here you have access to 127 music examples recorded at CD
quality. You can play them directly from the DVD using a computer or, if you prefer, burn
Foreword
●
xiii
an Audio CD by simply dragging them in your CD burning program. You will have to use
two different CDs if you decide to do so since Audio CDs allow a maximum of 99 tracks
per CD.
Free and Demo Software Folder: here you can find the installers (PC and Mac) for some
of the most advanced software synthesizers available on the market from companies
such as IK-Multimedia, Arturia and cutting edge loops from BandMateLoops.
For information on the book and the DVD you can contact Andrea Pejrolo at and also consult our new website acousticmidiorchestration.com
Enjoy!
Andrea Pejrolo
Richard DeRosa
This page intentionally left blank
Acknowledgments
The topic of this book has been always something very close to me and to my work as a
composer, producer, performer, and educator. Its realization is truly a dream come true for
me. The time, effort, energy, and inspiration that were required during the writing process
could not have been available without the support of some truly amazing people who are
part of my everyday life. First of all, my dear wife Irache; she is an incredible source of inspiration and support. She is my trustworthy compass I could not do without. I gratefully
acknowledge the educational background that my family and my dear friend Nella provided
in my early years. All their work paid off today when organizational skills, logic, hard work,
and striving for precision became crucial in completing this task. A special thank you to my
parents, who have taught me through the years how passion and commitment for what I
do is the only way of living a full and meaningful life.
I am also extremely grateful to Richard DeRosa for such a great experience and collaboration in co-writing this book. His expertise and knowledge were always inspiring.
I am extremely grateful to Catharine Steers and all the staff at Focal Press for their great
work and guidance. And finally a big thanks to Berklee College of Music and the Academic
Affairs Office for the Fellowship that was granted to me for the realization of this project.
I couldn’t have done it without their help.
Andrea Pejrolo
I would like to thank Andrea Pejrolo for inviting me to join him as a co-author of this text;
his evolution as a musician and teacher is continually impressive. Thanks also to William
Paterson University for granting me a one-semester sabbatical for this project; the free
time from my normal teaching duties enabled me to write this book while sustaining my
professional career. And finally, thanks to my lovely wife, Kimberly, whose support, wisdom and companionship are invaluable.
Richard DeRosa
xv
This page intentionally left blank
1
1.1
Basic Concepts for the MIDI
Composer, Arranger, and
Orchestrator
Introduction to MIDI and audio sequencing
If you are reading these pages you probably already have some basic experience of either
composing or sequencing (or maybe both). The purpose of this chapter is to ensure that
you are up to speed with some of the key concepts and techniques that are needed in
order to learn advanced orchestration and MIDI production procedures. In this chapter we
will brush up on the concept of MIDI, audio, and MIDI network, then review a detailed
description of MIDI messages, studio setup, and more. After covering the technical part
of the production process we will focus on the main principles on which orchestration,
arranging, and composition are based. You will become familiar with such concepts as
range, register, overtone series, transposition, balance and intensity, and many others.
These are all crucial and indispensable concepts that you will use to achieve coherent and
credible MIDI productions.
As you will notice, in the majority of the chapters of this book we follow a structure in
which the principles of MIDI sequencing and the traditional rules of orchestration alternate, in order to give you a solid background on which to build your MIDI sequencing and
production techniques. It is much easier to try to re-create a convincing string section if
you first wrote the parts as if they were supposed to be played by a real set of strings. This
is a basic concept that you always should keep in mind. No matter how sophisticated (and
expensive) your sound library is, the final result of your production will always sound
unconvincing and disappointing if you don’t compose and orchestrate with the acoustic
instrumentation and real players in mind.
Many composers believe that writing and orchestrating for a MIDI ensemble is easier than
working with a real orchestra, because you don’t have to deal with the stressful environment of live musicians. In fact, the opposite is true. Trying to re-create a live ensemble (or
even an electronic one) with the use of a MIDI and audio sequencer and a series of synthesizers is an incredibly challenging task, mainly because in most situations you will
be the composer, the arranger, the orchestrator, the producer, the performer, the audio
engineer, and the mastering engineer, all at the same time! While this might sound a bit
1
2
Acoustic and MIDI Orchestration for the Contemporary Composer
overwhelming, this is what makes this profession so exciting and, in the end, extremely
rewarding. There is nothing as rewarding as when you finish your production and you are
completely satisfied with the final result.
Before we introduce more advanced orchestration techniques, let’s review some of the
basic concepts on which MIDI production and orchestration are based. While some of
these concepts (such as the MIDI standard and common MIDI setup) will be reviewed
only briefly, others (such as control changes, MIDI devices, and MIDI messages) will be
analyzed in detail, as they constitute the core of more advanced MIDI orchestration and
rendition techniques. Keep in mind that to fit a comprehensive description of the MIDI
standard and all its nuances into half a chapter is very hard. The following sections represent an overall review of the MIDI messages with an in-depth analysis of the control
change messages, since we will frequently use this type of message to improve the rendition of our scores. For a more detailed look at how to set up your MIDI studio and at the
basic of the MIDI standard I recommend reading my book “Creative Sequencing Techniques for Music Production”, published by Focal Press, ISBN 0240519604.
1.2
Review of the MIDI standard
MIDI (Musical Instrument Digital Interface) was established in 1983 as a protocol to allow
different devices to exchange data. In particular, the major manufacturers of electronic musical instruments were interested in adopting a standard that would allow keyboards and synthesizers from different companies to interact with each other. The answer was the MIDI
standard. With the MIDI protocol, the general concept of “interfacing” (i.e., establishing a
connection between two or more components of a system) is applied to electronic musical
instruments. As long as two components (synthesizers, sound modules, computers, etc.)
have a MIDI interface, they are able to exchange data. In early synthesizers, the “data” were
mainly notes played on keyboards that could be sent to another synthesizer. This allowed
keyboard players to layer two sounds without having to play the same part simultaneously
with both hands on two different synthesizers. Nowadays, the specifications of MIDI data
have been extended considerably, ranging from notes to control changes, from system
exclusive messages to synchronization messages (i.e., MTC, MIDI clock, etc.).
The MIDI standard is based on 16 independent channels on which MIDI data are sent and
received by the devices. On each channel a device can transmit messages that are independent of the other channels. When sending MIDI data, the transmitting device
“stamps” on each message the channel on which the information was sent so that the
receiving device will assign it to the correct channel.
One of the aspects of MIDI that is important to understand and remember is that MIDI
messages do not contain any information about audio. MIDI and audio signals are always
kept separate. Think of MIDI messages as the notes that a composer would write on
paper; when you record a melody as MIDI data, for example, you “write” the notes in a
sequencer but you don’t actually record their sound. While the sequencer records the
notes, it is up to the synthesizers and sound modules connected to the MIDI system to
play back the notes received through their MIDI interfaces. The role of the sequencer in
the modern music production process is, in fact, very similar to that of the paper score in
Basic concepts for the MIDI composer, arranger, and orchestrator
3
the more traditional compositional process. You “sketch” and write (sequence) the notes
of your composition on a sequencer, then you have your virtual musicians (synthesizers,
samplers, etc.) play back your composition. This is the main feature that makes MIDI such
an amazing and versatile tool for music production. If one is dealing only with notes and
events instead of sound files, the editing power that is available is much greater, meaning
that one is much freer to experiment with one’s music.
Every device that needs to be connected to a MIDI studio or system must have a MIDI
interface. The MIDI standard uses three ports to control the data flow: IN, OUT, and THRU.
The connectors for the three ports are the same: a five-pin DIN female port on the device
and a corresponding male connector on the cable. While the OUT port sends out MIDI
data generated from a device, the IN port receives the data. The THRU port is used to send
out an exact copy of the messages received from the IN port. Nearly all professional electronic musical instruments, such as synthesizers, sound modules, or hardware sequencers,
have built-in MIDI interfaces. The only exception is the computer, which usually is not
equipped with a built-in MIDI interface and, therefore, must be expanded with an internal
or external one. Nowadays, the computer (along with the software sequencer running on
it) is the central hub of both your MIDI and audio data, becoming the main tool for your
writing and arranging tasks. While the synthesizers, samplers, and sound generators in
general may be referred to as the virtual musicians of the twenty-first century orchestra,
the computer can be seen as its conductor.
Depending on the type of MIDI interface you get for your computer and sequencer, you
can have two main MIDI configurations: daisy-chain (DC) or start network (SN). The DC
setup is mainly used in very simple studio setups or live situations where a computer is
(usually) not involved; it utilizes the THRU port to cascade more than two devices to the
chain. In a DC configuration, the MIDI data generated by the controller (device A) are sent
directly to device B through the OUT port. The same data are then sent to the sound generator of device B and passed to device C using the THRU port of device B, which sends
out an exact copy of the MIDI data received from its IN port. The same happens between
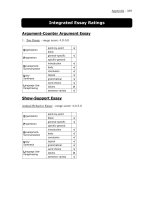
devices C and D. A variation of the original DC configuration is shown in Figure 1.1, where,
in addition to the four devices of the previous example, a computer with a software
sequencer, and a basic MIDI interface (1 IN, 1 OUT) are added.
In this setup, the MIDI data are sent to the computer from the MIDI synthesizer (device
A), where the sequencer records them and plays them back. The data are sent to the MIDI
network through the MIDI OUT of the computer’s interface and through the DC. This is a
basic setup for simple sequencing, where the computer uses a single port (or single cable)
MIDI interface; that is, an interface with only one set of INs and OUTs.
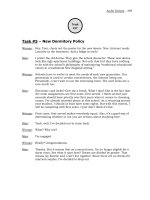
For an advanced and flexible MIDI studio a multi-cable (or multi-port) interface is really the
best solution, as it allows you to take full advantage of the potential of your MIDI devices.
By using a multi-cable interface all the devices connect to the computer in parallel; therefore, the MIDI data won’t experience any delay, as may occur when using the DC setup.
This configuration, involving the use of a multi-cable MIDI interface, is referred to as a star
network. One of the big advantages of the Star Network setup is that it allows one to use
all 16 MIDI channels available on each device, as the computer is able to redirect the MIDI
messages received by the controller to each cable separately, as shown in Figure 1.2.
4
Acoustic and MIDI Orchestration for the Contemporary Composer
Figure 1.1 Daisy-chain setup (Courtesy of Apple Inc.).
Figure 1.2 Star network setup (Courtesy of Apple Inc.).
Basic concepts for the MIDI composer, arranger, and orchestrator
5
In order to exploit fully the creative power offered by the MIDI standard it is crucial to precisely
know and identify the MIDI messages that are available to us. While you may be familiar with
some of the most common messages (e.g., Note On, Note Off), there are many others
(CC#11, CC#73, CC#74, etc.) that are essential if you are trying to bring your MIDI productions
to the next level. Let’s take a look first at the main categories of the MIDI standard.
1.3
MIDI messages and their practical applications
The messages of the MIDI standard are divided into two main categories: channel messages and system messages. Channel messages are further subdivided into channel
voice and channel mode messages, while system messages are subdivided into real-time,
common, and exclusive messages. Table 1.1 illustrates how they are organized.
Table 1.1 List of MIDI messages organized by category
Channel messages
System messages
Channel voice: Note on, Note off, Monophonic
aftertouch, Polyphonic aftertouch, Control
changes, Pitch bend, Program change
Channel mode: All notes off, Local control
(on/off), Poly on/mono on, Omni on, Omni off,
All sound off, Reset all controllers
System real-time: timing clock, start, stop,
continue, active sensing, system reset
System common: MTC, Song position pointer,
song select, tune request, end of SysEx
System exclusive
1.3.1
Channel voice messages
Channel voice messages carry information about the performance; for example, which
notes we played and how hard we pressed the trigger on the controller. Let’s take a look
at each message in this category in detail.
Note On message: This message is sent every time you press a key on a MIDI controller.
As soon as you press it, a MIDI message (in the form of binary code) is sent to the MIDI
out of the transmitting device. The Note On message includes information about the note
you pressed (the note number ranges from 0 to 127 or C-2 to G8), the MIDI channel on
which the note was sent (1–16), and the velocity-on, which describes how hard you press
the key and ranges from 0 to 127 (with a value of zero resulting in a silence).
Note Off message: This message is sent when you release the key of the controller. Its
function is to terminate the note that was triggered with a Note On message. The same
result can be achieved by sending a Note On message with its velocity set to 0, a technique that can help to reduce the stream of MIDI data. It contains the velocity-off parameter, which registers how hard you released the key (note that this particular information
is not used by most MIDI controllers at the moment).
Aftertouch (pressure): This is a specific MIDI message that is sent after the Note On
message. When you press a key of a controller, a Note On message is generated and sent
6
Acoustic and MIDI Orchestration for the Contemporary Composer
to the MIDI OUT port. This is the message that triggers the sound on the receiving device.
If you push a little bit harder on the key after hitting it, an extra message, called Aftertouch,
is sent to the MIDI OUT of the controller. The Aftertouch message is usually assigned to
control the vibrato effect of a sound, but, depending on the patch that is receiving it, it can
also affect other parameters, such as volume, pan, and more.
There are two types of aftertouch: polyphonic and monophonic. Monophonic aftertouch
affects the entire range of the keyboard no matter which key or keys triggered it. This is the
most common type of aftertouch, and it is implemented on most (but not all) controllers and
MIDI synthesizers available on the market. Polyphonic aftertouch allows you to send an independent message for each key. It is more flexible as only the intended notes will be affected.
Pitch bend: This message is controlled by the pitch-bend wheel on a keyboard controller.
It allows you to raise or lower the pitch of the notes being played. It is one of the few MIDI
data that do not have a range of 128 steps. In order to allow a more detailed and accurate
tracking of the transposition, the range of this MIDI message extends from 0 to 16,383.
Usually, a sequencer would display 0 as the center position (non-transposed), ϩ8191 fully
raised and –8192 fully lowered.
Program change: This message is used to change the patch assigned to a certain MIDI
channel. Each synthesizer has a series of programs (also called patches, presets, instruments or, more generically, sounds) stored in its internal memory; for each MIDI channel
we need to assign a patch that will play back all the MIDI data sent to that particular channel. This operation can be done by manually changing the patch from the front panel of the
synthesizer, or by sending a program change message from a controller or a sequencer.
The range of this message is 0 to 127. As modern synthesizers can store many more than
128 sounds, nowadays programs are organized into banks, where each bank stores a maximum of 128 patches. In order to change a patch through MIDI messages it is, therefore,
necessary to combine a bank change message and a program change message. While the
latter is part of the MIDI standard specification, the former changes depending on the
brand and model of MIDI device. Most devices use CC#0 or CC#32 to change bank (or
sometimes a combination of both), but you should refer to the synthesizer’s manual to find
out which MIDI message is assigned to bank change for that particular model and brand.
Control changes (CC): These messages allow you to control certain parameters of a MIDI
channel. There are 128 CCs (0–127); that is, the range of each controller extends from 0 to
127. Some of these controllers are standard and are recognized by all the MIDI devices.
Among the most important of these (because they are used more often in sequencing) are
CC#1, 7, 10, and 64. CC#1 is assigned to modulation. It is activated by moving the modulation wheel on a keyboard controller. It is usually associated with a slow vibrato effect.
CC#7 controls the volume of a MIDI channel from 0 to 127, while number 10 controls its
pan. Value 0 is pan hard left, 127 is hard right and 64 is centered. Controller number 64 is
assigned to the sustain pedal (the notes played are held until the pedal is released). This
controller has only two positions: on (values Ͼ 64) and off (values Ͻ 63). While the four
controllers mentioned above are the most commonly used, there are other controllers that
can considerably enhance the MIDI rendition of acoustic instruments and the control that
you have over the sound of your MIDI devices. Table 1.2 lists all 128 controllers with their
specifications and their most common uses in sequencing situations.
Basic concepts for the MIDI composer, arranger, and orchestrator
7
Table 1.2 Control change (CC) messages
Controller #
Function
Usage
0
Bank select
1
Modulation
2
Breath controller
Allows you to switch bank for patch selection. It is
sometimes used in conjunction with CC#32 to send
bank numbers higher than 128
Sets the modulation wheel to the specified value.
Usually this parameter controls a vibrato effect generated through a low-frequency oscillator (LFO). It can also
be used to control other sound parameters such as volume in certain sound libraries
Can be set to affect several parameters, but usually is
associated with aftertouch messages
3
4
Undefined
Foot controller
5
Portamento value
6
Data entry (MSB)
7
8
Volume
Balance
9
10
Undefined
Pan
11
12
Expression
Effect controller 1
13
Effect controller 2
14–15
16–19
Undefined
General purpose
20–31
32–63
Undefined
LSB for control 0–31
64
Sustain Pedal
65
Portamento on/off
Can be set to affect several parameters, but usually is
associated with aftertouch messages
Controls the rate used by portamento to slide between
two subsequent notes
Controls the value of either registered (RPN) or
non-registered (NRPN) parameters
Controls the volume level of a MIDI channel
Controls the balance (left and right) of a MIDI channel. It
is mostly used on patches that contain stereo elements
(such as stereo patches): 64 ϭ center, 127 ϭ 100%
right, and 0 ϭ 100% left
Controls the pan of a MIDI channel: 64 ϭ center,
127 ϭ 100% right, and 0 ϭ 100% left
Controls a percentage of volume (CC#7)
Mostly used to control the effect parameter of one of
the internal effects of a synthesizer (e.g., the decay time
of a reverb)
Mostly used to control the effect parameter of one of
the internal effects of a synthesizer
These controllers are open and they can be assigned to
aftertouch or similar messages
These controllers allow you to have a “finer” scale for
the corresponding controllers 0–31
Controls the sustain function of a MIDI channel. It has
only two positions: off (values between 0 and 63) and on
(values between 64 and 127)
Controls whether the portamento effect (slide between
two consequent notes) is on or off. It has only two positions: off (values between 0 and 63) and on (values
between 64 and 127)
(continued )
8
Acoustic and MIDI Orchestration for the Contemporary Composer
Table 1.2 (continued )
Controller #
Function
Usage
66
Sostenuto on/off
67
Soft pedal on/off
68
Legato footswitch
69
Hold 2
70
Sound controller 1
71
Sound controller 2
72
Sound controller 3
73
Sound controller 4
74
Sound controller 5
75–79
Sound controller 6–10
80–83
General purpose
controllers
84
85–90
91
Portamento control
Undefined
Effect 1 depth
Similar to the sustain controller, but holds only the notes
that are already turned on when the pedal was pressed.
It is ideal for the “chord hold” function, where you can
have one chord holding while playing a melody on top. It
has only two positions: off (values between 0 and 63)
and on (values between 64 and 127)
Lowers the volume of the notes that are played. It has
only two positions: off (values between 0 and 63) and on
(values between 64 and 127)
Produces a legato effect (two subsequent notes without
pause in between). It has only two positions: off (values
between 0 and 63) and on (values between 64 and 127)
Prolongs the release of the note (or notes) playing while
the controller is on. Unlike the sustain controller (CC#64),
the notes won’t sustain until you release the pedal, but
instead they will fade out according to their release
parameter
Usually associated with the way the Synthesizer produces the sound. It can control, for example, the sample
rate of a waveform in a wavetable synthesizer
Controls the envelope over time of the voltagecontrolled filter (VCF) of a sound, allowing you to change
over time the shape of the filter. It is also referred to as
“resonance”
Controls the release stage of the voltage-controlled
amplifier (VCA) of a sound, allowing you to adjust the
sustain time of each note
Controls the attack stage of the VCA of a sound, allowing you to adjust the time that the waveform takes to
reach its maximum amplitude
Controls the filter cutoff frequency of the VCF, allowing
you to change the brightness of the sound
Generic controllers that can be assigned by a manufacturer to control non-standard parameters of a sound
generator
Generic button-switch controllers that can be assigned
to various on/off parameters, they have only two positions: off (values between 0 and 63) and on (values
between 64 and 127)
Controls the amount of Portamento
92
Effect 2 depth
93
Effect 3 depth
Controls the depth of effect 1 (mostly used to control
the reverb send amount)
Controls the depth of effect 2 (mostly used to control
the tremolo amount)
Controls the depth of effect 3 (mostly used to control
the chorus amount)