Biến Tần Panasonic VF0 series 400v class
Bạn đang xem bản rút gọn của tài liệu. Xem và tải ngay bản đầy đủ của tài liệu tại đây (773.92 KB, 88 trang )
Compact Inverter
VF0 Series 400V class
Instruction Manual
Read this manual carefully before
attempting to operate the inverter
and store it for future reference.
Panasonic Electric Works Co., Ltd.
Downloaded from www.Manualslib.com manuals search engine
Important User Information
The variety of uses for this equipment and difference between this solid state
equipment and electromechanical equipment, means that the user of and those
responsible for the applying of this equipment must ensure that the application
and use of this product is acceptable and safe. Under no circumstances will
Matsusita Electric Works, Ltd. (MEW) be responsible or liable for indirect or
consequential damages resulting from the use of application of this equipment.
The diagrams and illustrations within this manual are solely intended to illustrate
the text of this document. Such are the variables associated with the application
of this product to any given installation, that MEW can not assume responsibility
or liability for actual use based on the illustrated uses and applications shown
herein.
No patent liability is assumed by MEW with concern to the use of information,
equipment or circuits outlined in this text.
Reproduction of this manual in whole/part or otherwise is prohibited without the
express permission of MEW.
Please follow the information and instructions as laid out in this manual carefully
to avoid damage to equipment or risk to personal injury.
ATTENTION ; Indicate situations that could lead to personal injury or death,
property damage or financial loss.
Attention will help the user to :
Identify hazard.
Avoid hazard.
Realize the consequences of ignoring the warnings given.
1
Downloaded from www.Manualslib.com manuals search engine
1. PREFACE
Important information relative to this manual
# Manufactures and their respective engineering departments responsible for
design and specification of electrical control equipment must refer to applicable
industry standards and codes for specific safety guidelines and interface
requirements.
# The installer/user of this product is responsible to assume compliance with
appropriate machine and operator safety codes or regulations within the factory
environment which are beyond the scope and purpose of this documents.
General precautions
Added to the precautions listed within this document.
The following statements common to the system must be read and understood.
ATTENTION ; Only qualified personnel familiar with the VF0 and its
application should plan, install, start up or maintain the system.
Failure to comply may result in personal injury and/or equipment damage.
ATTENTION ; This assembly contains parts that may be sensitive to static
discharge. Static control precautions will be required if performing repairs,
tests or servicing of this equipment otherwise component damage may
result.
ATTENTION ; A product that has been incorrectly applied or installed could
result in component damage and a reduction in product life. Malfunction of
system may be as a result of wiring or application errors, such as incorrect
or inadequate AC supply, excessive temperature or an undersized motor.
2
Downloaded from www.Manualslib.com manuals search engine
Safety Precautions
Read this manual and related documents before attempting to install, operate,
service or inspect this inverter.
Make sure that you have an understanding of the device, the safety information
and all precautions before starting use.
1. INSTALLATION
ATTENTION
Install the unit on a non-combustible material such as metal.
Installing it on other material could lead to fires.
Do not place the unit near flammable materials.
Doing so could lead to fires.
Do not hold by the terminal cover during transportation.
Doing so could cause the unit to drop and lead to injuries.
Do not allow foreign matter such as metal swarf enter the unit.
Entry of this type of matter could lead to fires.
Install the unit according to the instruction manual on a place where the
weight can be withstood.
Failure to do so could lead to dropping of the unit and to injuries.
Do not install or operate an inverter that is damaged or missing parts.
Doing so could lead to injuries.
CE Mark Conditions
VF-0 inverter meets overvoltage category II of the standard EN50178.
The inverter should be supplied with power from mains via a transformer
with at least basic insulation.
The complete machine has to comply to overvoltage category III of the
standard EN50178.
This inverter is not a self-contained operating unit according to the EMC
directive. Only after integrating the inverter into a machine including filters
can the complete system be evaluated with respect to electromagnetic
compatibility.
3
Downloaded from www.Manualslib.com manuals search engine
2. WIRING
ATTENTION
Always confirm that the input power is OFF before starting wiring.
Failure to do so could lead to electric shocks or fires.
Always connect the earth.
Failure to do so could lead to electric shocks or fires.
Wiring work must be carried out by a qualified technician.
Failure to do so could lead to electric shocks or fires.
Always install the unit before wiring.
Failure to do so could lead to electric shocks or fire.
ATTENTION
Do not connect an AC power supply to the output terminals
(U, V, W).
Doing so could lead to injuries or fire.
Confirm that the product's rated voltage and the AC power supply voltage
match.
Failure to do so could lead to injuries or fire.
Tighten the terminal screws to the designated tightening torque.
Failure to do so could lead to fire.
4
Downloaded from www.Manualslib.com manuals search engine
3. OPERATION
ATTENTION
Always close the terminal cover before turning the input power ON. Do not
open the terminal cover while the power is ON.
Doing so could lead to electric shock.
Do not operate the switches with wet hands.
Doing so could lead to electric shock.
Do not touch the inverter terminals when the inverter power is ON or even
when the inverter is stopped.
Doing so could lead to electric shock.
The STOP button is not designed for emergency stop purposes. Prepare
a separate emergency stop button.
Failure to do so could lead to injury.
Depending on the start mode and ride-through function settings, if the run
signal is on and the power is turned ON or the power is restored after a
power failure, the unit may start (restart) suddenly. Bear this in mind
before conducting maintenance.
(Design the machine so that personel safety can be ensured even if the
unit starts suddenly.)
Failure to do so could lead to injury.
Depending on the start mode function setting, if the fault trip is reset with
the run signal present, the unit may restart suddenly.
(Reset the trip after ensuring personel safety.)
Failure to do so could lead to injury.
When the retry function is used, the unit may automatically start (restart)
suddenly so do not approach the unit.
(Secure personal safety before using this function.)
Failure to do so could lead to injury
5
Downloaded from www.Manualslib.com manuals search engine
ATTENTION
The heat sink fins and brake resistor (dedicated option) can reach high
temperatures, so allow to cool before touching.
Doing so could lead to burns.
The inverter can be easily set to run from low speeds to high speeds.
Confirm the tolerable range of the motor and machine before starting
operation.
Failure to do so could lead to injury.
Prepare holding brakes when required.
Failure to do so could lead to injury.
4. MAINTENANCE, INSPECTION AND PART REPLACEMENT
ATTENTION
Wait at least five minutes after turning the input power OFF before starting
inspections.
Failure to do so could lead to electric shock.
Maintenance, inspection and part replacement must be done by qualified
persons.
[Remove all metal personal belongings (watches, bracelets, etc.) before
starting the work.] (Use tools treated with insulation.)
Failure to do so could lead to electric shocks or injury.
ATTENTION
Have an electrician periodically tighten the terminal screws.
Loosening of the terminal screws could lead to overheating or fire.
6
Downloaded from www.Manualslib.com manuals search engine
5. OTHERS
ATTENTION
Never modify the unit.
Doing so could lead to electric shock or injury.
General Precautions
All diagrams in this instruction manual show the state with the cover or safety
partitions removed to explain the details. Before operating the product,
replace the covers and partitions to the positions specified, and operate the
unit according to the instruction manual.
7
Downloaded from www.Manualslib.com manuals search engine
Contents
Points for Handing ..................................................................
9
Special Precautions ...............................................................
10
Installation ..............................................................................
12
Outline Dimensions ................................................................
13
Parts Identification ..................................................................
14
Main Circuit Wiring .................................................................
17
Control Circuit Wiring .............................................................
20
Basic Operation ......................................................................
22
Function of each mode ...........................................................
30
Setting and Changing Functions ............................................
31
Functional Descriptions (Parameter Table) ............................
34
Functional Descriptions (By Parameter ) ...............................
37
To Effectively Use the Inverter (contents) ...............................
64
Changing from Local Control to External Control ...............
65
Changing and Setting the Maximum Output Frequency.....
66
Boosting Torque at Low Speeds ........................................
67
Supplementary Explanation for Multi-function Terminal
Input....................................................................................
68
0V Stop Function ................................................................
73
Resetting Fault Trips...........................................................
73
Individual Details and Remedies for Fault Trips......................
74
Troubleshooting (1) .................................................................
76
Troubleshooting (2) ................................................................
78
Maintenance and Inspection ...................................................
79
Specifications .........................................................................
83
8
Downloaded from www.Manualslib.com manuals search engine
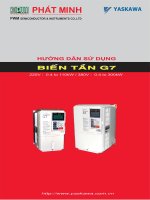
Points for Handling
Follow this manual and precautions when handling this unit. Incorrect handling
could lead to inhibited operation or a drop operating life. In the worst case, the
inverter could be damaged.
Power supply
Circuit
breaker
(MCCB)
N・F
Use within +10%, −15% of the tolerable input
voltage range, and within ±5% of the tolerable input
frequency range.
Size a breaker from the selection table on
page 19.
Magnet contactor
(MC)
A magnetic contactor is not required in normal
use. If installed, do not start or stop the inverter with
the magnet contactor.
Power factor
improvement
reactor
Connect this when the power factor must be
improved.
Input noise filter
Connect this when noise to the peripheral devices
is a problem. (Option for input side)
Inverter
The ambient temperature is a particularly important
factor for the installation site.
Make sure that the tolerable value is not exceeded.
(See page 10 to 12.)
Thermal relay
for open phase
protection
The thermal relay built into the inverter is used to
protect against overloads. Use an open phase
protection thermal relay for open phase protection.
Motor
3-phase induction motor
9
Downloaded from www.Manualslib.com manuals search engine
(Option for input side)
Special Precautions
♦ Use your inverter only within tolerable ambient temperature range.
(–10°C to 50°C)
Because the life of the inverter is greatly affected by ambient temperature, do
not use it outside the specifications. Also, pay attention to the installation
direction's and conditions. (See page 12.)
♦ The inverter will be damaged if the power voltage is applied to its
output terminal.
Applying power voltage to the output terminal U, V or W will damage the
inverter. Check for miswiring and operation sequence (commercial
changeover circuit, etc.). Never apply a voltage that exceeds the tolerable
voltage of the inverter.
♦ Never touch the inside of the inverter during operation.
This is extremely dangerous the inverter contains high-voltage circuit.
Be sure to wait at least 5 minutes after the inverter power has been turned
OFF, before making an internal check.
Do not touch the heat sink fins or brake resistor during operation as these
parts will become hot during operation.
♦ Radio interference
The main circuit of the inverter contains a higher harmonic component and
may interfere with communications equipment such as AM radios if these are
used nearby. The amount of radio interference depends on the field strength
in the area where the inverter is used. While it is difficult to completely
eliminate radio interference, it may be reduced by changing the angle of your
radio antenna, using a noise filter with the inverter, housing the inverter in a
metallic shield box, or routing inverter cables in metal conduit. (Please inquire
separately.)
♦ Do not attempt insulation testing between the inverter cables.
To measure the insulation resistance of the power supply cables or the motor
cables, disconnect them from the inverter. Never conduct insulation testing
on the control circuits. However, insulation testing can be performed between
the charging unit and the ground.
♦ Do not connect a power factor capacitor or suppressor to the output
terminal of the inverter.
Such devices can damage the inverter, its capacitors and other parts.
Remove the device if one is connected.
10
Downloaded from www.Manualslib.com manuals search engine
♦ If a magnetic contactor is connected to the power supply side or the
load side of the inverter, never use it to start or stop the motor (inverter).
Switching the inverter on the power supply side ON and OFF frequently by a
magnetic contactor, can cause the inverter to malfunction. Do not turn the
inverter on the load side ON and OFF during operation as this causes inverter
fault trips. Start or stop the motor only by means of inverter start input signals.
♦ Do not use this inverter for loads other than a motor or for single-phase
motors.
♦ Precautions regarding inverter's protection function
Various protection functions, such as stall prevention, current limiting and
overcurrent protection, are incorporated in the inverter.
These protection functions are used to protect the inverter from unexpected
faults that could occur during use of the inverter, and are not the control
functions normally used.
Thus, during normal usage, avoid applications that activate these protection
functions.
Depending on the state, the inverter life could drop, or damage could occur.
Before using the inverter, measure the output current, etc., with a measuring
instrument, and check the details of the fault trip memory. Make sure that
there are no problems in respect to the all precautions listed in this instruction
manual, including those above, and in respect to the product specifications.
♦ The CE Mark attached to the inverter complies with the Low Voltage
Directive.
♦ Measure the electromagnetic compatibility (EMC) in the state assembled
in the machine.
♦ Only basic insulation (Protection against Electric Shock Class I,
Overvoltage category II,
II Pollution degree 2) is provided on the control
circuit terminals.
The supplementary insulation must be provided on the final product to
comply with CE Marking requirements.
♦ Make sure to ground the supply neutral.
♦ Always connect protective devices such as fuses for overcurrent, short
circuits and leakage protection to the power supply input.
♦ Always use a ring crimp terminal for the main circuit wiring (R/L1, S/L2,
T/L3, U, V, W).
♦ Only for machinery with fixed connection.
11
Downloaded from www.Manualslib.com manuals search engine
Installation
ATTENTION
Install the unit on a non-combustible material such as metal.
Installing it on other material could lead to fire.
Do not place the unit near flammable materials.
Failure to do so could lead to fire.
Do not hold the terminal cover during transportation.
Failure to do so could cause the unit to drop and lead to injuries.
Do not allow foreign matter such as metal swarf enter the unit.
Entry of this type of matter could lead to fire.
Mount the unit according to the instruction manual in a place where the
weight can be withstood.
Failure to do so could lead to dropping of the unit and to injuries.
Do not install or operate an inverter that is damaged or with parts missing.
Failure to do so could lead to injury.
[Install the inverter vertically.]
Installing the inverter in any other way decreases
its heat dissipation effect and results in malfunction.
[Make sure the ambient temperature
stays within the specification.]
The ambient temperature surrounding the
inverter will increase when it is installed near a
heating unit or housed inside a panel. This may
reduce the life of the inverter. If you want to
house the inverter inside a panel, give careful
consideration to the cooling method and panel
size.
Tolerable ambient temperature
–10°C to 50°C
Note) Ambient temperatures should be
measured at a point 5 cm from the
inverter.
Space around the inverter
10cm or more
5cm
or more
Inverter
Vertical
Horizontal
Sideways
[Avoid installing the inverter in
the following locations.]
Areas subject to direct sunlight.
Areas subject to water or high levels of
humidity.
Areas with large amounts of oil mist, dust
or fiber dust.
Areas where rain water, water drops or
oil drops may come in contact.
Areas where corrosive gases, explosive
gases or flammable gases are present.
Installation onto flammable materials
such as wood, or near flammable
materials.
Areas subject to vibration.
5cm
or more
10cm or more
12
Downloaded from www.Manualslib.com manuals search engine
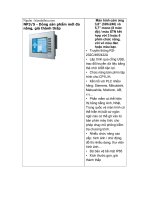
Outline Dimensions
4-ø5 (Mounting holes)
H
H1
Unit: mm
D
8
W2
W1
W
7
Note) The 1.5, 2.2 and 3.7kW
capacities have a cooling
fan at the broken line
section shown on the left.
• 3-phase 400V input type
Unit: mm
Inverter capacity
W
W1
W2
H
H1
D
0.75kW
130
121
110
130
90
148
1.5, 2.2kW
130
121
110
130
90
161
3.7kW
160
151
140
130
90
161
13
Downloaded from www.Manualslib.com manuals search engine
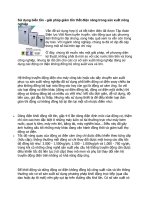
Parts Identification
Mounting hole
Operation panel
Frame
Warning label
Ground
terminal
Terminal cover
Terminal cover
Main circuit wire
lead-in hole
Cooling fan
Input power
3-phase 400V
∗ Check the rating nameplate
to confirm that the ordered
product has been delivered.
Control wire lead-in hole
Heat sink fins
Rating
nameplate
Applicable motor
capacity (kW)
0.75
1.5
2.2
3.7
Note) The cooling fan is mounted on the 1.5 to
3.7kW capacities. It is not mounted on the
0.75kW capacity.
Part No.
Brake
BFV00074
BFV00154
BFV00224
BFV00374
Only circuit built in
(Brake resistor is an option)
14
Downloaded from www.Manualslib.com manuals search engine
Explanation of inside of terminal cover
Note) This explanatory drawing shows the
state with the terminal cover removed.
During normal use, do not remove the
terminal cover.
Mounting holes
Control circuit terminal
(signal input/output: 1-11)
Control circuit terminal
Main circuit terminal
(relay output: A, B, C)
(Main circuit terminal block layout)
Ground terminal
R S T
U V W
Power supply
Motor
DB+
DB-
Brake resistor connection terminal
[Precautions for installation of
brake resistor (option)]
· Wait at least 5 minutes after turning
the power OFF before connecting the
resistor. (There is a risk of electric
shock.)
· Always securely connect the resistor
to the metal plate with metal screws,
etc. (There is a risk of fires.)
· Install the resistor at a position
separated at least 5cm from the
inverter edges and 10cm or more from
the top. (Resistor cannot be installed
at the bottom.)
· Note that the resistor will become very hot.
Brake resistor
10cm or more
5cm or more 5cm or more
Opening and closing the terminal cover
(1)
(1)
(2)
(1) Opening the terminal cover
Lightly press up the center bottom
edge of the terminal cover.
(2) Closing the terminal cover
Lightly press down on the center top
edge of the terminal cover.
Note) After closing the terminal cover,
confirm that it is securely closed.
15
Downloaded from www.Manualslib.com manuals search engine
Explanation of operation panel
button
⋅
Main display
Hz
Mode button
MODE
RUN
Run button
Set button
SET
STOP
Stop button
Frequency
setting dial
Main display
The output frequency, current, line speed, error details, data for function
setting and parameter numbers are displayed.
Run button
This switch is used to start the inverter.
Stop button
This switch is used to stop the inverter.
Mode button
Set button
button
This switch is used to change to each "output frequency, current display",
"frequency setting, monitor", "rotation direction setting" and "function setting"
mode, and to switch the display from the data to mode display.
This switch is used to change the display between the parameter No. and
data display, and to save the data.
In the "output frequency, current display mode", this switch changes the
display between the frequency and current.
(up) button
This switch is used to change the data and output frequency, and to set
forward run direction when carrying out forward rotation with the operation
panel.
(down) button
This switch is used to change the data and output frequency, and to set
reverse run direction when carrying out reverse rotation with the operation
panel.
Frequency setting dial
This is the dial for the potentiometer used to set the operating frequency with
the operation panel.
[Handling when output current is displayed]
1) The displayed output current is not intended for precise measurement.
Use this only as a guide value. (Use a separate measuring instrument
when precise values are required.)
2) A relatively large value may be displayed especially at approx. 40% or
less of the rated current. (For example, even if there is no output current,
a certain level may be displayed. Note that when the inverter is stopped,
"0A" will be displayed.)
16
Downloaded from www.Manualslib.com manuals search engine
Main Circuit Wiring
CAUTION
Always confirm that the input power is OFF before starting wiring.
Failure to do so could lead to electric shock or fire.
Always connect the ground wire.
Failure to do so could lead to electric shock or fire.
Wiring work must be carried out by a qualified technician.
Failure to do so could lead to electric shock or fire.
Always install the unit before wiring.
Failure to do so could lead to electric shock or injury.
ATTENTION
Do not connect an AC power supply to the output terminals (U, V, W).
Failure to do so could lead to injury or fire.
Confirm that the product's rated voltage and the AC power supply voltage
match.
Failure to do so could lead to injury or fire.
Tighten the terminal screws to the designated tightening torque.
Failure to do so could lead to fire.
Precautions
Note the following points carefully to prevent miswiring and misuse of the
inverter. (Devices may be broken.)
1) Connect the power supply to input terminals (R/L1, S/L2, T/L3) and the
motor to output terminals (U, V, W).
2) Make sure to ground the supply neutral.
3) Do not connect anything other than the optional brake resister across
terminals DB+ and DB-. Never short these terminals to each other as this
will damage the internal electronics of the inverter.
4) Use sleeved round crimp terminals for power supply and motor connections.
5) After wiring the main circuit, double check for tightness as access will be
limited once control circuit wiring is in place.
6) When connecting directly to a large capacity power transformer (500kVA
or more), always install a power factor improvement reactor (option) on the
inverter's input side.
7) Select connected devices and wire size according to the table on page 19.
17
Downloaded from www.Manualslib.com manuals search engine
Wiring
Note:
Ground marking
<<VF0 400V class>>
Main circuit and grounding
terminal screw size: M4
Power
supply
Main circuit terminal
R S T DB DB
/
/
/
+
–
L1 L2 L3
Circuit breaker
U
V
W
IM
Moter
(MCCB)
Break resistor
(Option)
Always connect protective devices such as fuse for overcurrent, short circuits
and leakage protection to the input.
<<Precautions for using regenerative brakes>>
1) When using the regenerative brakes, set the parameter P18 setting data
to "0". The brakes will not operate when the default data "1" is set.
2) Always use the Matsushita-dedicated option for the brake resistor.
Refer to the precautions on page 15 for installing the brake resistor, etc.
3) The regenerative brake specifications are shown below. Always consider
the working conditions carefully before using.
Note that the inverter could be damaged if the specifications are
exceeded during use.
· Maximum duty factor (%ED) : 2%
· Maximum working time
: 3 seconds
· Maximum torque
: 100%
18
Downloaded from www.Manualslib.com manuals search engine
Connected device, wire size and main circuit terminal tightening
torque
Inverter capacity
0.75 kW
1.5 kW
2.2 kW
3.7 kW
Circuit breaker
(MCCB)
5A
10A
15A
20A
Tightening torque
Wire size
1.2 N·m
(12.2 kgf·cm)
2mm
(14AWG)
2
Note 1) If the breaker's overcurrent trip is a magnetic type, the device
could overheat due to higher harmonics. Use a load rate of 50% or
less in this case.
Note 2) When using an installed circuit breaker with motor protection,
remove it.
Note 3) Crimp connectors used must be ring terminals.
19
Downloaded from www.Manualslib.com manuals search engine
Control Circuit Wiring
Wiring ∗ Only basic insulation (Protection against Electric Shock Class I, Overvoltage
B
A
1
COM NC NO
Relay output
0 to 5V
0 to 10V
4 to 20mA
2
4
5
6
7
8
9
10 11
VR
+
-
+
-
3
Forward/reverse
C
Start/stop
category II, Pollution degree 2) is provided on the control circuit terminals.
The supplementary insulation must be provided on the final product to comply
with CE Marking requirements.
200Ω
+
Analog
output
(0 to 5V)
SW1
SW3
SW2
C
E
Open collector
output
♦ Terminal specifications: "Screw size: M3 (minus screw)"
"Tightening torque: 0.5 to 0.6N·m"
♦ Frequency setting potentiometer (VR) specifications: "10kΩ, 1/4W or more
potentiometer"
♦ Relay output contact specifications: 1c no-voltage contact, 250VAC, 0.5A
(resistance load)
♦ Open collector output specifications: Maximum rating 50VDC, 50mA
Note 1) When using a 4 to 20mA signal for the frequency setting, always
connect a 200Ω, 1/4W resistor. (The inverter could be damaged if
the resistor is not connected.)
Note 2) Always read each function explanation for the parameters related to
each terminal before starting use.
Terminal
No.
1
2
3
4
5
6
7
8
9
10
11
A
B
C
Terminal function
Frequency setting potentiometer connection terminal (+5V)
Frequency setting analog signal input terminal
Common terminal for 1 , 2 , 4 to 9 signals
Multi-function analog signal output terminal (0 to 5V/PWM)
Start/stop, forward run signal input terminal
Forward/reverse, reverse run signal input terminal
Multi-function control signal SW1 input terminal
Multi-function control signal SW2 input terminal
Frequency setting signal changeover input terminal
Multi-function control signal SW3 input terminal
PWM signal input terminal
Open collector output terminal (C: collector)
Open collector output terminal (E: emitter)
Relay contact output terminal (NO: at factory setting)
Relay contact output terminal (NC: at factory setting)
Relay contact output terminal (COM)
Related parameter No.
P09
P09
P58, P59
P08
P08
P19, P20, P21
P19 to P21
P22 to P24
P19 to P21
P22 to P24
P25
P25
P26
P26
P26
20
Downloaded from www.Manualslib.com manuals search engine
♦ By using terminals No. 8 and 9, the output frequency can be controlled with
the PWM signal.
· No. 8: Frequency setting signal changeover input terminal (SW2)
(OFF: PWM signal, ON: controlled with signal set in parameter
P09)
· No. 9: PWM signal input terminal
3
8
9
PWM
signal
SW2
Note 1) When controlling the output frequency with the PWM
signal, parameters P22, P23 and P24 must be set.
Note 2) Use a PWM signal transistor (Tr) that has the following
capabilities:
· Maximum rated voltage : 50VDC or more
· Rated current
: 50mA or more
Precautions
1. Use shielded wires for all control signal wires and keep them more than 20
cm from power wiring.
2. Maximum control signal wire length is 30m or less.
3. The control circuit's input signal is a minute signal, so use two minute
signal contacts in parallel or use a twin contact to prevent contact faults
when inputting the contact.
4. No-voltage contact signal or open-collector outputs signal should be used
with control terminals No. 5 to 9.
(If a voltage signal is applied across these terminals, the internal electronics
may be damaged.)
∗ Input circuit specifications are shown below. Take special care to avoid
loop or leakage current.
5. When an inductive load is to be driven by an open-collector output, be sure
to use a freewheel diode.
Inverter internal circuit
2kΩ
Freewheel diode
Inverter
internal circuit
Terminal
No.10
X
+
12VDC
Terminals
No.5 to 9
Terminal
No.3
21
Downloaded from www.Manualslib.com manuals search engine
Terminal
No.11
e.g.24VDC
power source
Basic Operation
CAUTION
Always close the terminal cover before turning the input power ON.
Do not open the terminal cover while the power is ON.
Failure to do so could lead to electric shock.
Do not operate the switches or dials with wet hands.
Failure to do so could lead to electric shock.
Do not touch the inverter terminals when the inverter power is ON or even
when the inverter is stopped.
Failure to do so could lead to electric shock.
The STOP button is not designed for emergency stop purposes. Prepare a
separate emergency stop button.
Failure to do so could lead to injury.
ATTENTION
The heat sink fins and brake resistor (dedicated option) can reach high
temperatures, so do not touch them.
Failure to do so could lead to burns.
The inverter can be easily set to run from low speeds to high speeds. Confirm
the tolerable speed range of the motor and machine before starting operation.
Failure to do so could lead to injury.
Prepare holding brakes when required.
Failure to do so could lead to injury.
Before turning power ON, check the following points again.
1) Check that all wiring is correct.
Reversed wiring between the power supply and the load, in particular, can
result in damage to the inverter.
2) Make sure the inverter rating and power supply voltages match each
other.
3) Make sure no power factor capacitor is connected to the motor, as it can
damage the inverter.
4) Before starting a trial run, check the set frequency.
22
Downloaded from www.Manualslib.com manuals search engine
Setting the frequency and forward/reverse run operation with the
operation panel
There are two methods for setting the frequency and carrying out forward/
reverse run operation with the operation panel.
· Frequency setting:
"Potentiometer setting method",
"Digital setting method"
· Forward/reverse run operation: "Forward run/reverse run method",
"Start/ stop, rotation direction mode
setting method"
1. Setting the frequency
1) Potentiometer setting method (Parameter P09 set to "0": Factory setting)
Set with the rotation angle of the frequency setting dial on the panel. The
operation will stop at the Min. position (0V stop: refer to page 73), and
the maximum frequency will be attained at the Max. position.
2) Digital setting method (Parameter P09 set to "1")
Press the MODE button on the panel to enter the frequency setting mode
(Fr). Press the SET button, set the frequency to be set with the (up)
button and (down) button, and then press the SET button to enter the
data.
The frequency can be changed by holding down the (up) button and
(down) button during operation. (Hereafter, this function is called the
MOP function.)
This MOP function cannot be used when parameter P08 is set to "1".
23
Downloaded from www.Manualslib.com manuals search engine
2. Forward/reverse run operation
1) Forward run/reverse run method (Parameter P08 set to "1")
Press the button (forward run) or button (reverse run) on the panel
to select the rotation direction. Operation will start when the RUN button
is pressed, and will stop when the STOP button is pressed.
∗ The inverter will not start running just by pressing the RUN button.
∗ The MOP function cannot be used if the frequency is set with the
digital method.
2) Start/stop, rotation direction mode setting method (Parameter P08 set to
"0")
First, press the MODE button twice to enter the rotation direction setting
mode. Press the SET button to display the rotation direction data,
change the rotation direction with the (up) button and (down) button,
and then press the SET button to enter the data. (Forward run is set as
the factory setting.)
Operation will start when the RUN button is pressed, and will stop when
the STOP button is pressed.
3. Combination of "MOP function", "rotation direction setting mode",
and forward/reverse run operation
Forward/reverse run operation
MOP function
Forward run/reverse run method
Start/stop, rotation direction mode
setting method
× (Cannot be used)
Details of rotation direction
setting mode
Only monitor function
{ (Can be used)
Monitor function and direction setting
Note)
When the forward/reverse run operation is set to "forward run/
reverse run method", the MOP function cannot be used even if the
frequency is set with the digital method.
24
Downloaded from www.Manualslib.com manuals search engine