Winform c#
Bạn đang xem bản rút gọn của tài liệu. Xem và tải ngay bản đầy đủ của tài liệu tại đây (167.24 KB, 7 trang )
Designing a Winform in C# and Linking It to a SQL Server Database
Rating:
Fatima Ahmed (view profile)
December 3, 2003
Environment: C#
(continued)
<script language="JavaScript1.1" src=" />245-5?
mpt=1258752317&mpvc= />dev/www.codeguru.com/csharp/csharp/cs_network/database/1258752317/flex/OasDefault/
Covad_GEMS_5be/Covad_BoB2.html/37353030313562313439333237663830?">
</script> <noscript> <a
href=" />com/csharp/csharp/cs_network/database/1258752317/flex/OasDefault/Covad_GEMS_5be/
Covad_BoB2.html/37353030313562313439333237663830?
<img
src=" alt="Click
Here" border="0"> </a> </noscript>
Sign up for your free Internet.com
membership today and
automatically qualify to enter!
Membership provides access to exclusive content:
eBook Whitepaper Newsletters Webcasts
Each way you use your membership
qualifies you for another entry to win!
Existing Internet.com members are eligible to participate.
The main objective of Windows-based programming is to create applications that are
linked to databases, have user-friendly interfaces (Windows forms), and are capable of
running on most platforms. The C# language has all these capabilities to create applications
that are mostly required by the programmers at the time of designing the interface and
coding the modules of their projects. Because C# is object oriented (where each entity is
considered as object and where terminologies such as abstraction, encapsulation,
polymorphism, and inheritance prevail the language paradigm), most of the high-level
programmers feel that it's easy to code the program in the form of classes and to reuse them
in their later code.
This article will teach you how to design an interface (Windows Form) in Visual Studio
.NET using the C# language and then create and link it to a database on SQL Server 2000.
The first thing is to start the Visual Studio .NET environment sand create a new Project
named "WindowsApplication1." The projects, by default, are usually saved in the "My
Documents\Visual Studio Projects" folder, but you can browse and change the location.
Next, choose the Project Types as: Visual C# Projects and Templates: Windows
Application and click OK. Now, a new project has been created for you. You can add as
many forms you like from Project ---> Add Windows Forms, but here we need only two
forms. The Form1 is designed through the Toolbox components as follows. The View --->
Toolbox contains Windows components such as Labels, Text box, Combo box, Buttons,
Radio and Check box, Picture box, List box, Timer, Progress bar, Main Menu, DataGrid,
and other controls. You just need to drag these on the form and set their properties. All the
code for the above additions will be automatically generated by the .NET compiler. An
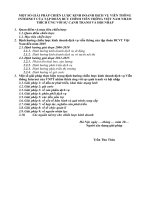
example picture of the Form1 to be designed for this tutorial is shown below:
Figure 1: FORM1 DESIGN
Form2 will contain only the DataGrid Component from the Toolbox. You can set the
Color, Name, Font, and other properties through the Properties of the forms. Here, I have
set the Background color of Form1 to White and of Form2 to Light Blue.
Now, move towards designing the database. This database is a simple database for
registering people to use any e-mail service. Start the Enterprise Manager of SQL Server
2000 and create a new database named "REGISTER DATABASE." Within the database,
create a new table named "REGISTER" in which the following columns and attributes are
defined while designing. The column of ID can be selected as a Primary Key because it
uniquely identifies every row in the table:
COLUMN NAME DATA TYPE LENGTH ALLOW NULLS
ID Int 4 No
FNAME varchar 50 No
LNAME varchar 50 No
LANG char 30 Yes
COUNTRY char 30 Yes
STATE char 30 Yes
ZIPCODE Int 4 Yes
TIMEZONE char 30 Yes
GENDER char 30 Yes
BDAY Int 4 Yes
BMONTH char 30 Yes
BYEAR Int 4 Yes
OCCUPATION varchar 50 Yes
Now, the next step is to link this database with our Windows Application. I assume the
programmer is somewhat familiar with the SQL Server and its connectivity. But anyway,
for novices I have tried to explain the things in detail. Go back to Form1 and drag the
SqlConnection or directly SqlDataAdapter (usually a SqlConnection is automatically
created when we configure a SqlDataAdapter) component from the Toolbox--->Data bar.
After you drag the SqlDataAdapter, you will see a Data Adapter Configuration Wizard
Form that will guide you in making your connection to the Server and to the Database
located in the Server. Click Next to go through the Wizard and press the New Connection
Button, then select the Provider as SQL Server and then in Connection Tab, enter your
Server Name and select the Database we just created above. It is better to test the
Connection by pressing the Test Connection button. This will create your form's
connectivity with the database.
Double-click on the Form1 to go to the code. It's a practice in C# to double-click the
component in which we want some code to be added and its event or method is
automatically generated. The namespaces at the top of your program should contain these:
using System;
using System.Drawing;
using System.Collections;
using System.ComponentModel;
using System.Windows.Forms;
using System.Data;
using System.Data.SqlClient;
All the SqlConnection, SqlCommand, SqlDataAdapter, and so forth are inherited from
System.Data.SqlClient. Next, create new variables for storing the values retrieved from the
textboxes and combo boxes keyed in by the user while filling out the form. For example,
we declare the following:
private string Fname,Lname,Lang,Country,State,Timezone,Bmonth,
Byear,Occup;
private char Gender;
private int Zipcode,Bday;
Then, we retrieve all that is keyed in by the user by the component events. For every
component—text boxes, combo boxes, and radio boxes—that we created, write the
following code:
private void textBox1_TextChanged(object sender, System.EventArgs e)
{
this.Fname=this.textBox1.Text.ToString();
}
private void comboBox1_SelectedIndexChanged(object sender,
System.EventArgs e)
{
this.Lang=this.comboBox1.SelectedItem.ToString();
}
private void radioButton1_CheckedChanged(object sender,
System.EventArgs e)
{
this.Gender='M';
}
I have shown only a few of the component's events; the rest can be coded in the same way
as above. Now, add the following code to make the buttons functional in their click event
code:
private void button1_Click(object sender, System.EventArgs e)
{ //LIST ALL REGISTERIES BUTTON
Form2 f2=new Form2();
f2.ShowDialog();
}
private void button2_Click(object sender, System.EventArgs e)
{ //CANCEL BUTTON
this.Dispose();
}
private void button3_Click(object sender, System.EventArgs e)
{ //REGISTER NOW BUTTON
if(this.textBox1.Text==""||this.textBox2.Text=="")
MessageBox.Show("Please enter your name");
else
{this.sqlConnection1.Open();
string insert="INSERT INTO REGISTER(FNAME, LNAME, LANG, COUNTRY,
STATE, ZIPCODE, TIMEZONE,
GENDER, BDAY, BMONTH, BYEAR,
OCCUPATION) VALUES