Windows store apps development II INTL kho tài liệu bách khoa
Bạn đang xem bản rút gọn của tài liệu. Xem và tải ngay bản đầy đủ của tài liệu tại đây (2.73 MB, 200 trang )
Windows Store Apps
Development – II
Windows Store Apps Development – II
© 2014 Aptech Limited
All rights reserved.
No part of this book may be reproduced or copied in any form or by any means – graphic, electronic or
mechanical, including photocopying, recording, taping, or storing in information retrieval system or sent
or transferred without the prior written permission of copyright owner Aptech Limited.
All trademarks acknowledged.
APTECH LIMITED
Contact E-mail:
Edition 1 - 2014
Dear Learner,
We congratulate you on your decision to pursue an Aptech Worldwide course.
Aptech Ltd. designs its courses using a sound instructional design model – from conceptualization
to execution, incorporating the following key aspects:
¾¾
Scanning the user system and needs assessment
Needs assessment is carried out to find the educational and training needs of the learner
Technology trends are regularly scanned and tracked by core teams at Aptech Ltd. TAG*
analyzes these on a monthly basis to understand the emerging technology training needs for
the Industry.
An annual Industry Recruitment Profile Survey is conducted during August - October to
understand the technologies that Industries would be adapting in the next 2 to 3 years.
An analysis of these trends & recruitment needs is then carried out to understand the skill
requirements for different roles & career opportunities.
The skill requirements are then mapped with the learner profile (user system) to derive the
Learning objectives for the different roles.
¾¾
Needs analysis and design of curriculum
The Learning objectives are then analyzed and translated into learning tasks. Each learning
task or activity is analyzed in terms of knowledge, skills and attitudes that are required to
perform that task. Teachers and domain experts do this jointly. These are then grouped in
clusters to form the subjects to be covered by the curriculum.
In addition, the society, the teachers, and the industry expect certain knowledge and skills
that are related to abilities such as learning-to-learn, thinking, adaptability, problem solving,
positive attitude etc. These competencies would cover both cognitive and affective domains.
A precedence diagram for the subjects is drawn where the prerequisites for each
subject are graphically illustrated. The number of levels in this diagram is determined
by the duration of the course in terms of number of semesters etc. Using the precedence
diagram and the time duration for each subject, the curriculum is organized.
¾¾
Design & development of instructional materials
The content outlines are developed by including additional topics that are required for the
completion of the domain and for the logical development of the competencies identified.
Evaluation strategy and scheme is developed for the subject. The topics are arranged/organized
in a meaningful sequence.
The detailed instructional material – Training aids, Learner material, reference material, project
guidelines, etc.- are then developed. Rigorous quality checks are conducted at every stage.
¾¾
Strategies for delivery of instruction
Careful consideration is given for the integral development of abilities like thinking, problem
solving, learning-to-learn etc. by selecting appropriate instructional strategies (training
methodology), instructional activities and instructional materials.
The area of IT is fast changing and nebulous. Hence considerable flexibility is provided in the
instructional process by specially including creative activities with group interaction between the
students and the trainer. The positive aspects of Web based learning –acquiring information,
organizing information and acting on the basis of insufficient information are some of the
aspects, which are incorporated, in the instructional process.
¾¾
Assessment of learning
The learning is assessed through different modes – tests, assignments & projects. The
assessment system is designed to evaluate the level of knowledge & skills as defined by the
learning objectives.
¾¾
Evaluation of instructional process and instructional materials
The instructional process is backed by an elaborate monitoring system to evaluate - on-time
delivery, understanding of a subject module, ability of the instructor to impart learning. As an
integral part of this process, we request you to kindly send us your feedback in the reply prepaid form appended at the end of each module.
*TAG – Technology & Academics Group comprises of members from Aptech Ltd., professors from
reputed Academic Institutions, Senior Managers from Industry, Technical gurus from Software
Majors & representatives from regulatory organizations/forums.
Technology heads of Aptech Ltd. meet on a monthly basis to share and evaluate the technology
trends. The group interfaces with the representatives of the TAG thrice a year to review and
validate the technology and academic directions and endeavors of Aptech Ltd.
Aptech New Products Design Model
Key Aspects
1
Scanning the
user system
and needs
assessment
2
Evaluation of
Instructional
Processes and
Material
Need Analysis
and design of
curriculum
3
Design and
development of
instructional
material
6
Assessment
of learning
4
Strategies for
delivery of
instructions
5
Preface
Windows Store Apps also known as Metro-styled Apps is a mobile app that runs on Smartphones, tablet,
computers, and other mobile devices running Windows 8 or Windows 8.1. Windows Store App is a
new application that runs on Windows 8 devices. Users can create their own apps using programming
language such as C#. Apps have one Window that supports multiple views that interact with each other.
The book, Windows Store Apps Development – II begins with creating a UI with XAML Designer. This
book introduces the working with tiles, data and files. It also allows to connect to networks and Web
services. It also covers the launching, debugging and publishing Windows Store Apps.
This book is the result of a concentrated effort of the Design Team, which is continuously striving to bring
you the best and the latest in Information Technology. The process of design has been a part of the ISO
9001 certification for Aptech-IT Division, Education Support Services. As part of Aptech’s quality drive,
this team does intensive research and curriculum enrichment to keep it in line with industry trends.
We will be glad to receive your suggestions.
Design Team
Table of Contents
Sessions
1.
Creating a UI Using XAML Designer
2.
Adding Personality to UI
3.
Working with Tiles and Search
4.
Working with Data and Files
5.
Connecting to Networks and Web Services
6.
Managing User Info
7.
Launching, Debugging, and Publishing Windows Store App
Session -
1
Creating a UI Using XAML Designer
Welcome to the session, Creating a UI Using XAML Designer.
The session will discuss how to work with the XAML designer and use
various options such as elements and resources. The session will also
discuss the binding of data in the designer.
In this session, you will learn about:
ÎÎ Explain to work with XAML Designer elements
ÎÎ Describe how to work with resources
ÎÎ Explain the use of data binding in XAML designer
ÎÎ Describe the
Designer
accessibility
information
for
the
ÎÎ Describe how to use the XAML Designer UI reference
XAML
1
Session
Creating a UI Using XAML Designer
1.1 Introduction
Microsoft Visual Studio 2012 offers the XAML Designer that a user can use to design the Windows Store
Apps. Users will be able to customize User Interfaces (UIs). You could edit the XAML code in the XAML
view to customize or you could drag and drop the required controls from the Toolbox menu and modify
the properties in the Properties window.
1.2 Working with Elements in XAML Designer
The user can use the XAML Designer to add elements. The user can also modify the margin and the way
the elements are layered or aligned. They can also reset the layout of the elements apart from grouping
and ungrouping them.
Concepts
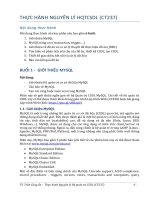
Figure 1.1 shows how an XAML Designer.
Figure 1.1: XAML Designer
V 1.0 © Aptech Limited
1
Session
Creating a UI Using XAML Designer
A layout is a way of positioning and arranging the various elements of a UI. The user has to keep in mind
to arrange the elements within a layout panel.
A panel is made of StackPanel, Canvas, and a Grid. The user can use these child elements as layout
containers and position and re-arrange the elements. A Grid panel is the default top-level layout container
in a page document. They can add layout panels, other elements, and controls to the top-level page
layout.
The user can access a Visual Studio project and perform one of these steps:
ÎÎ
In the Toolbox, double-click any element.
ÎÎ
Drag and drop an element from the Toolbox to the Layout window
ÎÎ
Select a tool from the drawing tools and draw an element.
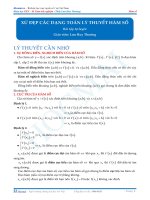
Figure 1.2 shows the Toolbox with the controls.
Figure 1.2: Toolbox
The user can edit the XAML content to add an element to the layout.
Code Snippet 1 shows how to create a button.
<Grid x:Name=”ContentPanel” Margin=”12,0,12,0”>
<Button Height=”72” Width=”160” Content=”Click Me” />
</Grid>
The user can use the <Button> element to develop a Button control. A <Grid> element is created
when a user develops a new Windows Store App.
V 1.0 © Aptech Limited
Concepts
Code Snippet 1:
1
Session
ÎÎ
Creating a UI Using XAML Designer
Modifying the element’s layer order
When a user adds an element to existing layout container, the element will get placed in front of
other elements. They can use the Order command to re-arrange the elements.
yy
To create a custom element layer order, drag and drop elements in the Document Outline
window.
yy
To select an option listed in the artboard or Document Outline window, right-click an
element, and click Order. Following are the list of options:
yy
ÎÎ
Bring to Front: Brings the element to the top of the layering order
Bring Forward: Brings the element one level forward in the existing order
Bring Backward: Sends the element back one level in the existing order
Send to Back: Sends the element to the back (last level) of the layering order
To modify the layering order, in the Properties window, from the Layout section, edit the
ZIndex value.
Modifying the element’s alignment
To modify the elements alignment, the user can do the following:
1.
2.
Concepts
ÎÎ
Use menu commands
Select an element to be aligned. Use the Ctrl key to select multiple items.
In the Layout section, from Horizontal Alignment, select a property: Left, Center, Right,
or Stretch.
Select a property: Top, Center, Bottom, or Stretch.
Use snaplines
Drag an element to align it with other elements in a Layout with more than one
element.
Alignment is indicated by a boundary, a red line.
Modifying the element’s margin
The space surrounding an element on the artboard and between two elements is known as the
margin. The user can modify the margin by using the following:
yy
Changing the value of: Top, Left, Right, or Bottom.
yy
Using the margin adorners.
V 1.0 © Aptech Limited
1
Session
ÎÎ
Creating a UI Using XAML Designer
Ungrouping and grouping different elements
The user can use grouping to create a new layout container and place related elements in it. The
grouping helps the user in selecting, moving, or modifying elements within a group.
To group the elements, the user should follow these steps:
1.
Select the element.
2.
Right-click and navigate to Group Into, select the desired layout container.
To ungroup the element, the user has to right-click and then, click Ungroup. The option just deletes the
layout containers.
ÎÎ
Resetting the element’s layout
The users can use the Reset Layout command to revert the element to its default layout properties
values.
1.3 Creating and Applying a Resource in XAML Designer
The styles and properties set for a particular element are stored in a reusable entity called resources.
A resource helps to reuse the saved styles and properties of an element across multiple elements for a
consistent appearance. The steps to create a new resource are as follows:
ÎÎ
Create an element using options in the Document Outline window.
ÎÎ
Click the property marker, then, click Convert to New Resource in the Properties window. A
dialog box to create a resource is displayed.
Concepts
Figure 1.3 shows the Create Brush Resource dialog box.
Figure 1.3: Create Brush Resource Dialog Box
V 1.0 © Aptech Limited
1
Session
Creating a UI Using XAML Designer
ÎÎ
In Name text box, type the name of the resource.
ÎÎ
Under Define in:
ÎÎ
yy
Select Application if you want to make the resource available to all the documents in the
application.
yy
To make the resource available to the current document, click This document.
yy
Select Document if you want to make the resource available only to the current document.
yy
To define the resource in the resource dictionary to reuse the resource in another project,
click Resource dictionary.
Click OK.
To apply resource to a property or element,
yy
Select the element to apply the resource.
yy
To map a resource and a property, click the property marker for the property value, in the
Properties window. Click Locate Resource and then, select Available Resources.
Right-click a control and point to Edit Template. Then, select Apply Resource to apply a style or control
template resource to a control.
1.4 Binding Data in XAML Designer
Using the XAML Designer, the user can map the data binding properties. Here is an example to demonstrate
the procedure to bind data with a UI Element control.
1.
Create a C# project using blank app template in Microsoft Visual Studio.
2.
Add the following code in ‘MainPage.xaml.cs’ and then, build the application.
Code Snippet 2 shows the example for building the application.
Code Snippet 2:
public class Employee
{
Concepts
public string Name
{
get { return “William”; }
set { value = “William”; }
}
public string Designation
V 1.0 © Aptech Limited
1
Session
Creating a UI Using XAML Designer
{
get { return “Software Developer”; }
set { value = “Software Developer”; }
}
public string Pay
{
get { return “$6000”; }
set { value = “$6000”; }
}
public string CityName
{
get { return “Texas”; }
set { value = “Texas”; }
}
}
From the MainPage.xaml page, click Grid. Point to the Properties window as shown in figure 1.4.
Concepts
3.
Figure 1.4: Properties Window
V 1.0 © Aptech Limited
1
Session
4.
Creating a UI Using XAML Designer
In the Properties window, click Common, and then, click New as shown in figure 1.5.
Figure 1.5: Properties Window Showing Common Options
Under our project, select Employee, and then, click OK as shown in figure 1.6.
Concepts
5.
Figure 1.6: Select Object Dialog Box
V 1.0 © Aptech Limited
1
Session
Creating a UI Using XAML Designer
6.
Add a TextBlock control from the artboard by double-clicking it from the Toolbox.
7.
Select a TextBlock control, and go to its Properties window. In Properties window select Text
Binding under Common option and click Create Data Binding as shown in figure 1.7.
8.
In the window, select the value(one out of the four fields, you defined earlier in code ) you want to
display with this control, for example, here it is the Name field. Then, click OK.
V 1.0 © Aptech Limited
Concepts
Figure 1.7: Create Data Binding
1
Session
Creating a UI Using XAML Designer
Figure 1.8 shows the output.
Figure 1.8: Output
1.5 Accessibility Information for XAML Designer
The user can use the information given here to learn about accessibility features. These features will help
them develop apps using the XAML Designer. Keyboard shortcuts available in the Designer are grouped
broadly as: Access keys and Shortcut keys.
ÎÎ
Access keys
The users can use these keys to access a menu command or any area within a dialog box. These
keys are identified by underscores.
For example, in XAML Designer, if you press Alt, an underline will appear under F in the File menu
so that you can recognize it as access key. If you press and hold Alt and then, press F, the File menu
is shown expanded. Then, press O and later, P key. A project dialog box with a list of projects is
opened.
ÎÎ
Shortcut keys
Concepts
Shortcut keys will speed up the users task rate. These keys reduce the time taken to do an action.
They can use these keys to perform repetitive actions such as modify a tool’s behavior, by pressing
a combination of keys.
For example, the Cut command on the Edit menu displays Ctrl+X which is the keyboard shortcut.
ÎÎ
Modifier Keys
You cannot discover certain shortcut keys that are not in the menu item.
V 1.0 © Aptech Limited
1
Session
Creating a UI Using XAML Designer
Following is list of some actions and corresponding shortcut keys.
Table 1.1 lists the shortcut keys for the modifier keys.
Action
Shortcut Keys
Rotate an element in increments of 15-degree
Choose multiple elements
Choose multiple non-adjacent elements
Switch between open documents and windows
While rotating the element, press and hold the
Shift key
While selecting each element, press and hold the
Shift key
While selecting the first and last elements, press
and hold the Shift key
Press, both the buttons simultaneously, Ctrl+Tab
Table 1.1: Modifier Keys
ÎÎ
Project Keys
The following are the project based shortcut keys in XAML Designer.
Table 1.2 lists the project shortcut keys.
Action
Shortcut Keys
To create a new project
To open a solution or project
To add a new item
To build a project
Press Ctrl+Shift+N
Press Ctrl+Shift+O
Press Ctrl+Shift+A
Press the key F6
Table 1.2: Project Keys
Document Shortcut Keys
Following shortcuts can be used when working with documents:
Table 1.3 lists the document shortcut keys.
Action
Switch between open documents and windows
To save the active document
To save all active documents
Close all the documents that are currently open
Undo the previous action
Do the action again that was performed last
Cut the selected stuff
Copy the selected stuff
Paste the selected stuff
V 1.0 © Aptech Limited
Shortcut Keys
Press Ctrl+Tab
Press Ctrl+S
Press Ctrl+Shift+S
Press Ctrl+Shift+W
Press Ctrl+Z
Press Ctrl+Y
Press Ctrl+X
Press Ctrl+C
Press Ctrl+V
Concepts
ÎÎ
1
Session
Creating a UI Using XAML Designer
Action
Shortcut Keys
Delete the selected stuff
Press Delete
Find the specified text (in XAML view)
Press Ctrl+F
Find the specified text in next occurrence (in XAML Press F3 or Ctrl+H
view)
Table 1.3: Document Shortcut Keys
ÎÎ
Elements Shortcut Keys
Table 1.4 lists the shortcuts available to work with elements on an artboard.
Action
Shortcut Keys
Create an element
Duplicate the selected element
Change the text in a control
Choose a single element
Press Ctrl+N
Press an arrow key by holding down Alt
Press F2 or press Esc to exit
Press Tab if you want to select elements in the
order similar to how they appear in the document
Choose multiple elements
While selecting each element, press and holds the
Shift key
Choose multiple non-adjacent elements
While selecting the first and last elements, press
and hold the Ctrl key
Move chosen elements
Press the arrow keys (T, For each key press, you
can increase the distance to move and this is done
by holding down the Shift key.)
Rotate an element in increments of
While rotating the element, hold down the Shift
key
15-degree
Choose all elements
Press Ctrl+A
Clear selection of elements that were Press Ctrl+Shift+A
previously selected
To show or hide element handles
Press F9
To select an element property
Press Tab while the element selected, and the
focus is on Properties window
Concepts
Table 1.4: Elements Shortcut Keys
ÎÎ
Document Outline Window Shortcut Keys
Table 1.5 lists the shortcuts that are available to work with elements in the Document Outline
window.
V 1.0 © Aptech Limited
1
Session
Creating a UI Using XAML Designer
Action
Shortcut Keys
When the focus is on the Document Outline window,
hide the artboard objects
When the focus is on the Document Outline window,
unhide the artboard objects
When the focus is on the Document Outline window,
lock the artboard objects
When the focus is on the Document Outline window,
unlock the artboard objects
Press Ctrl + H
Press Shift+Ctrl+H
Press Ctrl+L
Press Shift+Ctrl+L
Table 1.5: Document Outline Keys
1.6 XAML Designer UI Reference
The user can use the built-in visual UI in XAML Designer to design Windows Store Apps by using XAML,
WPF, and Silverlight.
The user can use the Collection Editor dialog box to add and remove items to and from a collection. The
editor is available for all the properties that have an ellipse symbol (…) in the Properties window.
Table 1.6 lists the controls.
Items
Items
Remove item
Up arrow
Down arrow
itemType
Add
Properties
Description
Lists all the items in the collection.
Removes the items that are selected.
Moves the selected item up, to the top of the list, in the collection.
The selected item are moved down to the bottom of the list in the
collection.
Allows to choose the type of item that can be added to the
collection.
Enables to add a new item to the collection. The new item is given
a default name and added to the bottom of the list. You can edit
name and similar properties in the Properties pane.
Displays the properties that you can update for the item that is
selected.
The Select Object dialog box is used in the designer when they need to select a Common Language
Runtime (CLR) type. The Select Object dialog box appears in many contexts. For example, they can use
it in the Collection Editor when they want to choose an item type.
V 1.0 © Aptech Limited
Concepts
Table 1.6: Controls
1
Session
Creating a UI Using XAML Designer
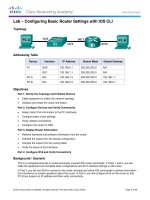
Figure 1.9 shows the Select Object dialog box for a row definition opened in the Collection Editor.
Figure 1.9: Collection Details in Select Object Dialog Box
Table 1.7 lists the related items and their descriptions.
Items
Search box
Select Type list
Show all assemblies
Description
Here you can search for a CLR type by name.
This is a tree view with which you can choose the CLR
type to match with the current property or element.
All framework assemblies in the Visual Studio project
are shown with the option to include or exclude them.
Table 1.7: Items
Concepts
A value converter helps the user modify data. They can create value converters using the
IValueConverter interface. When the users perform data binding, they can select a converter from
the Converter drop-down list. They can also select <Add value converter> to create a new one.
V 1.0 © Aptech Limited
1
Session
Creating a UI Using XAML Designer
Figure 1.10 demonstrates the Add Value Converter dialog box.
Concepts
Figure 1.10: Add Value Converter Dialog Box
V 1.0 © Aptech Limited