Ebook ABC of practical procedures: Part 1
Bạn đang xem bản rút gọn của tài liệu. Xem và tải ngay bản đầy đủ của tài liệu tại đây (2.71 MB, 68 trang )
Practical Procedures
Practical
Procedures
E D I TE D B Y
Tim Nutbeam
Specialist Trainee in Emergency Medicine
West Midlands School of Emergency Medicine
Birmingham, UK
Ron Daniels
Consultant in Anaesthesia and Critical Care
Heart of England NHS Foundation Trust
Birmingham, UK
This edition first published 2010, © 2010 by Blackwell Publishing Ltd
BMJ Books is an imprint of BMJ Publishing Group Limited, used under licence by Blackwell Publishing which was acquired
by John Wiley & Sons in February 2007. Blackwell’s publishing programme has been merged with Wiley’s global Scientific,
Technical and Medical business to form Wiley-Blackwell.
Registered office: John Wiley & Sons Ltd, The Atrium, Southern Gate, Chichester, West Sussex, PO19 8SQ, UK
Editorial offices: 9600 Garsington Road, Oxford, OX4 2DQ, UK
The Atrium, Southern Gate, Chichester, West Sussex, PO19 8SQ, UK
111 River Street, Hoboken, NJ 07030-5774, USA
For details of our global editorial offices, for customer services and for information about how to apply for permission to
reuse the copyright material in this book please see our website at www.wiley.com/wiley-blackwell
The right of the author to be identified as the author of this work has been asserted in accordance with the Copyright,
Designs and Patents Act 1988.
All rights reserved. No part of this publication may be reproduced, stored in a retrieval system, or transmitted, in any form
or by any means, electronic, mechanical, photocopying, recording or otherwise, except as permitted by the UK Copyright,
Designs and Patents Act 1988, without the prior permission of the publisher.
Wiley also publishes its books in a variety of electronic formats. Some content that appears in print may not be available
in electronic books.
Designations used by companies to distinguish their products are often claimed as trademarks. All brand names and
product names used in this book are trade names, service marks, trademarks or registered trademarks of their respective owners.
The publisher is not associated with any product or vendor mentioned in this book. This publication is designed to provide accurate
and authoritative information in regard to the subject matter covered. It is sold on the understanding that the publisher is not
engaged in rendering professional services. If professional advice or other expert assistance is required, the services of a competent
professional should be sought.
The contents of this work are intended to further general scientific research, understanding, and discussion only and are not
intended and should not be relied upon as recommending or promoting a specific method, diagnosis, or treatment by physicians
for any particular patient. The publisher and the author make no representations or warranties with respect to the accuracy or
completeness of the contents of this work and specifically disclaim all warranties, including without limitation any implied warranties
of fitness for a particular purpose. In view of ongoing research, equipment modifications, changes in governmental regulations, and the
constant flow of information relating to the use of medicines, equipment, and devices, the reader is urged to review and evaluate the
information provided in the package insert or instructions for each medicine, equipment, or device for, among other things, any changes
in the instructions or indication of usage and for added warnings and precautions. Readers should consult with a specialist where
appropriate. The fact that an organization or Website is referred to in this work as a citation and/or a potential source of further
information does not mean that the author or the publisher endorses the information the organization or Website may provide or
recommendations it may make. Further, readers should be aware that Internet Websites listed in this work may have changed or
disappeared between when this work was written and when it is read. No warranty may be created or extended by any promotional
statements for this work. Neither the publisher nor the author shall be liable for any damages arising herefrom.
Library of Congress Cataloging-in-Publication Data
ABC of practical procedures / edited by Tim Nutbeam, Ron Daniels.
p. ; cm. -- (ABC series)
Includes bibliographical references and index.
ISBN 978-1-4051-8595-0
1. Clinical medicine--Handbooks, manuals, etc I. Nutbeam, Tim. II. Daniels, Ron, MD. III. Series: ABC series (Malden, Mass.)
[DNLM: 1. Therapeutics--methods. 2. Clinical Competence. 3. Diagnostic Techniques and Procedures. 4. Inservice Training.
WB 300 A134 2010]
RC55.A23 2010
616--dc22
2009021675
ISBN: 978-1-4051-8595-0
A catalogue record for this book is available from the British Library.
Set in 9.25/12 pt Minion by Newgen Imaging Systems (P) Ltd, Chennai, India
Printed and bound in Malaysia
1
2010
Contents
Contributors, vii
Preface, ix
1 Introduction, 1
Tim Nutbeam and Ron Daniels
2 Consent and Documentation, 3
Tim Nutbeam
3 Universal Precautions and Infection Control, 6
Anne Mutlow
4 Local Anaesthesia and Safe Sedation, 11
Ron Daniels
5 Sampling: Blood-Taking and Cultures, 18
Helen Parry and Lynn Lambert
6 Sampling: Arterial Blood Gases, 23
Kathryn Laver and Julian Hull
7 Sampling: Lumbar Puncture, 29
Mike Byrne
8 Sampling: Ascitic Tap, 35
Andrew King
9 Sampling: Pleural Aspiration, 39
Nicola Sinden
10 Access: Intravenous Cannulation, 44
Anna Fergusson and Oliver Masters
11 Access: Central Venous, 50
Ronan O’Leary and Andrew Quinn
12 Access: Emergency – Intraosseous Access and Venous Cutdown, 57
Matt Boylan
13 Therapeutic: Airway – Basic Airway Manoeuvres and Adjuncts, 65
Tim Nutbeam
14 Therapeutic: Airway – Insertion of Laryngeal Mask Airway, 70
Tim Nutbeam
15 Therapeutic: Endotracheal Intubation, 73
Randeep Mullhi
16 Therapeutic: Ascitic Drain, 80
Sharat Putta
17 Therapeutic: Chest Drain, 84
Nicola Sinden
v
vi
Contents
18 Monitoring: Urinary Catheterisation, 91
Adam Low and Michael Foster
19 Monitoring: Central Line, 97
Ronan O’Leary and Andrew Quinn
20 Monitoring: Arterial Line, 101
Rob Moss
21 Specials: Suturing and Joint Aspiration, 107
Simon Laing and Chris Hetherington
22 Specials: Paediatric Procedures, 114
Kate McCann and Amy Walker
23 Specials: Obstetrics and Gynaecology, 120
Caroline Fox and Lucy Higgins
Index, 125
Contributors
Matt Boylan
Julian Hull
Emergency Medicine Registrar
HEMS Doctor
Midlands Air Ambulance
DCAE Cosford, UK
Consultant Anaesthetist and Critical Care Clinical Lead
Heart of England NHS Foundation Trust
Good Hope Hospital
Birmingham, UK
Mike Byrne
Andrew King
Anaesthetic Registrar
Birmingham Heartlands Hospital
Bordesley Green East
Birmingham, UK
Clinical Research Fellow
Centre for Liver Research
University of Birmingham
Birmingham, UK
Ron Daniels
Simon Laing
Consultant in Anaesthesia and Critical Care
Heart of England NHS Foundation Trust
Birmingham, UK
ST2 Emergency Medicine
City Hospital
Birmingham, UK
Anna Fergusson
Lynn Lambert
CT2 Anaesthetics
Russells Hall Hospital
Dudley, UK
Consultant in Acute Medicine
University Hospital Birmingham
Birmingham, UK
Michael Foster
Kathryn Laver
Consultant Urologist
Heart of England NHS Foundation Trust
Good Hope Hospital
Birmingham, UK
CT2 Anaesthetics
Birmingham City Hospital
Birmingham, UK
Caroline Fox
CT2 Anaesthetics
University Hospital Birmingham
Birmingham, UK
Lecturer
Birmingham Women’s Hospital
Birmingham, UK
Chris Hetherington
Consultant in Emergency Medicine
Worcestershire Acute Hospitals NHS Trust
Alexandra Hospital
Redditch, UK
Lucy Higgins
Academic Clinical Fellow
Maternal and Fetal Health Research Centre
University of Manchester
St Mary’s Hospital
Manchester, UK
Adam Low
Kate McCann
Paediatric Registrar
New Cross Hospital
Wolverhampton, UK
Oliver Masters
Specialist Registrar in Anaesthesia
Queen Elizabeth Hospital
Birmingham, UK
Rob Moss
ST3 Anaesthetics
Mersey Rotation
Liverpool, UK
vii
viii
Contributors
Randeep Mullhi
Sharat Putta
Specialist Registrar in Anaesthesia
Department of Anaesthesia
Queen Elizabeth Hospital
Birmingham, UK
Specialist Registrar, Liver
Queen Elizabeth Hospital
Birmingham, UK
Andrew Quinn
Anne Mutlow
Matron for Critical Care
Critical Care Unit
Heart of England NHS Foundation Trust
Good Hope Hospital
Birmingham, UK
Tim Nutbeam
Specialist Trainee in Emergency Medicine
West Midlands School of Emergency Medicine
Birmingham, UK
Ronan O’Leary
Specialist Registrar in Anaesthesia
Yorkshire Deanery
York, UK
Helen Parry
ST2 Doctor
University Hospital Birmingham
Birmingham, UK
Consultant in Anaesthesia and Intensive Care
Department of Anaesthesia
Bradford Royal Infirmary
Bradford, UK
Nicola Sinden
Specialist Registrar in Respiratory Medicine
West Midlands Rotation
Birmingham, UK
Amy Walker
Specialist Registrar in Paediatrics
Department of Neonatology
Birmingham Women’s Hospital
Birmingham, UK
Preface
This book is written as a practical guide to procedures commonly
performed by healthcare professionals. It is designed to cover all
the anatomy, physiology and pharmacology needed to perform
a wide range of procedures competently and confidently. Each
procedure is described in a detailed step-by-step manner, with
supporting photographs to aid understanding. Uniquely, each
chapter is written by those who perform the procedures on an
everyday basis (mostly junior doctors), supported by those who
supervise and teach them.
Introductory chapters introduce the fundamentals of consent,
documentation, universal precautions and infection control in
the context of practical procedures, and the practice of local
anaesthesia and safe sedation.
The procedures themselves are divided by purpose:
Sampling: obtaining samples for laboratory analysis: blood
taking and cultures, arterial blood gases, lumbar puncture and
pleural tap.
Access: securing venous access: venous cannulation, insertion
of a central venous catheter and specialist emergency access
techniques.
Therapeutic: techniques to directly improve or stabilise a patient’s
clinical condition: basic and advanced airway manoeuvres,
draining of ascitic fluid and insertion of chest drain.
Monitoring: procedures for intensive monitoring: urinary
catheterisation, central line monitoring and arterial line
insertion.
Specials: specialist procedures within emergency medicine,
paediatrics and obstetrics and gynaecology.
This book is directed towards every healthcare professional
who performs or assists in practical procedures throughout all
healthcare environments. The syllabus for junior doctor training in
the UK, including introductory specialist training, was used in the
selection of the procedures.
We hope this book will prove useful as a learning tool to junior
healthcare staff and as an aide memoire to more senior staff to
ensure the best possible training in this practical field.
Acknowledgements
We are grateful to Anna Fergusson for compiling the Handy
Hints boxes and to Simon Williams for taking many of the
photographs.
Tim Nutbeam
Ron Daniels
ix
CHAPTER 1
Introduction
Tim Nutbeam1 and Ron Daniels2
1West
Midlands School of Emergency Medicine, Birmingham, UK
of England NHS Foundation Trust, Birmingham, UK
2Heart
OVER VI EW
By the end of this chapter you should be able to understand:
• the importance of becoming proficient at practical procedures
• the principle of ‘competency’
• how to learn and maintain these skills
• the principles and purpose of a logbook.
Practical procedures
The importance of practical procedures and of performing them
safely cannot be underestimated. Healthcare professionals (HCPs)
will be expected to perform a wide range of practical procedures
with competence and confidence. Some of these procedures will
be diagnostic, some therapeutic and others life-saving. The structure of healthcare organisations dictates that even the most junior
trainees will on occasion have to undertake some of the procedures
described in this book without supervision.
This book contains procedures that are a part of medical, nursing
and allied health curriculi throughout the world. The focus is on
understanding not just the practical aspects of how to do a particular procedure but also why, when and where to do it.
Competency
Throughout healthcare education, ‘competency-based training’
has evolved to address gaps between theory and practice. The purpose is to demonstrate that an individual has received training and
assessment in knowledge and skills relevant to all aspects of their
clinical practice. Perhaps most importantly, maintaining a portfolio
of competencies stimulates the trainee and their clinical supervisor to reflect on their professional development and training needs
frequently to help direct future learning goals and strategies. An
additional benefit may be to limit the susceptibility of practitioners,
trainers and organisations to successful litigation should complications occur. Up to 50% of incidents where patients come to physical
harm in hospital are due to practical procedures being inadequately
ABC of Practical Procedures. Edited by T. Nutbeam and R. Daniels. © 2010
Blackwell Publishing, ISBN: 978-1-4051-8595-0.
or incompetently performed. Those responsible for the training
and supervision of the HCPs performing these procedures are
under increasing pressure to ensure the skills required to perform
these procedures are adequately taught and maintained. To do this
a learning and assessment process must be demonstrated.
Becoming adept at the practical procedures expected of you within
your role is a key step in achieving overall clinical competence.
A competency relates to performing a single skill or procedure,
but also includes the underlying knowledge, abilities and attitudes
necessary for optimal performance. In order to assess competency
in a procedure it must be performed to a specific standard under
specific conditions – standards and conditions this text attempts to
outline. Competence also implies a minimum level of proficiency
which must be attained and maintained; in the United Kingdom,
case law dictates that an individual must perform a procedure to
the standard which can reasonably be expected of others with a
similar level of training and experience.
Learning practical procedures: attaining
competency
The days of ‘see one, do one, teach one’ are over. Experts estimate
that each new practical competency (e.g. intravenous cannulation)
must be performed a minimum of 30 times to be ‘learned’ as a new
psychomotor process; it is more difficult to estimate how frequently
the process must be performed to be retained.
More complex procedures (e.g. insertion of a central venous
catheter) must be performed on 50–80 occasions before an ‘acceptable’ level of failure/complication (5%) is reached. However, healthcare now strives to achieve an adverse event rate of fewer than 1 in
100 episodes, and in anaesthesia and blood transfusion fewer than
1 in 1000 episodes result in adverse events. A failure rate of 5%,
therefore, may become unacceptable to patients in the foreseeable
future.
It is impossible to generalise competency to a certain number of
procedures for all individuals; the number needed to become and
remain competent will vary vastly depending on the experience and
dexterity of the practitioner, the procedure, how regularly it is performed, who it is performed upon and the environment in which
it is performed.
There are a number of essential preconditions that a practitioner
must satisfy before embarking upon a practical procedure.
1
2
ABC of Practical Procedures
Background knowledge
Before attempting a new procedure it is essential to gain sufficient
background knowledge to attempt the procedure competently. This
is not just ‘how’ to do a procedure but also why and when it should
be done, what contraindications to it exist, the anatomy behind the
procedure and its potential complications. This knowledge can be
attained from discussions, teaching sessions and prereading. This
book attempts to comprise the essential preprocedure reading for
each of the procedures covered.
Equipment
The practitioner should attempt to familiarise themself with the
equipment used for a procedure. Equipment will vary both between
hospitals and between departments within the same hospital.
Familiarise yourself before you have to perform a potentially
life-saving procedure; an emergency situation is not the time to
have to learn the basics.
Logbooks and assessment forms
It is essential to keep a logbook of the practical procedures you
perform. Many professions (e.g. anaesthesia) have mandatory
logbooks for all trainees provided by their governing body. A
logbook shows not only the number of procedures performed but
also how frequently and under what circumstances. The logbook
should not contain patients’ personal details, although unique
identifiers (e.g. their hospital number) are permitted.
Additionally, a number of the professions now encourage regular assessment of individuals’ performance in practical procedures.
This may take the form of a practical mannequin-based test (ideal
to test emergency situations which infrequently occur) or an assessment of how the procedure is performed for ‘real’. It is essential that
assessments in whatever form evaluate knowledge, skills and abilities; preferably in a multidimensional manner.
Summary
Mannequins
Mannequins are a great way to familiarise yourself with a new procedure and also maintain familiarity with a previously learnt procedure
in a safe way. They are especially useful for infrequently performed,
potentially dangerous procedures such as surgical chest drain insertion. Mannequins alone are not an acceptable substitute for multiple
supervised procedures on ‘real’ patients. Other forms of substitute
training include the use of animal models, which carries ethical
implications, and high-fidelity simulation. This latter mode of training incorporates training in practical skills with realistic real-time
scenarios, and includes elements of interprofessional working.
Patients
Patients are not there to be practised upon without knowing the
experience and role of the practitioner. They should be made fully
aware of your position as a trainee and the role of your trainer.
A vast majority of patients will not withdraw consent: they
appreciate the need for junior HCPs to learn.
Practical procedures form an essential part of diagnosis and treatment, and may be life-saving. A healthcare professional due to
undertake a procedure must be satisfied that he or she possesses the
required knowledge and skills to perform it – in other words, that
he or she is competent. This competence may have been assessed
through informal supervision in a number of the procedures, or,
increasingly, through formal ‘competency-based training’.
This book provides the knowledge required to understand the
reasons for performing each of the procedures described herein,
together with their contraindications, the relevant anatomy and
potential complications. This, together with a step-by-step guide
to performing each procedure should provide the practitioner with
a robust grounding to proceed to practice under supervision and
ultimately competence.
CHAPTER 2
Consent and Documentation
Tim Nutbeam
West Midlands School of Emergency Medicine, Birmingham, UK
OVER VI EW
By the end of this chapter you should:
• understand the components that make up ‘valid consent’
• understand the principles by which we treat patients who lack
capacity
• understand the principles by which we treat children under the
age of 16
• understand the importance of thorough documentation.
Introduction
In the vast majority of cases a patient must give consent in order
for a procedure to be performed. The principles of valid consent
are a cornerstone of all medical practice, and therefore protected by
medical law. Without valid consent (or an alternative recognised by
medical law) any procedure performed upon a patient is considered
an assault and criminal charges may result as consequence of this.
Medical law concerning consent varies vastly from country to
country – although the same principles can be found across the
globe. This chapter deals primarily with the law governing patients
treated in the UK.
In order for consent to be valid the following components must
be present:
• capacity
• information
• voluntariness.
more serious consequences such as a chest drain. Assessment of
capacity is complicated and varies vastly across the globe.
In England and Wales the following two questions must be asked:
• Does the person have an impairment of, or a disturbance in the
functioning of, their mind or brain?
• Does the impairment or disturbance mean that the person is
unable to make a specific decision when they need to?
Or alternatively a patient lacks capacity if:
‘the patient is incapable of acting on, making, communicating, understanding, or remembering decisions by reason of mental disorder or
inability to communicate due to physical disorder’
Consent: patients and doctors making decisions together.
GMC, June 2008
Capacity can be seen to have four individual elements, which all
must be complete in order for a patient to consent for a particular
procedure.
Understanding
The patient must understand: why the procedure is being done;
what the benefits and risks of the particular procedure are; what
the alternatives to the procedure are; and that they have the right to
refuse for the procedure to be performed.
Believing
The patient must believe the information given by the healthcare
professional and understand it to be true.
Retaining
Capacity
‘You must work on the presumption that every adult patient has the
capacity to make decisions about their care, and to decide whether to
agree to, or refuse, an examination, investigation or treatment’.
The patient must retain (and be able to recall) the information
given by the healthcare professional; in non-urgent procedures giving written information may aid this process.
Weighing
Consent: patients and doctors making decisions together.
GMC, June 2008
The principle of capacity is complex and variable. A patient may have
the capacity to consent for a minor procedure such as phlebotomy
but may lack the capacity to consent for a procedure with potentially
ABC of Practical Procedures. Edited by T. Nutbeam and R. Daniels. © 2010
Blackwell Publishing, ISBN: 978-1-4051-8595-0.
The patient must weigh up the information given by the healthcare
professional and make a decision. This decision is not necessarily one
which the healthcare professional would have made themselves:
‘This right of choice is not limited to decisions which others might regard
as sensible. It exists notwithstanding that the reasons for making the
choice are rational, irrational, unknown or even non-existent.’
Lord Donaldson 1992
Without all four elements of ‘capacity’ present the patient cannot
give valid consent for a procedure to take place.
3
4
ABC of Practical Procedures
Box 2.1 Mental Capacity Act 2005 – Section 1
Box 2.2 Information required for consent
1 A person must be assumed to have capacity unless it is
established that they lack capacity.
2 A person is not to be treated as unable to make a decision unless
all practicable steps to help him do so have been taken without
success.
3 A person is not to be treated as unable to make a decision merely
because he makes an unwise decision.
4 An act done, or decision made, under the Act for or on behalf of
a person who lacks capacity must be done, or made, in his best
interests.
5 Before the act is done, or the decision is made, regard must be
had to whether the purpose for which it is needed can be as
effectively achieved in a way that is less restrictive of the person’s
rights and freedom of action.
You must give patients the information they want or need about:
• the diagnosis and prognosis
• any uncertainties about the diagnosis or prognosis, including
options for further investigations
• options for treating or managing the condition, including the
option not to treat
• the purpose of any proposed investigation or treatment and what
it will involve
• the potential benefits, risks and burdens, and the likelihood
of success, for each option; this should include information, if
available, about whether the benefits or risks are affected by
which organisation or doctor is chosen to provide care
• whether a proposed investigation or treatment is part of a
research programme or is an innovative treatment designed
specifically for their benefit
• the people who will be mainly responsible for and involved in
their care, what their roles are, and to what extent students may
be involved
• their right to refuse to take part in teaching or research
• their right to seek a second opinion
• any bills they will have to pay
• any conflicts of interest that you, or your organisation, may have
• any treatments that you believe have greater potential benefit for
the patient than those you or your organisation can offer.
If an adult patient lacks capacity they cannot consent for a
procedure: no one may give consent for the procedure in their stead
(apart from under a legally appointed Lasting Power of Attorney).
Information
The General Medical Council (UK) makes recommendations about
the minimum amount of information a patient should be given in
order to give valid consent for a procedure (Box 2.2). As research
suggests that many patients have poor recall of oral information,
written information should ideally be provided.
The information should be delivered using clear, non-technical
language which the patient can understand. Consideration should
be given to the use of an interpreter if there is any doubt as to the
patient’s ability to understand the healthcare professional due to a
language barrier.
Any questions about the procedure a patient may ask must be
answered in an open and honest manner.
In an emergency it may not be possible to give all the information detailed in Box 2.2; however, the patient should be aware of the
purpose of the procedure, its potential side-effects and alternative
treatment strategies. Any questions they have must be answered.
Voluntariness
The patient must agree to the procedure being proposed and not
feel pushed or coerced into the procedure. The healthcare professional must check that the patient is in agreement for the procedure
to go ahead. Particular care must be taken with patients in police
custody or detained under mental health legislation.
Recording consent
If the above elements are present then a patient may consent to a
procedure.
Consent to medical treatment may be oral or written, expressed
or implied.
Standard consent forms are routinely used throughout medical
practice and ideally should be used for the majority of medical procedures – especially those with potentially serious side-effects.
Consent: patients and doctors making decisions together.
GMC, June 2008
Box 2.3 Conditions in which written consent is recommended
• The investigation or treatment is complex or involves significant risks.
• There may be significant consequences for the patient’s
employment, or social or personal life.
• Providing clinical care is not the primary purpose of the
investigation or treatment.
• The treatment is part of a research programme or is an innovative
treatment designed specifically for their benefit.
Consent: patients and doctors making decisions together.
GMC, June 2008
Box 2.3 covers situations when written consent is particularly
recommended.
‘You must use the patient’s medical records or a consent form to record
the key elements of your discussion with the patient. This should include
the information you discussed, any specific requests by the patient, any
written, visual or audio information given to the patient, and details of
any decisions that were made’.
Consent: patients and doctors making decisions together.
GMC, June 2008
When consent cannot be given
When an adult patient lacks capacity to give consent and no-one with a
legal power of attorney has been appointed (or cannot be contacted in
an emergency situation) then a senior healthcare professional will need
to decide what treatment is in the patient’s best interest (Box 2.4).
Consent and Documentation
Box 2.4 Considerations when a patient is unable to consent
• Whether the patient’s lack of capacity is temporary or permanent.
• Which options for treatment would provide overall clinical benefit
for the patient.
• Which option, including the option not to treat, would be least
restrictive of the patient’s future choices.
• Any evidence of the patient’s previously expressed preferences,
such as an advance statement or decision.
• The views of anyone the patient asks you to consult, or who has
legal authority to make a decision on their behalf, or has been
appointed to represent them.
• The views of people close to the patient on the patient’s
preferences, feelings, beliefs and values, and whether they consider
the proposed treatment to be in the patient’s best interests.
• What you and the rest of the healthcare team know about the
patient’s wishes, feelings, beliefs and values.
Consent: patients and doctors making decisions together.
GMC, June 2008
The treatment or procedure should be what is:
• in the patient’s best interests (taking into account the patient’s
past wishes and feelings)
• the minimum intervention which is required to achieve the
desired purpose.
When it is reasonable and practicable to do so (i.e. in every nonemergency situation) you must consult with relevant others: family
members, principal carers, etc. Specialised consent forms are used
in this situation and must be signed by two senior doctors (ideally
consultants) who are responsible for the patient’s care.
Children and consent
The law regarding children’s consent is complicated and regularly
updated.
The healthcare professional should involve children as much as is
practicably possible in discussions about their care; this is the case
even if the ultimate decision or ‘consent’ does not lie with the child.
In the UK and most of the developed world a young person is
assessed on an individual basis on their ability to understand and
weigh up options, rather than on their age. This ability to take decisions is known as ‘Gillick’ competence and originated from a court
case regarding the prescription of oral contraceptives to young
people under the age of 16.
‘As a matter of Law the parental right to determine whether or not their
minor child below the age of sixteen will have medical treatment terminates if and when the child achieves sufficient understanding and intelligence to understand fully what is proposed.’
Lord Scarman, 1985
If a child is judged as Gillick competent they can consent to a procedure and this decision cannot be overruled by their parents.
If a child is not Gillick competent they can neither give nor withhold consent. Those with parental responsibility need to make a
decision on their behalf.
Any further detail is beyond the scope of this text. It is important
to involve senior clinicians with overall responsibility for the child
as early as possible in the decision-making process.
5
Documentation
Good medical records are essential for delivering good patient care.
They are principally used to improve continuity of care and prevent
medical error. They are also a vital source of information if a negligence claim is made against a healthcare professional.
The General Medical Council of the UK states:
‘keep clear, accurate and legible records, reporting the relevant clinical findings, the decisions made, the information given to patients, and
any drugs prescribed or other investigation or treatment; make records
at the same time as the events you are recording or as soon as possible
afterwards’.
With particular reference to practical procedures, as a minimum
standard you should document the following.
• The time, date, who you are and where you are.
• The name of the procedure proposed.
• Consent: details of the information you discussed, any specific
requests by the patient, any written, visual or audio information
given to the patient, and details of any decisions that were made.
• Monitoring: document standards of monitoring whilst the procedure was being performed (e.g. ECG, SpO2).
• Drugs administered: supplemental oxygen, sedative agents etc.
• Persons present: the name of anyone assisting or supervising the
procedure (and their grade).
• Sterile precautions: include universal precautions (gloves, apron
etc.) as well as additional: visor, sterile field etc.
• Sterilising agents: what was used to clean the area – chlorhexidine, alcohol wipe, normal saline etc.
• Local anaesthetic: what was used, in which dose and how it was
given.
• The procedure itself: this will be specific to the procedure but will
include anatomical location, and a ‘step-by-step’ documentation
of the procedure.
• Complications: document any complications (or lack of them),
including how they were resolved.
• Postprocedure management: what needs to be done next (e.g.
chest X-ray for central line), period of intensive observation etc.
Medical records should be clear, objective, contemporaneous,
attributable and original.
Further reading
Department of Health. (2004) Better information, better choices, better health:
putting information at the centre of health.
Department of Health. (2001) Reference guide to consent for examination or
treatment.
Gillick v West Norfolk and Wisbech AHA [1986] AC 112.
General Medical Council (GMC). (2008) Consent: patients and doctors making decisions together.
Mental Capacity Act (2005) Code of Practice.
Medical Protection Society. (2008) Consent and young adults and children
(fact sheet).
MPS (2008) Guide to consent in the UK.
MPS (2008) Medical Records Booklet.
Royal College of Physicians, Patient Involvement Unit. (2006) Explaining the
risks and benefits of treatment options. www.rcplondon.ac.uk/college/PIU/
pi u_risk.asp
CHAPTER 3
Universal Precautions and
Infection Control
Anne Mutlow
Critical Care Unit, Heart of England NHS Foundation Trust, Good Hope Hospital, Birmingham, UK
OVER VIEW
By the end of this chapter you will:
• understand the importance of infection control
• Apply one shot of liquid soap to wet hands and wash using a 6- or
8-point technique (see Figure 3.1).
• Rinse in warm water.
• Dry thoroughly by patting with paper towels to prevent chafing.
• be able to describe the various levels of hand hygiene
• understand the term ‘universal precautions’
• be able to set up a sterile field
• understand the various methods of achieving asepsis
• know what to do if a needlestick or sharps injury occurs.
Infection prevention and control procedures are processes or
techniques that we can use to ensure that we safeguard the patient
from infection. It is essential that these techniques are followed in
all patient contact situations.
Handwashing and decontamination
Good hand hygiene by healthcare workers has been shown to be the
single most important preventative measure to reduce the incidence
of healthcare-associated infection. It is a simple, important action
that helps prevent and control cross-infection.
Every practitioner is personally responsible for their hand
hygiene, and must actively seek to promote and safeguard the interests and wellbeing of patients.
Before handwashing, rings, watches and bracelets must be
removed (most hospitals will allow the wearing of a plain band
wedding ring only; ensure that you are aware of local policy).
There are three levels of hand hygiene.
Level 1: Socially clean
This involves the use of liquid soap and running water to remove
any visible soiling of the skin. It should be used before and after
each task and every patient contact. This is sufficient to prevent
cross-infection.
ABC of Practical Procedures. Edited by T. Nutbeam and R. Daniels. © 2010
Blackwell Publishing, ISBN: 978-1-4051-8595-0.
6
Level 2: Intermediate or disinfection
An alcohol hand rub is used to kill any surface skin organisms.
The hand rub should be available at all washbasins, in all clinical
areas and outside any isolation areas. In areas where wall-mounted
dispensers are not practical, dispensers may be attached to trolleys
or smaller dispensers may be clipped to staff uniform. Alcohol
gel can be used as an alternative to soap and water (only if hands
are physically clean), or to disinfect the hands before an aseptic
procedure.
• Hands must be physically clean before application.
• Apply alcohol hand rub to clean hands and massage using a 6- or
8-point technique (follow manufacturer’s recommendations for
the amount to be used) (see Figure 3.2).
• Allow to dry before beginning your next task.
Alcohol hand gel will not kill Clostridium difficile spores –
soap and water is necessary
Level 3: Surgical scrub
This involves the use of a chemical disinfection and prolonged
washing to physically remove and kill surface organisms in the
deeper layers of the epidermis. This should be done before any
invasive or surgical procedure.
• Apply a bactericidal, detergent, surgical scrub solution to wet
hands and massage in using an 8-point technique, extending the
wash to include the forearms.
• Ensure the hands are positioned so as to prevent soap and water
running onto and contaminating the hands from unwashed areas
of the arms (high hands, low elbows technique).
• Rinse in warm water.
• Dry thoroughly by patting with sterile paper towels.
• Don sterile gown and gloves.
Figure 3.3 shows areas that are commonly missed during hand
hygiene processes.
Table 3.1 shows a summary of the three techniques.
Precautions and Infection Control
(a) Wet hands under
running water
(b) Apply soap and rub
palms together to ensure
complete coverage
(c) Spread the lather over
the backs of the hands
(d) Make sure the soap
gets in between the fingers
(e) Grip the fingers on
each hand
(f) Pay particular attention
to the thumbs
(g) Press fingertips into
the palm of each hand
(h) Dry thoroughly with a
clean towel
Figure 3.1 Handwashing technique. (With permission from
(a) Apply the gel to the palm of one hand
(d) Press fingertips of the other hand to the palm
.)
(b) Press fingertips of the other hand to the palm
(e) Quickly spread alcohol onto all
surfaces of both hands, paying particular
attention to thumbs
Figure 3.2 Alcohol rub decontamination technique. (With permission from
.)
(c) Tip the remaining alcohol from one palm
to the other
(f) Continue spreading the alcohol until it dries
7
8
ABC of Practical Procedures
Back
Front
Least missed
Sometimes missed
Most missed
Figure 3.3 Missed areas in hand hygiene.
Table 3.1 Summary of the three levels of hand hygiene.
Liquid soap
and water
Alcohol-based
handrub
Surgical scrub
Level 1
Level 2
Level 3
Action
Removal of physical
contaminants: dirt,
organic matter
Killing of transient
flora on physically
clean hands
Disinfection and
removal of transient
and resident flora
from hands
When
Between patients
When hands are
Before applying
physically dirty and
after using the toilet gloves for
procedures such
as venepuncture,
urinary
catheterisation,
lumbar puncture,
joint aspiration, etc
Prior to surgical
procedures
Before applying sterile
gloves to carry out a
procedure where an
implantable device is
to be inserted such
as central venous,
epidural and cardiac
catheters, and
pacemakers
The sterile field
The sterile field is the sterile area that can be used as a work area
when carrying out a sterile procedure. It is essential that this area is
kept free from microorganisms and spores.
The environment
Any sterile procedures should be carried out in a clean area, free
from airborne contamination. All surfaces to be used must be clean,
dry, flat and stable. Any activities that will cause environmental
disturbances or an increase in airborne contamination (dusting,
bed-making etc.) should not be carried out immediately before an
aseptic procedure. Curtains or fabric screens should be closed for
10 minutes to allow the airborne contaminates to settle. Ensure that
the patient is aware of the need to maintain sterility during the procedure, as he/she may accidentally touch the sterile field.
Preparing your sterile field/trolley for the
procedure
All sterile equipment is double wrapped. Packs containing sterile
equipment must be unopened and the seals must be intact. The
pack must be within the expiry date printed on the packaging.
All trolleys and surfaces must have been wiped or washed each
day thoroughly with detergent solution. They should additionally
be cleaned before each use using an alcohol-based disinfectant.
1 Wash your hands before handling the equipment and don a disposable apron and non-sterile gloves.
2 Touch only the outside layer of packaging – open the outer packs
away from your body, and tip the contents onto your proposed
work surface (trolley).
3 The outside of the inner wrapper is not part of the sterile field
and may be touched with the hands. To open the pack, hold the
corners of the wrapper only. Pull the corners out and down to
expose the contents. Ensure that you do not reach across the
opened pack or touch the contents.
4 The opened pack now becomes part of your sterile field.
5 Any additional sterile equipment can be tipped or dropped
onto this sterile field, ensuring that the sterile surfaces are not
touched.
The operator can now perform a surgical scrub and don sterile
gown and gloves.
Some procedures require the operator to wear a surgical mask.
This must be worn before the scrub to avoid contamination of the
hands. Local policy should be adhered to.
When wearing a sterile gown and gloves, always keep your
hands within view and above the waistline to prevent accidental
decontamination.
Extending the sterile field
The sterile field can now be extended to include the area between
the operator and the patient and surrounding the procedure site.
1 The skin is decontaminated using a bactericidal preparation of
2% chlorhexidine in 70% isopropyl alcohol, and allowed to dry.
2 Sterile drapes are opened by the operator, and held by the corners away from the body and any surfaces that will contaminate
them.
3 Apply the drapes around the procedure site, also covering the
area between the operator and the patient: leave only the decontaminated area of skin exposed.
4 Drapes are placed from the back to the front to avoid contaminating the operator’s gown or gloves.
5 Gloves must be changed if they touch a non-sterile area.
Skin preparation solutions
Skin antisepsis before a percutaneous procedure
2% chlorhexidine in 70% isopropyl alcohol has been shown to
provide very effective skin preparation. It has the dual benefits of
rapid action and excellent residual activity, reducing subsequent
colonisation.
Povidine iodine solution can be used if the patient has a history
of chlorhexidine sensitivity.
Precautions and Infection Control
Apply the skin preparation by rubbing the solution onto the skin
commencing at the insertion site and working outwards. Rub for
about 30 seconds and allow the solution to dry completely before
beginning the procedure. An alternative approach, recommended
for peripheral venous cannula insertion, is to use a ‘criss-cross’
approach in two directions to minimise the risk of missing areas.
Needlestick injury
Needlestick or sharps injuries are a daily risk for healthcare workers and can lead to infection with bloodborne viruses (BBVs) such
as hepatitis or HIV. The risk of infection following a single sharps
(percutaneous) injury varies depending on the type of BBV. The
risk is approximately:
• 1 in 3 if the instrument is contaminated with hepatitis B
• 1 in 30 if the instrument is contaminated with hepatitis C
• 1 in 300 if the instrument is contaminated with HIV, though this
depends on the infectivity of the source patient.
The chances of transmission are higher with hollow-bore needles
compared to other types of sharp injury.
Prevention of needlestick and sharps injuries
There are a few simple rules to help reduce the incidence of injury.
• Do not disassemble needles from syringes or other devices –
discard as a single unit.
• Do not resheath needles. If essential, use a resheathing device.
• Do not carry used sharps by hand or pass to another person.
• Discard sharps immediately after use into an approved sharps
container (which you should take with you to the bedside).
• Ensure sharps containers are of an appropriate size and available
at the points of use.
• Ensure sharps containers are closed securely when three-quarters
full, and disposed of according to local policy.
Peripheral venous cannulae with a device that closes over the
needle tip after it has been withdrawn from the cannula are available, and provide a safe option.
The risk of a percutaneous injury is increased during a surgical procedure when suture needles and scalpel blades are used.
Therefore:
• use blunt suture needles where possible (not suitable for skin
sutures)
• ensure that needle holders with needle tip guards are used
• use a disposable scalpel or ensure a blade removal device is used
at the end of the procedure.
When taking blood samples, avoid using a needle and syringe
if possible. A vacuum tube system reduces the risk of needlestick
injury.
Managing accidental exposure to bloodborne
viruses
Any exposure to blood or body fluids from a sharps injury, cut or
bite, or from splashing into the eyes or mouth or onto broken skin,
carries a risk of exposure to a BBV. All of these occurrences must
be reported to, and followed up by, the occupational health team. If
there is a strong suspicion of exposure to HIV, it is recommended
9
FIRST AID
Immediately stop what you are doing
and attend to the injury
Encourage bleeding of the wound by
applying gentle pressure (do not suck the wound)
Wash well under running water
Apply a waterproof dressing as necessary
If blood or body fluids splash
into the eyes, irrigate with cold water
If blood or body fluids splash
into the mouth, do not swallow.
Rinse out several times with cold
water
Report the incident to your occupational
health department, or emergency department
and your manager
Complete an accident form
In the cases of an injury
from a clean or unused instrument
or needle, no further
action is necessary
If the injury is from a used needle
or instrument, risk assessment
should be carried out with the
microbiologist, infection control
doctor or consultant for
communicable diseases.
CONSENT IS REQUIRED IF A
PATIENT’S BLOOD NEEDS
TO BE TAKEN
Figure 3.4 Needlestick injury protocol.
that antiretroviral post-exposure prophylaxis (PEP) is commenced.
Ideally this should be started within an hour of exposure and the
full course lasts 4 weeks. In situations when the treatment is delayed
but the source person proves to be HIV positive, PEP can be given
up to 2 weeks after the injury (though with reduced efficacy).
The occupational health team will assess the circumstances and
decide whether any action is necessary to reduce the risk of HIV
or hepatitis.
Figure 3.4 shows what to do in the event of a needlestick/sharps
injury.
Legal issues
The Human Tissue Act (HTA) 2004 was introduced following a
high-profile case regarding the unethical removal and retention of
organs. The act requires that virtually all organs or samples taken
from humans can only be tested or stored with the explicit consent
of the person from whom they were taken. Failure to obtain consent
can render the offender open to a fine or imprisonment. Therefore
a doctor may not test a patient for HIV or hepatitis for the benefit
of an injured healthcare worker if the patient refuses the test.
10
ABC of Practical Procedures
DO NOT REUSE
In the event of a needlestick injury to a healthcare worker, blood
may only be taken for testing from a patient who lacks capacity or
is unconscious if it is in the best interests of the patient.
Cleaning or disposing of equipment
Synonyms for this are:
• Single-use
• Use only once
Figure 3.5 Symbol used to identify equipment that cannot be cleaned or
reused.
The Mental Capacity Act (MCA) 2005 came into force on
1 October 2007. This was introduced to protect patients that lack
the capacity to provide consent.
Under the MCA, all treatment decisions relating to patients over
the age of 16 years who lack the capacity to consent must be necessary and made in the patient’s best interests.
Most equipment used in sterile procedures is disposable. Equipment
that cannot be cleaned or reused can be identified by the symbol
seen in Figure 3.5. Please dispose of contaminated equipment safely,
and prevent injury to other healthcare workers.
Further reading
Department of Health. (2005) Saving Lives Campaign.
Department of Health. (2003) Winning ways: working together to reduce
healthcare associated infection in England.
National Institute for Health and Clinical Excellence (NICE). (2003) Infection
control. NICE clinical guideline 2. www.nice.org.uk/cg2
National Resource for Infection Control (NRIC). www.nric.org.uk.
CHAPTER 4
Local Anaesthesia and Safe Sedation
Ron Daniels
Heart of England NHS Foundation Trust, Birmingham, UK
OVER VI EW
By the end of this chapter, you should:
• be able to describe the indications for local anaesthesia and
sedation
• be able to determine an appropriate agent for sedation and
for local anaesthesia in an individual patient
• have an understanding of the modes of action and doses of
reassuring to the patient, it is at best unsatisfactory and at worst
an assault.
This chapter covers aspects of local anaesthesia and sedation
relevant to the practical procedures described in this book. Specific
agents in common use are described: this is not intended to be an
exhaustive list. You should identify the policies and practices in use
in your organisation, and familiarise yourself with which drugs and
agents are available and where.
these agents
• know the principles behind safe administration of single-agent
conscious sedation
• be able to plan safe local anaesthesia including ring block
• be able to recognise and treat complications of local anaesthesia
and sedation.
Introduction
Most of the practical procedures described in this book are potentially
unpleasant for the patient, and a number may be painful. For some
procedures, local anaesthesia and sedation will only occasionally
be necessary in the adult patient (for example, peripheral venous
cannulation with a small-bore cannula). For others, local anaesthesia will routinely be required (e.g. chest drain insertion). Cultural
and individual factors may make sedation desirable for some
patients undergoing more uncomfortable procedures.
The importance of appropriate discussion with the patient
before a procedure and ongoing reassurance during it cannot be
underestimated. For lengthier and more uncomfortable procedures, it is good practice to have a colleague available to hold the
patient’s hand and provide reassurance. Managing the patient’s
expectations of the procedure, being frank about the severity and
duration of any likely discomfort, and explaining the reasons for
performing it can minimise or negate any requirement for sedation
and analgesia.
A practitioner must ensure that sedation is never administered
to a patient simply to reduce the need for this basic communication. Whilst it is undoubtedly easier to practice without continually
ABC of Practical Procedures. Edited by T. Nutbeam and R. Daniels. © 2010
Blackwell Publishing, ISBN: 978-1-4051-8595-0.
Local anaesthesia
Definition
Local anaesthesia is defined by a loss of sensation in the immediate
area of the body where the agent has been administered. Effective
local anaesthesia requires the blocking of transmission of pain by
both Aδ (fast myelinated, ‘sharp’ pain) and C (slow unmyelinated,
dull/throbbing pain) nerve fibres.
Local anaesthetic agents are used by anaesthetists and other experienced practitioners for both peripheral and central nerve blocks,
examples being femoral nerve block and spinal (subarachnoid)
block, respectively. Less commonly now, regional intravenous blockade (Biers’ block) of limbs may be performed. These are specialist
techniques outside the scope of this book. This chapter introduces
some commonly used local anaesthetic agents, and describes their
safe use in local infiltration and in performing a digital ring block.
Local anaesthetic agents
There are two principal groups of local anaesthetics – the esters
(such as cocaine) and the more commonly used amides (lidocaine,
bupivacaine, prilocaine). Agents differ in their potency, time to
onset and duration of action according to physical properties
including their lipid solubility, tendency toward protein binding
and pKa (the pH at which equal proportions of ionised and nonionised drug are present).
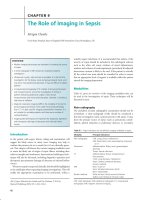
Local anaesthetics work by diffusing across the myelin sheath or
neuron membrane in their non-ionised form. More lipid-soluble
agents are more potent because more of the drug can cross into
the neurone. Local anaesthetics then ionise inside the neurone, to
block sodium channels from the inside (Figure 4.1). The rapidity
of this process, and thus the onset of action, is determined by their
pKa. The closer the pKa to physiological pH, the faster the onset.
More highly protein-bound drugs will bind more strongly and have
11
12
ABC of Practical Procedures
agent will therefore be shorter. Vasopressors, such as epinephrine
and felypressin, are commercially added to some preparations to
prolong the duration of action. Because systemic absorption is
reduced, this may also increase the maximum safe dose of local
anaesthetic for a given patient (Table 4.1). Vasoconstrictors should
be avoided in the extremities, particularly the digits and the penis,
because of the risk of ischaemia.
a longer duration of action. The properties of the commonly used
agents are listed in Table 4.1.
Most amide local anaesthetics cause local vasodilatation. Cocaine
vasoconstricts, and is used in nasal surgery for analgesia and to
reduce blood loss.
In the United Kingdom, the most commonly used agents are
lidocaine, which has a relatively fast onset and brief duration of
action; and bupivacaine and its derivative levobupivacaine, which
have a slightly slower onset and longer duration.
Infected tissues are acidic, such that local anaesthetics will tend
to be ionised and cross nerve membranes more slowly, and are
therefore less effective.
Side-effects and treatment of toxicity
At high dose, all local anaesthetics cause central nervous system
(CNS) and cardiovascular effects. The CNS effects are initially excitatory, with depression occurring at higher plasma concentrations.
Initial effects include light-headedness or dizziness, and numbness or tingling around the mouth. As the plasma concentration
rises, confusion, drowsiness and hypotension may ensue. With
severe toxicity, convulsions, coma, respiratory arrest and cardiovascular collapse may develop. It is important to remember that,
while toxicity is a spectrum, inadvertent intravenous administration can cause a patient to rapidly deterioriate to cardiorespiratory
arrest.
Treatment of local anaesthetic toxicity is largely supportive, along
an ABCDE format. Anticonvulsant drugs (benzodiazepines), and
urgent critical care assistance for airway and ventilatory support
may be required. Recently, lipid emulsions such as Intralipid® have
been advocated (seek specialist advice). These lipid emulsions are
of particular potential benefit in bupivacaine toxicity resulting in
cardiac compromise.
Prilocaine may cause methaemoglobinaemia, which should
be considered for treatment with methylene blue. Cocaine may
occasionally cause coronary artery spasm and acute myocardial
ischaemia. Expert help should be sought immediately if either of
these rare complications are suspected.
Additives
Local anaesthetics are cleared from the site of action in the bloodstream. In more vascular areas, the duration of action of a given
Interstitial
space
Na+
LA + HCl
Axonal
membrane
LAH+
Sodium channel
Cytoplasm
LA + HCl
Cl-
+ LAH+
Safe use of local anaesthetics
Naturally, a history of adverse reaction to local anaesthetic agents
should be sought.
Four things are crucial:
1 to have secure intravenous access
2 to know the maximum safe dose of the agent you are using
Figure 4.1 Local anaesthetics are weak bases and usually prepared as
hydrochlorides (LA + HCl). At the pH of the interstitial space (7.4) they
exist largely in this unionised form, which can cross the lipophilic axonal
membrane with ease. Once in the cytoplasm (pH around 7.1), equilibrium
shifts in favour of the ionised form (LAH+, and Cl–). The ionised LAH+
blocks voltage-gated sodium channels from inside the cell, preventing the
transmission of an action potential and thus blocking the nerve.
Table 4.1 Properties of commonly used local anaesthetic agents.
Local anaesthetic
pKa
Onset
Protein binding (%)
Duration
Maximum dose (per kg ideal body weight)
Lidocaine
7.9
Rapid
64
Intermediate
4 mg/kg (7 mg/kg with epinephrine)
Bupivacaine
8.1
Intermediate
96
Long
2 mg/kg (3 mg/kg with epinephrine)
Prilocaine
7.9
Rapid
55
Intermediate
6 mg/kg (9 mg/kg with epinephrine/octapressin)
Ropivacaine: less cardiotoxic, slightly less
potent than bupivacaine
8.1
Intermediate
95
Long
3 mg/kg
Levobupivacaine
(s-enantiomer of bupivacaine): less
cardiotoxic, ? reduced motor block
8.1
Intermediate
97
Long
3 mg/kg
Cocaine (ester): causes vasoconstriction,
topical only (eyes/mucous membranes)
8.7
Slow
98
Long
3 mg/kg
Local Anaesthesia and Safe Sedation
3 to take steps to avoid intravascular injection
4 to seek effects of accidental intravascular injection by continually asking the patient for symptoms of early toxicity during
injection.
The agent and concentration should be chosen according to the
proposed site of injection, volume of solution likely to be required,
and the duration of anaesthesia required. Maximum safe doses for
the commonly used agents are given in Table 4.1. An example of a
maximum safe dose calculation is given in Box 4.1.
Step-by-step guide: local anaesthetic infiltration
• Give a full explanation to the patient in appropriate terms
and ensure they consent to the procedure.
• Set up your trolley (Box 4.2).
• Prepare your trolley as a sterile field. Wear a plastic
disposable apron and non-sterile gloves, and take alcohol
hand rub with you.
1 Ensure that the patient has no history of adverse reaction to
local anaesthetic.
2 Calculate and do not exceed the maximum safe dose of your
chosen agent.
3 Position the patient comfortably, with the area to be infiltrated
on a secure surface.
4 Ensure that the field is adequately lit, adopt universal precautions, and set a sterile field.
5 Adequately clean the skin with an appropriate antiseptic solution (e.g. 2% chlorhexidine in 70% alcohol) and allow to dry.
6 Using a 25G (orange) or 23G (blue) needle, enter the skin at an
angle of approximately 45°.
7 As soon as the needle is subcutaneous, ensure that blood cannot
be aspirated. Without moving the needle, push on the plunger
to infiltrate with approximately 0.5–2 mL of local anaesthetic.
8 Ask the patient if they have any tingling or numbness around
the mouth, or are feeling light-headed or dizzy.
9 Advance the needle subcutaneously, avoiding superficial veins,
until the tip is at the edge of the wheal just created.
10 Aspirate once more before injecting further solution.
11 Repeat steps 7–10 until the skin area is fully infiltrated, or the
maximum safe dose has been reached.
12 If deeper anaesthesia is required (for example for chest drain
insertion), now insert the needle into deeper tissues through
the subcutaneous wheal and repeat steps 7–11 until infiltration
is complete.
13 Document the agent, concentration and volume used and any
complications. Allow time for the local anaesthetic to work
before attempting further procedures.
14 If toxicity is suspected at any time, discontinue injection and
assess using an ABCDE approach.
Step-by-step guide: digital ring block
Set up your trolley and perform steps 1–5 as for subcutaneous infiltration. There are four digital nerves per digit, one on each side
toward the flexor aspect and one on each side toward the extensor
13
Box 4.1 Example of a maximum safe dose calculation
A 75-kg man requires infiltration anaesthesia to suture a clean
laceration to the forearm.
Option 1
Bupivacaine is chosen as the agent to provide prolonged
post-procedure anaesthesia. Maximum safe dose of plain
bupivacaine:
• 2 mg/kg × 75 kg = 150 mg
• 0.5% bupivacaine contains 0.5 g (500 mg) of drug per 100 mL.
Therefore a 10-mL ampoule of 0.5% bupivacaine contains 50 mg.
Maximum safe volume of 0.5% bupivacaine = 30 mL
Option 2
Lidocaine is chosen to provide a quick onset of action. Maximum
safe dose of plain lidocaine:
• 4 mg/kg × 75kg = 300 mg
• 1% lidocaine contains 1 g (1000 mg) of drug per 100 mL.
Therefore a 10-mL ampoule of 1% lidocaine contains 100 mg.
Maximum safe volume of 1% lidocaine = 30 mL
Box 4.2 Equipment for local anaesthesia
• Cleaning solution (2% chlorhexidine in 70% isopropyl alcohol
recommended)
• 10-mL syringe
• Green (21G) needle for drawing up local anaesthetic from
ampoule
• Orange (25G) or blue (23G) needle for infiltration
• Second 21G needle if deeper infiltration will be required
• Swabs
aspect (Figure 4.2). 1% lidocaine is a suitable choice of agent and
will provide anaesthesia for 1–2 hours.
6 Using a 25G (orange) needle, enter the dorsal aspect of the web
space, close to the phalanx on one side.
7 Advance until the tip of the needle is just above the palmar
aspect of the web space.
8 Aspirate to ensure the absence of blood, then inject 1–2 mL of
solution to block the palmar (volar) nerve.
9 Withdraw the needle until just under the dorsal skin.
10 Aspirate to ensure the absence of blood, then inject a further
1 mL of solution to block the dorsal nerve.
11 Ask the patient if they have any tingling or numbness around
the mouth, or are feeling light-headed or dizzy.
12 Repeat steps 6–11 for the opposite side of the digit.
13 Document the procedure in the notes.
Topical local anaesthesia
Two topical local anaesthetic agents are in common use: EMLA®
and Ametop®. EMLA (eutectic mixture of local anaesthetics)
contains 2.5% lidocaine and 2.5% prilocaine; Ametop contains 4%
tetracaine. Some systemic absorption may occur with these agents,
and maximum safe doses should be observed.