- Trang chủ >>
- THPT Quốc Gia >>
- Toán
LUMION 5 keyboard shortcuts
Bạn đang xem bản rút gọn của tài liệu. Xem và tải ngay bản đầy đủ của tài liệu tại đây (105.81 KB, 4 trang )
Lumion Forum
Guest Forum (Registered users have access to more sections) => Quickstart Guides =>
Topic started by: Morten on October 24, 2014, 05:57:30 pm
Title: LUMION 5: Keyboard shortcuts
Post by: Morten on October 24, 2014, 05:57:30 pm
COMPATIBILITY
Please note that scenes and LS5 files saved in 5.x are NOT backwards compatible
with earlier versions. If you try to load scenes or imported model files made with
Lumion 1.x, 2.x, 3.x or 4.x, you will have to remove and reassign all materials in
Lumion 5.7.2.
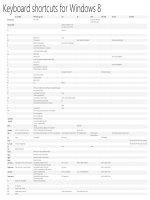
KEYBOARD SHORTCUTS FOR LUMION 5.7.2
NAVIGATION
(W) / (Up arrow): Move camera forward.
(S) / (Down arrow): Move camera backward.
(A) / (Left arrow): Move camera left.
(D) / (Right arrow): Move camera right.
(Q): Move camera up.
(E): Move camera down.
(Spacebar) + (W/S/A/D/Q/E): Move camera very slowly.
(Shift) + (W/S/A/D/Q/E): Move camera fast.
(Shift) + (Spacebar) + (W/S/A/D/Q/E): Move camera very fast.
Right mouse button + Move mouse: Look around.
Middle mouse button + Move mouse: Pan.
Mousewheel up/down: Move camera forward.
(CTRL) + (H): Reset camera pitch to horizontal viewpoint.
(O) + Right mouse button: Orbit camera.
Doubleclick with right mouse button on models: Instantly 'teleport' to the
position that you clicked on.
MISCELLANEOUS
(F1): Editor quality: 1 Star (Shadows off and some Movie effects off).
(F2): Editor quality: 2 Stars (Soft shadows off).
(F3): Editor quality: 3 Stars (Lowquality terrain and terrain shadows off).
(F4): Editor quality: 4 Stars (Highest quality level).
(F5): Quick save (Saves a file called QuickSave).
(F7): View the Lumion terrain at the maximum level of detail.
(F8): Hold down this key to temporarily show shadows from spotlights.
(F9): If you press F9, all trees and plants in the viewport will be rendered at their
best level of detail, so that it's easier to see where you need to add more trees and
plants in a scene.
Settings > (CTRL) + (F11): Go to Settings before pressing these keys to toggle
between Fullscreen and Windowed mode.
Settings > (F11): Maximize window with/without taskbar (press twice to toggle).
Sliders: You can doubleclick on all sliders in Lumion to manually type in values.
Press Shift while adjusting slider values to finetune them (more digits after the
decimal point will be displayed).
(G) + Mouse cursor on terrain material slot: Move grass to the desired terrain
material slot.
SAVE & LOAD CAMERA VIEWPOINTS
(CTRL) + (1) (2) … (9) (0): Use this function to save up to 10 camera positions.
All photos are saved in Photo Set 1.
(SHIFT) + (1) (2) … (9) (0): Load previously saved camera viewpoints. The
saved slots are also available as easily accessible thumbnail images in Photo Set 1
in Photo mode.
SELECTING, COPYING AND MOVING
Place Mode (Objects) >
(CTRL) + Drag with Left mouse button: Rectangular selection tool for selecting
multiple objects.
(CTRL) + (SHIFT) + Drag with Left mouse button: Add new rectangular
selection to existing selection.
(CTRL) + Click anywhere with Left mouse button: Deselect all objects.
(CTRL) + Leftclick: Randomly place 10 copies of the currently active object
library model.
(V) + Leftclick: Place a new object with +/0 to 50% random scale.
(CTRL) + (V) + Leftclick: Combined operation of above mentioned Place Object
Modes. Randomly place 10 copies of the currently active object library model with
+/0 to 50% random scale.
(ALT) + Move selected object(s): Copypaste selected object(s) by pressing
(ALT) while dragging one of the selected objects.
(H): Hold down this key and click + drag a model icon to move the model up or
down.
(L): Hold down this key and click + drag a model icon to scale the model.
(R): Hold down this key and click + drag a model icon to rotate the heading of the
model.
Move Mode (Objects) >
Drag with Left mouse button: Rectangular selection tool for selecting multiple
objects.
(SHIFT) + Drag with Left mouse button: Add new rectangular selection to
existing selection.
Click anywhere with Left mouse button: Deselect all objects.
(ALT) + Move selected object(s): Copypaste selected object(s) by pressing
(ALT) while dragging one of the selected objects.
Both Place and Move Mode
(N): Holding down this key while moving objects will now ensure that the objects
only move along the X axis. This also applies to the Move and Advanced Move
effects in Movie mode.
(M): Holding down this key while moving objects will now ensure that the objects
only move along the Z axis. This also applies to the Move and Advanced Move
effects in Movie mode.
Context Menu: Use above Place Mode or Move Mode key and mouse options to
select first.
Other Keys:
(F12): Drag Model mode lets you move objects by clicking directly on them and
dragging the mouse to move them. In addition, (H) lets you move objects up and
down while (R) allows you to rotate them.
(G): This function will make objects that you are moving or placing in your scene
snap to the Lumion terrain while ignoring all other object types.
(F): The orientation of all objects (apart from Trees/plants) can be made to adapt
to the surface angles of other objects. Move object button > Press (F) for "Flatten"
> Move the object(s) to make them adapt to the surface angles of other objects.
This function only works on surfaces that are facing the sky, i.e. less than 90
degree angles.
(SHIFT) + Move selected object(s): Press shift while dragging selected objects
to move them horizontally with snapping turned off.
(SHIFT) + Rotate selected object(s): Press shift while rotating objects to
temporarily turn the 45 degree angle snapping off.
(K) + Rotate selected object(s): Press (K) while rotating objects to make all of
the objects face the mouse cursor.
CONTEXT MENU
Use the selection methods from above with the Context Menu to alter the position,
size, rotation, and alignment of objects.
Same Height/Same Rotation command: The selected objects will be placed at
the same height as the object you clicked on.
Select objects > Context Menu > Click on the icon of the object that has the
height you want the other objects to inherit > Transformation > Same
height.
Same Rotation command: The selected objects will inherit rotation from the
object you clicked on.
Select objects > Context Menu > Click on the icon of the object that has the
rotation you want the other objects to inherit > Transformation > Same
Rotation.
Place On Ground command: The selected objects will be placed on the Lumion
Terrain or the Imported Object if it is Marked as Terrain.
Select objects > Context Menu > Click on the icon of the object that has the
rotation you want the other objects to inherit > Transformation > Place On
Ground.
Space command: The selected objects will be placed in a straight line as defined
by the object that you clicked on to execute the command and the object that is
furthest away from that object.
Select objects > Context Menu > Click on the selection icon of one of the
selected objects > Transformation > Space.
Align command: This command lets you centre selected objects so that their pivot
points are at the same position.
Select objects > Context Menu > Transformation > Align). If you need to
move or manipulate one of the overlapping objects, place the mouse cursor
over the small overlapping object selection icons and use the Arrow Up/Down
keys to toggle between the objects.
Reset Size Rotation command: The selected objects will be set to their size and
rotation when originally placed in the scene.
Select objects > Context Menu > Click on the selection icon of one of the
selected objects > Transformation > Reset Size Rotation.
Space XZ command: The selected objects will be moved at their current height,
and spaced evenly between the first and last object selected in the XZ world plane.
Select objects > Context Menu > Click on the selection icon of one of the
selected objects > Transformation > Space XZ.
Randomize command: You can change the selected objects Position, or Rotation,
or both Rotation and Size(Scale) to random amounts.
Select objects > Context Menu > Click on the selection icon of one of the
selected objects > Transformation > Randomize.
Lock Position command: The selected objects will be locked for position, height,
size and rotation.
Select objects > Context Menu > Click on the selection icon of one of the
selected objects > Transformation > Lock Position.
SMF 2.0.7 | SMF © 2014, Simple Machines