Quick Reference
Bạn đang xem bản rút gọn của tài liệu. Xem và tải ngay bản đầy đủ của tài liệu tại đây (73.24 KB, 22 trang )
Chapter 9 Quick Reference 83
CHAPTER
9
Quick Reference
This section lists common tasks for application development, keyboard shortcuts for
use in the IDE, and abbreviations for coding in the Source Editor. You can see a
complete list of keyboard shortcuts by choosing Menu > Keyboard Shortcuts from
the main menu.
You can also modify and assign keyboard shortcuts for IDE actions in the Options
window. To view or change shortcuts for IDE actions, open the Options window and
choose Keymap in the left pane. In the right pane, select the action and enter or
change the keyboard shortcut in the Shortcuts text area.
This section covers:
■
Window Navigation Shortcuts
■
Project Tasks
■
VCS Tasks
■
Configuring Tasks
■
Source Editor Tasks
■
Source Editor Abbreviations for Java Files
■
Source Editor Abbreviations for JSP and Servlet Files
■
Source Editor Abbreviations for XML and DTD Files
■
Special Code Template Syntax
■
Build Tasks
■
Running J2SE Application Tasks
■
Running Web Application Tasks
■
Debugging Tasks
■
JUnit Tasks
Using NetBeans
TM
5.0 IDE
84 Chapter 9 Quick Reference
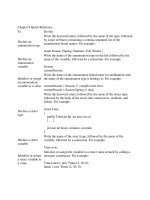
Window Navigation Shortcuts
Keys Action
Ctrl-0 Switches focus to the Source Editor.
Ctrl-1/Ctrl-Shift-1 Switches focus to the Projects window.
Ctrl-2/Ctrl-Shift-2 Switches focus to the Files window.
Ctrl-3/Ctrl-Shift-3 Switches focus to the Favorites window.
Ctrl-4 Switches focus to the Output window.
Ctrl-5 Switches focus to the Runtime window.
Ctrl-6 Switches focus to the To Do window.
Ctrl-7 Switches focus to the Navigator window.
Ctrl-8/Ctrl-Shift-8 Opens the Versioning window.
Alt-Shift-1 Opens the Local Variables debugger window.
Alt-Shift-2 Opens the Watches debugger window.
Alt-Shift-3 Opens the Call Stack debugger window.
Alt-Shift-4 Opens the Classes debugger window.
Alt-Shift-5 Opens the Breakpoints debugger window.
Alt-Shift-6 Opens the Sessions debugger window.
Alt-Shift-7 Opens the Threads debugger window.
Alt-Shift-8 Opens the Sources window.
Ctrl-Tab Toggles through the open windows in the order
that they were last used. The dialog box displays
all open windows and each of the open
documents in the Source Editor.
Shift-Escape Maximizes the Source Editor or the present
window.
Ctrl-F4 Closes the current tab in the current window. If
the window has no tabs, the whole window is
closed.
Ctrl-Shift-F4 Closes all open documents in the Source Editor.
Shift-F4 Opens the Documents dialog box, in which you
can save and close groups of open documents.
Alt-right Displays the next tab in the current window.
Alt-left Displays the previous tab in the current window..
Using NetBeans
TM
5.0 IDE
Chapter 9 Quick Reference 85
Project Tasks
To perform this task Follow these steps
Create a project. 1. Choose File > New Project (Ctrl-Shift-N).
2. Select the right template for your project.
Add a JAR file to a
standard project's
classpath.
1. In the Projects window, right-click the node for
the project and choose Properties.
2. In the Project Properties dialog box, select the
Libraries node in the Categories pane and
ensure the Compile tab is selected.
3. Click Add JAR and select the JAR file in the file
chooser.
Note: If you also want to attach source code and
Javadoc for the JAR file, click Add Library
instead.
Set up compilation
dependencies
between projects.
1. In the Projects window, right-click the node for
the project and choose Properties.
2. In the Project Properties dialog box, select the
Libraries node in the Categories pane and
ensure the Compile tab is selected.
3. Click Add Project and select the project folder
for the project that you want to add to the
classpath.
Open required
projects.
• In the Projects window, right-click the project
node and choose Open Required Projects.
Build a project. • Choose Build > Build Main Project (F11) or
right-click any project node and choose Build
Project.
Clean a project. • Right-click the project node and choose Clean
Project.
Clean and build a
project.
• Right-click the project node and choose Clean
and Build Main Project (Shift-F11).
Run a project. • Choose Run > Run Main Project (F6) or right-
click any project node and choose Run Project.
Debug a project. • Choose Run > Debug Main Project (F5) or right-
click any project and choose Debug Project.
Using NetBeans
TM
5.0 IDE
86 Chapter 9 Quick Reference
Specify sources for a
JAR file on the
project classpath.
1. Choose Tools > Library Manager from the main
window.
2. If the JAR file is not already registered in the
Library Manager, create a new empty library
using the Add Library button.
3. Select the library in the left panel of the Library
Manager.
4. In the Classpath tab, click Add JAR/Folder and
specify the location of the JAR file containing
the compiled class files. Note: A library can
contain multiple JAR files.
5. In the Sources tab, add the folder or archive file
containing the source code.
Specify Javadoc for
a JAR file on the
project classpath.
1. Choose Tools > Library Manager from the main
window.
2. If the JAR file is not already registered in the
Library Manager, register the JAR file as
described above.
3. In the Javadoc tab, click Add ZIP/Folder and
specify the location of the Javadoc files.
Set the main project. • Right-click the project node and choose Set
Main Project.
To perform this task Follow these steps
Using NetBeans
TM
5.0 IDE
Chapter 9 Quick Reference 87
VCS Tasks
To perform this task Follow these steps
Check out sources. 1. Select CVS > Checkout from the main menu.
2. In the CVS dialog box, specify the CVS
repository root location and password and click
Next.
3. Specify the modules you wish to check out.
You can checkout specific modules and
branches by clicking the Select button and
choosing from options available.
4. Specify the location of the local folder.
5. Click Finish to check out the files.
Update local file
versions.
1. In the Project, Files or Favorites window, right-
click the file's node that you wish to update and
choose CVS > Update.
Diff files. 1. In the Project, Files or Favorites window, right-
click the appropriate revision node and choose
CVS > Diff.
Commit local
changes.
2. Ensure that your local copies of the files are up
to date by right-clicking and choosing CVS >
Update before proceeding.
3. Right-click the files or directories you wish to
commit and choose CVS > Commit.
Merge revisions. 1. In the Project, Files or Favorites window, right-
click the appropriate revision node and choose
CVS > Merge Changes from Branch.
2. In the Merge Changes from Branch dialog box,
specify the options for the merge and click
Merge.
Configure global
VCS options.
1. Choose Tools > Options and click the Advanced
Options button in the Options window.
2. Expand the Server and External Tool Settings
node and then the Diff and Merge Types node
in the left pane.
3. Select the node to modify in the left pane and
edit the desired properties in the right pane of
the Options window.
Using NetBeans
TM
5.0 IDE
88 Chapter 9 Quick Reference
Configuring Tasks
To perform this task Follow these steps
Configure general
options
1. Choose Tools > Options from the main menu.
2. In the left pane of the Options window,
select a
category in the left pane to display the
settings options in the right pane
.
3. Specify the desired settings
in the right pane
of
the Options window.
Set the IDE's web
browser
1. Choose Tools > Options from the main menu.
2. Select the General category in the left pane of
the Options window and select the desired
browser from the Web Browser drop-down list.
Configure proxy
settings
1. Choose Tools > Options from the main menu.
2. Select the General category in the left pane of
the Options window and specify the proxy
settings in right pane. To use a proxy server,
select the HTTP Proxy check box and type the
Proxy Host and Proxy Port.
Configure the Auto
Update feature
1. Choose Tools > Options from the main menu.
2. In the Check Period drop-down list, choose how
often you want the IDE to automatically check
the Update Center for updates.
Configure
Advanced IDE
options
1. Choose Tools > Options from the main menu.
2. Click the Advanced Options button in the
Options window to see the the Advanced view.
3. Select a node in the left pane and set the
properties as desired in the right pane.
Configure General
Java Settings
1. From the main menu, choose Tools > Options.
2. In the Advanced Options view, expand the
Editing node and select Java Sources in the left
pane of the window.
1. Set properties as desired in the right pane of the
window.
Using NetBeans
TM
5.0 IDE
Chapter 9 Quick Reference 89
Customize the IDE's
Menus
1. In the Advanced Options view, expand IDE
Configuration > Look and Feel > Menu Bar.
2. Right-click the Menu Bar node and choose Add
> Menu.
3. In the New Menu dialog box, type a name for
the menu and click OK.
The IDE adds an empty menu to the main
window.
4. Expand the Actions node and find the
command you want to add to the menu, then
right-click the command node and choose Copy.
5. Expand the Menu Bar node, right-click the node
of the menu you just created, and choose Paste
> Copy.
Customize the
toolbar in the IDE
1. From the main window, choose View > Toolbars
> Customize, or right-click the IDE toolbar and
choose Customize.
2. In the Customize Toolbars dialog box, click
New Toolbar and name your toolbar.
3. The IDE adds an empty toolbar to the main
window. You can now drag an item from the
Customize Toolbars dialog box to your new
toolbar.
Install additional
modules
1. Choose Tools > Update Center from the main
menu.
2. Designate the update center location you want
to connect to in the Update Center wizard and
click Next.
3. Select the modules you wish to install.
4. Review the licensing agreement and click
Accept.
Enable and disable
modules
1. Choose Tools > Module Manager from the main
menu to open the Module Manager.
2. Select or deselect the Active checkbox to
activate or deactivate that module.
You can check for new modules by clicking the
Update button in the Module Manager to open
the Update Center Wizard.
To perform this task Follow these steps
Using NetBeans
TM
5.0 IDE
90 Chapter 9 Quick Reference
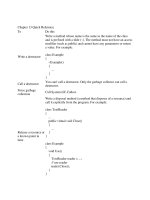
Source Editor Tasks
To perform this task Follow these steps
Open a file that is
not available in the
Projects window or
the Files window.
1. Choose File > Open File (Ctrl-O).
2. In the file chooser, navigate to the file and then
click Open.
Maximize a tab in
the Source Editor.
Do one of the following:
• Double-click a file's tab in the Source Editor.
• Make sure that the Source Editor window has
focus and then press Shift-Escape.
• Choose Window > Maximize.
Revert a maximized
Source Editor to its
previous size.
Do one of the following:
• Double-click a file's tab in the Source Editor.
• Press Shift-Escape.
• Choose Window > Restore.
Display line
numbers.
Choose View > Show Line Numbers.
View two files
simultaneously.
1. Open two or more files.
2. Click the tab of one of the files and drag it to
the side of the window where you want the file
to be placed. Once the red preview box appears
indicating the correct location for the window,
release the mouse button to drop the window.
The window can be split horizontally or vertically,
depending on where you drag the tab.
Split the view of a
single file.
1. Right-click the document's tab in the Source
Editor and choose Clone Document.
2. Click the tab of the cloned document and drag
it to the part of the window where you want the
copy to be placed.
Format code
automatically.
• Right-click in the Source Editor and choose
Reformat Code.
If any text is selected, only that text will be
reformatted. If no text is selected, then the whole
file is reformatted.