Oracle Unleashed- P6
Bạn đang xem bản rút gọn của tài liệu. Xem và tải ngay bản đầy đủ của tài liệu tại đây (199.73 KB, 50 trang )
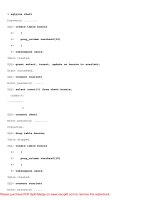
Enter table name or . if done: dept
Enter table name or . if done: .
The last example is from full database mode.
Import entire export file (yes/no): yes >Y
User Mode
The user method of Import enables you to import tables that belong to a specific user. This can also be combined with
the table mode to import specific tables from a specific schema. This is important because Import attempts to create the
tables in the current schema's default tablespace if the schema specified in the export file does not exist. This can work to
your advantage if you need to move tables from one schema to another.
Table Mode
You usually use table mode to import a table or a list of tables, rather than all tables in the export file. If a user has access
to other schema, he can import tables from other schema by qualifying with the schema name. The default is to import
all tables in the schema of the user doing the import.
Full Database Mode
The full database option of Import does not quite work the same way as the full database option of Export. If you specify
the full database option in Export, the entire database is exported, and to import the entire file, you must have the role
IMP_FULL_DATABASE assigned to you. If the export file is a user export or table export, the entire export file is
imported (whatever is in it), and you do not need to have the role IMP_FULL_DATABASE assigned to you.
Interactive Versus Command Line
Both Import and Export can operate in command-line mode and in interactive mode. Both modes have their advantages,
but Oracle recommends that you use the command-line mode with a parameter file. The two modes are outlined in this
section. I'm sure you will find good reasons for using both in your own situation.
Interactive Method
The interactive method is an easy way to import data from export files, but you do not have all the options of the
parameter or command-line method. For example, you cannot create an index file. The interactive prompts might change
depending on the response to previous prompts. The interactive prompts also have the benefit of showing the prechosen
defaults. To use Import in the interactive mode, type imp or imp USERID=userid/password at the command line.
The interactive method continues to exist only for backward compatibility.
An interactive import might resemble the following:
/usr/local/p3016dk > imp scott/tiger
Please purchase PDF Split-Merge on www.verypdf.com to remove this watermark.
Import: Release 7.1.4.1.0 - Production on Sun Oct 1 10:12:54 1995
Copyright (c) Oracle Corporation 1979, 1994. All rights reserved.
Connected to: Oracle7 Server Release 7.1.4.1.0 - Production Release
With the distributed and parallel query options
PL/SQL Release 2.1.4.0.0 - Production
Import file: ./expdat.dmp > scott.dmp
Enter insert buffer size (minimum is 4096) 30720>
Export file created by EXPORT:V07.01.04
List contents of import file only (yes/no): no >
Ignore create error due to object existence (yes/no): yes > n
Import grants (yes/no): yes > y
Import table data (yes/no): yes > y
Import entire export file (yes/no): yes > y
Command-Line Method
The same import can be accomplished by entering the following command-line options.
imp USERID=scott/tiger FILE=scott.dmp ignore=N
Import responds with the following:
Import: Release 7.1.4.1.0 - Production on Sun Oct 1 10:19:12 1995
Copyright (c) Oracle Corporation 1979, 1994. All rights reserved.
Connected to: Oracle7 Server Release 7.1.4.1.0 - Production Release
With the distributed and parallel query options
PL/SQL Release 2.1.4.0.0 - Production
Export file created by EXPORT:V07.01.04
. importing SCOTT's objects into SCOTT
. . importing table "BONUS" 0 rows imported
. . importing table "CUSTOMER" 9 rows imported
. . importing table "DEPT" 4 rows imported
. . importing table "DUMMY" 1 rows imported
Please purchase PDF Split-Merge on www.verypdf.com to remove this watermark.
. . importing table "EMP" 14 rows imported
. . importing table "EXECUTABLES" 0 rows imported
. . importing table "FALL5" 30 rows imported
. . importing table "ITEM" 64 rows imported
. . importing table "ORD" 21 rows imported
. . importing table "PRICE" 17 rows imported
Import terminated successfully without warnings.
Import Parameters That Affect Performance
As with Export, Import also has several parameters that affect performance. This section lists the parameters that affect
performance the most along with an explanation of how they work and how to use them.
BUFFER
The BUFFER parameter for Import works the same way as the BUFFER parameter in Export. For the most part, you can
specify a large value for best results.
COMMIT
The COMMIT parameter defaults to N, but if do not have large rollback segments to use (at least as large as the largest
table), set this option to Y. If you set COMMIT to Y, Import commits every time the buffer fills and the array is inserted.
The only significant performance gain you will notice is when your import fails because of a rollback issue and you must
redo an import.
LOG
Quite simply, always use the LOG parameter so you can review the log file and effectively fix anything that went wrong.
How Objects Import
Objects are created in a specific order as the import progresses. The important thing to remember is that Import first
creates the table and then loads the data for each table. Import creates all the indexes on the tables after it loads all the
table data. Finally, Import enables all the table constraints and triggers. In some situations, the table constraints can cause
interesting results (usually undesirable). If you are in the habit of precreating the tables before the import as I am, you
know you'd better disable the constraints before importing. Reenable the constraints when the import is finished. Don't
forget!
Tables
Import first creates the table definitions and then loads the data. Import creates all the indexes for the table and then
creates and enables the constraints and database triggers. The important thing to note is that all the tables are loaded and
all of the indexes are created a table at a time. When the tables are finished, Import creates and reenables all the table
constraints.
Stored Procedures
Please purchase PDF Split-Merge on www.verypdf.com to remove this watermark.
Packages, functions, and stored procedures are imported without updating the time stamp. This enables Oracle to use the
objects without recompiling them.
Snapshots
Snapshots are exported quite uneventfully. Oracle exports and imports the master table, the master table trigger, the
snapshot log (if you are using one), and the snapshot itself, similar to exporting and importing tables and database
triggers. If you are using a snapshot log, only the snapshot log definition is exported and imported. What this means to
you is that the first fast refresh that is attempted on that snapshot will fail. Plan on a complete refresh of all of the
imported snapshots after the import is complete.
Importing and Exporting with Personal Oracle7
My world has not been the same since Oracle introduced Personal Oracle7. I have been able to develop complete
applications on my PC at home. Although I do not have a PC platform that compares with our Sequent, HP, or DG
platforms, I can't resist the desire to develop applications on it. I haven't yet used Personal Oracle7 for any production
applications, but I am sure many people have.
All of us who have had the pleasure of experiencing Personal Oracle7 will agree that the Windows front end on the
Import and Export utilities is a nice addition to the old familiar utilities. I think that many Personal Oracle7 users like me
are developing applications. I find myself exporting tables from the true development platforms at the job site and then
importing them into my PC database so I can develop whenever and whatever I like.
Using the Personal Oracle7 version of Import and Export is quite a bit different from the old standards. Personal Oracle7
has a nice GUI interface that is hard to beat. It still works internally the same way as the character versions and outputs
files that you can transfer to other Oracle instances. The main difference in Personal Oracle7 is the Windows front end.
Figure 9.1 shows the Export utility in Personal Oracle7; the title bar has the caption Database Exporter. The first thing
you notice is that parameters are represented by text boxes, checkboxes, or pull-down lists. Figure 9.2 shows the
advanced options. The advanced options are Record Length (RECORDLENGTH), Buffer Size (BUFFER), Record
Export in System Data (RECORD), Keep Components Consistent (CONSISTENT), Compress When Imported
(COMPRESS), Log File (LOG) Increment Type (INCTYPE), and Statistics Type (STATISTICS). The other Export
parameters follow similar translations.
Figure 9.1. Personal Oracle's Export utility.
Figure 9.2. Export utility advanced options.
Figure 9.3 and 9.4 show the Database Importer and the advanced options available. The Database Importer closely
resembles the Exporter's look and feel. I do not go into detail because its functionality is fairly obvious.
Figure 9.3. The Import utility.
Figure 9.4. Import utility advanced options.
Import and Export Hints and Tips
You can use Import and Export for tasks other than just backing up data. I often use Import and Export for several other
constructive reasons, and this section outlines a few of the best hints and tips.
Please purchase PDF Split-Merge on www.verypdf.com to remove this watermark.
Create an Index File
Import can create what is known as an index file. This is a SQL script of not only the creation scripts for the indexes in
the export file but also creation scripts for the other database objects in the export file. All the lines in the file except for
the index creation scripts are commented out. The commented-out code contains creation scripts for the remaining
objects in the export file. With some editing, you can create a script that can be used to precreate all the tables and
indexes and so on. This is often necessary if you use the parameter COMPRESS=Y.
Adjusting Storage Parameters
Using the parameter COMPRESS=Y rewrites the original storage parameters so that the table or index resides on one
contiguous extent. Compressing the extents is a good idea as long as you actually have the contiguous extents available.
I suggest precreating the tables and indexes with your edited INDEXFILE. This ensures that you can actually create the
objects. Of course, if any table or index fails to create, you can adjust the initial and next extents in the INDEXFILE and
attempt to create the table again. This is also a good time to adjust the PCTFREE and PCTUSED and the
TABLESPACE parameters (or any of the other table parameters) in the table and index creation statements. I highly
recommend that you study and adjust the size requirement if necessary at this time, especially if the storage parameters
are set to their defaults. I don't go into great detail, but here are some good places to start if you have a mess of default
storage parameters:
Parameter Defaults to Set to
PCTFREE 10% 5-20%
PCTUSED 40% 55-90%
PCTINCREASE 50% 0%
INITIAL 10240 or 2048 All data in one extent plus some growth if possible
NEXT 10240 or 20480
25% up to the size of INITIAL
There are other storage parameters, but these five are typically the most important to me.
Reorganizing Data
Users own tables, indexes, and other objects. The tables and indexes users create reside in tablespaces. If you were to
export a user's tables, drop them, and then import them, they end up in the user's default tablespace again. If you need to
move tables from one tablespace to another, you export the tables and change the user's default tablespace and quotas to
another tablespace that you want to contain the tables. Then, when you reimport the tables, they are created in the new
default tablespace.
Reducing Database Fragmentation
When a database has many small blocks of free space, you should export it with the FULL=Y parameter. Recreate the
database and then do a full database import. Tablespaces also need similar help. You should plan carefully where and
how many data files a tablespace has. To recreate the tablespace, export all the objects, using the nifty script I provided if
Please purchase PDF Split-Merge on www.verypdf.com to remove this watermark.
you like. Drop the tablespace including its contents. Recreate the tablespace and then import the fresh new tablespace.
Migrating from Version 6 to Oracle7
Import can read export files from Version 6 Oracle. You could use this function to migrate by exporting the Version 6
database and then recreating the database in Oracle7. Some data type changes occurred after Version 6; the old Version 6
CHAR data type changed to VARCHAR2. Import handles this conversion for you. If you're wondering who is going to
change all your table creation scripts from the old CHAR data type to VARCHAR2, try using the INDEXFILE
parameter explained earlier. Oracle7 provides vastly expanded integrity constraints, and the SQL syntax is slightly
different from Version 6. All the existing constraints are exported, but only the NOT NULL constraint is imported and
enabled.
Importing Tables with LONG and LONG RAW Data Types
Did you know it is possible to export a table with extremely large columns (LONG data types can be up to 2 GB in
length) only to discover that they cannot be imported? It hasn't happened to me, but Oracle reports that this could
happen. The reason is that Export can break up the long data, but Import must read the data into contiguous memory to
import. If you do not have enough memory, the import fails.
Summary
Import and Export not only provide data recovery, but they have quite a few database management uses as well. I am
sure you will find yourself using Import and Export often to keep your database tuned well by reducing fragmentation
and enabling yourself to change the storage parameters of tables and their locations or owners. Whatever task you
choose for Import and Export, you will find them to be a stable pair of utilities that are easy to use.
Previous
Page
TOC
Next
Page
Home
Please purchase PDF Split-Merge on www.verypdf.com to remove this watermark.
Previous
Page
TOC
Next
Page
Home
●
Part III
Part III
Database Administration
Previous
Page
TOC
Next
Page
Home
Please purchase PDF Split-Merge on www.verypdf.com to remove this watermark.
Previous
Page
TOC
Next
Page
Home
●
10
❍
Installation
■
Oracle Software Options
■
Base Product
■
Procedural Option
■
Distributed Option
■
Parallel Server Option
■
Parallel Query Option
■
Trusted Oracle
■
Installation Preparation
■
Installing the Software
■
Directory Structure
■
Operating System Specifics
■
UNIX
■
VMS
■
MS Windows
■
Summary
10
Installation
In this chapter we look at some of the issues involved in installing the Oracle software and database. However, since
Oracle runs on over 90 different platforms, we can only give an overview of the process involved here—the specifics for
your operating system can be found in the Oracle Installation and User's Guide manual which comes with the software.
In addition, the last-minute System Release Bulletin that comes with the software should be studied, along with the even
later produced README.DOC file that is on the install media.
On most platforms, if a user process connects directly to the database server machine, two things must be known. One is
the starting location of the Oracle software directory, and the other is the instance identifier to which the user process
will connect to. This information is provided in different ways on different operating systems, but many use an operating
system command file named something such as "orauser" or "oraenv" to set up these operating system variables as soon
as a user logs into the machine.
During the installation process, on most machines, an option is given to install a default database by choosing some
menu options. Chapter 11, "Managing the Database," covers how to create a database if you either don't want to or can
not use the menus to give you this starting database. Usually the menus are sufficient to create a practice database, but
for production and real systems, more control is needed over the choices available when creating a new database.
Installation of the Oracle tools is usually done at the same time as installation of the Oracle software. For client/server
environments, an added complication is that the tools exist on a different machine than that on which the database
software resides. To allow the two machines to communicate between each other, some networking software must be
installed on both machines (such as TCP/IP), and on top of that both machines need a flavor of SQL*Net installed so that
the Oracle software can interface to the networking software. Installing SQL*Net software for the network protocol
you're using is usually done at the same time as installing the Oracle server software and tools software.
Please purchase PDF Split-Merge on www.verypdf.com to remove this watermark.
This is one of the areas where there are major differences between different operating systems due to the nature of the
process itself.
Oracle Software Options
When you purchase the Oracle software, a number of additional software options are available. However, these options
may not be available on all platforms at the same time (for example, at the time of this writing, the Distributed option
was not yet available on the Personal Oracle 7 version of the software).
Base Product
The standard product (without the addition of the procedural, distributed, parallel, or other options) gives you the SQL
language—without this not much can be done on the database. In the near future, the PL/SQL language is also to be
included in the standard, base product. In addition, the database only locks those rows which are actually being modified
instead of locking out the entire table. (This was an option that had to be purchased separately in version 6 of the
database server.)
The base product also includes the capability to do parallel recoveries in the case of media failure, which means that you
can have more than one process running the recover tablespace command. All of these processes can run in parallel and
will use whichever archived and online redo log files are required for the tablespace being recovered. Parallel tablespace
backup commands can also be issued, as well as parallel loads of data from operating system files using the SQL*Loader
product with the direct load path option, which is available with that product.
Procedural Option
The procedural option gives the you ability to use PL/SQL and to create procedures, functions, packages, and database
triggers. At the time of this writing, this was being bundled in as part of the base product, and so was not an additional
option for most platforms.
Distributed Option
The base product itself gives you the ability to write distributed queries—queries which in the same transaction or even
in the same statement, query tables on one or more databases, usually by using database links (which have already been
defined by the database administrator). In addition, the user can connect to a remote database and make changes to tables
on that database.
However, one thing that is not possible without the distributed option is the capability to make changes to tables on more
than one database within the same transaction (the same commit unit). The distributed option allows one transaction to
make changes to more than one database. When the changes are committed (or rolled back), the Oracle server software
ensures that either all the databases commit, or if anything goes wrong, that they all rollback the work. This is provided
without requiring the developer to put in any more code than the normal commit or rollback statement.
The synchronization mechanism is provided using the 2-Phase Commit algorithm, which synchronizes all the databases
involved.
In addition, with the distributed option, one non-Oracle database can take part in a distributed transaction. Usually this
involves using the Oracle Gateway products which allow access to non-Oracle data sources.
If any failures do occur with a distributed transaction, the Oracle RECO background process periodically tries to either
commit or to rollback the changes on the databases involved. It is better for the database administrator to allow the
RECO process to recover the distributed transaction without getting involved. The Oracle data dictionary tables,
DBA_2PC_NEIGHBORS and DBA_2PC_PENDING, give further information on the transactions which have been
Please purchase PDF Split-Merge on www.verypdf.com to remove this watermark.
involved in a distributed failure.
The distributed option is also required if you wish to create Snapshots which are copies of tables (usually) on other
databases which are automatically replicated to your database at user defined intervals. In addition, the distributed option
includes the capability to call procedures, functions, and packages, which have been defined on remote databases. So, in
theory though not very practically, you can hold the database procedures, functions, and packages on one central
database, and all other databases can make calls to this central copy of the code.
Parallel Server Option
The Oracle parallel server option allows more than one instance to access the same set of database files. This option
ensures, for example, that if a row is locked on one instance that it is reported as locked on any other instances accessing
the same database.
The parallel server option is be used where more than one processor is available (either in the same machine or in
different machines which have been clustered together).
Parallel Query Option
The parallel query option improves performance of full-table scans. This allows a large query to be executed by multiple
processes so that many processes can be used to perform parts of the query, with the results being merged together
automatically.
In addition, the parallel query option allows creation of indexes in parallel. This is similar in concept to the parallel query
mentioned earlier, where more than one process can be used to build different parts of the index, and the results from
each of these processes is merged together.
The parallel query option normally runs on those machines where more than one processor has been installed so that you
can use the processing power of more than one processor to perform the heavy-load work which you require.
Trusted Oracle
Trusted Oracle provides additional security than what is available with the base product and is usually found either in
military type applications or those where a high level of security is required. This gives, for example, the ability to
control which rows are accessible to which users. This is not easily done with the base product.
Tip: Use the v$version view, which is accessible to the system user, to see which versions of the Oracle
product you have installed. In addition, the v$compatseg view shows which version of the Oracle server software
introduced some of the new releases.
Installation Preparation
The actual process of installing the Oracle software and creating the first database is relatively easy on most platforms
because you can follow the menu options; however, preparation before the actual install pays dividends in the long run.
One of the first things to consider is the amount of disk space required both for the software and for the database itself.
In addition, the locations of the program files, database files, redo logs, and control files should be carefully considered
so that disk contention does not occur.
Please purchase PDF Split-Merge on www.verypdf.com to remove this watermark.
The amount of storage required for the software varies from platform to platform—the Oracle installation and User's
Guide manual for your platform should be able to give you an idea for the amount of storage required.
The amount of memory required for Oracle will be split into the memory required for the Oracle software to load (much
of which is re-entrant code that can be used at the same time by more than one process), the common memory areas
(such as the SGA), and the private memory areas (such as the PGA for each connection to the database), as well as
memory for the client programs which are executing. Though, this may be on a different machine than the one on which
the database server is being run.
The default memory allocations (especially for the common SGA area) is not sufficient for most databases.
In addition, some operating system specific issues need to be addressed (such as the number of semaphore sets in
UNIX)—most of which will be detailed in the installation and user's guide manual.
Installing the Software
Most platforms have a menu driven installation script or, even better, an installation program that makes the installation
a one-stop point-and-click operation, such as the program for installing the Oracle software on the Microsoft Windows
platform. Because dependencies exist between different components of the Oracle software, the menu first prompts for
the components of software to be installed and works out the dependencies between the different components so that all
required components are installed.
On some platforms, it may be necessary to create an operating system account with a high-level of privileges which will
be used to install the software (usually called Oracle7).
The operations of connecting as internal, starting up the instance, shutting down the instance, and creating a database are
all privileged operations. They can all be performed from within the SQL*DBA tool (or from the server manager tool if
that is available on your platform). As a result, your operating system account needs to have the necessary operating
system privileges in order to perform these operations (UNIX groups on UNIX, or process rights on VMS, for example).
The way that Oracle determines whether these privileges are in effect is different from platform to platform.
At the time of this writing there is no check to ensure that you only install the products for which you are licensed, or
that you do not exceed the number of users for which you've bought the license for.
Use the v$license view to determine whether you are exceeding the number of users for which you're
licensed.
Directory Structure
For those platforms where a hierarchical directory structure exists, the Oracle default home directory has a name such as
"Oracle7," and below this you'll find many subdirectories—usually one for each product being installed. Within each of
these product subdirectories, further subdirectories exist for things such as the install scripts, demo files, and so on.
The directory structure underneath the Oracle home directory should not be changed—Oracle needs to know
Please purchase PDF Split-Merge on www.verypdf.com to remove this watermark.
where to find the different files for the software being installed.
For those platforms that support it, an operating system environment variable exists to define where the starting location
is for the Oracle software ($ORACLE_HOME for UNIX, ORA_ROOT for VMS and the ORACLE.INI file for the MS
Windows platform). Once this environment variable exists, Oracle can work out the locations of the subdirectories and
gain access to the files it requires.
It is also possible on some platforms to install many different versions of the Oracle software.
Operating System Specifics
In this section, we highlight some points for three of the major platforms for Oracle.
UNIX
In addition to an installation and user's guide manual being provided for your platform, there is also a generic UNIX
technical reference guide which applies to all UNIX platforms on which Oracle can be run. This should be read in
conjunction with the installation and user's guide before starting the install.
The $ORACLE_HOME environment variable is used to locate the home directory for the Oracle software, and the
$ORACLE_SID environment variable is used to determine which instance ID the user process will connect into.
The PATH environment variable should include the $ORACLE_HOME/bin directory so that you can access the various
Oracle components.
One of the options available for the UNIX platform is to allow Oracle to use raw disk devices—essentially this means
that the Oracle software can bypass the buffer manager for the disks and access the disk drives directly giving an
increase in performance. However, you should ensure that the necessary UNIX expertise is on-hand to manage raw disk
devices—something that is not to be considered for those sites new to UNIX and new to Oracle.
VMS
The ORA_ROOT logical is used to point to the location of the home directory for the Oracle software. In addition, the
ORA_SID symbol is used to determine the instance identifier of the instance to which user processes will connect.
MS Windows
This is nowadays one of the easiest platforms on which to install the Oracle tools and software.
The ORACLE.INI file is used to set the various parameters used by Oracle. The parameters ending with path control
where the Oracle software on the PC attempts to find the Oracle software. The default location of the database server
machine, the network protocol used to connect that machine, and the instance identifier used when a connection is made
to that machine, can be given by the LOCAL parameter in the INIT.ORA file.
Summary
In this chapter, you have seen an overview of some of the things to consider when installing the Oracle software. This is
one of the areas where major differences exist between different platforms. As mentioned earlier, you refer to the
installation and user's guide manual for your platform to learn the specifics for your platform.
Please purchase PDF Split-Merge on www.verypdf.com to remove this watermark.
Previous
Page
TOC
Next
Page
Home
Please purchase PDF Split-Merge on www.verypdf.com to remove this watermark.
Previous
Page
TOC
Next
Page
Home
●
11
❍
Managing the Database
■
The Parameter File: INIT.ORA
■
The Oracle SID
■
Creating a New Database
■
The First Objects Created
■
Startup and Shutdown
■
Startup Stages
■
Shutdown Stages
■
The Data Dictionary
■
Core System Tables
■
Data Dictionary Views
■
Dynamic Performance Tables
■
Other Data Dictionary Views
■
Redo Logs
■
Creating, Altering, and Dropping Redo Logs
■
Multiplexing Redo Logs
■
Control Files
■
Multiplexing Control Files
■
Trace and Alert Files
■
Database Modes
■
NOARCHIVELOG Mode
■
ARCHIVELOG Mode
■
Changing the Mode of the Database
■
Useful Data Dictionary Views
■
Summary
11
Managing the Database
In this chapter, you learn how to perform the following tasks:
●
Make a new Oracle database
●
Manage the instance by bringing the instance up and down
●
Obtain information from the Oracle system tables
●
Modify the number of control and redo log files
The Parameter File: INIT.ORA
An instance is the set of background processes and the memory structures that Oracle uses. Every instance must have a
parameter file, known as the INIT.ORA file, from which it retrieves the parameters that it uses to run and the mode of
Please purchase PDF Split-Merge on www.verypdf.com to remove this watermark.
the database. This parameter file is used by the Oracle SQL*DBA tool when the instance is first started. Once the
instance has been started, the parameter file is not used again until the next time the instance is started. The parameter
file must be on the same machine as the SQL*DBA tool.
INIT.ORA parameter files are used to specify
●
Amount of storage allocated for the Oracle memory structures
●
Which rollback segments to use for the instance
●
National language settings
●
Settings for running Oracle in parallel server mode
●
Which database and control file to use
●
When to issue checkpoints
●
Limits for database control structures
●
Which non-mandatory background processes to initialize
The file is given the generic name INIT.ORA, but the Oracle instance identifier is usually part of the filename. The name
can be any filename, but it usually begins with INIT.
The parameter file is an ordinary text file, which you modify using any character-based operating system text editor. The
parameters can be included in any order, and they can be specified in upper, lower, or mixed case.
Even though the parameters can be included in mixed case, the names of operating system files must be specified
according to the operating system's rules for file naming. In UNIX, for example, a filename must be specified exactly as
it appears on the file system.
You specify over 130 parameters. Most of them are common to all the platforms on which Oracle runs. The number of
the parameters increase from one release of the Oracle RDBMS software to the next.
An example parameter file comes with the Oracle software; its default name is INIT.ORA. You can use this file could to
run your instance, although you might have to adjust the parameters manually to obtain optimal performance.
It is possible to many parameter files for the same instance, although only one is used at a time for the instance startup. If
you want to use another set of parameters for the run, you must shut down and restart the instance.
Many parameters have a minimum value. If they are set below the minimum value, the Oracle instance does not start up.
The values of some parameters are derived from settings in other parameters. Normally, you do not need to set them.
There are even some parameters that you should not set unless the Oracle support desk instructs you to set them.
Appendix A of the Oracle7 Server Administrator's Guide describes all the different parameters.
Use one parameter file for the instance for normal online operations during the day. At night, use a
parameter file that optimizes performance for a batch job.
Please purchase PDF Split-Merge on www.verypdf.com to remove this watermark.
In the INIT.ORA file, the only parameter that is mandatory is the CONTROL_FILES parameter, which names one or
more control files to be used for the instance. This control files are used during instance startup to determine the names
and locations of the database and redo log files. Table 11.1 describes additional parameters for the INIT.ORA file.
Table 11.1. Important INIT.ORA parameters.
Parameter Name Description
AUDIT_TRAIL
Must be set to TRUE to enable auditing rows to be inserted, even if the auditing facility has
been set up by issuing the AUDIT SQL command.
BACKGROUND
_DUMP_DEST
Controls the directory location where the trace files from the Oracle background processes
are written. The alert file, which records significant database events and messages, is also
written to this location. You can delete the trace and alert files without affecting the
performance of the database.
CHECKPOINT_
PROCESS
Controls whether the Oracle CKPT background process is to be run. By running the CKPT
process, load is decreased from the LGWR process in updating the database file headers
whenever a checkpoint occurs.
CONTROL_FILES
Names one or more control files to be used for this instance. Control files are used during
instance startup to determine the name and location of the database and redo log files.
DB_BLOCK_BUFFERS
Specifies the number of Oracle database blocks to cache in the database buffers area of the
SGA. The default value of 32 is too small for all but test databases.
DB_BLOCK_SIZE
Specifies the size of each Oracle block in the database files. Set this parameter when you
first create the database and then do not alter it.
DML_LOCKS
Specifies the maximum number of DML locks that can be taken out by the instance. There
is one DML lock for each user for each table undergoing an INSERT, UPDATE, or
DELETE operation at any time for the instance.
INIT_SQL_FILES
Specifies the name of the sql files to be executed when the database is created. These files
are typically the Oracle-supplied files used to create the data dictionary, the views on the
data dictionary, and views that enable the export and import utilities to run. After these files
have been run during the CREATE DATABASE operation, they are never executed again.
LICENSE_MAX_
SESSIONS
Controls the maximum number of user sessions that can be connected to the Oracle
database at any time.
LOG_ARCHIVE_DEST
Controls the location to which the archived redo log files are written if the database runs in
ARCHIVELOG mode.
Please purchase PDF Split-Merge on www.verypdf.com to remove this watermark.
LOG_ARCHIVE_
FORMAT
Controls the naming format of the archived files if the database is running in
ARCHIVELOG mode. That way, the redo log sequence number, instance thread number, or
a fixed string can be inserted into the filename.
LOG_BUFFERS
Specifies the size of the redo log buffer in the SGA into which all changes are recorded
from all transactions on the instance.
LOG_
CHECKPOINT_
INTERVAL
Used to specify whether a checkpoint should occur earlier than the default time of a redo
log file switch. This should not normally be set for most systems, because more frequent
checkpointing incurs extra system overhead in writing out the changed database blocks in
the database buffer cache in the SGA.
LOG_CHECKPOINT
_TIMEOUT
Controls the amount of time to wait before issuing a checkpoint on the database. For
example, if this parameter is set to 1800 seconds (30 minutes), a checkpoint is performed
every 30 minutes, even if no activity has occurred on the system in the period.
MAX_DUMP
_FILE_SIZE
Specifies the maximum size of any trace files generated. If you use the trace facility to trace
large amounts of work, use this parameter to limit how much trace information can be
produced.
OPTIMIZER_MODE
Specifies the default mode for the Oracle optimizer, which determines the execution plan
for a SQL statement. The Oracle6 method is RULE, which means that the optimizer does
not take account of any statistics that were gathered on tables by using the ANALYZE
command. The default value, CHOOSE, uses statistics if they exist. Otherwise, it defaults to
the rule based on the optimization method.
OS_AUTHENT
_PREFIX
Specifies the proxy login. The Oracle user name defaults to the operating system user name
prefixed by OPS$. You can control the password by using this parameter. The default on
most platforms is OPS$, but you can change it to any prefix or even NULL.
PROCESSES
Controls the maximum number of operating system processes that can connect to the Oracle
database through this instance, which includes the background processes. Four background
processes are mandatory, and the instance cannot start without them.
RESOURCE_LIMIT
Must be set to TRUE to enforce checking of resource limits if system resources are
controlled through database profiles assigned to Oracle users. To set this parameter online,
use the ALTER SYSTEM command.
ROLLBACK_
SEGMENTS
Contains the names of private rollback segments that the instance should use for storing the
before-image of any changes made to the database. Rollback segments not mentioned here
can still be activated by using the ALTER ROLLBACK SEGMENT command. If no
rollback segments are activated, the SYSTEM rollback segment—normally reserved for
recording changes made to the Oracle data dictionary—is used for recording the before-
image of the Oracle data blocks. If more than one instance is using the Oracle database, they
cannot use the same rollback segments.
Please purchase PDF Split-Merge on www.verypdf.com to remove this watermark.
SEQUENCE_CACHE_
ENTRIES
Specifies the number of sequence objects to cache in the SGA for generating unique
numbers using sequences. The sequences must have been created with the CACHE
parameter specified as part of the CREATE SEQUENCE statement.
SHARED_POOL_SIZE
Specifies the size of the shared pool area in the SGA that is used to hold the data dictionary
cache, cursors for SQL statements, and PL/SQL code units.
SMALL_TABLE_
THRESHOLD
Sets the low threshold for the data blocks in an Oracle table. Tables with Oracle data blocks
below this limit are read into the SGA completely when you perform a full table scan on
them. If a table has more data blocks than this limit, the full table access of the table uses
only a portion of the lower part of the database buffers cache of the SGA. This ensures that
active blocks in the SGA from other tables are not removed from memory when a full table
scan is performed on a large table.
SQL_TRACE
Turns on the trace facility for the instance when set to TRUE. With tracing on, execution
plans and statement performance can be determined by formatting the trace files produced
with the TKPROF utility. Timing information is provided only if the TIMED_STATISTICS
parameter is also set to TRUE.
TIMED_STATISTICS
Determines whether timing information is recorded in the trace files when tracing is enabled
for the instance or for user sessions.
USER_DUMP_DEST
Determines the location of user process trace files produced when tracing is enabled for the
instance or for user sessions.
Table 11.1 does not describe all the parameters in the INIT.ORA file. Refer to Appendix A of the Oracle7 Server
Administrator's Guide for descriptions of the all parameters.
Use the IFILE parameter to name a file that contains a common set of parameters for all the instances
running on the machine.
To see the parameters that the current instance is using, enter the following in SQL*DBA:
SQLDBA> SHOW PARAMETERS
You can also see only those parameters that contain a given string. For example,
SQLDBA> SHOW PARAMETERS buffer
shows all the parameters that contain the string buffer.
To see a list of the parameters when the instance first comes up, include the word LIST in the first line of the INIT.ORA
file.
To access the parameters from any Oracle tool, run a select operation against the v$parameter table, as in
Please purchase PDF Split-Merge on www.verypdf.com to remove this watermark.
SQLPLUS> SELECT * FROM v$parameter.
You must have access to the v$parameter table, which is owned by the Oracle user SYS.
The Oracle SID
The Oracle System Identifier (SID) identifies the Oracle instance on the machine. It is usually set up as an operating
system variable— the $ORACLE_SID environment variable in UNIX or the ORA_SID symbol in VMS—that is used to
name of the Oracle background processes and to identify the SGA area in memory. Whenever a user process wants to
connect to a database, the SID set up in that operating system account determines to which instance and, therefore, to
which database the user will connect. The same user name can exist in different databases. For example, the Oracle
system username SYS exists in all Oracle databases. With the SID, you can connect to the correct instance.
Many instances might be running on the same machine, each doing the processing for a different database. By looking at
the processes running on the machine, you see many occurrences of the DBWR background process. The name of the
process itself usually has the SID somewhere in it.
For client/server setups, the client machine identifies the network protocol and machine address to which the client
machine wants to attach and the name of the SID of the connection. Requests are then processed against the database for
which the instance is processing.
Creating a New Database
When you create a database, you create files on disk that Oracle has formatted and prepared. The structure of the
database does not have to remain the same as initial structure. You can add other files later.
On some platforms, you can create a new database when the Oracle software is first installed. To create a database
manually after that, follow the steps in this section. It is assumed that the software has been installed correctly on your
machine. The steps provided here are general steps that apply to most platforms. Creating a database involves operating
system-specific steps, of course. Refer to the Oracle7 Installation and User's Guide for their platform for specific
information on your platform.
The crux of creating a database lies in running the CREATE DATABASE SQL statement. You must perform other
steps, however, before you can run it. The syntax of the CREATE DATABASE SQL statement is
CREATE DATABASE mydb
LOGFILE file1, file2 SIZE nM
MAXLOGFILES n
MAXLOGMEMBERS n
MAXLOGHISTORY n
DATAFILE file1 SIZE nM
MAXDATAFILES n
MAXINSTANCES n
ARCHIVELOG | NOARCHIVELOG
Please purchase PDF Split-Merge on www.verypdf.com to remove this watermark.
For example,
CREATE DATABASE mydb
DATAFILE '/disk03/mydb/system1.dbf' SIZE 20M
LOGFILE '/disk04/mydb/log1.log',
'disk05/mydb/log2.log' SIZE 512K;
The datafile parameter will physically create the first database file on the disk specified and with the size specified. If the
file already exists the command will fail (unless the REUSE option is specified as well in which case the file will be
over-written). The same is true with the LOGFILE parameter which creates the very first two redo log files.
Dont use the REUSE option of the CREATE DATABASE command, for you could accidentally overwrite a file
that is being used by another database. Instead, physically delete the file. You can use REUSE on some platforms when
contiguous disk space that you want to reuse has already been allocated to a file.
The default mode of the database is NOARCHIVELOG.
To specify the maximum number of data files, redo logs, and log members that can exist on the database, use the
MAXDATAFILES, MAXLOGMEMBERS, and MAXLOGFILES parameters. If you specify lower limits, fewer
resources are used in the SGA. The MAXINSTANCES parameter controls the maximum number of instances that can
be connected to database.
If you set these maximum limits lower than the predefined maximum as part of the CREATE DATABASE statement,
you must recreate the control file manually to increase them. Instead, you should specify the limits by using the INIT.
ORA parameters, which set the limits for that startup of the instance. That way, I you need to increase the limits, simply
increase the INIT.ORA parameter and restart the instance.
Leave the database mode set to NOARCHIVELOG—the default—in the CREATE DATABASE
command. Change the mode to ARCHIVELOG when all the application objects have been created and populated. This
improves performance while the application objects and data are initially loaded.
The steps in creating new database are
1. Plan for the creation. Make sure that there is adequate disk space for the database. It is useful to do a sizing
exercise to estimate the amount of storage required to hold the data for the application system. Determine the
names and locations of the database files, the control file, and the redo log files.
Make sure that the memory on the machine is enough for the new database, including the memory for the SGA,
the PGA, and the programs on the database server machine. All the Oracle memory structures should fit into the
machine's real memory.
2. The operating system user account that you will use should have the INTERNAL privilege. This privilege
Please purchase PDF Split-Merge on www.verypdf.com to remove this watermark.