Nghệ thuật xếp hình Nhật Bản:heartring_2
Bạn đang xem bản rút gọn của tài liệu. Xem và tải ngay bản đầy đủ của tài liệu tại đây (41.45 KB, 4 trang )
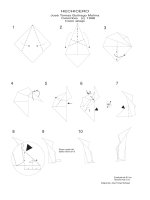
$ Heart Ring
Copyright 1998-99 Stephen Hecht. All Rights Reserved
A dollar bill makes a ring with a heart measuring 35mm across and 38 mm tall.
For first attempt, begin with a 3x7 rectangle larger than a dollar bill.
center line
1. Either side up; I think it looks
better if you start with the black
side up.
Crease at eights horizontally,
but not too sharp in the middle.
2. Valley in half vertically.
Then add 3 more alternating
creases on each side, at
one-eight-width distance.
3. Valley down at one-fourth.
center line
center line
5. Pleat, sinking on creases
from previous step.
4. Crease sharply where
shown.
center
line
6. Like so. Pleat and unfold.
Do valley-fold first, then align
mountain-fold on edge A.
A
7. Pleat and sink as in step 5,
but sink the long top edge, too.
Swinging the little flap over
first helps.
8. Like so. Repeat steps
4-7 on left end of bill.
4-7
tuck
behind
9. Closed sink, tucking behind
the central band.
$ Heart Ring (continued)
Copyright 1998-99 Stephen Hecht. All Rights Reserved
12. Closed sink.
13. Reverse folds. They go
on top of the sunken
trapezoid from the
previous step.
14. Pull down center,
swinging the sides in.
15. Tuck under.
16. Swing over.
17. Squash.
sharp
18. Make the squash sharp
only where indicated.
Swing top back down.
11. Swing middle two flaps
outward.
10. Fold the upper flap in half.
Note the fudging that is
necessary within the sunken
zone. Repeat on the left side.
(Remaining non-optional
diagrams don’t reflect this step.)
OPTIONAL -- thinner band
19. Swing back over, which
lifts up the lower portion.
The x-ray line is a hidden
valley-fold (squash).
squash
upwards
flatten
20. First squash where
indicated. Then flatten
remaining edges.
$ Heart Ring (continued)
Copyright 1998-99 Stephen Hecht. All Rights Reserved
16-20
21. Unfold 16-20. Repeat
16-20 on left end. Then reform
both sides together, and
disentangle the bottom to form
a water-bomb base.
water-bomb
base
extra flap
w.b. base’s edges
are wrapped
around these
22. Open sink long edge.
Partially unfold to sink, but be
careful at the top.
Repeat at left.
OPTIONAL
OPTIONAL
OPTIONAL
OPTIONAL
23. Wrap around top layer
to the inside.
24. Fold upper 2-ply flap in
half, swivelling in the middle
area.
25. Fold bottom flap in half,
over the one you just folded.
Notice the hidden valley-fold.
There is a tiny squash where
it meets the visible one.
26. Tuck that fold under the
previous one, including the
squashed bit.
27. Repeat steps 25-26 on the
upper flap -- try to do it in a
single motion. Then repeat
steps 23-27 on the left side.
(Remaining diagrams don’t
reflect optional steps.)
OPTIONAL -- thinner band
23-27
25-26
28. Pull down and open the
water-bomb base, and tuck
the indicated edges behind
the central vertical band.
29. Valley-fold up.
corner
in here
30. Mountain-fold the hidden
corner along the 45-degree
line, tucking it behind the
central band (of which it is
the bottom corner).
Repeat on the right.
31. Tuck corners into
pockets. Reverse-fold upper
tips to shape them. Then
swing over the band (the
valley line is farther from the
middle if you thinned the band).
32. Spread-squash to shape
corner. Repeat on left side.
same here
33. Interlock band to complete model.
(If you’ve followed the optional
“thinner-band” steps, there will be more
layers; but the interlock is essentially
the same.)
Copyright 1998-99 Stephen Hecht. All Rights Reserved
$ Heart Ring (continued)
tuck behind
34. Done. Adjust band to desired tightness.