Defining the Deck Component
Bạn đang xem bản rút gọn của tài liệu. Xem và tải ngay bản đầy đủ của tài liệu tại đây (515.67 KB, 66 trang )
Defining the Deck Component
One of the most important aspects of most nontrivial applications (especially UI type
apps) is the ability to respond to events that are generated by the various components of
the application, both in response to user interactions and other system components . . . .
—Terry Warren, SCOUG, 1999
T
his chapter expands on the blueprint for building components outlined in the previous
chapter. For this chapter, we will show how to create a component that can act as an accordion,
or deck, which is commonly used within applications and integrated development environ-
ments (IDEs) to show and hide information, such as information about selected files in a file
explorer or JSF components in a component palette. Figure 3-1 shows an expandable deck used
in Microsoft’s Windows Explorer.
Figure 3-1. Expandable deck used in Microsoft Windows Explorer
A deck component has the benefit of being stackable and of being able to store more
information than the equivalent space in a traditional HTML page. From a component writer’s
point of view, this type of component introduces several key areas of component design, such
as handling events, rendering children, and loading external resources.
105
CHAPTER 3
■ ■ ■
5807ch03.qxd 1/13/06 11:06 AM Page 105
Requirements for the Deck Component
The design of the deck component will allow a user to expose specific information that is cur-
rently hidden by clicking one of the displayed decks and exposing a set of items associated with
the clicked deck. These child items can be anything, including links, text, and even graphics.
The component should be intelligent enough to detect an already open deck and close it before
opening the one requested by the user. From an application developer’s point of view, the com-
ponent needs to be extensible, meaning the application developer can add as many decks as
needed and include any number of children within these decks. The application developer
should also be able to add any number of deck groups to a page.
The Deck Component
As you remember from the first chapter, the only reason for creating new behavioral super-
classes is if the behavior and the definition have not been introduced before. According to the
requirements in the previous section, the deck component should be able to selectively show
nested components or groups of components, based on the user selection, and only one
group will be shown at any time. To achieve this, you have to create a new Renderer to handle
the selective display and a new event type to handle the user selection with an accompanying
listener interface for that particular event type. Since the behavior of showing and hiding chil-
dren has not been introduced yet, we will cover two new behavioral superclasses to handle the
show-one-item behavior (see Table 2-1 in Chapter 2).
After completing this chapter, you should understand the JSF event model and know how
to create new behavioral superclasses and your own event type with a corresponding listener
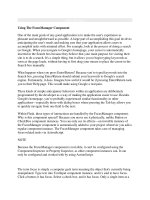
interface. Figure 3-2 shows the 11 classes you will create in this chapter.
Figure 3-2. Class diagram showing classes created in this chapter
CHAPTER 3
■
DEFINING THE DECK COMPONENT106
5807ch03.qxd 1/13/06 11:06 AM Page 106
The classes are as follows:
• The ProShowOneDeckTag class represents the ProShowOneDeck component.
• The ShowItemTag class represents leaf nodes of the deck component.
• The ShowListenerTag class represents a custom action that the application developer
will use to register a ShowListener instance to a UIShowOne component.
• The HtmlShowOneDeckRenderer is the new custom Renderer, which is in charge of the
markup rendered to the client.
• The ShowListener is a Listener interface.
• The ShowAdapter supports adding a MethodBinding as a ShowListener.
• The ShowEvent is the custom event class.
• The UIShowItem is a behavioral superclass and represents each of the child components
to the UIShowOne component.
• The ShowSource class isolates the event listener management methods.
• The UIShowOne class is a behavioral superclass that acts as a top-level container,
controlling which one of its child components to display when activated.
• And finally, the ProShowOneDeck class is your renderer-specific subclass.
Designing the Deck Component Using a Blueprint
When you design a component that requires a new behavior or new functionality, it is wise to
start implementing this before creating the actual Renderer for this behavior, and as such, these
two steps precede the client-specific Renderer step in the blueprint, as shown in Table 3-1.
Table 3-1. Steps in the Blueprint for Creating a New JSF Component
# Step Description
1 Creating a UI prototype Create a prototype of the UI and intended
behavior for your component using the
appropriate markup.
2 Creating events and listeners (Optional) Create custom events and listeners
in case your specific needs are not covered by
the JSF specification.
3 Creating a behavioral superclass (Optional) If the component behavior is not to
be found, create a new behavioral superclass
(for example, UIShowOne).
4 Creating a client-specific Renderer Create the Renderer you need that will write
out the client-side markup for your JSF com-
ponent.
5 Creating a renderer-specific subclass (Optional) Create a renderer-specific subclass.
Although this is an optional step, it is good
practice to implement it.
Continued
CHAPTER 3
■
DEFINING THE DECK COMPONENT 107
5807ch03.qxd 1/13/06 11:06 AM Page 107
Table 3-1. Continued
# Step Description
6 Registering a UIComponent and Renderer Register your new UIComponent and Renderer
in the faces-config.xml file.
7 Creating a JSP tag handler and TLD This step is needed in case you are using JSP
as your default view handler. An alternative
solution is to use Facelets (http://facelets.
dev.java.net/).
As you can see, the blueprint has two additional steps: creating events and listeners and
creating a behavioral superclass. According to the blueprint, you still need to first implement
the component in the intended markup.
Step 1: Creating a UI Prototype
Let’s take a moment to reflect on what you want to achieve and create a prototype of the
intended markup needed for the client (in this case, a web browser). Remember, by doing so,
you will find out what elements the Renderer has to generate, what renderer-specific attributes
the application developer will need, and what behavior is expected to build an application
with the deck component.
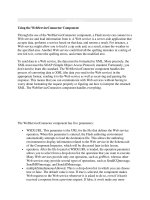
Figure 3-3 shows the end result of the deck component implemented in HTML.
Figure 3-3. The deck component, implemented in HTML, showing the Java item expanded
Let’s first focus on the presentation of the prototype. As you can see in Figure 3-3, the
deck has three labels—Java, Open Source, and .NET. Each label represents an expandable
region, and in Figure 3-3 the Java region is currently expanded and shows its content. These
labels are containers, since they can hold more than just text (for example, a combination of
CHAPTER 3
■
DEFINING THE DECK COMPONENT108
5807ch03.qxd 1/13/06 11:06 AM Page 108
images and text). Within the expanded Java region is a mix of plain text and links. Styles con-
trol the actual look and feel. Code Sample 3-1 shows the HTML needed to create the deck
component.
Code Sample 3-1. The Deck HTML Prototype Implementation
<html>
<head>
<title>Pro JSF : ProShowOneDeck Prototype</title>
<style type="text/css" >
.ProShowOne { ... }
.ProShowItem { ... }
.ProShowItemHeader { ... }
.ProShowItemContent { ... }
</style>
</head>
<body>
<div style="width:200px;" >
<div class="ProShowOne">
<div class="ProShowItem">
<div class="ProShowItemHeader"
onclick="alert('first')" >
<img src="resources/java_small.jpg"
alt="The Duke"
style="margin-right: 8px; vertical-align:bottom;" />
Java
</div>
<div class="ProShowItemContent">
<table>
<tbody>
<tr>
<td>
<a href=" />Pro JSF: Building Rich Internet Components
</a>
</td>
</tr>
<tr>
<td>Pro EJB 3</td>
</tr>
<tr>
<td>Pro Apache Maven</td>
</tr>
</tbody>
</table>
</div>
CHAPTER 3
■
DEFINING THE DECK COMPONENT 109
5807ch03.qxd 1/13/06 11:06 AM Page 109
</div>
<div class="ProShowItem">
<div class="ProShowItemHeader"
onclick="alert('second')" >
Open Source
</div>
</div>
<div class="ProShowItem">
<div class="ProShowItemHeader"
onclick="alert('third')">
.NET
</div>
</div>
</div>
</div>
</body>
</html>
As you can see, <div ...> elements represent the label containers and their contents. The
reason for choosing <div> elements instead of anchor elements (<a href>) is so you can more
easily control the look and feel of the deck nodes. If you implemented this using anchor ele-
ments, you would have to deal with browser-specific behaviors to handle links, such as the
look of visited links, not visited links, and so on.
Apart from the obvious visual aspect, you do not need to identify which label the user
has activated, since only one node can be expanded at any time. In the prototype in Code
Sample 3-1, we have simulated this behavior by adding an alert (for example, onclick=
"alert('first')") to the <div> element representing the label of the expandable region.
By examining the HTML source in Code Sample 3-1, you can also see that you need to
expose attributes for four style classes—ProShowOne, ProShowItem, ProShowItemHeader, and
ProShowItemContent. Code Sample 3-2 show how to map some of the visible HTML attributes
to their corresponding UIComponent attributes.
Code Sample 3-2. Parameterized HTML for the showOneDeck Renderer
<div class=[showOne.styleClass]>
<div class=[showOne.itemStyleClass]>
<div class=[showOne.itemHeaderStyleClass]
onclick="alert([showItem.id])" >
<img src="resources/java_small.jpg"
alt="The Duke"
style="margin-right: 8px; vertical-align:bottom;" />
Java
</div>
<div class=[showOne.itemContentStyleClass]>
<table>
<tbody>
CHAPTER 3
■
DEFINING THE DECK COMPONENT110
5807ch03.qxd 1/13/06 11:06 AM Page 110
<tr>
<td>
<a href=" />Pro JSF: Building Rich Internet Components
</a>
</td>
</tr>
<tr>
<td>Pro EJB 3</td>
</tr>
<tr>
<td>Pro Apache Maven</td>
</tr>
</tbody>
</table>
</div>
</div>
<div class="[showOne.itemStyleClass]" >
class="[showOne.itemHeaderStyleClass]"
onclick="alert([showItem.id])" >
Open Source
</div>
</div>
<div class="[showOne.itemStyleClass]" >
<div class="[showOne.itemHeaderStyleClass]"
onclick="alert([showItem.id])" >
.NET
</div>
</div>
</div>
Part of the design of the component is that it should allow the user to expand only one
item at a time. For this you need to first identify the item activated by the user; this takes place
with the alert() function attached to each item, and [showItem.id] illustrates the identifier.
In addition, you need a way to keep track of each item and to ensure that only one is expanded
at any time.
To achieve this, you need a parent container that can listen for the event identifying the
activated item and then expand it and close the previously opened item. The prototype uses
the <div class=[showOne.styleClass]> element as the logical parent container. This design of
having a logical container for multiple items is modeled after HtmlDataTable and UIColumn in
the JSF specification. The attributes in the prototype are associated with one of these compo-
nents (in other words, the parent container, showOne) or one of its children (showItem).
It is important to note that although the prototype describes the user interface require-
ments, some attributes and functionality still might not be visible or make sense in the actual
prototype. For the HTML source in Code Sample 3-2, one attribute is not visible but still needed
by the implementation—showOne.showItemId. It will be used to set the default expanded item
CHAPTER 3
■
DEFINING THE DECK COMPONENT 111
5807ch03.qxd 1/13/06 11:06 AM Page 111
on the initial request. Additionally, you need to let application developers listen for events on
the component showOne.showListener and invoke application logic when an item has been
activated.
Before you start creating the deck component, take a sneak peak at the final result and
how it will be used in a JSP page, as shown in Code Sample 3-3.
Code Sample 3-3. Deck Component As It Would Be Used in a JSF JSP Document
<?xml version="1.0" encoding="UTF-8" ?>
<jsp:root ...>
<jsp:directive.page contentType="text/html" />
<f:view>
...
<pro:showOneDeck showItemId="first"
showListener="#{backingBean.doShow}" >
<pro:showItem id="first" >
<f:facet name="header" >
<h:panelGroup>
<h:graphicImage url="/resources/java_small.jpg"
alt="The Duke"
style="margin-right: 8px; vertical-align:bottom;" />
<h:outputText value="Java" />
</h:panelGroup>
</f:facet>
<h:panelGrid columns="1" >
<h:outputLink value="" >
<h:outputText value="Pro JSF: Building Rich Internet Components" />
</h:outputLink>
<h:outputText value="Pro EJB 3" />
<h:outputText value="Pro Apache Maven" />
</h:panelGrid>
</pro:showItem>
<pro:showItem id="second" >
<f:facet name="header">
<h:outputText value="Open Source" />
</f:facet>
<h:panelGrid columns="1" >
<h:outputText value="Foundations of AJAX" />
<h:outputText value="Pro Apache Ant" />
<h:outputText value="Pro PHP Security" />
</h:panelGrid>
</pro:showItem>
<pro:showItem id="third" >
<f:facet name="header">
CHAPTER 3
■
DEFINING THE DECK COMPONENT112
5807ch03.qxd 1/13/06 11:06 AM Page 112
<h:outputText value=".NET" />
</f:facet>
<h:panelGrid columns="1" >
<h:outputText value="Pro .NET Extreme Programming" />
<h:outputText value=".NET for Delphi Programmers" />
</h:panelGrid>
</pro:showItem>
<pro:showListener
type="com.apress.projsf.ch3.application.MyShowListener" />
</pro:showOneDeck>
...
</f:view>
</jsp:root>
The tags highlighted in bold represent the JSF components you will learn how to create
in this chapter. As you can see, the sample is a fairly simple application with one parent
component—<pro:showOneDeck ... >—that keeps track of which item is currently open and
which node is set to be expanded by default. In the page the parent component has three
children—<pro:showItem ... >. Each <pro:showItem ... > child component has its own
unique identifier (for example, first, second, and third). Each <pro:showItem ... > has a
facet—<f:facet name="header">—associated with it representing the “header” of the click-
able area of the item (see Chapter 1 for more about facets).
Part of the deck component’s requirements is to allow application developers to use any
component to represent the actual clickable header, and as examples we have used regular
<h:outputText> and <h:panelGroup> components. Nested within each <pro:showItem ... > is
a set of children, which will be displayed when the user selects an item. When the user selects
any of the <pro:showItem ... > components, an event will be delivered to the event queue for
processing in the Invoke Application phase.
To be able to react to this event, a new listener—<pro:showListener ... />—listens for
the aforementioned event.
Step 2: Creating Events and Listeners
To be able to create the component, you need to understand two new behavioral superclasses—
UIShowOne and UIShowItem. The UIShowOne behavioral superclass keeps track of which node the
user has selected, and the UIShowItem acts as a clickable parent container that will either show
or hide its children. For these new UIComponents, you also need a new event type, ShowEvent,
with a corresponding event listener interface, ShowListener, to notify application developers
and to attach application code to the component. The new event instance needs to keep track
of which item the user has selected. On top of this, you need to create a new Renderer to han-
dle the selective rendering with accompanying renderer-specific subclasses and JSP tag handlers.
Figure 3-4 shows the classes needed for the event and listener implementation that you
will learn how to create in this chapter.
CHAPTER 3
■
DEFINING THE DECK COMPONENT 113
5807ch03.qxd 1/13/06 11:06 AM Page 113
Figure 3-4. Class diagram showing all classes needed for the event and listener implementation
Event Handling Overview
This section will cover a few topics regarding the JSF event model before you see the code for
the event and listener implementation for the deck component.
If you have experience developing applications with the Swing toolkit or Oracle’s ADF
Swing framework, you will notice that the event model implemented by JSF is similar. In fact,
JSF implements a model for event notification and listener registration based on the naming
convention in the JavaBeans specification, version 1.0.1. Essentially, this means an application
developer can write application code and register it to listen for a specific event. A UIComponent
delivers the event itself (for example, when a user clicks a button, which is similar to the
approach taken in other UI toolkits). Application developers will immediately recognize the
benefits of such a model, since it has proven to be easy to maintain and develop. It allows appli-
cation developers to write application code for specific events in well-defined blocks of code
like the ones used in Microsoft Visual Basic.
The main difference between the Swing framework and JSF is that Swing operates in a
stateful mode and is always listening for events fired by the client; by contrast, JSF works in a
stateless environment. With no permanent connection between the client and the backend
server, JSF cannot always listen to events and has to rely on postbacks to be notified about any
changes on the client that might cause an event to be delivered. This limitation of HTTP has
CHAPTER 3
■
DEFINING THE DECK COMPONENT114
5807ch03.qxd 1/13/06 11:06 AM Page 114
forced JSF to implement a strict event model to handle client-generated events, based on the
JSF request-processing lifecycle described in Chapter 1.
During postback, all six phases of the JSF request lifecycle are called (unless somewhere
in the process renderResponse() is called, in which case the lifecycle will directly jump to the
Render Response phase). When the Restore View phase is executed, it restores any state avail-
able from the previous request. During the Apply Request Values phase (see Figure 3-5), the
submitted value from the request parameters is established and added to each input compo-
nent, and any events are queued.
Figure 3-5. Applying new values passed on the request to the components
By default, at the end of each one of these phases, the appropriate UIViewRoot lifecycle
management method (processDecodes(), processValidators(), processUpdates(), and
processApplication()) will loop over events queued in the phase and notify any registered
listeners on the component that queued the event (for example, a ProShowOneDeck). Applica-
tion logic in these listeners can also queue events, and the UIViewRoot lifecycle management
method will continue looping through the queued list of events until it is empty before con-
tinuing to the next phase.
■
Note
It is important to understand that events can be queued and delivered during any of the following
request lifecycle phases: Apply Request Values, Process Validations, Update Model Values, and Invoke
Application.
Application Scope
Lifecycle
FacesServlet
render()
execute()
Request Scope
FacesContext
renderResponse()
213
654
ProShowItem ProShowItem ProShowItem
2. Apply
Request
Values
ProShowOneDeck
HtmlForm
UIViewRoot
CHAPTER 3
■
DEFINING THE DECK COMPONENT 115
ART1
5807ch03.qxd 1/13/06 11:06 AM Page 115
Events
Application developers can use event instances to be notified about changes to the UI or
underlying model. The JSF specification defines two default event types—javax.faces.
event.ActionEvent and javax.faces.event.ValueChangeEvent. The ActionEvent is usually
delivered when a user activates a UICommand component, and the ValueChangeEvent indicates
that a value has changed in any of the UIInput components.
The FacesEvent Base Class
The javax.faces.event.FacesEvent class is the abstract base class for UI and application
events within JSF that can be delivered by UIComponents. The FacesEvent constructor takes
one argument—the UIComponent event source instance, which identifies the component from
which the event will be broadcast to interested listeners. All component event classes within
JSF—default or custom—must extend the FacesEvent class in order to be supported by the
request-processing lifecycle. The FacesEvent extends java.util.EventObject, which is the
base class for all events in the Java Standard Edition. Table 3-2 describes the structure of the
FacesEvent base class.
CHAPTER 3
■
DEFINING THE DECK COMPONENT116
Table 3-2. Method Summary of the FacesEvent Base Class*
Method Return Type Description
getComponent() javax.faces.component.UIComponent Returns the source UIComponent
instance that delivered this event
getPhaseId() javax.faces.event.PhaseId Returns the identifier—phaseId—
for which phase this event is
going to be delivered
setPhaseId void Sets the PhaseId during which
this event will be delivered
isApproriateListener() boolean Checks whether this listener is
of a listener instance that this
event supports
processListener() void Broadcasts this event to the
specified listener
queue() void Convenience method that queues
this event for broadcast at the
end of the current request-
processing lifecycle phase
* Source: The API Java documentation for the JSF specification
The phaseId Property
By default events are delivered in the phase in which they were queued, but component
authors can decide to have events delivered at any of the JSF request-processing lifecycle
phases by setting the phaseId property of the FacesEvent class, which has a data type of
PhaseId. This data type is a type-safe enumeration and stores a value representing which
request lifecycle phase should deliver the event. Table 3-3 shows the valid values.
5807ch03.qxd 1/13/06 11:06 AM Page 116
Table 3-3. Valid PhaseId Values
PhaseId value Description
PhaseId.ANY_PHASE This is the default value if the component author has not
set anything. The event will be delivered in the phase in
which it was queued.
PhaseId.APPLY_REQUEST_VALUES Delivers the event at the end of the Apply Request Values
phase.
PhaseId.PROCESS_VALIDATIONS Delivers the event at the end of the Process Validations
phase.
PhaseId.UPDATE_MODEL_VALUES Delivers the event at the end of the Update Model Values
phase.
PhaseId.INVOKE_APPLICATION Delivers the event at the end of the Invoke Application
phase.
PhaseId.RENDER_RESPONSE Delivers the event at the end of the Render Response
phase.
At the end of each phase, the UIViewRoot component will loop over all events in the
queue, starting with events that have phaseId set to ANY_PHASE and thereafter with events that
have phaseId set to that particular phase.
Broadcast Events
As described previously, at the end of each phase, the UIViewRoot component will loop over
the list of queued events, and it will “broadcast” events to any listeners registered for that par-
ticular event. In practice, it means the UIViewRoot will call a method—broadcast()—on the
UIComponent instance delivering the event, as shown in Code Sample 3-4.
Code Sample 3-4. The broadcast() Method Signature
public abstract void broadcast(
FacesEvent event) throws AbortProcessingException;
This method notifies any listeners registered for a specific event type, and it takes one
argument of type FacesEvent.
Event Subclass
In Chapter 2, the second step in the blueprint was to create a client-specific Renderer. In this
chapter, you need to extend the custom component blueprint by adding the creation of new
event types and behavioral superclasses.
Based on the analysis of the HTML source, you need to be able to handle client-side user
events and keep track of what has been expanded and what the user wants to expand next.
Before you create the new behavioral superclass, you need to define a new event class and a
new listener interface that can be used to execute application code specific to this new type of
user events. You also have to decide on a name for the new event class; the convention used in
the JavaBeans specification is to prefix the name with the actual event behavior, which in this
case is to show something (Show) followed by the name Event (for example, ShowEvent). Code
Sample 3-5 shows the new event class.
CHAPTER 3
■
DEFINING THE DECK COMPONENT 117
5807ch03.qxd 1/13/06 11:06 AM Page 117
Code Sample 3-5. The ShowEvent Subclass
package com.apress.projsf.ch3.event;
import javax.faces.component.UIComponent;
import javax.faces.event.FacesEvent;
import javax.faces.event.FacesListener;
import javax.faces.event.PhaseId;
/**
* The ShowEvent event.
*/
public class ShowEvent extends FacesEvent
{
/**
* Creates a new ShowEvent.
*
* @param source the source of the event
* @param oldShowItemId the previously showing item identifier
* @param newShowItemId the currently showing item identifier
*/
public ShowEvent(
UIComponent source,
String oldShowItemId,
String newShowItemId)
{
super(source);
setPhaseId(PhaseId.INVOKE_APPLICATION);
_oldShowItemId = oldShowItemId;
_newShowItemId = newShowItemId;
}
public String getOldShowItemId()
{
return _oldShowItemId;
}
public String getNewShowItemId()
{
return _newShowItemId;
}
public boolean isAppropriateListener(
FacesListener listener)
{
return (listener instanceof ShowListener);
}
CHAPTER 3
■
DEFINING THE DECK COMPONENT118
5807ch03.qxd 1/13/06 11:06 AM Page 118
public void processListener(
FacesListener listener)
{
((ShowListener) listener).processShow(this);
}
private String _oldShowItemId;
private String _newShowItemId;
}
When you introduce a new event class, you need to make sure it extends javax.faces.
event.FacesEvent so that the event can participate in the JSF request-processing lifecycle.
The FacesEvent base class constructor takes one argument—the source of the UIComponent
instance delivering the event. This means the new event class—ShowEvent—has to take the
UIComponent instance source as an argument and pass it on to its superclass—super(source);.
If not set, the default value for phaseId is PhaseId.ANY_PHASE, which means the event will be
delivered in the phase in which it was queued. To ensure that the deck component’s ShowEvent
event is not delivered before the entire component hierarchy has been processed, you have
to set phaseId to PhaseId.INVOKE_APPLICATION. This is important since the deck node needs to
know about its children and allow them to be updated and validated in order to render properly.
To make life easier on application developers using the ShowEvent class, you can also add
two properties—oldShowItemId and newShowItemId—with corresponding getter methods,
which are not required by the FacesEvent base class. These accessors are there for conven-
ience so that application developers can find out which item is collapsed and which item is
currently expanded.
You also override two methods in the FacesEvent base class—isApproriateListener()
and processListener(). The isApproriateListener() method returns true if the listener is an
instance of ShowListener (more about this listener in a second). The isAppropriateListener()
method allows component writers to verify that the signature of the listener associated with
the component is compatible with the event being broadcast. If the listener is compatible, the
processListener() method is called during UIComponent.broadcast() to deliver this event to
the ShowListener instance’s processShow() method, implemented by the application developer.
Listeners
For an application to react to events raised by the user, JSF supports a Listener. For each
event type (for example, ValueChangeEvent) defined by either the JSF implementation or
a custom UIComponent, there has to be a corresponding Listener interface (for example,
ValueChangeListener). The Listener implemented by the application developer implements
one or more of these Listener interfaces, along with the event handling method(s) specified
by those interfaces, which will be called during event broadcast.
The FacesListener Interface
The javax.faces.event.FacesListener interface (extends java.util.EventListener) is the
base interface for all default and custom listener interfaces in JSF. The FacesListener interface
(extends java.util.EventListener) is a marker interface and is used only for type safety.
Commonly, most implementations of this listener interface take a single argument of the event
CHAPTER 3
■
DEFINING THE DECK COMPONENT 119
5807ch03.qxd 1/13/06 11:06 AM Page 119
type for which the listener is being created (for example, public void processShow(ShowEvent
event);).
Event Listener Interface
Any custom event type that extends the FacesEvent base class has to provide a Listener inter-
face for that event type, which makes sense since there is no meaning in delivering an event
unless there is a way to act on it.
Code Sample 3-6 extends the FacesListener interface and creates a listener interface—
ShowListener—that adds the processShow() method that takes a ShowEvent instance as an
argument. As you can see, this follows the same naming convention used for the ShowEvent
class with a prefix of the intended event name and a suffix of Listener to indicate the purpose
of this class.
Code Sample 3-6. The ShowListener Interface
package com.apress.projsf.ch3.event;
import javax.faces.event.FacesListener;
/**
* The ShowListener listener.
*/
public interface ShowListener extends FacesListener
{
/**
* Processes a ShowEvent.
*
* @param event the show event
*/
public void processShow(
ShowEvent event);
}
Event Listener Adapter
As described in Chapter 2, the UIInput component delivers a ValueChangeEvent to all registered
event listeners. In addition, the ValueChangeEvent is also delivered to the backing bean via a
MethodBinding stored in the UIInput’s valueChangeListener attribute. The valueChangeListener
attribute is exposed as a tag attribute on the standard input tags, such as <h:inputText
valueChangeListener="#{backingBean.doValueChange}" >. In JSF 1.2, the valueChangeListener
attribute is deprecated on the UIInput component but is still present on the JSP tag as a
JSP 2.1 MethodExpression, so an adapter class is needed to adapt the MethodExpression into
a ValueChangeListener instance. This allows the backing bean to still be called when a
ValueChangeEvent occurs but without needing a separate valueChangeListener attribute
on the UIInput component. This simplifies and clarifies component development by more
closely following the JavaBeans specification while preserving MethodBinding support for
application development.
CHAPTER 3
■
DEFINING THE DECK COMPONENT120
5807ch03.qxd 1/13/06 11:06 AM Page 120
We will show how to follow this design pattern to adapt a JSF 1.1 MethodBinding into a
ShowListener instance. Code Sample 3-7 shows the implementation of this design pattern,
ShowAdapter.
Code Sample 3-7. The ShowAdapter Class
package com.apress.projsf.ch3.event;
import javax.faces.component.StateHolder;
import javax.faces.component.UIComponentBase;
import javax.faces.context.FacesContext;
import javax.faces.el.MethodBinding;
/**
* The ShowAdapter calls a MethodBinding with the same signature
* as the <code>processShow</code> method.
*/
public class ShowAdapter implements ShowListener,
StateHolder
{
/**
* The MethodBinding signature for ShowListener methods.
*/
public static Class[] SIGNATURE = new Class[] { ShowEvent.class };
/**
* Creates a new ShowAdapter.
*
* @param showMethod the MethodBinding to adapt
*/
public ShowAdapter(
MethodBinding showMethod)
{
_showMethod = showMethod;
}
/**
* Processes a ShowEvent.
*
* @param event the show event
*/
public void processShow(
ShowEvent event)
{
FacesContext context = FacesContext.getCurrentInstance();
_showMethod.invoke(context, new Object[]{event});
}
CHAPTER 3
■
DEFINING THE DECK COMPONENT 121
5807ch03.qxd 1/13/06 11:06 AM Page 121
/**
* Saves the internal state of this ShowAdapter.
*
* @param context the Faces context
*
* @return the saved state
*/
public Object saveState(
FacesContext context)
{
return UIComponentBase.saveAttachedState(context, _showMethod);
}
/**
* Restores the internal state of this ShowAdapter.
*
* @param context the Faces context
* @param object the state to restore
*/
public void restoreState(
FacesContext context,
Object object)
{
_showMethod = (MethodBinding)
UIComponentBase.restoreAttachedState(context, object);
}
/**
* Returns true if this ShowAdapter is transient and should
* not be state saved, otherwise false.
*
* @return the value of transient
*/
public boolean isTransient()
{
return _transient;
}
/**
* Indicates whether this ShowAdapter is transient and should
* not be state saved.
*
* @param isTransient the new value for transient
*/
public void setTransient(
boolean isTransient)
{
CHAPTER 3
■
DEFINING THE DECK COMPONENT122
5807ch03.qxd 1/13/06 11:06 AM Page 122
_transient = isTransient;
}
private MethodBinding _showMethod;
private boolean _transient;
}
The ShowAdapter implements the processShow method, calling the specified MethodBinding
with the ShowEvent parameter. It is important that the MethodBinding passed to the ShowAdapter
constructor matches the signature of the processShow method. Therefore, the ProShowOneDeckTag
uses the SIGNATURE constant to create the MethodBinding with the correct signature.
It is important to implement the StateHolder interface on this adapter class so that the
state can be properly saved and restored when an instance is registered as a listener on a com-
ponent in the component hierarchy.
You must provide an implementation of the saveState() method to store to the
MethodBinding state as the UIShowAdapter state, so you need to use a static method from
UIComponentBase called saveAttachedState(). This convenience method does the work of
state saving attached objects that may or may not implement the StateHolder interface.
You must also provide an implementation of the restoreState() method that takes the
FacesContext and the state object as arguments. Note that using the saveAttachedState()
method to save the MethodBinding state implies that you use the restoreAttachedState() method
to restore the MethodBinding state.
Event Delivery in Practice
Let’s use the same page as in Code Sample 3-3 to step through the event delivery mechanism
provided by JSF. We will now show how to use the same code to dive into the JSF event and lis-
tener model. The page contains the source in Code Sample 3-8.
Code Sample 3-8. Page Source with the showListener Tag
<h:form>
...
<pro:showOneDeck showItemId="first"
showListener="#{backingBean.doShow}" >
<pro:showItem id="first" >
...
</pro:showItem>
<pro:showListener
type="com.apress.projsf.ch3.application.MyShowListener" />
</pro:showOneDeck>
...
</h:form>
The <pro:showOneDeck ...> contains one attribute that is associated with the ShowEvent
event type—ShowListener. This sample sets the <pro:showOneDeck> attribute showListener to
#{backingBean.doShow}. This is a common approach of assigning a listener to a component via
an attribute. The MethodBinding is pointing to a method—doShow()—that follows the signature
CHAPTER 3
■
DEFINING THE DECK COMPONENT 123
5807ch03.qxd 1/13/06 11:06 AM Page 123
of the ShowListener interface but without directly implementing it. Code Sample 3-9 shows
the source for the ShowListener method—doShow().
Code Sample 3-9. A ShowListener Method—doShow()
package com.apress.projsf.ch3.application;
import com.apress.projsf.ch3.event.ShowEvent;
/**
* ShowOneDeckBean is a backing bean for the showOneDeck.jspx document.
*/
public class ShowOneDeckBean
{
/**
* The ShowListener method binding.
*
* @param event the show event
*/
public void doShow(
ShowEvent event)
{
String oldShowItemId = event.getOldShowItemId();
String newShowItemId = event.getNewShowItemId();
System.out.println("BackingBean [oldShowItemId=" + oldShowItemId + "," +
"newShowItemId=" + newShowItemId + "]");
}
}
This way of implementing a listener is provided as a convenience for application develop-
ers. However, it is also limiting in that the showListener attribute on the <pro:showOneDeck />
takes only one method binding; by contrast, associating a listener using a specific listener
tag—such as <pro:showListener ...>—allows application developers to associate as many
listeners as needed (for example, to log information about the event) and to associate one to
actually process the event. From an application developer’s point of view, an implementation
of the ShowListener could look something like Code Sample 3-10.
Code Sample 3-10. Implementation of the ShowListener Interface
package com.apress.projsf.ch3.application;
import com.apress.projsf.ch3.event.ShowEvent;
import com.apress.projsf.ch3.event.ShowListener;
public class MyShowListener implements ShowListener
{
public void processShow(
ShowEvent event)
CHAPTER 3
■
DEFINING THE DECK COMPONENT124
5807ch03.qxd 1/13/06 11:06 AM Page 124
{
String oldShowItemId = event.getOldShowItemId();
String newShowItemId = event.getNewShowItemId();
System.out.println("MyShowListener " +
"[oldShowItemId=" + oldShowItemId + "," +
"newShowItemId=" + newShowItemId + "]");
}
}
This listener—MyShowListener—implements the ShowListener interface and takes an
instance of ShowEvent as an argument, and it gets the IDs of the new and old items used in
the deck component from the event instance and prints them to the system log window.
Event Handling in the JSF Lifecycle
When a user interacts with the deck component (for example, expanding an item), a request
is sent to the server with information about the action performed. By now you know that the
first phase, Restore View, will restore the component hierarchy on postback. The second phase
is the interesting phase—the Apply Request Values phase (see Figure 3-6).
Figure 3-6. Event handling in the Apply Request Values phase
In this phase, the incoming request parameters are decoded and mapped to their counter-
part UIComponent in the component hierarchy. When the Renderer for a component discovers
that the user has triggered an event, the component’s Renderer creates an instance of the corre-
sponding FacesEvent subclass and queues the event to the source component.
Application Scope
Lifecycle
FacesServlet
render()
execute()
Request Scope
FacesContext
renderResponse()
2
1
3
654
ProShowItem ProShowItem ProShowItem
2. Apply
Request
Values
ProShowOneDeck
HtmlForm
UIViewRoot
CHAPTER 3
■
DEFINING THE DECK COMPONENT 125
ART1
5807ch03.qxd 1/13/06 11:06 AM Page 125
For example, when the Renderer for the UIShowOne component discovers that the user has
activated, or clicked, the header of an item in the rendered markup, the UIShowOne’s Renderer
creates an instance of ShowEvent, passing the source UIShowOne component instance to the
constructor, and calls the queue() method on the newly created event instance. This causes
the ShowEvent instance to be stored in the event queue by the UIViewRoot until it is delivered
during the Invoke Application phase (see Figure 3-7).
■
Note
If no
Renderer
is associated with the
UIComponent
, it is the responsibility of the component’s
decode(
) method to queue the event, usually targeting the Invoke Application phase for delivery.
Figure 3-7. Event handling in the application
After you have completed queuing any events delivered with this request, and all request
values have been applied to their UIComponents, it is time to broadcast and process events that
have phaseId set to the default value (PhaseId.ANY_PHASE) or have phaseId set explicitly for this
phase (PhaseId.APPLY_REQUEST_VALUES)—the Apply Request Values phase. If there are events
to deliver in this phase, the processDecodes() method on the UIViewRoot is called first. This
method takes all queued events and broadcasts to each component in the component hierar-
chy. In the application, the only event fired during this request is the ShowEvent delivered by
the UIShowOne component Renderer.
The UIShowOne component has the phase identifier set to PhaseId.INVOKE_APPLICATION,
which indicates to the request-processing lifecycle that this event must be delivered in the
Invoke Application phase. In this phase, the processApplication() method on the UIViewRoot is
called first. This method broadcasts any events that have been queued for the Invoke Application
Application Scope
Lifecycle
FacesServlet
render()
execute()
Request Scope
FacesContext
renderResponse()
2
1
3
654
ProShowItem ProShowItem ProShowItem
2. Apply
Request
Values
ProShowOneDeck
HtmlForm
UIViewRoot
CHAPTER 3
■
DEFINING THE DECK COMPONENT126
ART1
5807ch03.qxd 1/13/06 11:06 AM Page 126
phase of the request-processing lifecycle by calling the UIShowOne.broadcast(ShowEvent)
method.
If the UIShowOne has listeners attached when a ShowEvent is broadcast, each registered
ShowListener is called in turn to deliver the event. A ShowAdapter may be registered as a lis-
tener to execute a method binding (for example, #{backingBean.doShow}) that references a
public method with a void return type and a single parameter of type ShowEvent.
Step 3: Creating a Behavioral Superclass
You are now done with the Event and Listener implementation, so it is time to introduce the
two new behavioral superclasses—UIShowOne and UIShowItem. At the moment you decide you
need additional behavioral superclasses, you also need to decide what naming convention to
use for these new classes. The convention used by the JSF specification is to prefix any top-
level behavioral component with UI, followed by the actual behavior (for example, UIInput).
Internal components, such as UISelectItem, that are useful only inside a particular parent
component often use part of their parent component’s name and the suffix Item to indicate
they are not a top-level behavioral component.
During prototyping, it was decided that the deck component needs two new UIComponents.
The first new component acts as a top-level container, controlling which one of its child com-
ponents to display when activated. Following the naming conventions, this is called UIShowOne.
The second component represents each of the child components that are displayed in col-
lapsed form when inactive and in expanded form when activated. Following the naming
conventions, this is called UIShowItem.
You will now look at the UIShowOne component implementation; Figure 3-8 shows the
classes you will create for the UIShowOne component implementation.
Figure 3-8. Class diagram showing the UIShowOne implementation
CHAPTER 3
■
DEFINING THE DECK COMPONENT 127
5807ch03.qxd 1/13/06 11:06 AM Page 127
The classes are as follows:
• The UIShowOne class is the behavioral superclass.
• The ProShowOneDeck class is the client-specific subclass.
• And the ShowSource class isolates the event listener management methods.
■
Tip
Several good resources are available in the JSF community; in particular, organizations such
as Apache MyFaces (
/>) and community sites such as JSF Central
(
/>) are invaluable sources of information.
The ShowSource Interface
In case a component writer would like to create a component that uses ShowEvent and
ShowListener (for example, maybe for a UIShowMany component), you should follow best
practices by isolating the event listener management methods into an interface. The naming
convention for this interface is based on the event and listener names, with a Source suffix. In
this case, the listener management interface is called ShowSource, as shown in Code Sample 3-11.
Code Sample 3-11. The ShowSource Interface
import com.apress.projsf.ch3.event.ShowListener;
import javax.faces.el.MethodBinding;
/**
* A ShowSource is the source of ShowEvents.
*/
public interface ShowSource
{
/**
* Adds a ShowListener to this ShowSource component.
*
* @param listener the show listener to be added
*/
public void addShowListener(
ShowListener listener);
/**
* Removes a ShowListener to this ShowSource component.
*
* @param listener the show listener to be removed
*/
CHAPTER 3
■
DEFINING THE DECK COMPONENT128
5807ch03.qxd 1/13/06 11:06 AM Page 128
public void removeShowListener(
ShowListener listener);
/**
* Returns all ShowListeners for this ShowSource component.
*
* @return the show listener array
*/
public ShowListener[] getShowListeners();
}
The ShowSource interface will make sure you follow the standard JavaBeans design pat-
tern for EventListener registration—add<ListenerType>(<ListenerType> listener) and
remove<ListenerType>(<ListenerType> listener)—to allow application developers to program-
matically add and remove listeners from any behavioral component that needs to deliver
ShowEvents. The last method—public ShowListener[] getShowListeners();—is added so that
anyone who might have interest in knowing which listeners are attached to this component can
find out (for example, via an IDE).
The UIShowOne Behavioral Superclass
The UIShowOne component is a behavioral superclass, and it defines the contract for how an appli-
cation interacts with the component or any component extending this superclass. It is important
to understand that behavioral UIComponent subclasses, such as UISelectOne, do not define any-
thing that is renderer-specific, so they can be reused for many different client technologies.
As you remember from Chapter 1, the component family returned by the getFamily()
method is a string that represents the component’s behavior and is used to select a Renderer
for the particular UIComponent. The component type returned by the getComponentType()
method is a string that is used by the Application object as an identifier for the UIComponent
subclass (for example, UIShowOne). Following the naming convention from the previous chap-
ters, the component family and component type are both called com.apress.projsf.ShowOne.
Code Sample 3-12 introduces the first behavioral superclass—UIShowOne.
Code Sample 3-12. Extending the UIComponentBase Class
import java.util.Iterator;
import java.util.List;
import javax.faces.component.NamingContainer;
import javax.faces.component.UIComponentBase;
import javax.faces.context.FacesContext;
import javax.faces.el.MethodBinding;
import javax.faces.el.ValueBinding;
import javax.faces.event.AbortProcessingException;
import javax.faces.event.FacesEvent;
import com.apress.projsf.ch3.event.ShowEvent;
import com.apress.projsf.ch3.event.ShowListener;
CHAPTER 3
■
DEFINING THE DECK COMPONENT 129
5807ch03.qxd 1/13/06 11:06 AM Page 129