Nghệ thuật xếp hình Nhật Bản: rockinghorse
Bạn đang xem bản rút gọn của tài liệu. Xem và tải ngay bản đầy đủ của tài liệu tại đây (474.55 KB, 10 trang )
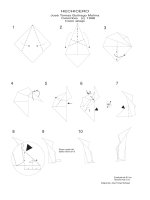
Rocking Horse
Ronald Koh - 1983
c
Begin by folding a Bird
Base from a 20 to 25cm
square, preferably coloured
on both sides.
Fold the flap facing you all
the way up, crease well,
and unfold. Repeat at the
back.
1.
2.
3.
Swivel the uppermost flap on the right to
the left, and the left flap at the bottom to
the right.
Fold the flap facing you all the
way up again, crease well, and
unfold. Repeat once more at
the back.
4.
Fold the apex to meet the
intersection of the the verticle
and horizontal crease lines
below. Crease firmly and
unfold.
5.
Now fold up the tip of the
uppermost flap to meet the
circled intersection as
shown. Crease firmly and
unfold, then turn the model
over and repeat this step at
the back.
Open out the model
slightly ...
6.
7.
... like this. Now sink fold by converting
the crease lines made in Step 4
into mountain folds before
bringing the points of each flap
together again ...
9.
Fold up ...
8.
... like this. Swivel one flap on
the right to the left ...
10.
... then fold the first flap on
the left to the right ..
11.
... and repeat Steps 8 to 10 on
the left.
12.
Fold and unfold carefully as illustrated,
through the circled intersecting lines
and corners. Crease firmly. Turn model
over and repeat on the other side.
Swivel the flap on the
right to the left ...
... then fold down the
triangular piece at the
top.
Swivel two layers on the left to the
right, then repeat Steps 13 and 14
on the left. That done, swivel one
layer on the right to the left ...
... like this, returning the lower
half of the model to its original
position before the start of
Step 13. Fold the triangular
flap up again ...
16.
17.
Lift one layer from each side and open out to
the left and right, bringing the point at the
top all the way down at the same time ...
14.
13.
15.
... like this. Fold the first layer up along the
existing horizontal crease line in the
middle.
18.
19.
Lift up the horizonral edge in the middle and
reverse fold on the left and right along
existing crease lines ...
... like this. Repeat Step 20
on the right. Next, open
out the left half of the
model by grasping the
circled area and
pulling to the right.
Now sink fold along the
existing crease lines as
illustrated ...
23.
... like this. Repeat Step 22
on the right ...
24.
... then fold down the flap at
the top.
25.
Turn model over and repeat
Steps 16 to 24 on the other
side
20.
Make a mountain fold along the existing
vertical crease line while lifting and swivelling
the pocket to the left ...
21.
22.
Valley fold a little of the left
edge down precisely as
illustrated ...
26.
... then the right, bringing
the edge to the
intersecting vertical and
horizontal lines.
Valley fold on the left again,
like this ..
... then on the right once more,
in the precise proportions
illustrated.
Turn the model over ... ... and repeat Steps 26 to
29, but in the opposite
direction, beginning
from the right edge.
32.
34.
This is a somewhat difficult. Valley
fold at the top, aligning with the
diagonal edge of the layer
underneath, while making another
valley fold along the length of the
lower piece ...
Your model should now
look like this, a mirror
image of Diagram 30.
Fold the flap up again.
... until your model looks
like this. Repeat
Step 33 on the
right.
28.27. 29.
30. 31.
33.
35.
Fold down the flap at the
top again, ...