Module 8: Implementing Security in a Windows 2000 Network
Bạn đang xem bản rút gọn của tài liệu. Xem và tải ngay bản đầy đủ của tài liệu tại đây (497.47 KB, 54 trang )
Contents
Overview 1
Introduction to Securing a Windows 2000
Network 2
Windows 2000 Security Policies 3
Implementing Security Policies 5
Implementing an Audit Policy 13
Recovering Encrypted Files 21
Lab A: Implementing Security in a
Windows 2000 Network 25
Best Practices 46
Review 47
Module 8: Implementing
Security in a
Windows 2000 Network
Information in this document is subject to change without notice. The names of companies,
products, people, characters, and/or data mentioned herein are fictitious and are in no way intended
to represent any real individual, company, product, or event, unless otherwise noted. Complying
with all applicable copyright laws is the responsibility of the user. No part of this document may
be reproduced or transmitted in any form or by any means, electronic or mechanical, for any
purpose, without the express written permission of Microsoft Corporation. If, however, your only
means of access is electronic, permission to print one copy is hereby granted.
Microsoft may have patents, patent applications, trademarks, copyrights, or other intellectual
property rights covering subject matter in this document. Except as expressly provided in any
written license agreement from Microsoft, the furnishing of this document does not give you any
license to these patents, trademarks, copyrights, or other intellectual property.
??1999 Microsoft Corporation. All rights reserved.
Microsoft, Active Directory, PowerPoint, and Windows are either registered trademarks or
trademarks of Microsoft Corporation in the U.S.A. and/or other countries.
The names of companies, products, people, characters, and/or data mentioned herein are fictitious
and are in no way intended to represent any real individual, company, product, or event, unless
otherwise noted.
Other product and company names mentioned herein may be the trademarks of their respective
owners.
Project Lead and Instructional Designer: Mark Johnson
Instructional Designers : Aneetinder Chowdhry (NIIT Inc.), Kathryn Yusi
(Independent Contractor)
Lead Program Manager: Ryan Calafato
Program Manager: Joern Wettern (Wettern Network Solutions)
Graphic Artist: Julie Stone (Independent Contractor)
Editing Manager: Tina Tsiakalis
Substantive Editor: Kelly Baker (Write Stuff)
Copy Editor: Wendy Cleary (S&T OnSite)
Online Program Manager: Nikki McCormick
Online Support: Arlo Emerson (MacTemps)
Compact Disc Testing: Data Dimensions, Inc.
Production Support: Arlene Rubin (S&T OnSite)
Manufacturing Manager: Bo Galford
Manufacturing Support: Mimi Dukes (S&T OnSite)
Lead Product Manager, Development Services: Elaine Nuerenberg
Lead Product Manager: Sandy Alto
Group Product Manager: Robert Stewart
Module 8: Implementing Security in a Windows 2000 Network iii
Introduction
This module provides students with the necessary knowledge and skills to
implement security in a Microsoft® Windows® 2000 network by using security
policies and auditing and by recovering encrypted files.
In the lab in this module, students will have a chance to create a customized
Microsoft Management Console (MMC) console for configuring security
settings and creating a new security template. Then they will analyze and
configure the security settings for a computer. They will also plan and
implement audit settings in a domain. Finally, they will recover an
encrypted file.
Materials and Preparation
This section provides you with the materials and preparation needed to teach
this module.
Materials
To teach this module, you need the following materials:
?? Microsoft PowerPoint® file 1558A_08.ppt
Preparation
To prepare for this module, you should:
?? Read all the materials for this module.
?? Complete the lab.
?? Study the review questions and prepare alternative answers to discuss.
?? Anticipate questions that students may ask. Write out the questions and
provide the answers.
?? On the course 1558A, Advanced Administration for Microsoft
Windows 2000, Student Materials compact disc.
?? Read the white paper, Secure Networking Using Windows 2000
Distributed Security Services.
?? Read the white paper, Security Configuration Tool Set.
?? Read the white paper, Encrypting File System for Windows 2000.
?? Read the technical walkthrough, Encrypting File System.
?? Read the technical walkthrough, Using the Security Configuration
Tool Set.
Presentation:
60 Minutes
Lab:
75 Minutes
iv Module 8: Implementing Security in a Windows 2000 Network
Module Strategy
Use the following strategy to present this module:
?? Introduction to Securing a Windows 2000 Network
In this topic, you will introduce the purpose of securing a Windows 2000
network. Emphasize that you use Group Policy to establish and enforce
security policies for network computers.
?? Windows 2000 Security Policies
In this topic, you will introduce the different types of security policies in
Windows 2000. Show students the security settings that they can configure
in Group Policy.
?? Implementing Security Policies
In this topic, you will introduce the procedure for implementing security
policies. Emphasize that a preconfigured security template ensures
duplication of desired settings that are already existing for a computer, and
can be tested before security settings are applied to multiple computers.
Explain the purpose of a security template and demonstrate how to create a
security template. Emphasize that you can define a security setting once and
apply it in many places. Explain the purpose of Security Configuration and
Analysis and demonstrate how to configure and analyze the security settings
of a computer. Illustrate how to use Group Policy to apply security policies.
?? Implementing an Audit Policy
In this topic, you will introduce the procedure for implementing an Audit
policy. Explain the purpose of auditing. Tell students that auditing is used to
track user events. An event shows the action that was performed, the user
who performed the action, and the date and time of the action. Show the
events that Windows 2000 can audit and explain what the event indicates.
Explain how to plan an audit strategy and determine which events to audit.
Illustrate how to set up an Audit policy. Explain how to audit access to file
system, Active Directory
™
directory service, and printer objects, and list the
guidelines to be followed for auditing each resource.
?? Recovering Encrypted Files
In this topic, you will introduce recovering encrypted files. Briefly discuss
the purpose and the process of encrypting and decrypting files and folders.
Discuss the purpose of a recovery policy. Emphasize that the first
administrator to log on to a stand-alone computer is the recovery agent for
that computer, and the first administrator to log on to the domain after the
first domain controller is created is the recovery agent for the domain.
Illustrate how to recover files and folders. Point out that recovering files and
folders is the same as decrypting files and folders.
?? Lab A: Implementing Security in a Windows 2000 Network
Prepare students for the lab in which they will create a customized MMC
console and a new security template for configuring security settings. Next,
they will analyze and configure the security settings for a computer by using
Security Configuration and Analysis. They will also plan and implement
audit settings in a domain. Finally, if time permits, they will configure the
Group Policy security settings for a computer by using a security template.
Make sure that students run the command file for the lab and tell them that
they will work with their partner’s computers. After students have
completed the lab, ask them if they have any questions.
Module 8: Implementing Security in a Windows 2000 Network v
?? Best Practices
Present best practices for implementing security in Windows 2000 network.
Emphasize the reason for each best practice.
Customization Information
This section identifies the lab setup requirements for a module and the
configuration changes that occur on student computers during the labs. This
information is provided to assist you in replicating or customizing Microsoft
Official Curriculum (MOC) courseware.
The labs in this module are also dependent on the classroom
configuration that is specified in the Customization Information section at the
end of the Classroom Setup Guide for course 1558A, Advanced Administration
for Microsoft Windows 2000.
Lab Setup
The following list describes the setup requirements for the labs in this module.
Setup Requirement 1
The labs in this module require a regular user account for the student. To
prepare student computers to meet this requirement, create the user
account manually.
Setup Requirement 2
The labs in this module require the Log on locally right for domain controllers
to be assigned to the Everyone group. To prepare student computers to meet
this requirement, perform one of the following actions:
?? Run C:\MOC\Win1558A\Labfiles\Lab08\Setup\Lab08.cmd.
?? Assign the right manually.
Setup Requirement 3
The labs in this module require that a shortcut for Active Directory Domains
and Trusts, Active Directory Users and Computers, and Active Directory Sites
and Services exists on the desktop of the regular user account. To prepare
student computers to meet this requirement, perform one of the
following actions:
?? Run C:\MOC\Win1558A\Labfiles\Lab08\Setup\Lab08.cmd.
?? Create the shortcuts manually and place them in
C:\Winnt\Profiles\All Users\Desktop.
Setup Requirement 4
The labs in this module require the following organizational units (OUs) in the
student’s domain.
This OU In this organizational unit
East Domain Controllers
West Domain Controllers
Important
vi Module 8: Implementing Security in a Windows 2000 Network
To prepare student computers to meet this requirement, perform one of the
following actions:
?? Run C:\MOC\Win1558A\Labfiles\Lab08\Setup\Lab08.cmd.
?? Create the OUs and user accounts manually.
Setup Requirement 5
The labs in this module require a printer called Color Printer on each student
computer. To prepare student computers to meet this requirement, perform one
of the following actions:
?? Run C:\MOC\Win1558A\Labfiles\Lab08\Setup\Lab08.cmd.
?? Create the printer manually.
Setup Requirement 6
The labs in this module require a user account named StefanK in each student
domain with a password of password. To prepare student computers to meet
this requirement, perform one of the following actions:
?? Run C:\MOC\Win1558A\Labfiles\Lab08\Setup\Lab08.cmd.
?? Create the account manually.
Lab Results
Performing the labs in this module introduces the following configuration
changes:
?? Students move their domain controllers to the East OU or West OU if they
have not been moved already.
?? Students configure their computers by using a security template that
they create.
?? Students create a Group Policy object (GPO) linked to the East OU or
West OU in their domains that contains security template and Audit
policy settings.
?? Students remove GPOs linked to the East OU or West OU in their domains.
?? Students move their domain controllers to the Domain Controllers OU.
?? Students run a command file to reset their computer’s security configuration
to default values.
?? Students encrypt and decrypt files.
You can run
C:\MOC\Win1558A\Labfiles\Lab08\Setup\Lab08rm.cmd to remove most
configuration changes introduced during the labs in the module. Remove the
Log on locally right from the Everyone group manually. Manually delete the
GPOs created by students.
Important
Module 8: Implementing Security in a Windows 2000 Network 1
Overview
? Introduction to Securing a Windows 2000 Network
? Windows 2000 Security Policies
? Implementing Security Policies
? Implementing an Audit Policy
? Recovering Encrypted Files
? Best Practices
Microsoft® Windows® 2000 provides policies and utilities to monitor security
settings for computers throughout a network, a set of templates to create and
deploy standard security settings throughout an enterprise, and an auditing
function for determining how resources are accessed. Windows 2000 also
provides administrators with the ability to recover Encrypting File System
(EFS) encrypted files, enabling the management of user encrypted files.
At the end of this module, you will be able to:
?? Identify the purpose of securing a Windows 2000 network.
?? Identify the Windows 2000 security policies.
?? Implement security policies by using Security Templates, Security
Configuration and Analysis, and Group Policy.
?? Plan and implement an Audit policy.
?? Recover encrypted files.
?? Apply best practices for implementing security in a Windows 2000 network.
Slide Objective
To provide an overview
of the module topics
and objectives.
Lead-in
In this module, you will learn
to create and configure
security policies and
implement security in a
Windows 2000 network.
2 Module 8: Implementing Security in a Windows 2000 Network
Introduction to Securing a Windows 2000 Network
? Implementing Security in a Network
? Confirms the identity of users attempting to gain access
to resources
? Protects against inappropriate access to specific
resources
? To Secure a Network:
? Use Group Policy to establish and enforce security
policies
? Use Audit policy to monitor various security-related
events in Windows 2000
? Use EFS to encrypt files so that only the persons who
encrypted the files and administrators can access them
To implement a secure network, you need to create a network that provides
users with all of the information and resources that they need, while protecting
the information and resources from damage and unauthorized access.
Implementing security in a network provides the following benefits:
?? Confirms the identity of users attempting to gain access to resources. This
prevents unauthorized users from accessing, stealing, or damaging system
resources, such as sensitive data or mission-critical applications.
?? Protects against inappropriate access to specific resources, for example,
ensuring that only corporate management personnel can gain access to
employee payroll information.
When implementing security in a Windows 2000 network, you can use the
following methods for securing a network:
?? Group Policy. Use Group Policy to establish and enforce security policies
for network computers by ensuring that settings are applied consistently
over the network and that they can be centrally managed.
?? Audit policy. Use Audit policy to monitor various security-related events in
Windows 2000. Monitoring security events is necessary to detect intruders
and attempts to compromise data on the system.
?? Encrypting File System. Use EFS to encrypt files so that only the user who
encrypted the file and administrators are able to access it, regardless of the
NTFS file system permissions assigned.
Slide Objective
To identify the purpose of
securing a Windows 2000
network.
Lead-in
A secure network provides
users with all of the
information and resources
that they need and protects
the information and
resources from damage and
unauthorized access.
Ask students how they
secure their networks.
Key Points
Use Group Policy to
establish and enforce
security policies for network
computers.
Use Audit policy to monitor
various security -related
events in Windows 2000.
Only administrators are able
to recover an encrypted file
if users lose their keys.
Module 8: Implementing Security in a Windows 2000 Network 3
Windows 2000 Security Policies
Account
policies
Account
Account
policies
policies
Local policies
Local policies
Local policies
Event log
Event logEvent log
Restricted
group
Restricted
Restricted
group
group
System
services
System
System
services
services
Configure password and account policies
Configure password and account policies
Configure auditing, user rights, and security options
Configure auditing, user rights, and security options
Configures settings for application logs, system logs, and security logs
Configures settings for application logs, system logs, and security logs
Configures group memberships for security sensitive groups
Configures group memberships for security sensitive groups
Configure security and startup settings for services running
on a computer
Configure security and startup settings for services running
on a computer
Registry
Registry
Registry
Configures security on registry keys
Configures security on registry keys
File system
File systemFile system
Configures security on specific file paths
Configures security on specific file paths
Public key
policies
Public key
Public key
policies
policies
Configure encrypted data recovery agents, domain roots,
trusted certificate authorities, and so on
Configure encrypted data recovery agents, domain roots,
trusted certificate authorities, and so on
IPSec policies
IPSec policiesIPSec policies
Configure IP security on a network
Configure IP security on a network
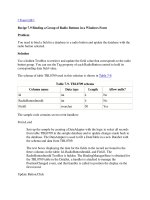
In Windows 2000, you can use the Security Settings extension in Group Policy
to define the security settings for various local and domain security policy
attributes. The following list describes the security settings that you can
configure in Group Policy:
?? Account policies. Account policy settings allow you to configure password
policies and account lockout policies for the domain. The account policy for
a domain defines the password history, the lifetime of account lockouts, and
more. These policies are effective only when they are applied at the
domain level.
?? Local policies. Local policy settings allow you to control settings that affect
individual computers rather than domain-specific settings. Local policies
include auditing policies, the assignment of user rights and privileges, and
other security options that are applied to and affect the local computer.
?? Event log. Event log settings allow you to configure the size, access, and
retention parameters for application logs, system logs, and security logs.
?? Restricted group. Restricted group settings allow you to manage the
membership of selected groups as part of security policy. Restricted group
policies also track and control reverse membership of each restricted group.
?? System services. System services settings allow you to configure security
and startup settings for services running on a Windows 2000-based
computer.
?? Registry. The registry settings allow you to configure security on
registry keys.
?? File system. The file system settings allow you to configure security for
specific local file paths on network computers. These settings set consistent
NTFS permissions for static files and folders on domain computers.
Slide Objective
To identify the different
types of security policies in
Windows 2000.
Lead-in
You can use security
policies to establish and
enforce security on
your network.
Delivery Tip
Show students the security
settings that can be
configured in Group Policy.
4 Module 8: Implementing Security in a Windows 2000 Network
?? Public key policies. The public key policy settings allow you to configure
encrypted data recovery agents, domain roots, and trusted certificate
authorities.
?? Internet Protocol Security (IPSec) policies on Active Directory. IPSec
policies allow you to configure network Internet Protocol (IP) security
options for computers on the network.
Module 8: Implementing Security in a Windows 2000 Network 5
? Implementing Security Policies
? Introduction to Implementing Security Policies
? What Is a Security Template?
? Creating Security Templates
? What Is Security Configuration and Analysis?
? Using Configuration and Analysis
? Using Group Policy to Apply Security Policies
You can use security policies to manage a wide range of operating system,
computer, and file system security settings for your network and its computers
and users. Security policies define an organization’s expectations of proper
computer and network usage, as well as procedures to prevent and respond to
security incidents. Windows 2000 provides many utilities to analyze and
configure security settings for your network. These utilities are available as
stand-alone snap-ins in Microsoft Management Console (MMC).
Slide Objective
To introduce the topics
related to implementing
security policies.
Lead-in
There are many different
ways of implementing
security policies.
6 Module 8: Implementing Security in a Windows 2000 Network
Introduction to Implementing Security Policies
Computer1
User1
User2
OU2
OU1
OU3
Computer2
Group Policy
Group Policy
Group Policy
Group Policy
Security
Template
Security
Template
Implementing Security
Policies Through Group Policy
Implementing Security
Policies Through Group Policy
Implementing Security Policies by Importing Preconfigured
Security Templates
Implementing Security Policies by Importing Preconfigured
Security Templates
Through the use of Group Policy in Active Directory
™
directory service,
administrators can centrally apply the security settings required to protect
enterprise systems. You can implement security settings in two ways:
?? By using the Security Configuration and Analysis utility for a single
computer or multiple computers.
?? By manually configuring the security settings in Group Policy or importing
a preconfigured security template (which contains the security settings) for a
single computer or multiple computers.
A preconfigured security template ensures the duplication of desired settings
that already exist for a computer. Because the settings are preconfigured, you
can test them on a single computer before applying them to other computers.
Doing this enables you to avoid making mistakes while applying the
security settings.
To import preconfigured security templates, first create and test the security
template by using the Security Configuration and Analysis utility, and then
import the security template into Group Policy.
Slide Objective
To introduce how the
security settings are applied
to computers.
Lead-in
You can implement security
policies by manually
configuring the security
settings in Group Policy or
by configuring a security
template and importing it
into a GPO.
Key Points
A preconfigured security
template ensures consistent
security settings.
Test the preconfigured
security settings on a single
computer before applying
them to other computers,
and then export the
tested settings to a
security template.
Module 8: Implementing Security in a Windows 2000 Network 7
What Is a Security Template?
Group Policy
Group Policy
? A Security Template Is a Text File That Contains the Security Settings
? Apply Security Templates by:
? Using Security Configuration and Analysis to apply a security template
? Importing a Security Template into a Group Policy object
? Default Security
Templates Are:
Security
Template
Security
Template
Basic
Basic
Compatible
Compatible
Secure
Secure
High
High
Computer
and User
Accounts
Computer
and User
Accounts
A security template is a text file that contains security settings that you can use
to analyze computers and configure them with consistent settings.
Instead of editing individual settings through local Group Policy, you can use
security templates to apply preconfigured security settings to a computer. There
are two methods by which you can apply security templates:
?? Using the Security Configuration and Analysis utility to apply a security
template to a single computer.
?? Importing a security template into a Group Policy object (GPO) and
applying Group Policy to an Active Directory container (site, domain, or
organizational unit).
Windows 2000 includes several default security templates. These predefined
templates can be customized by using the Security Templates snap-in and can
be imported into the Security Settings extension of Group Policy. These
templates incrementally modify the default security settings. They do not
include the default security settings plus the modifications. The following list
describes the default security templates:
?? Basic. The default security level for Windows 2000. These templates can be
used as a base configuration for security analysis and should be applied to
configure the upgraded computer with the new Windows 2000 default
security settings.
?? Compatible. Provides a higher level of security but still ensures that all the
features of standard business applications will run.
?? Secure. Provides an additional level of security, but does not ensure that all
of the features of standard business applications will run.
?? High. Enforces the maximum security for Windows 2000 without
consideration for application functionality. High security is primarily
intended for testing and development of high security applications.
Slide Objective
To explain the purpose of a
security template.
Lead-in
A security template contains
all the security settings to be
applied to a computer.
Show students the four
default security templates by
using Security Templates.
Key Points
Using Security Templates,
you can define a security
setting once and then apply
it in many places.
8 Module 8: Implementing Security in a Windows 2000 Network
Creating Security Templates
? Use the Security Templates Snap-in to Create a
Security Template
? Create a Security Template by:
? Defining a new template and
modifying the defaults
? Editing an existing security template and then saving it
as a new template
Security
Template
Security
Template
New
New
Security
Template
Security
Template
Security
Template
Security
Template
Save As
Save As
Existing
Existing
You can use the Security Templates snap-in to create a security template. The
Security Templates snap-in is used for viewing, defining, or modifying existing
security templates.
You create a security template by using any one of the following methods:
?? Defining a new template and modifying the defaults.
?? Editing an existing security template and then saving it as a new template.
To create a new security template, perform the following steps:
1. In Security Templates, expand the Security Templates node, right-click
the path node where you want to store the new template, and then select
New Template.
2. Type a name and description for the new security template.
3. Expand the new security template node to display the security areas, and
then expand the node for the security area that you want to configure.
4. In the details pane, double-click the security attribute that you want
to configure.
5. If the Exclude this setting in analysis check box is selected, clear it to
allow editing, and then click OK.
Another method for creating a new security template is to edit an existing
security template. To create a new security template from an existing template,
perform the following steps:
1. In Security Templates, expand the default path node, right-click the existing
template that you want to modify, click Save As, specify a name for the new
security template, and then click OK.
2. Perform steps 4 and 5 from the previous procedure to edit security settings
in the new template or edit the security settings that you want to modify.
Slide Objective
To illustrate how to create a
security template.
Lead-in
You can create a security
template by either defining a
new template or editing an
existing template.
Delivery Tip
Demonstrate how to create
security templates by either
defining a new template and
modifying the defaults or
editing an existing template
and then saving it as a
new template.
Module 8: Implementing Security in a Windows 2000 Network 9
What Is Security Configuration and Analysis?
? Analyze System Security by:
? Creating a security database
? Applying a template to specify the settings to be
analyzed
? Configure System Security by:
? Importing security templates
? Applying the templates to local computer policy
? Import Additional Security Templates by:
? Merging settings or replacing previous templates
? Making manual changes to settings
Security Configuration and Analysis is a utility used to
directly configure and analyze local system security
Security Configuration and Analysis is a utility used toSecurity Configuration and Analysis is a utility used to
directly configure and analyze local system security
directly configure and analyze local system security
Security Configuration and Analysis is a MMC snap-in that is used to
directly configure and analyze local system security. This utility enables you to
configure and analyze the security settings for a specific computer.
?? Analyzing system security. Analyzing system security compares the current
security settings for the computer with the settings specified in the security
template and then displays the results. Because the state of the operating
system and applications on a computer is dynamic, regular analysis enables
an administrator to track and ensure an adequate level of security on each
computer. To analyze system security:
?? Create a security database in which to store the analysis results.
?? Apply a template to specify the settings that should be analyzed and the
expected configuration for those settings.
Security Configuration and Analysis then populates the database with the
current settings for the computer and marks settings that do not match
the template.
?? Configuring system security. Windows 2000 enables you to import security
templates created with the Security Templates snap-in, and then apply
these templates to local computer policy. This immediately configures the
local computer security settings with the values specified in the
applied template.
After analyzing the system, you can import additional security templates by:
?? Merging the settings with or replacing the previously imported templates
and analyzing again.
?? Making manual changes to settings and saving the computer’s current
configuration as a new template.
Slide Objective
To explain the purpose of
Security Configuration
and Analysis.
Lead-in
Security Configuration and
Analysis is a snap-in that
you use to configure and
analyze the security settings
of a computer.
Show students Security
Configuration and Analysis.
10 Module 8: Implementing Security in a Windows 2000 Network
Using Configuration and Analysis
Configuring and Analyzing System Security
Configuring and Analyzing System Security
Configuring and Analyzing System Security
Set Up a Security Database
Set Up a Security Database
Analyze the Current Configuration
Analyze the Current Configuration
Configure the Computer with the Security
Settings Contained in a Security Template
Configure the Computer with the Security
Settings Contained in a Security Template
The Security Configuration and Analysis snap-in enables you to configure
security, analyze security, view results, and resolve any discrepancies revealed
by analysis.
To configure and analyze system security, perform the following tasks:
?? Set up a working (security) database.
?? Analyze the current configuration.
?? Configure the computer with the security settings contained in a
security template.
Setting Up a Working Database
To set up a working database, perform the following steps:
1. In Security Configuration and Analysis, right-click Security Configuration
and Analysis.
2. To open or create a working database, click Open Database, and either
enter the name for an existing database or type a name for the new security
database, and then click OK.
Analyzing the Current Configuration
You can use Security Configuration and Analysis to perform a security analysis
on a computer by comparing the computer’s security settings with those in a
security template. You can use a comparison of security settings against a
baseline security template to quickly analyze whether a computer’s security
settings comply with your organization’s security policy or whether security
configuration settings were changed since the last time you reviewed the
settings. Security Configuration and Analysis also offers the ability to resolve
any discrepancies revealed by analysis by allowing you to configure the local
computer with the security template settings used for analysis.
Slide Objective
To illustrate how to
configure and analyze the
security settings of
a computer.
Lead-in
You configure and analyze
system security by setting
up a working database,
analyzing the current
configuration of the
computer, and then
configuring the computer
with security settings
Delivery Tip
Demonstrate how to use
Security Configuration and
Analysis to set up a working
database, configure a
computer, analyze current
configuration, and view
analysis results.
Module 8: Implementing Security in a Windows 2000 Network 11
To analyze system security, perform the following steps:
1. In Security Configuration and Analysis, set a working database, and then
import security templates into the database.
2. To begin the analysis, right-click Security Configuration and Analysis,
and then click Analyze System Now.
3. Click OK to use the default analysis log, or type a file name and valid path
to create a new analysis log.
A progress dialog box indicates the different security areas being analyzed.
After this is complete, you can review the results.
If frequent analysis of large numbers of computers is required, the
Secedit.exe command-line utility may be used for batch analysis. However,
analysis results must still be viewed with Security Configuration and Analysis.
For more information on Secedit.exe, see the white paper, Security
Configuration Tool Set on the course 1558A, Advanced Administration for
Microsoft Windows 2000, Student Materials compact disc.
Configuring a the Computer with Security Settings
You can make configuration changes to the security settings that are not
complying with the security template and then reconfigure the system with
these settings.
To configure security settings, perform the following steps:
1. In Security Configuration and Analysis, set a working database, and then
import one or more security templates into the database.
2. Right-click Security Configuration and Analysis, and then click
Configure System Now.
The settings contained in the security database are applied to the computer.
Note
12 Module 8: Implementing Security in a Windows 2000 Network
Using Group Policy to Apply Security Policies
Applying Security Policies
Applying Security Policies
Applying Security Policies
Identify or create a security
template
Identify or create a security
template
Import the security template into
a GPO
Import the security template into
a GPO
Analyze the security settings
Analyze the security settings
You can use Group Policy to standardize security settings by applying the same
security template to multiple computers in one step. To apply security policies
for a local computer or an Active Directory container, you import one or more
security templates into Security Settings in Group Policy. Importing a security
template into Group Policy ensures that all members of the container will
automatically receive the security template when Group Policy propagates.
To import a security template into a GPO, perform the following tasks:
1. Identify an existing Windows 2000 security template that contains the
required security configuration, or create a new security template.
2. Import the security template into the GPO:
a. Expand Computer Configuration, expand Windows Settings, and then
expand Security Settings.
b. Right-click Security Settings, and then click Import Policy.
c. Select the security template that you want to import, and click OK.
3. Analyze the security settings for each computer to determine if the
current security settings should be modified to meet your organization’s
security requirements.
Slide Objective
To explain how to use
Group Policy to apply
security policies.
Lead-in
You use Group Policy to
define a number of
configuration settings and to
apply them to multiple
computers in one step.
Delivery Tip
Demonstrate how to import
a security template by using
Group Policy.
Key Points
Use Group Policy
to standardize
security settings.
Import security templates
into Security Settings in
Group Policy to apply
consistent and tested
security policies to
computers in an Active
Directory container.
Module 8: Implementing Security in a Windows 2000 Network 13
? Implementing an Audit Policy
? What Is Auditing?
? Events to Audit
? Planning an Audit Policy
? Setting Up an Audit Policy
? Auditing Access to Resources
Security auditing is a feature of Windows 2000 that monitors various security-
related events. Monitoring system events is necessary to detect intruder’s
attempts to compromise data on the system.
Slide Objective
To introduce the topics
related to implementing an
Audit policy.
Lead-in
Implement auditing to track
specific events and to
maintain security.
14 Module 8: Implementing Security in a Windows 2000 Network
What Is Auditing?
? Auditing Is the Process of Tracking User and Operating System
Activities
? An Audit Entry Contains Action That Was Performed, User Who
Performed the Action, and Success or Failure of the Event
? Audit Policy Defines the Types of Security Events That Windows 2000
Records
? Set Up an Audit Policy To Track the Success or Failure of Events,
Identify Unauthorized Use of Resources, and Maintain a Record of
User and Administrator Activity
? View Security Logs in Event Viewer
Event ViewerEvent ViewerEvent Viewer
User1 logon failed
Access denied
Printing successful
Use of
Resources
Use of
Use of
Resources
Resources
Success or
Failure
Logged
Success or
Success or
Failure
Failure
LoggedLogged
Auditing in Windows 2000 is the process of tracking user and operating system
activities (called events) on a computer. When an audited event occurs,
Windows 2000 writes a record of the event to the security log.
An audit entry in the security log contains the following information:
?? The action that was performed.
?? The user who performed the action.
?? The success or failure of the event and when the event occurred.
An Audit policy defines the types of security events that Windows 2000 records
in the security log on each computer. Windows 2000 writes events to the
security log on the specific computer where the event occurs.
You can set up an Audit policy for a computer to:
?? Track the success and failure of events, such as attempts to log on, attempts
by a particular user to read a specific file, changes to a user account or
group membership, and changes to security settings.
?? Minimize the risk of unauthorized use of resources.
?? Maintain a record of user and administrator activity.
You use Event Viewer to view events that Windows 2000 has recorded in the
security log. You can also archive log files to track trends over time. This is
useful to determine the usage of printers, access to files, or to verify attempts at
unauthorized use of resources.
Slide Objective
To explain the purpose
of auditing.
Lead-in
Auditing is a feature used by
administrators for monitoring
network security
Key Point
Use auditing to track system
events. An ev ent shows the
action that was performed,
the user who performed the
action, and the date and
time of the action.
Module 8: Implementing Security in a Windows 2000 Network 15
Events to Audit
Event
Event
Event
Example
Example
Example
Account logon
Account logon
Domain controller receives a request to validate a user account
Domain controller receives a request to validate a user account
Account
management
Account
management
Administrator creates, changes, or deletes a user account or group
Administrator creates, changes, or deletes a user account or group
Directory service
access
Directory service
access
User gains access to an Active Directory object
User gains access to an Active Directory object
Logon
Logon
User logs on or off a local computer
User logs on or off a local computer
Object access
Object access
User gains access to a file, folder, or printer
User gains access to a file, folder, or printer
Policy change
Policy change
Change is made to the user security options, user rights, or
Audit policies
Change is made to the user security options, user rights, or
Audit policies
Privilege use
Privilege use
User exercises a right, such taking ownership of a file
User exercises a right, such taking ownership of a file
Process tracking
Process tracking
Application performs an action
Application performs an action
System
System
User restarts or shuts down the computer
User restarts or shuts down the computer
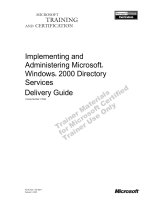
The first step in implementing an Audit policy is selecting the types of events
that Windows 2000 should audit. The following table describes the events that
Windows 2000 can audit.
Event Example
Account logon A domain controller receives a request to validate a user account.
Account
management
An administrator creates, changes, or deletes a user account or
group. A user account is renamed, disabled, or enabled, or a
password is set or changed.
Directory
service access
A user gains access to an Active Directory object. To log this type of
access, you must configure specific Active Directory objects for
auditing.
Logon A user logs on or off a local computer, or a user makes or cancels a
network connection to the computer.
Object access A user gains access to a file, folder, or printer. You must configure
specific files, folders, or printers for auditing.
Policy change A change is made to the user security options (password options,
account logon settings), user rights, or Audit policies.
Privilege use A user exercises a user right, such as changing the system time (this
does not include rights that are related to logging on and logging
off), or an administrator takes ownership of a file.
Process
tracking
An application performs an action. This information is generally
only useful for programmers who want to track details of application
execution.
System A user restarts or shuts down the computer, or an event has occurred
that affects Windows 2000 security or the security log.
Slide Objective
To identify the events
that Windows 2000 can
audit and what the
event indicates.
Lead-in
To implement an Audit
policy, you first select the
types of events that
Windows 2000 should audit.
16 Module 8: Implementing Security in a Windows 2000 Network
Planning an Audit Policy
Determine the Computers on Which to Set Up Auditing
Determine the Computers on Which to Set Up Auditing
Review Security Logs Frequently
Review Security Logs Frequently
Determine Whether to Audit the Success or Failure of Events,
or Both
Determine Whether to Audit the Success or Failure of Events,
or Both
Determine Which Events to Audit
Determine Which Events to Audit
Determine Whether You Need to Track Trends
Determine Whether You Need to Track Trends
When you plan an Audit policy, you need to determine what you want to audit
and the computers on which to configure auditing. For each event that you
audit, the configuration settings can indicate whether Windows 2000 tracks
successful or failed attempts, or both.
Use the following guidelines when planning an Audit policy:
?? Determine the computers on which to set up auditing. Plan what to audit for
each computer, because Windows 2000 records audited events on each
computer separately. For example, you need to audit computers used to
store sensitive or critical data frequently, but you can infrequently audit
client computers that are used solely for running productivity applications.
?? Determine the types of events to audit:
?? Access to files and folders
?? Users logging on and off
?? Shutting down and restarting a computer running Windows 2000 Server
?? Changes to user accounts and groups
?? Attempts to make changes to Active Directory objects
?? Determine whether to audit the success or failure of events, or both.
Tracking successful events can tell you how often Windows 2000 or users
gain access to specific resources. You can use this information for resource
planning. Tracking failed events can alert you to possible security breaches.
?? Some organizations are required to maintain a record of resource and data
access. Determine whether you need to track trends of system usage. If so,
plan to archive event logs.
Slide Objective
To explain how to plan an
audit strategy and determine
which events to audit.
Lead-in
Before you set up an Audit
policy, you need to
determine what you want to
audit and whether to audit
successful or failed events.
Delivery Tip
Show students the events
that Windows 2000
can audit.
Point out to students that
even though Windows 2000
will track the events that
they configure, it is
necessary for the audit log
to be reviewed regularly for
that information to be of
value to an organization.
Module 8: Implementing Security in a Windows 2000 Network 17
?? Review security logs frequently. Set a schedule and regularly review
security logs. Auditing alone does not alert you to security breaches.
Auditing too many types of events creates excess overhead. Audit only
the events that provide information that is useful in your environment.
Note
18 Module 8: Implementing Security in a Windows 2000 Network
Setting Up an Audit Policy
Action View
Audit Account Logon events
Audit Account Management
Audit Directory Service Access
Audit Logon Events
Audit Object Access
Audit Policy Change
Audit Privilege Use
Audit Process Tracking
Audit System Events
Attribute Stored Template Setting
Group Policy
asa [DENVER1558.namerica1558.
Computer Configuration
Software Settings
Windows Settings
Security Settings
Account Policies
Local Policies
Audit Policy
User Rights Assign
Security Options
Success,Failure
No Auditing
Not Configured
Success,Failure
Not Configured
Success
Failure
Not Configured
Not Configured
?First Column; Successful
?Second Column; Failed
?First Column; Successful
?Second Column; Failed
? Assign Security Settings to a Single
Computer by Configuring the Settings
in Local Policies in Group Policy
? Assign Security Settings to Multiple Computers by Creating a Group
Policy Object and Assigning It
Auditing offers a mechanism for tracking events that occur on computers in
your organization. You can implement auditing of file system objects, Active
Directory objects, and printers after you set an Audit policy on a computer. You
can assign audit settings to a single computer or to multiple computers.
?? To assign security settings to a single computer, configure the settings in
Local Policies in Group Policy for the computer. You can also configure
audit settings as part of a security template and use Security Configuration
and Analysis to apply audit settings or import the template into
Group Policy.
?? To assign security settings to multiple computers, create a GPO and assign it
to the site, domain, or organizational unit (OU) that contains the computers.
To set an Audit policy, perform the following steps:
1. In Group Policy, double-click Computer Settings, Security Settings,
Local Policies, and then click Audit Policy.
The console displays the current Audit policy settings in the details pane.
2. Select the type of event to audit. On the Action menu, click Security.
3. Select the Audit successful attempts or Audit failed attempts check box,
or both.
4. Click OK.
Slide Objective
To illustrate how to set up
an Audit policy.
Lead-in
Before you set the events to
audit, you must set up an
Audit policy.
Delivery Tip
Demonstrate how to set up
an Audit policy.
Key Point
Directory service access
enables auditing a user’s
access to specific Active
Directory objects. Object
access enables auditing a
user’s access to files,
folders, and printers.
Module 8: Implementing Security in a Windows 2000 Network 19
Auditing Access to Resources
File System
File System
?Set the Audit Policy to Audit Object Access
?Enable Auditing for Specific NTFS Files and Folders
?Record Success or Failure of an Event
?Set the Audit Policy to Audit Object Access
?Enable Auditing for Specific NTFS Files and Folders
?Record Success or Failure of an Event
NTFSNTFS
Printers
Printers
?Set the Audit Policy to Audit Object Access
?Enable Auditing for Specific Printers
?Record Success or Failure of an Event
?Set the Audit Policy to Audit Object Access
?Enable Auditing for Specific Printers
?Record Success or Failure of an Event
Active Directory
Objects
Active Directory
Objects
?Set the Audit Policy to Audit Directory Service
Access
?Enable Auditing for Specific Objects
?Record Success or Failure of an Event
?Set the Audit Policy to Audit Directory Service
Access
?Enable Auditing for Specific Objects
?Record Success or Failure of an Event
When auditing for security purposes, you will typically audit access to file
system objects, Active Directory objects, and printers.
Auditing Access to File System Objects
To audit user access to the file system, perform the following tasks:
?? Set the Audit policy to audit object access, which includes files and folders.
?? Enable auditing for specific files and folders, and specify the types of access
to audit. You can only audit access to files and folders that are located on
NTFS volumes. The file allocation table (FAT) file system does not
support auditing.
When you specify file system audit settings, use the following guidelines:
?? Record failure events for Read operations to determine when users are
attempting to gain access to files for which they have no permissions.
?? Record success and failure events for Delete operations when auditing
confidential and archival files.
?? Record success and failure events for Change Permissions and Take
Ownership operations for confidential and personal user files. These
operations may indicate that someone is attempting to modify security in
order to gain access to data for which they do not currently have
permissions. If an Administrator takes ownership of a user’s file to assign
him or herself access, this setting ensures that this event is recorded.
?? Record success and failure events for all operations performed when
auditing members of the Guests group. This should be done especially on
folders and files to which Guests should not be granted access.
?? Audit file and folder access on all computers containing shared data that
should be secured.
Slide Objective
To explain the procedure for
auditing access to file
system, Active Directory,
and printer objects.
Lead-in
To alert you to potential
security breaches, you can
set up auditing for files and
folders, Active Directory
objects, and printers.
Delivery Tip
Demonstrate how to set up
auditing for files and folders,
Active Directory objects,
and printers.
Key Point
You can audit only access
to files and folders that are
located on NTFS volumes.
When you specify Active
Directory audit settings, be
sure to audit both success
and failure events for all
operations performed by
administrators.